April 2008 Archives

ricoh_gr_digital_ii.jpg

We've had some interesting discussion around Adobe's DNG format, both here on The Digital Story, and on the TDS Flickr Public Group. The main focus has been: should you consider converting your existing RAW files to DNG when you upload them to your computer?

However, we're seeing the occasional digital camera writing natively to the DNG format, and the latest entry is the Ricoh GR Digital II. Over at PhotographyBLOG, Mark Goldstein puts the camera to the test in his complete review of the Ricoh GR Digital II. Mark writes:

"The Ricoh GR Digital II is not your usual run-of-the-mill compact digital camera. The fast 28mm fixed focal length lens, Adobe DNG RAW format, external hotshoe and 1:1 aspect ratio for square format photos all point to a serious camera for the seriously keen photographer. As does the £399 price-tag, which could alternatively buy you a DSLR camera with kit lens. The Ricoh GR Digital II is also not the only compact with a fixed 28mm lens, being recently joined by the much-delayed Sigma DP1, which offers a much larger APS-C sized sensor. We wanted to know if the Ricoh GR Digital II is a worthy addition to Ricoh's extensive line-up of digital compacts for the professional."

Whether or not you think the Ricoh is a tempting camera after you read Mark's review, the trend for some manufacturers to use DNG as their high-quality format seems to be on the rise.

Technorati Tags: , , , , ,

photo_downloader.jpg

Photo Downloader is an immensely useful application that you may already have on your computer. It's part of the Adobe Photoshop CS3 package, and it comes with Photoshop Elements 6 for the Mac. I've posted about Photo Downloader in the past, but during my teaching, I'm still finding that most people don't realize they have it.

So in this show, I cover all the wonderful functions of this program. I also describe a bit about how it can become an important part of your workflow, especially if you haven't made the move to Lightroom or Aperture yet.

Monthly Photo Assignment

Angular is this month's photo assignment. Just about everything intersects at some sort of angle... lots of possibilities for this one. You can read more about how to submit on our Submissions page. Deadline for entry is April 30.

Listen to the Podcast

Now that I've piqued your curiosity, it's time to listen to today's audio show titled, "Photo Downloader." You can download the podcast here (25 minutes). You can also subscribe to the podcast in iTunes

The Digital Story Podcasts are available for direct download from Apple iPhones. I've created a special mobile download page here. Just load the page in Safari, browse the podcast line-up, and click on the one you want to listen to.

Want to share photos and talk with other members in our virtual camera club? Check out our new Flickr Public Group. It's a blast!

Event Calendar

Events! See the TDS Event Calendar for photography workshops, speaking engagements, and trade show appearances.


Technorati Tags: , , , , ,


Sponsor Notes...

Lowepro Bags for Photographers On the Go -- Lowepro gear for every type of camera rig, every type of photographer.

Add Magic to Your Slideshows -- FotoMagico presentations are so amazing that your audience will be asking how you did it.

To Convert to DNG, or Not

adobe_dng.jpg

In the workflow class I taught last weekend, we had some discussion about the Adobe DNG format, and if RAW shooters should convert to DNG when uploading their images to the computer.

I've published a fair amount on this subject. In Digital Photography Podcast 114, Julieanne Kost talks about on Lightroom and DNG, and she's a big proponent of the open file format. Anyone who has been to one of my workshops knows that if you're not using Lightroom or Aperture, I recommend Photo Downloader, which comes with Adobe Bridge and allows you to convert to DNG during the upload process (as does Lightroom).

But, just because you can convert to DNG easily, does that mean you should? I'm not as worried about my RAW files becoming unreadable someday as others (a big reason some advocate converting to DNG). But what I don't like about the RAW workflow (outside of Aperture and Lightroom) are the XMP sidecar files cluttering up my picture folders. So, believe it or not, one of the reasons I do like DNG is because it's tidy. All those metadata files are stored in the container and not out floating around.

I am curious though... do you have a strong argument either for or against converting your RAW files to DNG? If so, I'd like to hear.

Technorati Tags: , , , , , ,

"Cherry Blossoms" - Grab Shot 145

cherry_blossoms_d_hunt.jpg

"I was listening to your presentation the other week and tried out one of the ways of making a photo stand out," said David Hunt. "This example was to get in close."

"So I looked up my camera manual on how to take macro shots, and came up with this shot of cherry blossoms. Camera was an Lumix DMC-FZ50, f/5 at 1/200, ISO 100."

"I also just received your new book, The Digital Photography Companion, and will be putting in to use right away. Thanks for all the inspiration and insights into photography."

Thank you David, and what a terrific shot. Just as an exercise, compare this image to shots in the past of similar subjects. I think you'll be thrilled with the difference.

Event Calendar

Events! See the TDS Event Calendar for photography workshops, speaking engagements, and trade show appearances.


Technorati Tags: , , , ,

sandisk_4gb_web.jpg

Want to know the fastest memory card to buy for your Canon 40D, Nikon D300, and a host of other DSLRs? Rob Galbraith's CF/SD Performance Database is a collection of memory card write speed results from Canon and Nikon DSLR cameras. You'll also find card-to-computer transfer results for the latest CompactFlash cards, with more CompactFlash and SD/SDHC results to be posted soon.

The Card-to-Computer Transfer Speed section is new, and really interesting to pour over to see the best combinations for readers and memory cards.

If you want the best read/write performance with your DSLR, I'd bookmark this page and refer to it before purchasing new memory.


Now Available! The Digital Photography Companion. The official guide for The Digital Story Virtual Camera Club.

  • 25 handy and informative tables for quick reference.
  • Metadata listings for every photo in the book
  • Dedicated chapter on making printing easy.
  • Photo management software guide.
  • Many, many inside tips gleaned from years of experience.
  • Comprehensive (214 pages), yet fits easily in camera bag.

Technorati Tags: , , , ,

panasonic_tz5.jpg

I had a chance to shoot with a preproduction model of the Panasonic DMC-TZ5 at PMA in January. The "TZ" stands for travel zoom, and this is a terrific "on the go" camera.

Starting with the 10X Leica DC Vario-Elmarit optical zoom (28-280mm equivalent), the little compact can handle a variety of shooting situations. The image stabilization works wonderfully, and having the option of choosing among aspect ratios (4:3, 3:2, or 16:9) is a creative plus. This latest version provides HD movie capture at 1280 x 720 @ 30 fps. The accompanying audio is recorded with an onboard mic, so it isn't as good as the visuals, but still a great option to have while traveling.

The picture of Hoover Dam that I shot with the TZ5 is featured on the fourth page of The Digital Photography Companion across from the credits. I was able to add the image just as we were going to production.

DP Review has posted an in-depth examination of the Panasonic TZ5. If you want to know more about this little travel gem that sells for about $300 US on Amazon, I would take a look at what Lars Rehm has to say.

Technorati Tags: , , , , ,

after_every_shoot_icon.jpg

In this week's podcast show notes for "After Every Shoot", there's a downloadable Jpeg graphic listing the 10 reminders I encourage you to follow after each camera session. The reference graphic prints nicely on a 4 x 6 sheet of photo paper, enabling you to stash it in your camera bag or use as a bookmark for The Digital Photography Companion.

Go get yours today. Print one for yourself, and a few to share with friends.

Technorati Tags: , , ,

print_setup_card.jpg

Be sure to download the free reference card that you can print on a standard 4 x 6 sheet of photo paper and carry in your camera bag. The card, titled, "After Every Shoot," lists the 10 reminders that you need to pay attention to at the close of each session.

In this podcast, I go over every point on the list. Once you finish listening, download the Jpeg image below and print it on a sheet of standard 4 x 6 photo paper. For best results, print in "portrait" mode (vertically aligned paper), center the image, and scale to fit (see illustration above for settings). You'll then have a handy reminder card that you can carry around. Print as many as you like and share with friends too.

after_every_shoot.jpg

You can add your own notes to the back of the card, use it to shade the lens on bright days, or fan yourself if it gets too hot while you're on location. It's also the perfect bookmark for your copy of The Digital Photography Companion. So many uses for this handy freebie.

Monthly Photo Assignment

Angular is this month's photo assignment. Just about everything intersects at some sort of angle... lots of possibilities for this one. You can read more about how to submit on our Submissions page. Deadline for entry is April 30.

Listen to the Podcast

Now that I've piqued your curiosity, it's time to listen to today's audio show titled, "After Every Shoot." You can download the podcast here (31 minutes). You can also subscribe to the podcast in iTunes

The Digital Story Podcasts are available for direct download from Apple iPhones. I've created a special mobile download page here. Just load the page in Safari, browse the podcast line-up, and click on the one you want to listen to.

Want to share photos and talk with other members in our virtual camera club? Check out our new Flickr Public Group. It's a blast!

Event Calendar

Events! See the TDS Event Calendar for photography workshops, speaking engagements, and trade show appearances.


Technorati Tags: , , , , ,


Sponsor Notes...

Lowepro Bags for Photographers On the Go -- Lowepro gear for every type of camera rig, every type of photographer.

Add Magic to Your Slideshows -- FotoMagico presentations are so amazing that your audience will be asking how you did it.

buck_heim_pa_mar.jpg

The March 2008 Photo Assignment was "Paper," and we have a spacious selection of images to show you -- 17 photos submitted by Digital Story members who demonstrate their ability to identify artistic uses of paper in the world around them.

To produce the gallery, the pictures were first loaded into Aperture. I then added the accompanying stories to the IPTC caption field and combined it with the EXIF data from the photograph. The final step was to create a web gallery in Aperture and upload it to the Digial Story server. You can view this month's photo assignment here.

The April 2008 assignment is "Angular." Start working on your contribution now. Details can be found on the Submissions page. Because of our new gallery format, you can now submit photo assignment pictures up to 600 pixels in the widest direction. Please follow the instructions carefully for labeling the subject line of the email for your submission. It's easy to lose these in the pile of mail if not labeled correctly. For example, the subject line for next month's assignment should be: "Photo Assignment: April 2008." Also, if you can, please don't strip out the metadata. And feel free to add any IPTC data you wish (These fields in particular: Caption, Credit, Copyright, Byline), I use that for the caption info.

Good luck with your April assignment, and congratulations to all of the fine contributors for March. It's an excellent collection of images.

Photo by Buck Heim


Now Available! The Digital Photography Companion. The official guide for The Digital Story Virtual Camera Club.

  • 25 handy and informative tables for quick reference.
  • Metadata listings for every photo in the book
  • Dedicated chapter on making printing easy.
  • Photo management software guide.
  • Many, many inside tips gleaned from years of experience.
  • Comprehensive (214 pages), yet fits easily in camera bag.

Technorati Tags: , ,

toshiba_bu_drive.jpg

After I published the Drobo podcast, some readers commented that picture backup seems more complicated than it should be. That's a great point. The answer is yes... and no

Those of us who have been wrestling with this issue for a long time probably have more redundancy built into our approach than the average photographer wants to think about. I totally understand that. What happens is, as I develop one archive system, and use it for a while, I begin to observe places where it is vulnerable. I then think about how to plug those holes. But if such matters are not your cup of tea, you can keep things simple and be reasonably safe. Here are three methods for doing that.

Method 1: Optical Disc for your Best Shots

Start with a photo management application such as Aperture, Lightroom, or iPhoto. Rate your images to identify the best ones. Put those heros in a folder and burn copies to DVDs once a month. I recommend that you burn two copies and store in different locations.

Method 2: Dual FireWire Drives

Here's where I really like Aperture. Set up a managed library where Aperture stores all of your assets, including the masters. I use an external FireWire drive for this so I don't fill up my computer's internal hard drive with Raw files. Connect a second FireWire drive, and use the Vault system in Aperture for incremental backups to that drive.

In Lightroom, you have another very good option. Have both FireWire drives connected. When you upload your images from your memory card, Lightroom can automatically backup a second set to a separate drive during upload. Very nice.

Method 3: Image Catalog System

This is also a two FireWire drive approach. But instead of using a photo management application, you organize your images by folders (usually labeled by date and name), then use a cataloging program such as Expression Media to rate and keyword the pictures. You can then use an incremental backup program such as Chronosync or SuperDuper to back up your images to a second hard drive.

So, backup doesn't have to be hard. And if you don't have a system now, start one today, no matter how simple. I admit that I am overcautious and spend too much money on hard drives. So view my approach as the extreme end of the spectrum, find a place where you fit, and go from there.

As always, your comments and alternative approaches are welcome!


Now Available! The Digital Photography Companion. The official guide for The Digital Story Virtual Camera Club.

  • 25 handy and informative tables for quick reference.
  • Metadata listings for every photo in the book
  • Dedicated chapter on making printing easy.
  • Photo management software guide.
  • Many, many inside tips gleaned from years of experience.
  • Comprehensive (214 pages), yet fits easily in camera bag.

Technorati Tags: , , , , , ,

peter_krogh_tasmania.jpg

"We found this beautiful place in some old growth rain forrest, and Maki did an installment in her Makirama series," writes Peter Krogh. "I was running camera for her -- pushing the button when she was ready. After a series of images, I handed her the camera for review."

This is just a taste of the compelling imagery being posted from the Adobe Photoshop Lightroom Adventure 2008: Tasmania, where a team of more than 20 photographers "traveled to the end of the world, literally, to the remote island of Tasmania. Their mission is to road test specialized digital photography software designed by Adobe [Lightroom] while capturing images from one of the world's most mysterious and varied geographic locations."

In addition to the bounty of great photographs, there are blog posts discussing the event itself. It's truly a modern adventure, and I thought you might want to see what these artists have captured.

Photograph by Peter Krogh.

Technorati Tags: , , ,

epson_paper.jpg

TDS member Jason writes: "Over the last year, as I began looking at my photographs with a more critical eye, I realized that my prints were always noticeably darker than what I was seeing on my computer screen -– specifically, I was losing a lot of shadow detail in the prints."

"Shadow details that were easily visible on my screen disappeared into black on my prints. At the time, I was doing my editing using iPhoto and Photoshop Elements on a 20 inch iMac G5 running Panther. I didn't have my own photo printer, but I tried several different print services (Apple's, Snapfish, Shutterfly, Ritz), and always got similar results. Not only did I notice the problem with my prints, but I also noticed it when I viewed my pictures on PCs."

"I began to research the issue, and the first thing I came across was the difference between monitor gamma settings on Macs and PCs. So I ran a monitor calibration on my iMac for the first time and changed the gamma from 1.8 to 2.2. That helped, but it wasn't enough. I then lowered the brightness on my display, which got me closer, but still not perfect. What I got in the habit of doing was using Elements to boost the shadow detail of my images by a few percent (since I couldn't do that with iPhoto 6), knowing that I would lose a bit of it when it was printed. This worked okay, but it's a hassle, and it seems like it shouldn't be this way."

"I thought I'd write you to see if you had any thoughts or recommendations. Have you encountered anything like this? Am I the only one?"

Derrick responds: You are not the only one, Jason, who has run headfirst into this problem. The first issue is the inherent difference between glowing, backlit computer monitors and reflective sheets of printing paper. They are two different animals, and you will never get an exact match. So your expectation should be to get a good print, not an exact match to what you see on the monitor.

That being said, you can take steps to get the best results possible out of your printer. First, start with one of your best images. Sharp, well-exposed pictures print better that lesser shots. Then, make sure your monitor is calibrated. I've written about the ColorMunki, the Spyder3Elite, and the hueyPRO. You should be using a tool like one of these. They not only set the color, they calibrate the tones.

If I'm using a very bright monitor, such as my 23" Apple Cinema Display, I usually reduce its brightness about 3 notches. This helps bring it in line with the reflective surfaces that come out of the printer.

I then make sure that I'm using the proper ICC profile for the paper I'm printing on. You can usually download profiles from the paper manufacturer's site. They ensure that your computer and printer are talking the same language during the print job.

Finally, experiment with different paper stocks. If you're using only glossy, for example, it is more contrasty than say a nice matt paper. Paper choice is a huge variable in printing.

If you do these things, and take notes along the way, you'll soon develop a printing formula that results in consistent, attractive output. I've dedicated a chapter to printing in The Digital Photography Companion. Best of luck to you Jason!


santafeworkshops-int.gif

Events! See the TDS Event Calendar for photography workshops, speaking engagements, and trade show appearances, including my Beginning Workflow with Adobe Photoshop and Lightroom on June 22-28, 2008 in Sante Fe, New Mexico.


Technorati Tags: , , , , ,

"Bike Break" - Grab Shot 144

neil_martin_belize.jpg

"This grab shot was taken on a recent trip to San Pedro, Ambergris Caye, Belize," said Neil Martin. This is the most common mode of transportation on the island along with many golf carts and a few van type taxis. Belize is a great place to visit with many photo opportunities from beaches and colorful towns to Mayan ruins and jungle wildlife."

Neil used was a Sony DSC-W90 point and shoot: 1/400 @ f/8 ISO 125.

If you have a candid you'd like to share, take a look at our Submissions page, then send us your Grab Shot. We'll try to get it published for you on The Digital Story.

And you can view more images from our virtual camera club in the Member Photo Gallery.


Now Available! The Digital Photography Companion. The official guide for The Digital Story Virtual Camera Club.

  • 25 handy and informative tables for quick reference.
  • Metadata listings for every photo in the book
  • Dedicated chapter on making printing easy.
  • Photo management software guide.
  • Many, many inside tips gleaned from years of experience.
  • Comprehensive (214 pages), yet fits easily in camera bag.

Technorati Tags: , ,

drobo_web.jpg

I've gone Drobo, and I have lots to report about networking this robotic storage array. If that sounds intimidating, it isn't. And after listening to this podcast, you might start thinking about putting a hard drive, or a hard drive array (such as the Drobo) on your network to store images.

I've also published a couple weblog posts on the subject. Be sure to check out Drobo Hard Drive Back Up for Photographers and on the Inside Aperture site, Alas, No Aperture on my Drobo.

Monthly Photo Assignment

Angular is this month's photo assignment. Just about everything intersects at some sort of angle... lots of possibilities for this one. You can read more about how to submit on our Submissions page. Deadline for entry is April 30.

Listen to the Podcast

Now that I've piqued your curiosity, it's time to listen to today's audio show titled, "Going Drobo." You can download the podcast here (30 minutes). You can also subscribe to the podcast in iTunes

The Digital Story Podcasts are available for direct download from Apple iPhones. I've created a special mobile download page here. Just load the page in Safari, browse the podcast line-up, and click on the one you want to listen to.

Want to share photos and talk with other members in our virtual camera club? Check out our new Flickr Public Group. It's a blast!

Event Calendar

Events! See the TDS Event Calendar for photography workshops, speaking engagements, and trade show appearances.


Technorati Tags: , , , , ,


Sponsor Notes...

Lowepro Bags for Photographers On the Go -- Lowepro gear for every type of camera rig, every type of photographer.

Add Magic to Your Slideshows -- FotoMagico presentations are so amazing that your audience will be asking how you did it.

drobo_web.jpg

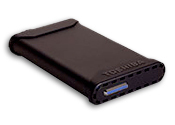
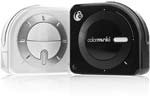
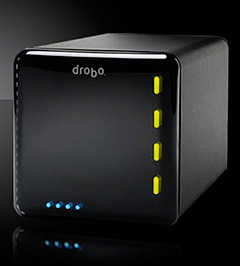
The Drobo is labeled as "Fully Automated SATA Robotic Storage Array," which sounds a little intimidating, like something that will taunt the cat when you're not around. But actually, it's a fairly clever device about the size of a toaster that you can insert up to four SATA hard drives. After doing so, Drobo takes it from there. It stores any data that you write to it, automatically backs it up, and constantly monitors the situation making necessary adjustments and repairs while you're out doing what you should be doing, taking pictures.

As a passionate digital photographer, I had pledged to figure out my storage solution in 2008. Prior to the Drobo, I would purchase a standalone 500 GB hard drive, use it until it was full, catalog it, put it on the shelve next to the other drives, and start all over again. I was storing big Raw files, music, movies, and all my other data. I decided that I wanted to separate my photography data from the rest of my stuff. And if I could find a good photo storage solution, that it would take pressure off the rest of my backup needs. After asking around and reading some research online, I decided to try the Drobo to store my photos.

I purchased the Drobo for about $465 and two 750 GB SATA drives for $165 each, making for an investment of just under $800 -- fairly sizable for sure. In return I get over a Terabyte of automated, backed-up storage that I can expand with additional drives whenever I want.

Preparing the Drobo for Network Sharing

My thought was to put the Drobo on my AirPort Extreme network that also handles my Internet and printing. I had saved one open port on the USB hub for network storage, and that's where the Drobo was going. Setup, as advertised, was easy. I unpacked the Drobo, inserted the two hard drives and connected it directly to my MacBook Pro running Leopard. I did this so I could use the Drobo Dashboard to initialize the hard drives. Unfortunately, Dashboard doesn't recognize the Drobo on an 802.11 network, so you have to perform the initial set up with the Drobo directly connected to a computer. You only have to do this once. When you add SATA drives in the future, Drobo automatically prepares them for you.

After initial set up using Drobo's Mac formatting for the drives, I connected the robot to my network and accessed it via the "Shared" tab in the sidebar of any open Finder window in Leopard. You'll see the name of your network, and when you click on it, it will reveal the Drobo. At this point you can copy files just like you would with any connected hard drive. Drobo manages the information once it has it in its procession, and presumably you can go back to work with the peace of mind that your pictures are safe. And so far, this seems true.

Read/Write Speed on a Network

I work with three different laptops. What makes this configuration so nice is that I can back up files and print from any of my machines without ever connecting a wire. I can also grab files from the Drobo and copy to any machine. But there is a price for this convenience, and it is read/write speed. For my first test, I copied and Aperture archive that was 14 GBs. It took 90 minutes to complete the transfer over the wireless network. I did a little more research and found an article on AppleInsider titled, Exploring Time Capsule: theoretical speed vs practical throughput. There is a table near the bottom of the article that compares throughput speed with different connections: direct USB, Ethernet networking, and wireless networking. The chart shows a big difference between direct USB connection (30 MB/sec) and 802.11g connection (3 MB/sec). So, there's a major bump in speed when connecting the Drobo directly to a computer compared to putting it on a wireless network. My one hope was that a 802.11n network has a 9 MB/sec throughput, which isn't bad. So, I revisited my network setup to make sure I was taking full advantage of the AirPort Extreme's 802.11n capabilities.

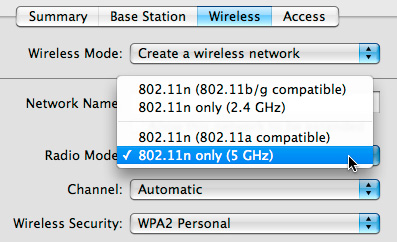
I opened the AirPort Utility (Applications > Utilities > AirPort Utility), clicked on the Wireless tab, and selected "802.11n only (5 Ghz)" from the Radio Mode. (Previously, I had been using 802.11n (802.11b/g compatible.) I then ran my 14 GB test again. This time the Aperture archive transferred in, well, 90 minutes. So, apparently I was getting as much out of my network as it had to offer. Further messing around with settings didn't make any noticeable improvements. Well, at least now I know.

airport_setup.jpg
I tried making a few changes to my network, but performance remained the same.

The good news is that file copying can happen in the background. So I just start uploading when I first arrive, and everything is finished by the time I'm ready to pack up and hit the field. If I wanted to spend another $200, I could purchase a DroboShare that lets me use Gigabit Ethernet (40 MB/sec). That should speed things up considerably, and if the current 802.11 network begins to drive me crazy, I might start saving my pennies for the upgrade. (Or do I want another hard drive for that third slot!)

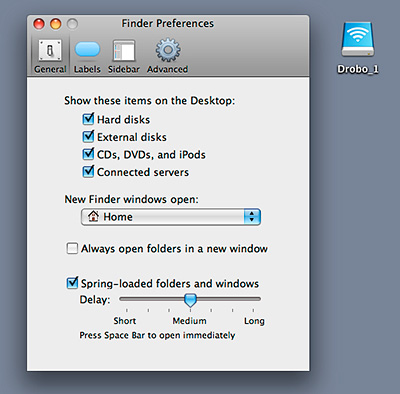
I have a couple of tips too. If you get a "Connection Failed" message when trying to access the Drobo, you probably just have to click the "Connect As" button and enter the network password. That did the trick for me. And if you want your Drobo icon to display on the Desktop, open Finder Preferences and check the "Connected servers" box under the General tab.

finder_prefs.jpg

Final Thoughts

Drobo is both Mac and Windows compatible. If you use it on a Mac, I recommend the latest version of Leopard, and make sure you have the current firmware update for AirPort Extreme (7.3.1 at the time of writing). This allows you to use the Drobo with Time Machine, which is fairly nifty. The Drobo web site contains a wealth of information, and is worth investigating if you have a particular strategy in mind.

As for me, time will tell. Right now, I'm still fine-tuning my backup gameplan that includes Drobo for much of the heavy lifting. I don't plan on using it for any realtime work, such as Aperture or Lightroom referenced files. The network performance would be too slow for me. But, so far, I do like this solution for archiving my work. Last night I sent a 42 GB job to the Drobo for safe keeping. This morning everything was there safe and sound. If I continue to like the way it performs over the long haul, I'll probably purchase another for offsite storage too. For the time being, I'll continue to use 500 GB drives offsite for redundancy, and count on the Drobo as my primary storage.

What really jumps out at me after this exercise is that there is still no single solution that handles all of my storage and backup needs the way that I want. The Drobo moves the ball forward, and I appreciate that. But I still have a ways to go.

If you've tested the Drobo yourself, please post a comment with your thoughts, and any tips you have for fine-tuning your backup strategy.

Technorati Tags: , , , , ,

chdk_logo.jpg

Canon compacts with DIGIC II or III processors have more capabilities than appear on their menus. Functions such as high-speed shutter and RAW mode can be unlocked using firmware available via the CHDK project (Canon Hacker's Development Kit). WIRED Magazine helped shine a light on this work with their recent article, Supercharge Your Camera with Open-Source CHDK Firmware. It's a terrific overview piece with lots of links, and I suggest you start there if interested in this project.

I have a Canon SD700 IS that I'm going hack. It's a wonderful little camera that I use primarily for underwater because I have a matching housing for it. I want to be able to capture in RAW while snorkeling, and CDDK seems like the way to go.

Of course, anyone trying this does so at their own risk. But if you've tested CHDK, please post a comment and let us know how it went. And if you're interested in trying it, here's a list of cameras.

Technorati Tags: , , , , ,

Repost of Stephen Johnson Interview

stephen_johnson_book.gif

Sometimes we can't just leave well enough alone... If you downloaded Podcast 123, Interview with Stephen Johnson on Tuesday or Wednesday (April 8 & 9), then you noticed that my segments covering virtual camera club business sounded terrible. What happened was that in an attempt to remove some of the background noise from the Johnson interview on the expo hall floor at Photoshop World, we totally butchered the in studio stuff. Yuck!

I've since reposted the audio and it sounds so much better. You can redownload the podcast here (28 minutes). You can also subscribe to the podcast in iTunes

Sorry about that!

It's a great interview, however, I hope you listen to what Stephen has to say.


Now Available! The Digital Photography Companion. The official guide for The Digital Story Virtual Camera Club.

  • 25 handy and informative tables for quick reference.
  • Metadata listings for every photo in the book
  • Dedicated chapter on making printing easy.
  • Photo management software guide.
  • Many, many inside tips gleaned from years of experience.
  • Comprehensive (214 pages), yet fits easily in camera bag.

Technorati Tags: , ,

adrees_latif.jpg

"“Tipped off by protests against soaring fuel prices, I landed in Yangon on 23 September, 2007, with some old clothes, a Canon 5D camera, two fixed lenses and a laptop," writes Adrees Latif in his blog post.

"...Knowing that hundreds of people were gunned down in similar circumstances in a 1988 uprising, I climbed an old crosswalk directly overhead, to get to one of the few spots offering a clear view... I had already locked on my 135mm lens and set my camera shutter speed to 1000, aperture to F/7.1 and ISO at 800. With the camera on manual, I wanted to stop any movement while offering as much depth-of-field as possible."

This is a fascinating account that is worth reading for anyone interested in great photojournalism.

Image by Adrees Latif.

Technorati Tags: , ,

colormunki.jpg

We heard about the ColorMunki Photo ($449 on Amazon.com) earlier this year at PMA. But now that the real product is shipping, the reviews are starting to surface.

Over at PhotographyBLOG, they write:

"ColorMunki Photo is a brand new colour management device that makers X-Rite are touting as a "breakthrough product". What's the reason for all the excitement? Namely price - ColorMunki Photo offers monitor, projector, and printer profiling at the previously unheard of price of $499 / £379 / 429 Euros, seemingly without cutting any corners. Our colour management expert Jon Canfield has been testing the ColorMunki for the last few months - find out if it meets all those high expectations in our latest review..."

I can tell you right now, Jon likes it. And so do others I've talked to. If you've been waiting for the next big thing in color management, this might be it. The name is funny, but the results seem quite serious.

Technorati Tags: , , ,

shoot_at_night_webinar.jpg

If you missed my first live webinar, "Five Ways to Impact," you can now download the entire presentation from the O'Reilly Media site. The 54-minute presentation shows five techniques for making your pictures look better than others, plus includes a Q&A session with queries submitted live from the audience. You'll need some bandwidth, however, because this puppy is really a big dog at 175 MBs. It does have quick start, so the movie begins playing before the download is complete.

To view, go to -- http://downloads.oreilly.com/oreilly/videos/oreilly-story-webcast.mov -- then put your feet up and enjoy.


Now Available! The Digital Photography Companion. The official guide for The Digital Story Virtual Camera Club.

  • 25 handy and informative tables for quick reference.
  • Metadata listings for every photo in the book
  • Dedicated chapter on making printing easy.
  • Photo management software guide.
  • Many, many inside tips gleaned from years of experience.
  • Comprehensive (214 pages), yet fits easily in camera bag.

Technorati Tags: , , , , ,

stephen_johnson_studio.jpg

Stephen Johnson is a digital photography pioneer. His mastery of traditional technique combined with his forward thinking led him to the new world of digital imaging.

In this interview recorded in Orlando, FL at Photoshop World, Stephen talks about his seminal work, On Digital Photography, the evolution of digital cameras including how megapixels fit into that picture, and provides some great advice on how to best display your work. It's a terrific chat that I think you will enjoy. You can find out more about Stephen's ongoing projects and workshops by visiting www.sjphoto.com.

Photo of Stephen Johnson in his studio by Derrick Story.

Monthly Photo Assignment

Angular is this month's photo assignment. Just about everything intersects at some sort of angle... lots of possibilities for this one. You can read more about how to submit on our Submissions page. Deadline for entry is April 30.

Listen to the Podcast

Now that I've piqued your curiosity, it's time to listen to today's audio show titled, "Stephen Johnson on Photography." You can download the podcast here (28 minutes). You can also subscribe to the podcast in iTunes

The Digital Story Podcasts are available for direct download from Apple iPhones. I've created a special mobile download page here. Just load the page in Safari, browse the podcast line-up, and click on the one you want to listen to.

Want to share photos and talk with other members in our virtual camera club? Check out our new Flickr Public Group. It's a blast!

Event Calendar

Events! See the TDS Event Calendar for photography workshops, speaking engagements, and trade show appearances.


Technorati Tags: , , , , ,


Sponsor Notes...

Lowepro Bags for Photographers On the Go -- Lowepro gear for every type of camera rig, every type of photographer.

Add Magic to Your Slideshows -- FotoMagico presentations are so amazing that your audience will be asking how you did it.

55x5_s_humphries.jpg

"This image is a culmination of approximately 35 images taken from a small street near a busy freeway interchange," said Sage Humphries D.D.S. "I originally got the idea when changing from one So Cal freeway to another in traffic. As I was gazing down upon the busy interchange from high above, I was amazed at the aerial view and really wanted to try and replicate the complexity of the interchange without the chaos of the cars."

"I knew that I could not set up a tripod and a camera at this location of inspiration, and I knew there was no way to shoot a Southern California freeway without any cars during daylight hours. I was aware of the stacks feature released in Photoshop CS3, so I scouted out another interchange, with a descent vantage point, and decided to give it a try."

How Sage Captured the Photo

"Originally 75 images were taken on a tripod to ensure that enough data was obtained. The photos were captured using a Canon 5D with a 24-105mm EF f/4 lens at ISO 100, shutter 1/400 sec, and f/5.0. After taking the shots, they were imported into lightroom and I selected 32 of the images and opened them in Photoshop CS3. In PS I utilized the median stacks feature to remove all of the cars. It took PS some time to crunch down the stack (especially with auto align selected: my tripod is not too stable), but once finished, I had an image without any cars (well I had one but that was easy enough to clone out). From here I removed a few distracting background elements and added a black and white adjustment layer."

"I know that there are probably a lot of people out there using this feature of PS CS3, but I figured that it may be something new to some of the virtual camera club members. I see a lot of potential for this feature. Think how many times you wanted to take a photo of a popular site but could not capture the image without distracting background or foreground elements."

"The day I shot this particular photo was a pretty cloudy day and in retrospect I might have increased my ISO a little so I could increase the shutter speed and minimize blurring in the cars. This would have probably helped eliminate the ghosting of the last car after the stacking."

Photo of the No Car Freeway by Sage Humphries.


More Tips from The Digital Photography Companion

"How I Did It" is a new feature of The Digital Story featured on The Digital Photography Companion mini site. These are techniques from virtual camera club members who have built upon information in The Digital Photography Companion, or have come up with new tips altogether.

We're building a living library of knowledge for everyone to use (and contribute to). If you have a "How I Did It" tip to share, just send it to me with the sample photo, and put "How I Did It" in the email subject.


santafeworkshops-int.gif

Events! See the TDS Event Calendar for photography workshops, speaking engagements, and trade show appearances, including my Beginning Workflow with Adobe Photoshop and Lightroom on June 22-28, 2008 in Sante Fe, New Mexico.


Technorati Tags: , , , , ,

"Eight Dog Sled" - Grab Shot 144

chain_gang.jpg

"I shot this with a Canon 30D on my first weekend out with a new 100-400 IS L. Yes, that's right, the same lens that will have me eating rice & beans for the next 6 months after the Visa bill comes in," says Allan Cunningham. "Years from now I know it will seem a trivial price to have paid for all the neat shots I hope to capture. These dog races are events at a winter carnival held every year here in Hay River, Northwest Territories, Canada."

Allan set his Canon 30D to Aperture Priority mode at f-7.1 with the resulting shutter speed at 1/1000. The ISO was 200.

If you have a candid you'd like to share, take a look at our Submissions page, then send us your Grab Shot. We'll try to get it published for you on The Digital Story.

And you can view more images from our virtual camera club in the Member Photo Gallery.


Now Available! The Digital Photography Companion. The official guide for The Digital Story Virtual Camera Club.

  • 25 handy and informative tables for quick reference.
  • Metadata listings for every photo in the book
  • Dedicated chapter on making printing easy.
  • Photo management software guide.
  • Many, many inside tips gleaned from years of experience.
  • Comprehensive (214 pages), yet fits easily in camera bag.

Technorati Tags: , ,

Tom Hogarty, Adobe Photoshop Lightroom Product Manager, took the stage in Orlando and showed off some of the new features in the beta release of Lightroom 2.0. Existing users of Lightroom 1 can get the beta today by visiting Adobe Labs and clicking on the download link.

Adobe states on the Labs page: "The Lightroom 2.0 beta program is available for use by all current Lightroom customers. If you don't already own a copy of Lightroom you can download the beta and try it for thirty days. If thirty days is not enough time, Lightroom customers can invite friends to try the beta with them for the full length of the program."

Tom demoed some slick metadata tricks, improved integration with Photoshop, print module additions, and new selective editing tools that allow you to easily work on specific areas of your image. In Lightroom 2, photographers can use brushes for dodging, burning, and other adjustments giving them greater control than possible with global adjustments.

You can watch a 3-minute movie of Tom Hogarty demoing Lightroom 2 where here shows off the new dodge and burn tools.

lightroom_demo.jpg

Overall, the response was enthusiastic to the selection tools. If you download the Lightroom 2 beta and want to report your experiences, please post a comment here.

Event Calendar

Events! See the TDS Event Calendar for photography workshops, speaking engagements, and trade show appearances.


Technorati Tags: , , , ,

dpp_185x185.gif

Lynda.com just announced the release of my latest title, Digital Photography Principles: The Camera. And they've made 14 movies from the title available for free. That's more than 40 minutes of instruction that you can go watch right now. I hope you check them out, because they are useful and fun. But what I really want to talk about today is how we made this movie. I think it's a real departure from what you normally see on Lynda.

First of all, this isn't your standard screencast type training. As I mentioned in an earlier post, we were able to use Samy's Camera in Santa Barbara as the set for many of our live action movies. It's quite fun having the run of a camera store after hours. During the shoot in Samy's, they lost some of the B-roll footage that showed the close-up shots of equipment that I was explaining. To compensate for this, the next day they photographed every piece of equipment I discussed in the Chapter 13 movies in the Ventura studio, then inserted the stills where the B-roll was supposed to go. The upshot? I think the still photos work better than the B-roll would have. It was more work, but in the end the viewer benefits.

dppstill_photo.jpg

Then, for other pieces, such as discussing flash mode options, we connected digital cameras via their video output jacks to the recorder. Doing this allowed us to show in real time the various camera menus just like you'd see them on you LCD. I wanted pretty backgrounds while demonstrating the function controls that show the live image as you made adjustments, so I rigged up a light booth and focused the camera on mounted photographs while I discussed the controls.

dpp_histogram_lesson.jpg

You can see an example of this technique above. The picture of the cruise ship is a mounted photo in my rigged-up light booth. I have a camera on a tripod (Sony T200) with a live histogram showing on the LCD. We took the video feed off the LCD from the camera and plugged it into our recorder. Meanwhile, I'm in a closed sound booth with controlled audio to make sure my voice comes across clean and clear. As I said, this isn't your standard Lynda.com training.

We also did fun stuff such as going to a mountain top to shoot a panorama, recorded live face detection demos in the lobby of Lynda.com, and even visited a parking garage to talk about the usefulness of mobile devices. My favorite part in the parking garage is where they shoot me teaching through the back-up video camera on a Toyota Prius.

dpp_toyota_cam.jpg

Yeah, that's me behind the Toyota. Here's another fun insider story. I mentioned the panorama movie earlier shot on a mountain top. Well, the wind was really whipping that day, as you can see by my tussled hair. There was no way we could capture clean audio. But we really wanted to keep this piece in the title.

So our solution was to make a written transcript of my monologue on the mountain top, then send it to me after I had returned home. I went into the Digital Story podcasting studio and read the transcript while watching the video. I sent my new audio back to Lynda headquarters in Ventura, and they synced up the studio audio with the video. If you watch closely, you'll notice it's a little like a dubbed Japanese horror flick. But it's also fun. I'm really glad we kept the panorama piece in the title.

dpp_pano_movie.jpg

There's plenty of other goofy stuff too, but I think you get the idea. When it's all said and done, Digital Photography Principles: The Camera will help lots and lots of people master their camera and take better photos. It's the first installment of a trilogy. I'll be heading down south soon to begin work on the second title. Stay tuned.

Technorati Tags: , , , , ,