As 2011 comes to a close, and we begin to think about our goals for 2012, improving our photography will be on many lists. I'm about to announce next year's workshop schedule, and one of these events might fit nicely into your aspirations. In addition to the instruction itself, one of the major benefits I've observed is the exchange of ideas among the photographers themselves.
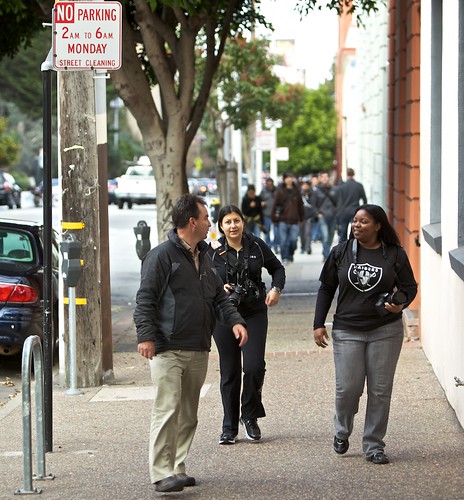
Participants talking about a shoot they had just finished during a recent Lowepro workshop in San Francisco.
Usually, at the beginning of the workshop, folks are a bit quiet and depend on me to lead the conversation. Makes perfect sense. But then, as we begin to work, much of the conversation shifts to with each other. Any of you who have attended one of these events know exactly what I mean.
Learning begins to happen on many different levels at once -- not to mention feedback on project ideas, comments about photos, and ideas about the business side of shooting. Often these conversations extend well beyond the workshop itself.
If you've never had the experience of working with other photographers in a positive environment, consider attending one of these events in 2012. You can get on the reserve list now for the workshop that you find most appealing.
The Digital Story on Facebook -- discussion, outstanding images from the TDS community, and inside information. Join our celebration of great photography!
I just watched a terrific video by Lee Morris of FStoppers about improving the audio for your DSLR videos. I was expecting a complicated setup that I wouldn't be interested in. Instead, he used an iPhone app called iTalk Premium ($1.99) by Griffin Technology. And that was it. He demonstrates the app in this movie.
You can transfer the audio files from your iPhone to your Mac or Windows computer using iTalk Sync, which is a free download. I've tested the audio recorder and the sync app, and they worked great.
The result is a high quality .AIFF audio file that I can import into Final Cut X to sync with the video. In the tutorial, Lee shows how to do this with Adobe Premier. The process is essentially the same with Final Cut X.
Overall, I think this is a great solution to improve our movie making. I'll be testing it soon for video I'll be recording in Las Vegas for WPPI.
The Digital Story on Facebook -- discussion, outstanding images from the TDS community, and inside information. Join our celebration of great photography!
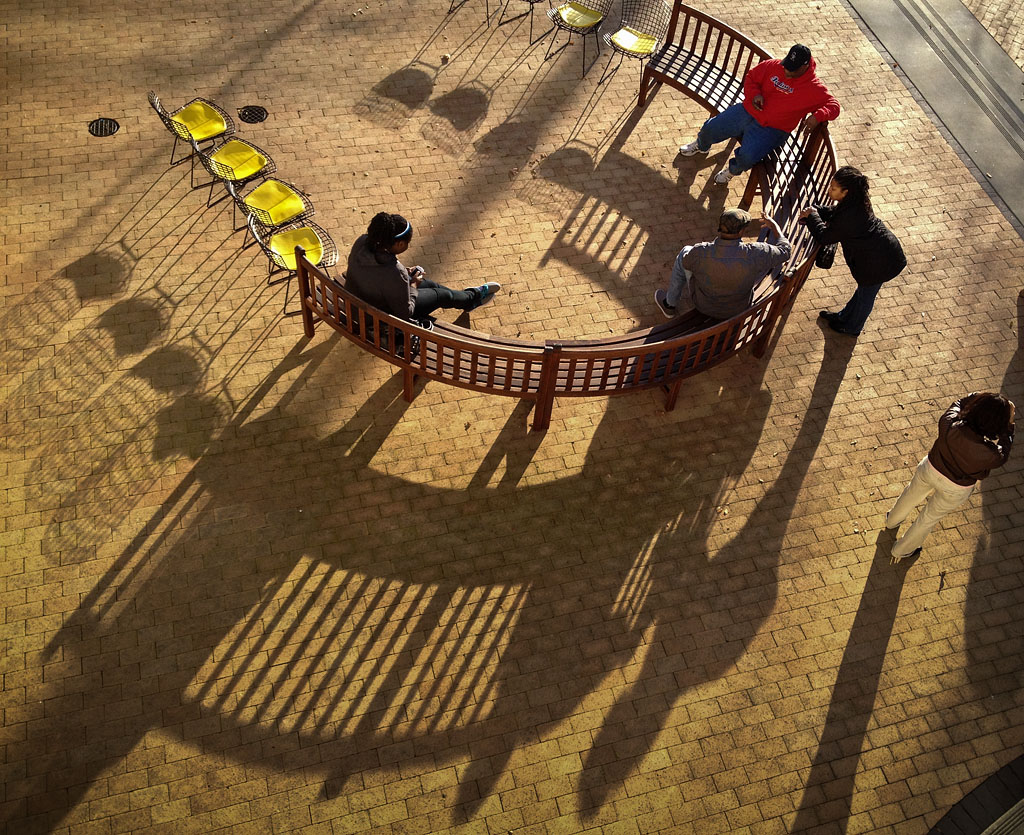
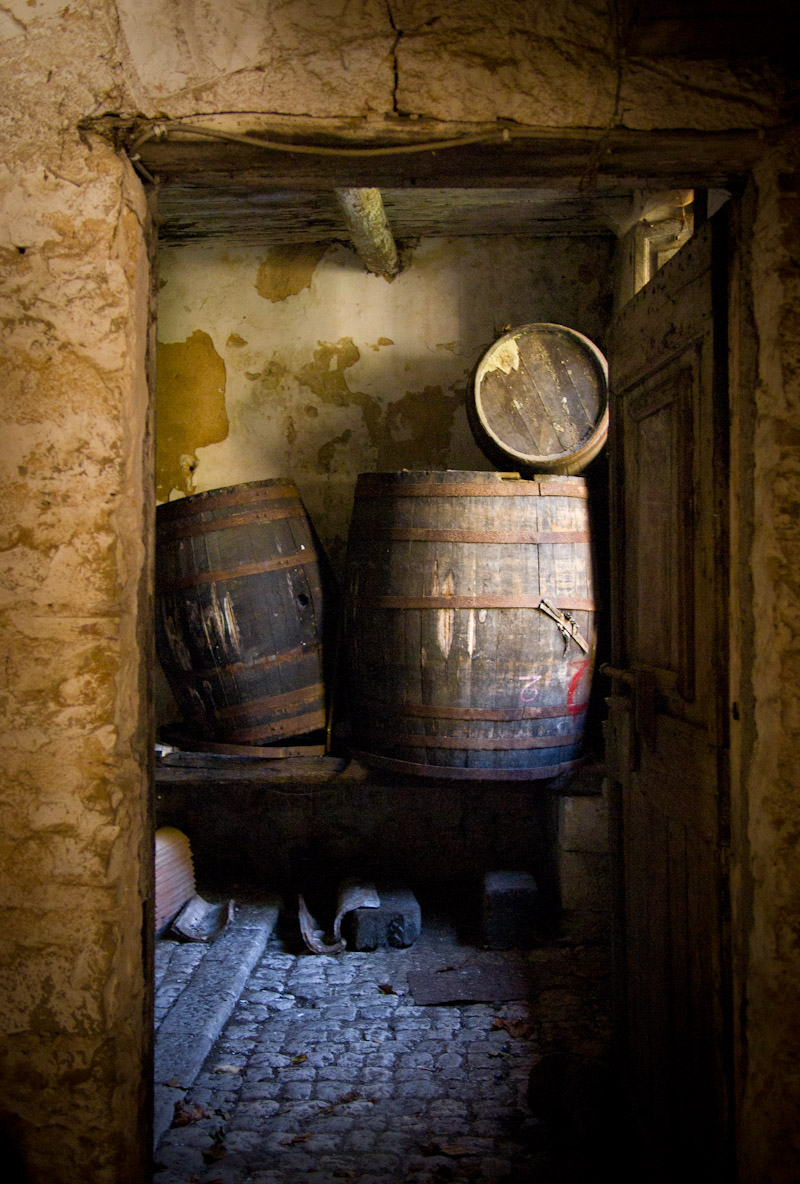
I was scouting a location yesterday afternoon, when I noticed the beautiful graphic design created by winter shadows.
I found a high vantage point and snapped a few images with the iPhone 4S, then processed the picture in Adobe Camera Raw. The low sun this time of year makes for tough driving, but great photography.
The Digital Story on Facebook -- discussion, outstanding images from the TDS community, and inside information. Join our celebration of great photography!
2011 was a busy year for photographers and tech fans alike. In this week's podcast, I review a dozen of the topics that I discussed, each one marking a particular month. I include the podcast number for each in case you want to revisit a particular subject. We began the year with Aperture being available in the new Mac App Store for $80, and close out 2011 with an all-iPad time lapse movie. And there was so much in between. Please join me for this last podcast of 2011.
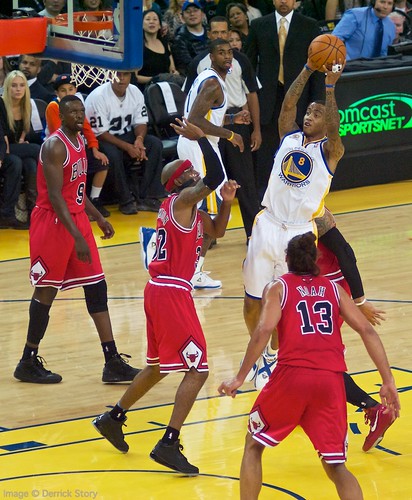
Monta Ellis scored 26 points and led the Golden State Warriors to a 99-91 victory over the visiting Chicago Bulls last night at Oracle Arena in Oakland, CA. I was there with a Zeiss 135mm f/2.8 lens mounted on an Olympus PEN Mini. I talked about this rig in yesterday's blog post.
"Monta Ellis Shot in the Lane" by Derrick Story
For the shoot, the ISO was set to 1600, aperture at f/2.8, with most of the exposures at 1/1000th of a second. Manual focusing was aided by an Olympus Electronic Viewfinder.
It was an entertaining game and fun to shoot. You can see more of the images on my Flickr Set: Bull vs Warriors.
The Digital Story on Facebook -- discussion, outstanding images from the TDS community, and inside information. Join our celebration of great photography!
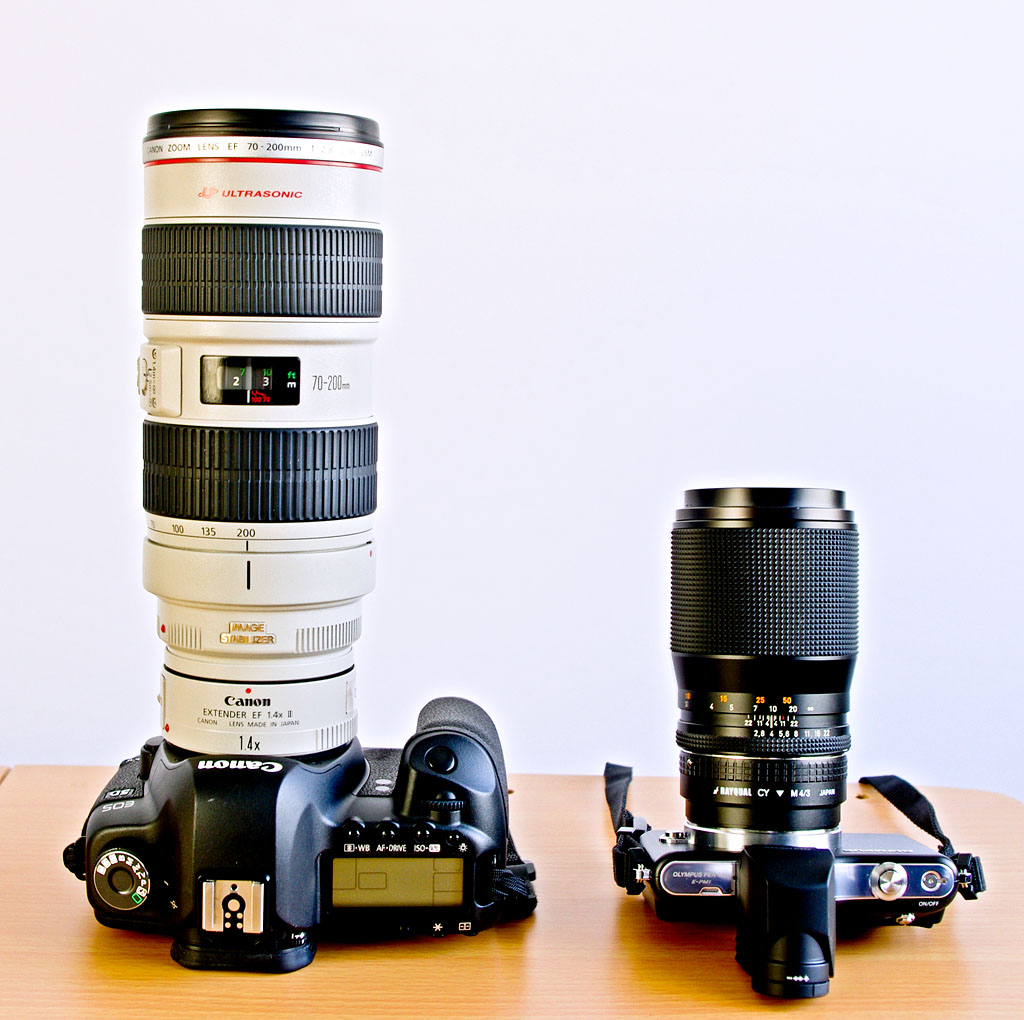
For your next event shoot, say a pro basketball game, which would you rather have: a 280mm f/4 on a 21 MP body, or a 270mm f/2.8 on a 12 MP body? Now here's the real question: which one do you think has the best odds of getting in the arena?
Left - Canon 5D Mark II, 20-200mm f/2.8 zoom, 1.4X extender. Right - Olympus PEN E-PM1 with Carl Zeiss 135mm f/2.8 prime lens.
For tonight's game, I'm choosing the Olympus Pen E-PM1(camera on the right, 12MP, 5 FPS) with a Zeiss 135mm f/2.8 using a Rayqual micro 4/3rds adapter. When I shoot micro 4/3rds, I can double the effective focal length of any lens I mount on the body. And since the Olympus PEN Mini has image stabilization built-in, the lens is automatically stabilized.
If I don't get turned away at the door, I hope to have sample shots for you tomorrow.
The Digital Story on Facebook -- discussion, outstanding images from the TDS community, and inside information. Join our celebration of great photography!
As the New Year approaches, I like to get organized. One of the best ways to store and transport camera gear is with a professional roller bag. I've been testing the new Lowepro Pro Roller Lite 150 AW, and it has become my new "go-to" hold-everything bag. It stores a ton of gear, yet it is ever so nimble: exterior is only 14.0 x 7.3 x 18.8" (35.6 x 18.4 x 47.6 cm). That means it will fit in the overhead compartment of virtually any commercial airplane.
Nimble, yes. But this roller stores a ton of gear too.
What's Inside My Bag
Canon 5D Mark II with 70-200mm f/2.8 L zoom attached
Canon 60D with 15-85mm zoom attached
Canon 580EX and 320EX SpeedLites with Off-Camera Shoe Cord
Canon 24-105 f/4 L zoom
Canon 17-40 f/4 L zoom
Canon 100mm f/2.8 Macro
Sigma 50mm f/1.4 prime
Lapel mic
Expo Disc (under the 17-40mm zoom)
Canon S90 compact camera
Rogue FlashBenders
iPad 2 (inside pocket)
MacBook Air (outside pocket in Acme Made Skinny Sleeve)
Batteries, memory cards, etc.
Cool Features
The 150 AW has durable YKK Zippers that accept your TSA lock. On top there's a padded handle, but there are also handles on the other three sides. No matter which way you reach for this bag, you'll have a handle to pull. The in-line skate wheels are user-replaceable with wheels that you can get at any skate supply shop. If the weather turns bad, pull out the attached All Weather cover to protect your gear. (Have you seen the cute stop motion video of the Pro Roller with the AW cover?). The dual-bar extendable handle hides in the back of the bag keeping the overall depth to less that 8". Stretchy front pocket great for disc reflectors, documents, or a MacBook Air.
The Bottom Line
If you need a stylish organizer for stowing your gear at home, yet has the versatility to roll out the front door for a road trip, take a look at the $259 Lowepro Pro Roller Lite 150 AW. Great looking, nice capacity, and oh so nimble.
The Digital Story on Facebook -- discussion, outstanding images from the TDS community, and inside information. Join our celebration of great photography!
I bought my Canon 85mm f/1.8 EF USM lens for wedding work well over a decade ago. At the time, I was shooting film with an EOS Elan. The 85mm was only my second Canon prime lens, after the 50mm f/1.8.
Cameras have changed a lot since my wedding days. Most of my DSLR work is with the 5D Mark II or 60D. And yet that $350 investment I made so many years ago is still helping me produce some of my favorite images.
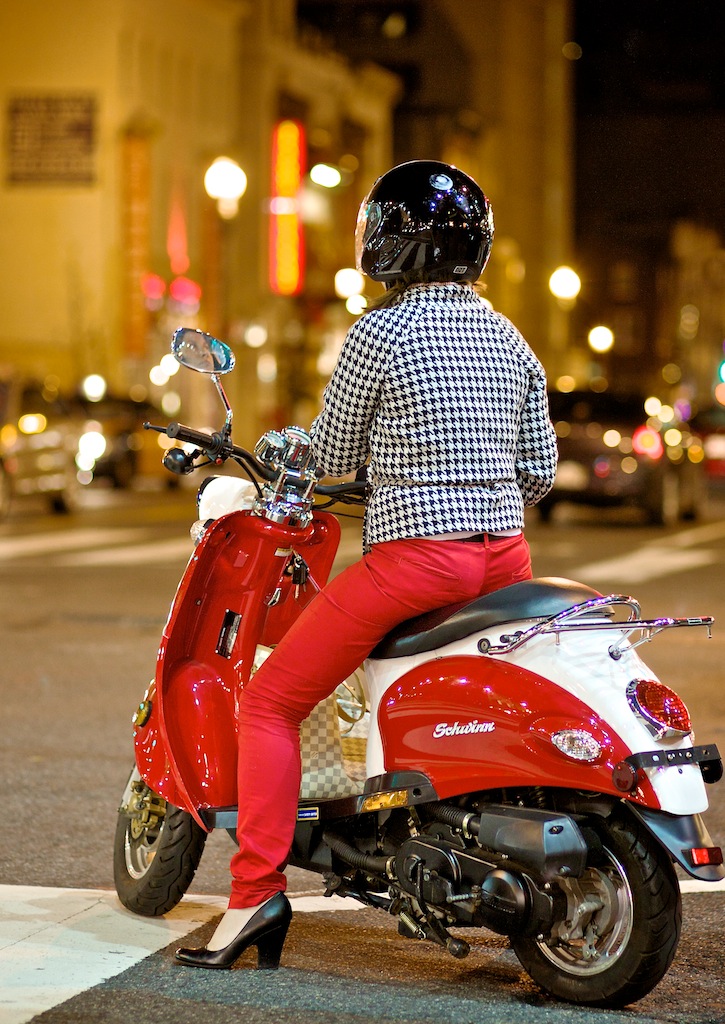
The 85mm f/1.8 is affordable. Right now, it's available for $358 at B&H. The focusing is so quiet and fast that you would think it uses the latest in micro motor technology. It's sharp. Very sharp. And when wide open, the bokeh is very pleasing.
"Girl on Scooter" by Derrick Story. Click on image for larger size.
One of the SizzlPix I have hanging in the studio gallery was taken in Washington DC with the 85mm at f/2 on the 5D Mark II. The image has the characteristics of this lens all over it. It's sharp, yet the background is pleasingly soft. And it has a feeling to it that I don't seem to get with other lenses.
When you're thinking about investing in glass, keep in mind, that your favorite lenses will serve you for years. As for me, yes, I'm still crazy about the Canon 85mm f/1.8 prime.
The Digital Story on Facebook -- discussion, outstanding images from the TDS community, and inside information. Join our celebration of great photography!
When you're a photographer, spending time and money on your WiFi network is like having to buy tires for the car. You need them, but there are so many other things you'd rather do with the resources. But when my 4-year-old AirPort network pooped out, I had no choice but to upgrade. Of course now that the project is finished, I'm loving it.
The AirPort Extreme has dual band support, so the devices that use the 2.4GHz band (iPhone for example) and the computers that can use the 5GHz band (MacBook Air) can tap their respective bands at the same time. I usually have a number of devices on WiFi at any given moment, and after a month of testing, I have not experienced a bottleneck.
Some of the particulars that I enjoy with the AirPort Extreme 5th Gen include:
Guest Network - I love this feature! In addition to my working network that supports my various hard drives and computers, I can enable a second network for visitors just by checking a box in the setup menu. They have full access to the Internet, but not to my machines. This will be perfect for the 2012 TDS Workshop season.
Speed - You can read the technical articles about how the AirPort Extreme stacks up against other routers, but based on my heavy use, I can tell you that it does quite well. I'm enjoying the improved performance.
Port Forwarding, etc. - I had problems with the old router setting up outside access to some of my NAT drives, such as the Iomega StorCenter 4 TB ix2 that requires port forwarding. I went through the steps again with the new 5th gen AirPort Extreme, and everything works great.
Apple Integration - One reason that I stay within the AirPort family is that I can check and change settings from any Mac, iPhone, or iPad. This makes it very easy to monitor my network.
Bumps in the Road
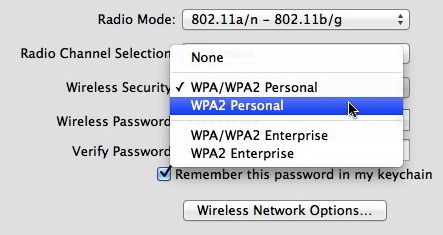
After I set up the new AirPort Extreme, my WiFi network seemed solid. That is, until I tried to log on with my PowerBook G4 1 GHz running Mac OS X Tiger. Yes, I still have a 2003 laptop on my studio network. And as a side note, I think this is one of the best PowerBooks Apple ever produced. To this day, it runs like a champ.
But, for some reason, it couldn't log on to my new network. I discovered that the problem was that I had set the AirPort Extreme to "WPA2 Personal" for security, instead of "WPA/WPA2 Personal." My old Tiger PowerBook doesn't support WPA2. So all I had to do, once I figured out the problem, was switch to "WPA/WPA2 Personal" and reboot the router. Everything worked great after that.
The Bottom Line
Even though I didn't want to spend the $179 for the new Airport Extreme 5th Gen,I'm loving the features and performance. The Guest Network is a big plus, and having all of my network drives happy and accessible improves my workflow. Based on one month of testing, I can easily recommend this router for home or studio use.
Lowepro is sponsoring a 1-Day Photo Workshop with SF Giants Staff Photographer Andy Kuno and yours truly on Dec. 28, 2011 in San Francisco, CA.
This event was designed to be offered only to Lowepro Preferred Photographers, but since I'm the Evangelist, I can share the news with a few of my friends (which happens to be our virtual camera club). All you have to do is sign up as a Lowepro Preferred Photographer, which is free and has great benefits anyway. Once you do that, you can reserve a spot for the workshop. Here's the official scoop from Lowepro:
We start the day with two morning sessions that will be one-hour classroom style.
Derrick will teach Environmental Portraiture. There are backdrops and settings in the city that you could never emulate in the studio. The trick is knowing how to work efficiently with your lighting and your subject. In this class we'll review techniques for environmental portraiture and then hit the streets with a professional model to test those ideas.
Andy will speak about the 2010 World Series experience, some of his favorite sports images over the years, as well as action photography shooting techniques.
After lunch, which is included, you'll head out into the field with each photographer doing hands on photography of what was just covered in the classroom.
So you get one shoot with me, then we switch groups, and you get the second shoot with Andy. We have some great spots scouted out in SF. The class itself will be at Joby headquarters. And, if all that wasn't good enough, lunch is included.
To register, go to the sign up page, pay your $27.37, and make plans to hang out with me, Andy Kuno, and the Lowepro staff on Dec. 28. Limited to 25 seats. It's going to rock. Seriously.
Once you begin to take notice of time lapse photography, you see it everywhere. And for good reason. This style of video adds spice to existing movie productions, or can stand on its own two feet. This week I explain how to record and polish time lapse with just an iPhone or iPad 2. It's easy, fun, and will add impact to your photography.
To learn more about the specific tools I discuss in the podcast, check out these articles:
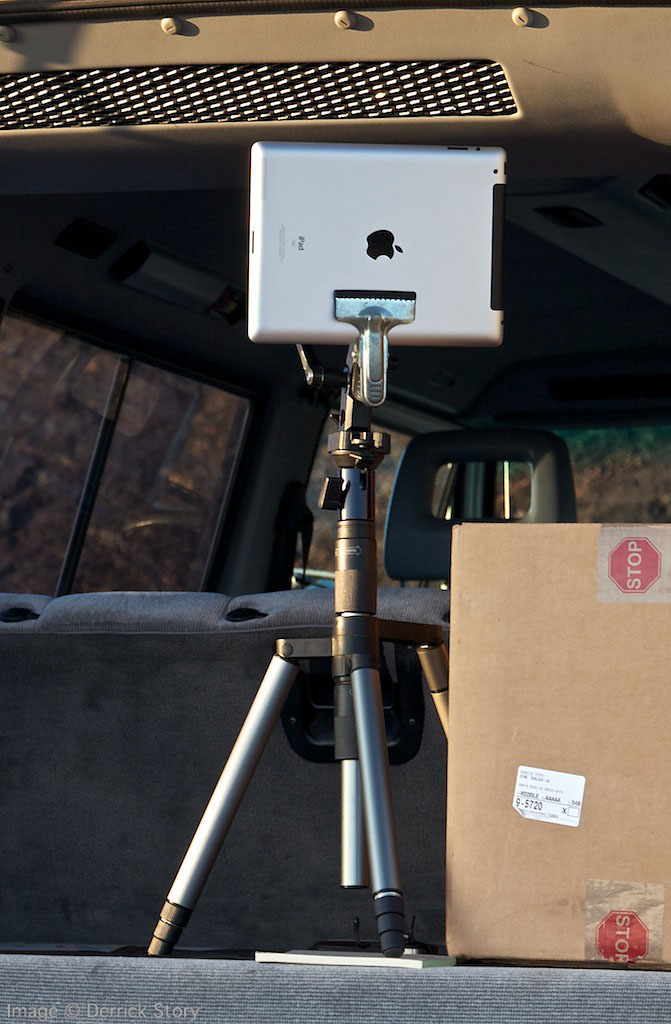
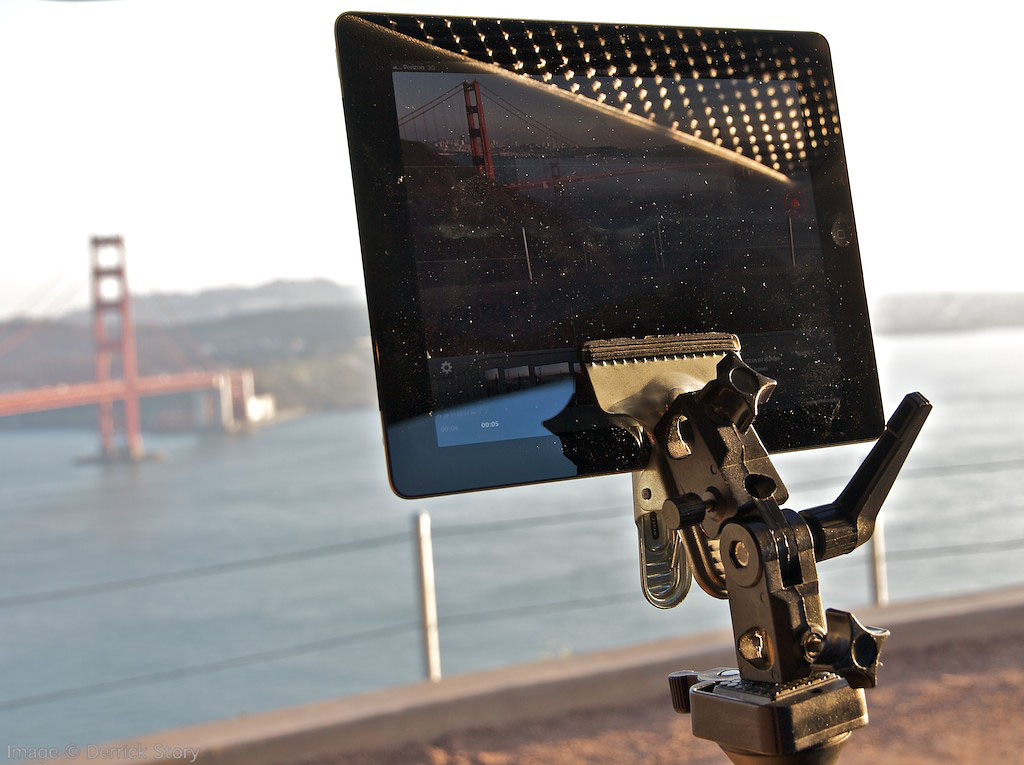
You can securely mount an iPad 2 to your favorite tripod for movie recording and time lapse photography. All you need are a few standard studio hardware items that may already exist in your lighting kit. If not, this article lists what to get and where to find it.
If you haven't considered actually taking pictures with an iPad 2, you might want to read Nimble Time Lapse Photography with iStopMotion for iPad, where I share examples of time lapse movies that were recorded, edited, and published using only the iPad 2 with iStopMotion for the iPad and iMovie for iOS. (This is fun stuff!)
Hardware List
OK, back to the hardware you'll need to make this happen.
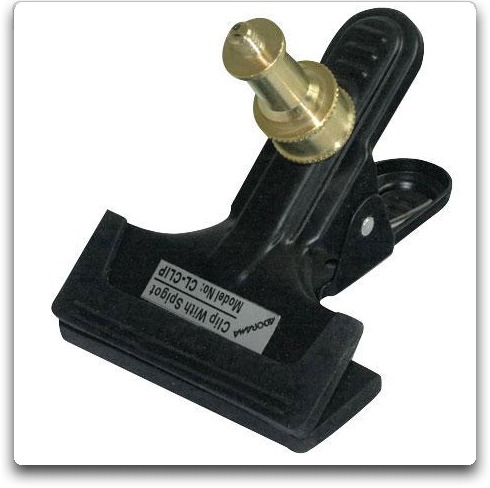
Flashpoint Clamp with 1/4-20 Stud ($9.95) - This clamp securely holds the iPad 2. Make sure the rubber grips are in place so you don't scratch the screen.
Chimera Single Axis Stand Adapter ($38.90) -- You put the Flashpoint Clamp in the top of the Chimera, then mount the entire rig to your tripod using the included threaded adapters. You can use other brands too, but make sure they include, or you already have, the adapters to connect to your tripod.
This rig will work with any tripod. And the best part is, you can also use these pieces for off-camera flash and studio lighting.
My personal rig that I used for shooting The Overlook time lapse movie.
The Digital Story on Facebook -- discussion, outstanding images from the TDS community, and inside information. Join our celebration of great photography!
Earlier in my career, I used to shoot a lot of physician portraits. And it seemed that I was constantly dealing with reflections in eyeglasses. In this helpful video produced by Adorama TV, there are some excellent tips for coping with the situation during portrait sessions.
But like most things in photography, you usually have to give up one thing to get another. For subjects with very curved eyeglasses lenses, I often find that raising the off-camera flash does get rid of the reflection, but then creates a lighting effect that I'm not thrilled about for portraiture. The next step usually requires additional fill cards and reflectors.
In other words, there are no pat answers when battling unwanted reflections. But this video does provide a good starting point.
The Digital Story on Facebook -- discussion, outstanding images from the TDS community, and inside information. Join our celebration of great photography!
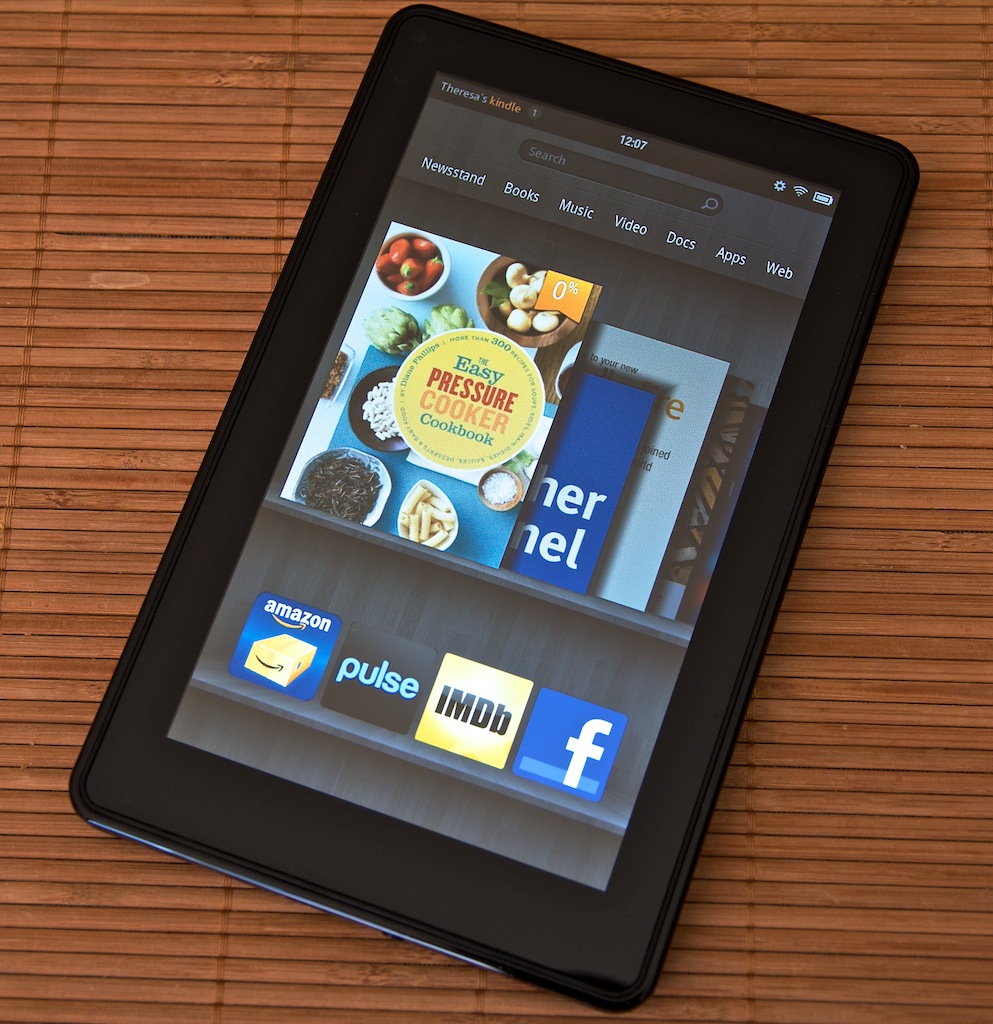
If you've purchased a Kindle Fireas a gift, and want to set it up before the official unwrapping, I have a few tips for you. These are just for consideration, not necessarily recommendations. Peruse and see if anything seems interesting to you.
Preloading Content
Wouldn't it be terrific for the recipient to already have a few well-chosen books and maybe a dozen songs when they first power up? You can do this, but there are a couple of considerations. First, the Kindle Fire is tied to the account you establish when you set it up. It's easy enough to change accounts, but by doing so, you also lose any content you've purchased. (You don't really lose it; it's just not on that particular Kindle anymore.) So it's best to set up the Kindle with an Amazon account that belongs to its eventual owner.
You could get the eventual owner's information, but then when you purchase stuff, they will be charged. Ho Ho Ho! Another route to consider is setting up a new Amazon account in the eventual owner's name. I did this with a shared email address we have with our cable company. She never checks that email, so it was perfect for this use. I wrote her log-in information on the instruction card that came with the device.
More Content Via a Gift Card
If you don't think that preloading content is a practical idea, you can get an Amazon downloadable gift cardand include it with the Kindle Fire. You choose the amount, pick the style of card, then Amazon sends you a PDF that you can print out and fold. It's personalized, looks great, and is a nice touch to the already thoughtful Fire.
A Home for the Kindle
Since the device doesn't come with a case, you may want to purchase one. This makes a great add-on gift that others can give. You provide the Fire, they add the steak sauce.
Get to Know the Device
If you spend an hour or so getting familiar with the Kindle Fire, then you can help the recipient get up to speed quickly after the unwrapping. Plus, there might be software updates that need to be installed. Why not take care of that beforehand?
Fully Charged and Ready for Action
The Kindle Fire ships with a decently charged battery. But you can top it off and have the device ready for a full day of action.
Hands Off; It's for Her
Once you give the gift, let her enjoy it. It's not your toy. Hands off unless she offers to let you play with it.
The Digital Story on Facebook -- discussion, outstanding images from the TDS community, and inside information. Join our celebration of great photography!
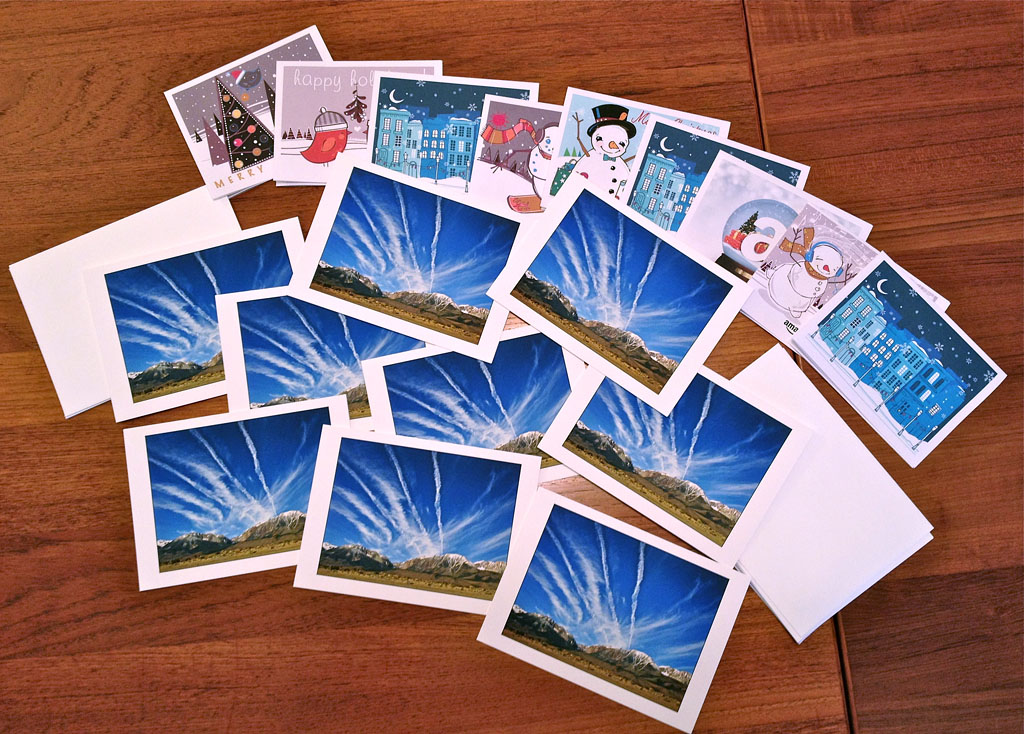
You want to give something special to your close friends and family, but you don't have a lot of time. Sound familiar? Here's an idea that just might save the day. Print your own fine art greeting card, then put a holiday gift certificate inside.
Fine art greeting cards that I printed myself, with Amazon downloadable gift cards that can be output with any inkjet printer.
There are a variety of ways to accomplish this. I'll explain what I use, then you can tailor to your own tastes. This year I started with Red River Linin 60lb card stock. It's beautiful high quality paper, scored, and folds to a 5"x7" fine art card. I choose a favorite image, then make a print run of about 30 cards. I like to have a few extras.
Red River has a Card Help Center that provides you with tips, templates, and more. I use Aperture for my fine art cards because I can create a template then drop in the photo. But you can use Photoshop, Lightroom, or Photoshop Elements too.
I then add a holiday gift certificate. This year I chose Downloadable Amazon Gift Cardsthat let me set the amount and choose the design. They then send me a PDF of the gift that I can print out and include in my fine art greeting card.
Put everything in a 5"x7" envelope, add a holiday sticker or two, and you're set. You may have heard me mention before that people love these fine art cards. I've had many recipients tell me that they've framed them so they can enjoy year round.
Accessible time lapse photography is a gift of the digital age. And now, thanks to Boinx Software, it's easier than ever to create stop motion and time lapse video with just an iPad 2. I've been testing the beta version of iStopMotion for iPad ($4.99 in the App Store), and I can tell you right now... it's a blast.
"The Overlook" - recorded with the camera on an iPad 2 with iStopMotion, then finishing touches added in iMovie for iOS. No additional cameras or computers used. By Derrick Story.
To test the nimbleosity of this app, I set out to record, edit, and publish a time lapse movie using just the iPad 2. I put the iPad in a studio clamp with rubber protectors, then mounted it on a Joby Gorillapod Focuswith Ball Head X and launched iStopMotion.
iPad 2 rig for recording "The Overlook."
The excellent battery life for the iPad, and iStopMotion's judicial use of it, allowed me to record over the course of an entire afternoon, into twilight, without having to recharge.
You have three shooting options with the software: front iPad camera, back camera, or via WiFi with the iPhone 4S (using the free companion app, iStopCamera.) I used the back camera for recording "The Overlook," but also tested the iPhone 4S camera via WiFi for making this stop motion movie. I typically shot one frame every 3 seconds when using just the iPad 2, or switched to one frame every 6 seconds when using the iPhone 4S on WiFi. You have control with the duration using this software.
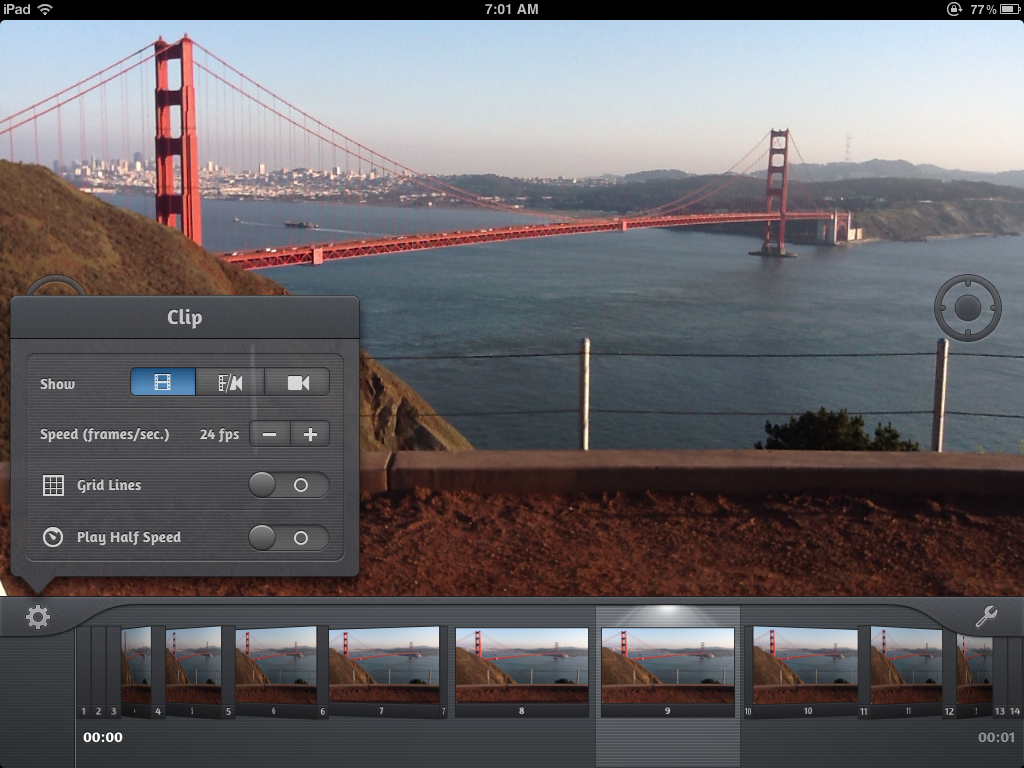
Once you've recorded your images, you can play them back at a variety of frame rates. I typically watched the movies at 12, 15, 24, or 30 fps. If you notice a few images you don't want in there, they can be deleted individually by tapping on the wrench icon.
The iStopMotion interface
Other helpful features include onion skinning, exposure setting, and grid lines. Once you have the movie to your liking, you can add a soundtrack from your music library and upload it to your Camera Roll, YouTube account, or share via email. There are three resolution options for export, including HD.
For "The Overlook," I saved scenes to my Camera Roll, then opened them in iMovie for iOS to stitch them together and add the finishing touches. I'm going to discuss this process more in next week's TDS Podcast.
The Bottom Line
iStopMotion for iPad earns a Nimbleosity Rating of 4. That's impressive considering this is the first release of this ambitious app, and we should see further enhancements up the road. Used by itself, you can create simple, but impressive stop motion or time-lapse movies, enhanced by the ability to delete frames and control frame rate. When used in combination with iMovie for iOS, iStopMotion becomes even more powerful. You have an entire recording, editing, and publishing environment, right there on your iPad.
The Digital Story on Facebook -- discussion, outstanding images from the TDS community, and inside information. Join our celebration of great photography!
When we're very busy (as most are this time of year), it can be difficult to adhere to your formal archiving plan. Even I struggle at times with this (it's true!). But I do have a Plan B in force that keeps me protected.
I call it the "Mini 2-Drive Approach with Color Labels." I keep one WD My Passport 750 GB portable hard drivein my backpack and another at the studio. After I upload a shoot to an Aperture library on my MacBook Air (but before I erase the memory card), I copy that project to both external hard drives. It only takes a few minutes. Now I have my photos, plus any work I've done to them, in at least two different places.
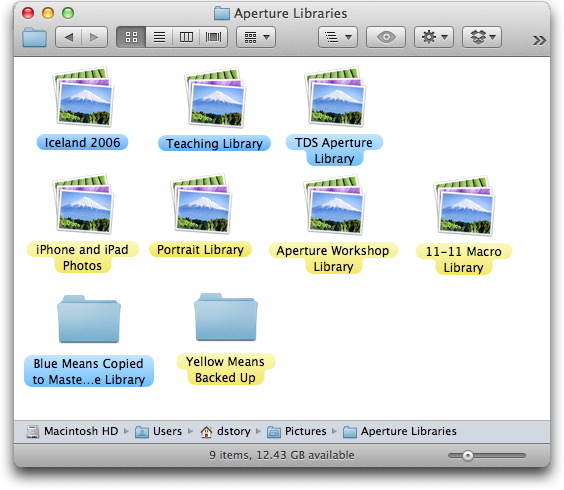
But here's the real trick: keeping track of the "workflow state" of each library. When looking in the Pictures folder on my MacBook Air, I might forget what I've done, or not done, to each library in there. Has a library been backed up on external drives? Has it been incorporated into my main Aperture library? How do I know?
I use color labels to keep track of these libraries. A yellow color label means the library has been backed up, but not incorporated into my main Aperture system. A blue color label means it's been incorporated into the main Aperture library on my desktop computer. And so I don't forget what's what, I create two empty folders titled "Blue Means Copied to Master Aperture Library" and "Yellow Means Backed Up." That way, I always immediately know the state of any given library on any device.
As for creating the master system itself, take a look at Organizing and Archiving Digital Photos for some new ideas. If you start building your plan now, you should be ready to implement it on Jan. 1, 2012. And if you want to learn more about Aperture itself, such as how to merge libraries as I do here, I have a few titles on lynda.com for that too.
The Digital Story on Facebook -- discussion, outstanding images from the TDS community, and inside information. Join our celebration of great photography!
Nimble photography isn't just for still photos. Our nimbleosity can extend to movie making too. This week I cover iMovie for the iPad and discuss an easy to adopt workflow. Even though the tools are simple, you'll become comfortable with filmmaking concepts that could prove very handy up the road. All of this, plus a Denny's waitress anecdote, and a whole lot of fun.
I like to set the Drive Mode to "continuous" when shooting animals, children, and people in general. Yes, you take up a bit more space on your memory card. But you also increase the odds of getting the best pose possible. Once you have your favorite shot, you can delete the others if you wish.
To replay the above sequence, I've had the best luck by refreshing the web page.
All you have to do is find Drive Mode on your camera. It's usually represented by clock-like symbol (representing self timer) or a series of squares that illustrate a sequence. In the menu, choose the series of squares. Then start shooting. This setting is particularly good for natural light portraits.
The Digital Story on Facebook -- discussion, outstanding images from the TDS community, and inside information. Join our celebration of great photography!
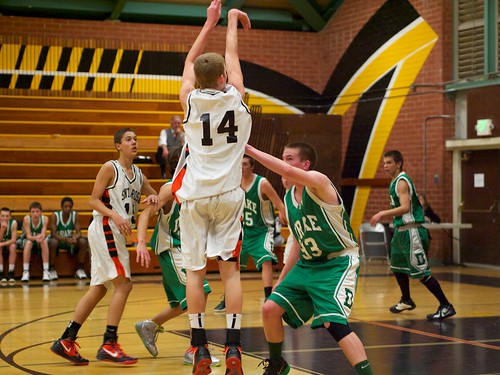
Jump shot captured the the Olympus PEN Mini and 45mm f/1.8 prime lens. Photo by Derrick Story.
At first, you might think this is an odd rig for action photography. I can tell you, it's actually quite impressive. The focusing is blazing fast with this camera/lens combination -- and by any standard, not just within the world of compact system cameras. Plus, I had 5 fps for burst mode. And to be honest, it felt faster than that.
I set the ISO to 1600 and shot wide open or at f/2 for the entire game, and the resulting images were crisp and clean. You can see a gallery of 10 shots here to give you a better feel for this lens in action.
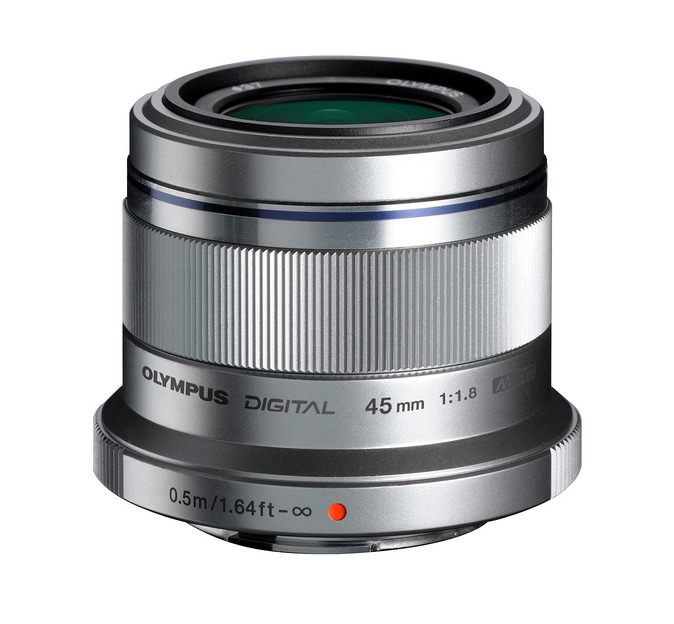
I had read user reviews of this lens, and everyone said that "you would not regret this purchase." Very seldom that you see such wide agreement about optics. But I'm adding my voice to the chorus. The $399 Olympus 45mm f/1.8 prime is now my favorite Micro Four Thirds lens. Fast, sharp, and affordable.
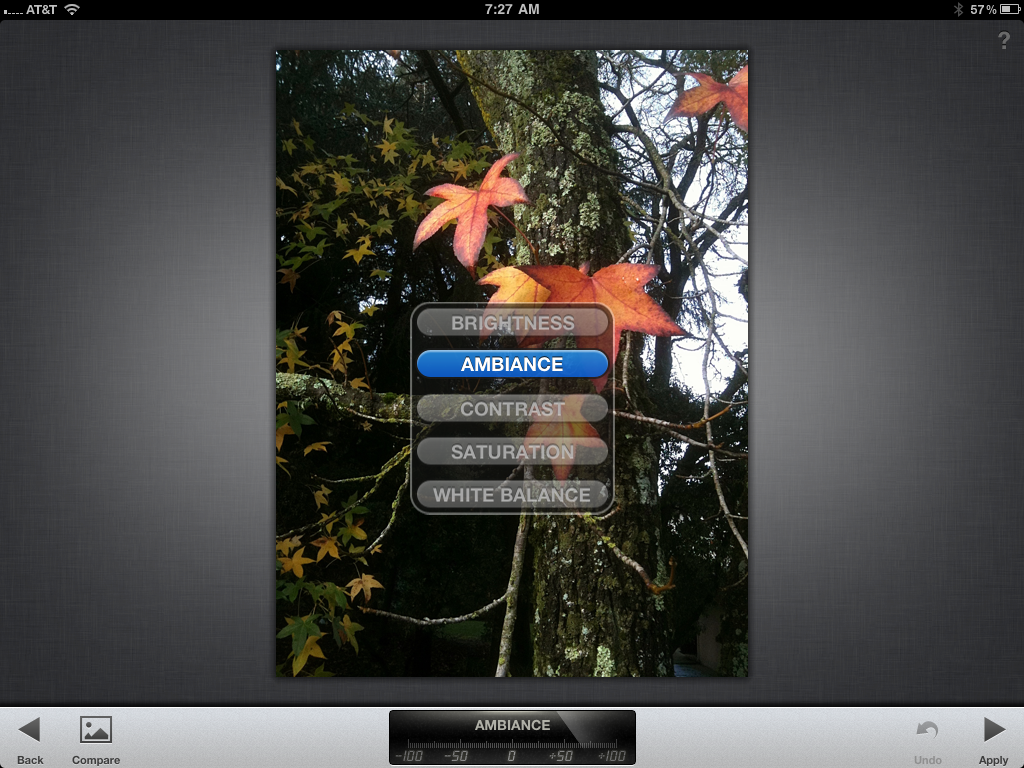
DP Review reports that Instagram and Snapseed are the Apps of the year for the iPhone and iPad respectively. The apps are part of Apple's Rewind 2011 selections.
Obviously, both are excellent choices. For more on Snapseed, here's a review I wrote back in June. The photography tools available on the iPad are quite amazing these days... and affordable.
The Digital Story on Facebook -- discussion, outstanding images from the TDS community, and inside information. Join our celebration of great photography!
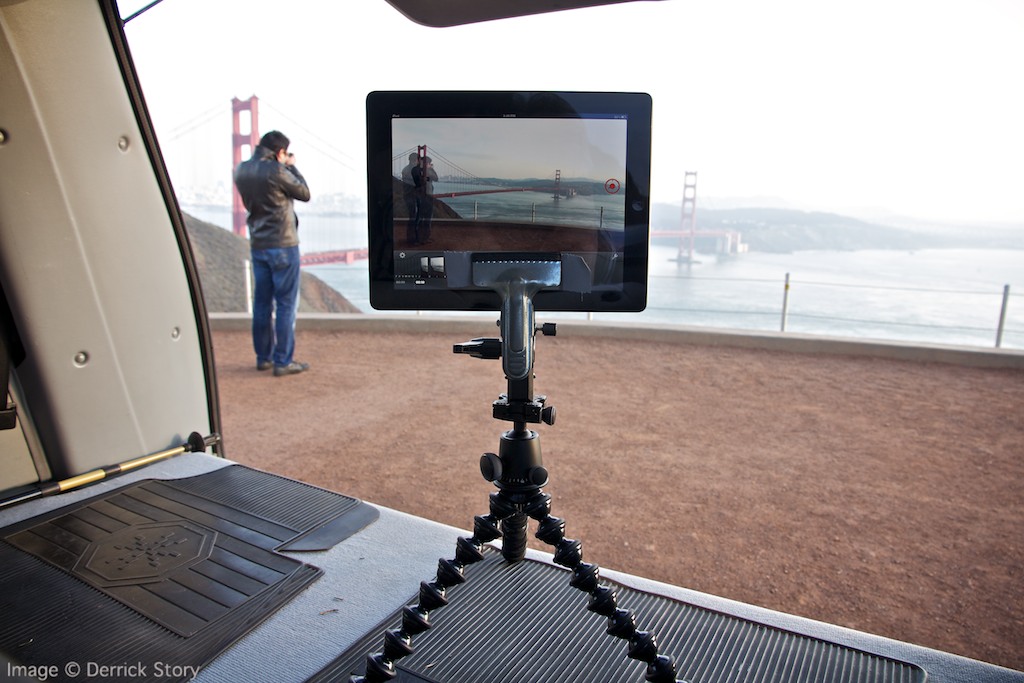
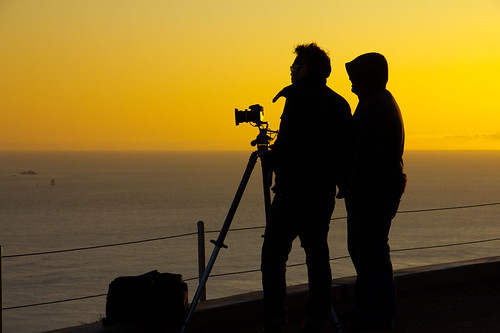
I was working on a project last night at the Golden Gate Bridge north of San Francisco, when I noticed these two photographers in the distance. I always keep a second camera on-hand for unexpected shots. Fortunately, I captured these two before they changed position.
I have two goals on every photo shoot: 1) Make sure I capture what is expected for the assignment, and 2) Be ready for the unexpected.
Only when I have good images in both categories do I consider it a good shoot.
The Digital Story on Facebook -- discussion, outstanding images from the TDS community, and inside information. Join our celebration of great photography!
It's not often that you get to sit down with a Sports Illustrated photographer and learn about life in the end zone. But on Monday, Dec. 12, from 11 am to 12 pm PST (2 to 3 pm EST), you can have a seat at the table with Robert Beck sharing his secrets to sports photography. And it's free.
Robert Beck hanging out at a football game. Photo by Derrick Story. Click on image for larger version.
I had a chance to hangout with Robert on the sidelines a while back. He's incredibly down to earth for a guy who's published numerous cover shots and double gates. Now you'll have a chance to hear those same stories and insights that I enjoyed so much.
To reserve your spot, sign up now, then log on Monday Dec. 12. It will be time well spent.
The Digital Story on Facebook -- discussion, outstanding images from the TDS community, and inside information. Join our celebration of great photography!
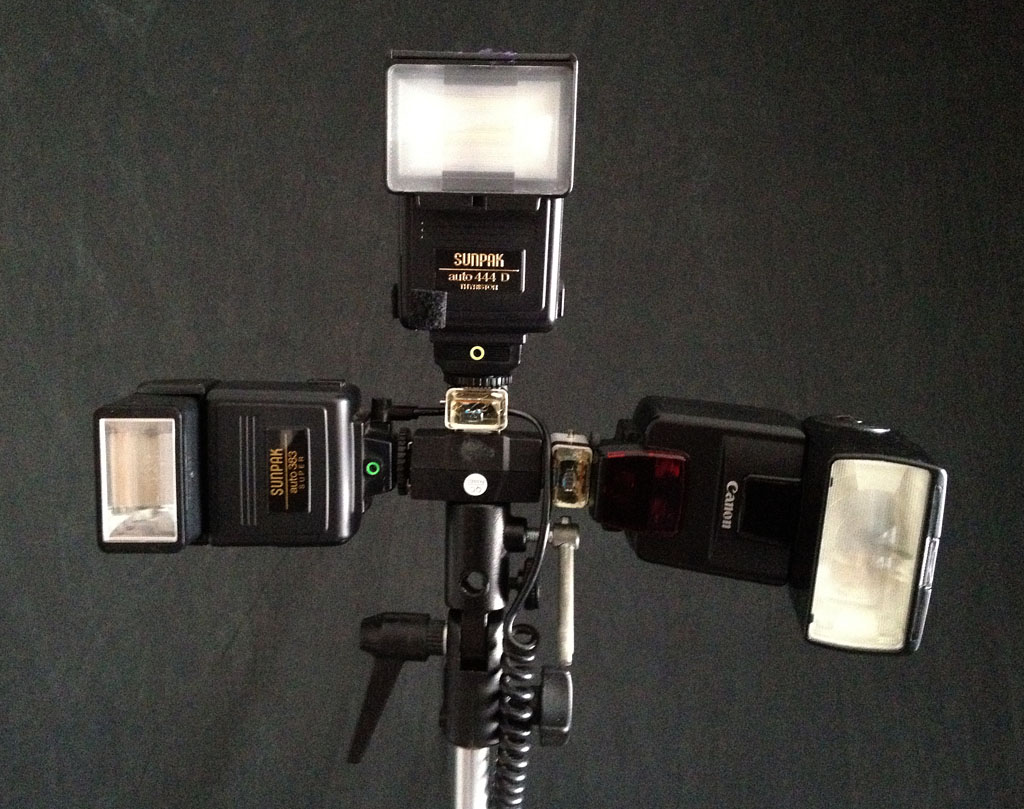
Things are sometimes better in threes. Three flashes on one lightstand; three exposures on one frame. Yes, this week I'm talking about multiples. I cover the Adorama Triple Shoe Adapter that costs less than $20, but allows you to put three flashguns on one lightstand. By doing so, you can increase your output while cutting down on the amount of time the flash takes to recycle.
I also cover working with in-camera multiple exposures. My sample shoot is with the Pentax K-5 DSLR.
But this technique works with any camera that can accommodate multiple exposures. I like the K-5 because it allows for up to nine images on one frame. For my example, I photographed the lovely Alyssa in three different poses. You can see the image and read more details about the shoot in the post, Multiple Exposure Model Shoot with the Pentax K-5. I guess you could say that this week's show is triple the fun.
One of my favorite features on the Pentax K-5is the multiple exposure setting that allows me to integrate up to 9 images on one frame. So I set up the K-5 in the studio and went to work with one of my best models.
We set up the shoot so Alyssa would strike three poses. The camera was firmly mounted on a tripod in one position for all three shots. I positioned her on the far left for the first exposure and tripped the shutter. We then set up the second pose in the middle of the frame, and the third on the far right. I was working at a slight angle so I could create perspective.
After the third exposure, the K-5 combined the poses into one Raw file. I then uploaded the image to Aperture for tonal adjustment and finishing work with the Nik Silver Efex Pro 2plug-in.
You could combine these poses in Photoshop instead of working in-camera. But what I like about this approach is that the lighting and background are spot-on consistent throughout the composition. That's not always easy in post production.
The multiple exposure technique can be used indoors and out, with people or objects. I had been thinking about making this image for a few weeks, and we had a blast working on it yesterday.
The Digital Story on Facebook -- discussion, outstanding images from the TDS community, and inside information. Join our celebration of great photography!
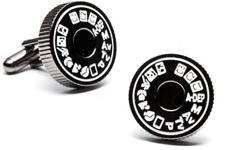
Now that we're smack dab in the middle of the holiday season, many of us want to finish off our gift list. Here are 8 unusual stocking stuffers for photographers, including "mode dial" cufflinks.
And don't forget the official TDS Photographer's gift guide. Between the two lists, you have more than 20 great items to consider for the photographer in your life... and for under $100. And we all know what a trick that can be.
For the Oct. '11 Photo Assignment, TDS shooters worked the angles while exploring the theme Side Lighting. The imagery in this gallery is quite beautiful. And which one will be the SizzlPix Pick of the Month? (These will look great Sizzled!)
Photo by Robert Barone. For more information about this image, plus all of the other terrific shots from Oct., visit the Side Lighting gallery page.
Participate in This Month's Assignment
The Dec. 2011 assignment is "Family." Start working on your contribution now. Details can be found on the Member Participation page. Deadline is Dec. 31, 2011.
Please follow the instructions carefully for labeling the subject line of the email for your submission. It's easy to lose these in the pile of mail if not labeled correctly. For example, the subject line for this month's assignment should be: "Photo Assignment: Dec. 2011." Also, if you can, please don't strip out the metadata. And feel free to add any IPTC data you wish (These fields in particular: Caption, Credit, Copyright, Byline), I use that for the caption info.
Good luck with your Dec. assignment, and congratulations to all of the fine contributors for October.
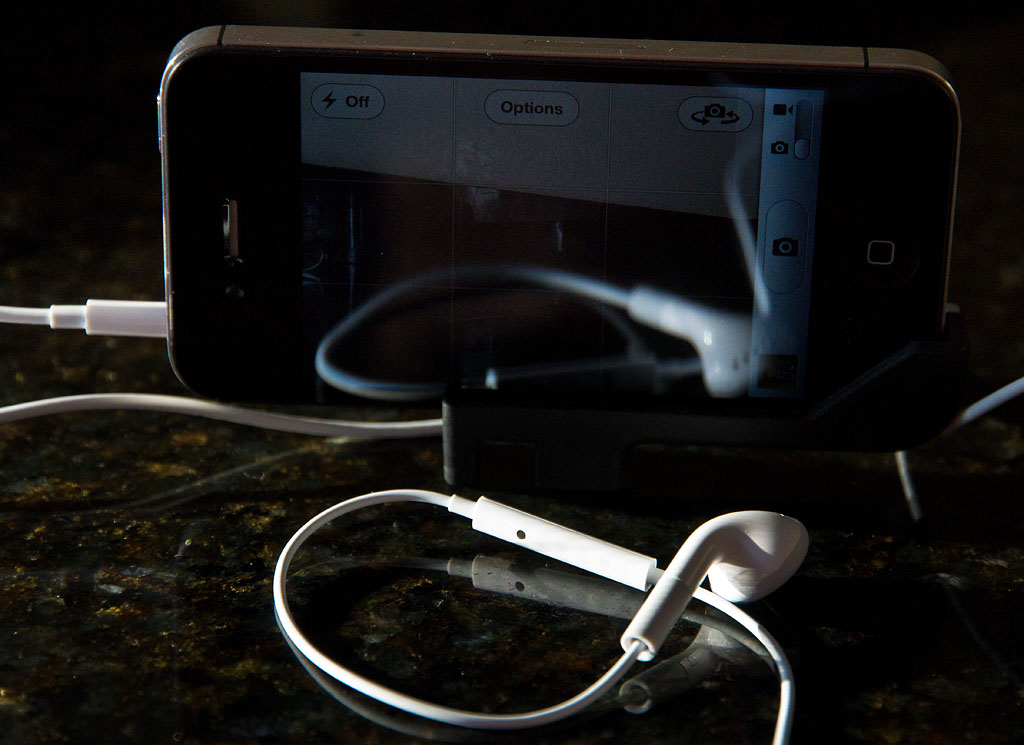
Your Apple ear buds with remote can also serve as a cable release for the iPhone. I've just tested this with my iPhone 4S, and it works great.
Your Apple ear buds can also be used as a cable release for the iPhone. Photo by Derrick Story. Click on image for larger version.
Plug your ear buds into the iPhone, launch the camera app, steady the shot using your favorite stand or tripod, then squeeze the remote button on the ear buds. Your iPhone will take shot, steady as a rock. And the best part is, the cable release comes included in the box.
This tip is great for long exposures, HDR, etc. Give it a try!
Thanks so much to TDS Member, William St. John, for alerting me to this ultra cool tip.
The Digital Story on Facebook -- discussion, outstanding images from the TDS community, and inside information. Join our celebration of great photography!
In these early days of iCloud, the Photo Stream component is far from perfect. But the concept is good. So it's really a matter of fine tuning on Apple's part.
But I think Photo Stream can still be used in the meantime. In my Macworld Magazine article, Control Photo Stream with iPhoto and Aperture, I explain a workflow that uses iPhoto as a holding tank for your Photo Stream, then tapping the images you want via the iPhoto Photo Browser function in Aperture.
Using this method, you get the backup benefits of Photo Stream, but you don't have a bunch of crud flowing into your photo management environment. Take a look at the article and see what you think.