April 2012 Archives

The $63 Macro Focusing Rail

Two of the challenges of macro photography is getting precise focusing and correct position. I've found that a focusing rail is an invaluable tool for close-up work. However, this accessory is usually a bit pricy for the enthusiast macro photographer. One exception is the Adorama Budget Macro Focusing Rail Set that sells online for $63.

adorama_macro_focus_rail.jpg

We recently put this device through its paces at the TDS Close-Up Photography Workshop, and it got rave reviews. A couple of the participants have already ordered one for themselves.

Adorama's description reads: "Flashpoint rail sysytem provides rack and pinion movement, fine focusing adjustments. Two 6" rails allow movement in four directions, right, left, forward and backward. Mounts on, and accepts 1/4x20 threaded screws, will fit most tripods and copy stands. Positive locking knobs assure rock-steady focus."

I leave is mounted on a tripod in the studio. So whenever I need a close-up shot, it's right there and ready to use.


The Digital Story on Facebook -- discussion, outstanding images from the TDS community, and inside information. Join our celebration of great photography!


Backyard Photo Adventures

We need to shoot often to improve our technique and stay sharp. But it's not always easy to fit a photo expedition into our busy schedules. That's when exploring our own backyards can become a photographic paradise.

joel_kaneshiro_bee.jpg Close-up photography is particularly well-suited to backyard adventures. This photo by Joel Kaneshiro was captured on a patio outside the TDS studio. (See photo below.)

Once the sun begins to shine, I usually stop by the plant nursery and spend $20-$30 on seeds and potted flowers. I plant the seeds and repot the flowers, and before I know it, I have a new crop of photo subjects. Plus, they attract bees, butterflies, and a variety of interesting insects.

backyard_photo_shoot.jpg During this patio shoot, Joel Kaneshiro is holding a diffusion panel for Chaz Benedict while he works a subject with a close-up lens and ring flash attachment.

For a small investment, both in time and money, you can create a rich photo environment that will provide countless hours of shooting.

Images from the TDS Close-Up Photography Workshop.


The Digital Story on Facebook -- discussion, outstanding images from the TDS community, and inside information. Join our celebration of great photography!


Aperture Library First Aid

Do you ever have the feeling that your Aperture library isn't feeling quite right? For those Alka Seltzer situations, try running the Aperture Library First Aid tool.

aperture_first_aid.jpg

Just 3 easy steps to potential relief:

  • Quit Aperture.
  • Hold down the Option and Command keys while relaunching the application.
  • Choose "Repair Database."

This handy tool is built right in to the app. And it just might provide the relief you need for that upset database.

More Aperture Tips and Techniques

To learn more about Aperture 3, check out my Aperture 3 Essential Training on Lynda.com. Also, take a look at our Aperture 3 Learning Center. Tons of free content about how to get the most out of Aperture.

My next open Aperture Workshop is scheduled for Nov. 2012, in Santa Rosa, CA. You can get on the pre-registration list, plus learn about all the other photography workshops offered this season by visiting the TDS Workshops page.


The Digital Story on Facebook -- discussion, outstanding images from the TDS community, and inside information. Join our celebration of great photography!


One of the features on the new Olympus ED 12-50mm F3.5-6.3 zoomthat intrigued me was the macro capability. I'm asked all the time if "macro modes are any good." I thought I'd run a quick test with the zoom mounted on the Olympus OM-D E-M5 16MP bodyand show you the uncropped results.

Macro Mode On Macro mode on Olympus 12-50mm zoom.

Macro Mode Off No macro mode.

Not only does macro mode on the 12-50mm zoom get you closer, it also renders a softer background. Not too bad for a compact lens (3.3 x 2 x 2 inches) that only weighs 7.5 ounces and is weather sealed.

To enable close up mode, press the "Macro" button on the side of the lens and move the zoom ring forward to the front optic. Once it locks into place, your world just got a little closer.

The zoom sells separately for $499, but you can save yourself a couple hundred bucks if you buy it in a kit with the OM-D.

So is macro mode any good? Well, it's not as close as your dedicated 100mm glass, but I like having this option on an all-purpose zoom that's easy to pack. So, I would say, "yes!".


The Digital Story on Facebook -- discussion, outstanding images from the TDS community, and inside information. Join our celebration of great photography!


Lots of news this week and I'm covering four topics that have been on my radar: The New iPad, Adobe Creative Cloud, Lowepro Flipside Sport AW, and the just-concluded TDS Close Up Photography Workshop. More fun that you could even imagine!

Listen to the Podcast

You can also download the podcast here (32 minutes). Or better yet, subscribe to the podcast in iTunes. You can support this podcast by purchasing the TDS iPhone App for only $2.99 from the Apple App Store.


Enter to Win a Nikon 1 with 10-30mm zoom lens by "Liking" Red River Paper Facebook Fan Page.


Monthly Photo Assignment

Macro is the April 2012 Photo Assignment. You can read more about how to submit on our Member Participation page. Deadline for entry is April 30, 2012.

More Ways to Participate

Want to share photos and talk with other members in our virtual camera club? Check out our Flickr Public Group. And from those images, I choose the TDS Member Photo of the Day.

Podcast Sponsors

Red River Paper -- The $7.99 Sample Kit is back! And with free shipping.

Make Your Photos Sizzle with Color! -- SizzlPix is like High Definition TV for your photography.

Need a New Photo Bag? Check out the Lowepro Specialty Store on The Digital Story and use discount code LP20 to saven 20% at check out.


Technorati Tags:
, , , , ,


creative_cloud_announcement.jpg

Adobe CEO Shantanu Narayen stepped on stage at the de Young Museum in San Francisco to reveal the path to Adobe's future. Adobe is hoping that it's a path upward to the Creative Cloud.

Adobe's vision of cloud computing goes beyond hosting software and sharing pictures. They see a complete creative environment, a virtual studio that integrates tools, assets, published work, and ideas. On a basic level, V1 looks like this.

  • Creative Cloud membership provides users with access to download and install every new Adobe CS6 application announced at the event and two new HTML5 products, Adobe Muse and Adobe Edge preview.
  • Creative Cloud integrates Adobe's creative tablet applications, such as Photoshop Touch, into everyday work -- seamlessly synchronizing and storing files in the cloud for sharing and access on any device.
  • Creative Cloud members will be able to easily deliver mobile apps to iOS and Android marketplaces and publish, manage and host websites.
  • Adobe Creative Cloud members will have access to application upgrades, including new CS point-product features, before they are launched as part of major CS updates, as well as inventive new products and services as they emerge.
  • Adobe Creative Cloud membership is US$49.99 per month, with an annual contract. A special introductory offer of US$29.99 per month for CS3, CS4, CS5 and CS5.5 individual customers is also available.

creative_cloud_setup.jpg

But on an idealistic level, Adobe wants to build a virtual studio where participants have all the tools they need in an inspirational environment -- not only to create their work, but to easily publish it also. Unlike box software, where the manufacturer builds it then ships, the Creative Cloud will represent ongoing work by Adobe personal as well as its customers. New ideas inspire updates not tied to release schedules.


Setting up for the Creative Cloud event at the de Young Museum in San Francisco.


Artistic inspiration was the theme of the day. The event was held at one of San Francisco's best museums. The independent artists who created the imagery for Creative Suite 6 were present for the event. And Adobe showed off its in-house talent via demos by respected artists such as Jeff Veen.

Will it work? The keys to success will be in the many details that will be grappled with over the coming months. But the concept is solid. My recommendation is, for those of us who are Adobe customers, is to keep an open mind and take a close look at how you could make it work for you. Like any community, the more of us who participate, the better the odds of success.


The Digital Story on Facebook -- discussion, outstanding images from the TDS community, and inside information. Join our celebration of great photography!


If you're an outdoor photographer who likes stream crossings on a fallen log, jogging down a winding trail, or mountain biking on a brisk Spring day, you'll probably like carrying your camera gear in the just-announced Flipside Sport.

Flipside Sport 15 and 10 Liter Two models of the Lowepro Flipside Sport. You can see the complete set of images on the TDS Flickr page.

Available in two colors (orange and blue) and two sizes (15 liter and 10 liter), the Flipside Sport is designed with a comfortable, lightweight harness system. This allows you to secure the bag to your body and maintain balance during transport.

Flipside Sport 10 Liter Back

Access to your gear is provided via the zippered rear flap.You don't need to remove the backpack to get to your camera. Simply slide off the shoulder straps and swing the bag around with the waist belt still attached.

70-200mm inside Flipside Sport 10 Liter

The smaller of the two bags, the 10 liter, will accommodate a 70-200mm f/2.8 IS L zoom on a Canon 5D Mark II body or equivalent, plus the 24-105mm f/4 L lens. The larger bag holds more.

Tripod Sleeve

Other handy features include innovative tripod transport sleeve, hydration pouch, removable camera box with cover, and an All Weather cover. You can learn more about the Flipside Sport series at lowepro.com/flipside. More images available on the TDS Flickr page.The bag should be available in May 2012.

Author's note: This is a pre-release announcement. The Lowepro URL should be updated by midday Monday, April 23.


The Digital Story on Facebook -- discussion, outstanding images from the TDS community, and inside information. Join our celebration of great photography!


The killer feature in Apple's 3rd generation iPad is the Retina display. The 9.7-inch LED-backlit glossy widescreen shows your pictures with 2048-by-1536-pixel resolution at 264 pixels per inch. And you will notice the difference right away.

ipad_screen_comparisons.jpg

One of the first tests I ran was to open my favorite shots in Minimal Folio on both the iPad 2 and the New iPad, then place the displays side by side. The difference is stunning. The New iPad isn't only the best mobile display I've seen, it's one of the most impressive ways to look at my images, period. It's like having a collection of SizzlPix that you can carry in your backpack.

My workflow for moving images out of Aperture and on to the iPad has changed a bit as a result. I've created a new export preset that saves the images at 2048 on the longest side at 264 resolution. I then upload the files to Dropbox so they will be available to Minimal Folio on the iPad. The files are bigger now than the 1024s I previously used, but the payoff is more that worth it.

So that leads us to the question that I and many photographers grapple with: "Is the Retina display worth the price of upgrade?"

If you use the iPad as a portfolio to display your work: yes.

If the iPad is an important part of your photography workflow: yes.

If the iPad is more of an email, web browsing, Facebook tool: you can probably wait, just don't look at The New iPad in the meantime.

The iPad 2 is a fantastic device. I was very happy with mine and still use it daily. But I needed the New iPad with its improved camera and Retina display for a project I'm working on. And even after reading the marketing copy and in-depth reviews, I was still shocked by the brilliance of the display. It's an amazing tool for photographers.


The Digital Story on Facebook -- discussion, outstanding images from the TDS community, and inside information. Join our celebration of great photography!


This is one of the oldest, and most affordable tricks, for close up photography: the reverse ring. With this $10 adapter that you screw into the filter threads on the front of your 50mm lens, you can turn it around and mount it to the camera face first. By doing so, you increase the magnification of the lens substantially.

canon_50mm_reverse_ring What's wrong with this picture? (The lens is mounted backwards!)

We used this trick in the film days, but it was hard to predict results with it. Since the lens is reversed, you don't have autofocusing or auto exposure. But now, thanks to Live View on most DSLRs, you can see exactly what you get before pressing the shutter button.

moth_revierse_ring.jpg Moth photographed with lens reversed and with a wide open aperture.

Also keep in mind that with most of today's autofocus lenses, you don't have an aperture ring to control depth of field. So you're shooting wide open, often creating a bit of a "Lens Baby" look.

But since the lens is reversed, you can use any make or model glass that has the right filter thread diameter. So that old Pentax 50mm you have in the closet that does have an aperture ring, can now be pressed into service on your modern DSLR.

And like many of these types of techniques, an hour or two of experimentation can spur your creativity and lead to something really interesting.


The Digital Story on Facebook -- discussion, outstanding images from the TDS community, and inside information. Join our celebration of great photography!


Ring flash is useful for macro and portrait photography. Yesterday I reviewed the impressive Orbis Ring Flash and bracket that combines versatility with professional results. And even though it's more affordable than much of the competition, it will still set you back $249.

If you want to experiment with ring flash lighting before making that kind of investment, take a look at the DIY Ring Flash Kit that you build yourself for $35 including the bracket.

Step 14

A few days after placing your order, you receive a flat box with the contents of your kit and a well-written instruction guide.

Step 1

I spent about 20 minutes assembling the components. If you want to see all of the steps involved, take a look at my Flickr set titled DIY Ring Flash Assembly.

Once completed, I mounted my Canon 320 EX Flash and took some pictures. The ring light worked remarkably well, and this is definitely a good way to become familiar with this type of lighting.

Step 17 Small Audi A3 model photographed with just the DIY ring light.

If you decide you like this type of flash modifier, I would consider getting a more sturdy rig such as the Orbis Ring Flash. The DIY kit isn't as sturdy, and it's a bit clunky to use. Another downside is that if you want to use a strobe with a larger flash head, such as my Canon 580 EX, you have to stretch the opening of the modifier to make it fit. Plus, you wouldn't want to show up at a model shoot with this attached to your camera.

That being said, the DIY Ring Flash Kit is a great weekend project that will introduce you to the joys of ring lighting. We'll be playing with this one over the weekend during my Close Up Photography Workshop.


The Digital Story on Facebook -- discussion, outstanding images from the TDS community, and inside information. Join our celebration of great photography!


With the closing of MobileMe, and Flickr seeming to fall behind the pack, it reaffirmed my belief that it's best to have complete control over your photos. In this week's podcast, I talk about the balance between local storage, online storage, and sharing via social media. Each avenue presents its own challenges and benefits. The trick is using them correctly, and staying on top of the game.

Listen to the Podcast

You can also download the podcast here (30 minutes). Or better yet, subscribe to the podcast in iTunes. You can support this podcast by purchasing the TDS iPhone App for only $2.99 from the Apple App Store.


Enter to Win a Nikon 1 with 10-30mm zoom lens by "Liking" Red River Paper Facebook Fan Page.


Monthly Photo Assignment

Macro is the April 2012 Photo Assignment. You can read more about how to submit on our Member Participation page. Deadline for entry is April 30, 2012.

More Ways to Participate

Want to share photos and talk with other members in our virtual camera club? Check out our Flickr Public Group. And from those images, I choose the TDS Member Photo of the Day.

Podcast Sponsors

Red River Paper -- The $7.99 Sample Kit is back! And with free shipping.

Make Your Photos Sizzle with Color! -- SizzlPix is like High Definition TV for your photography.

Need a New Photo Bag? Check out the Lowepro Specialty Store on The Digital Story and use discount code LP20 to saven 20% at check out.


Technorati Tags:
, , , , ,


Orbis Ring Flash with Bracket

For my upcoming Close Up Photography Workshop, I needed a ring flash that would work with each student's lighting gear. After some research, I bought the Orbis Ring Flash with Bracket. It looks like I made a good choice.

bee_on_lavender_web Bee on lavender captured with a handheld Canon 60D, 100mm f/2.8 L macro, and the Orbis Ring Flash.

The Orbis slips over the head of standard hot shoe flashes. I'm testing it with a Canon 580 EX. (You'll need a dedicated flash cord too, so if you don't have one, add that to the budget.) I purchased the "system" kit that includes the ring flash and bracket directly from Orbis for $249. It's not cheap, but if you compare it to other dedicated ring flash systems, it's less expensive than most.

Once everything is put together, it's a fairly bulky rig. But I found it surprisingly easy to handle. I used my left hand to hold the middle of the bracket while pressing the shutter release with my right. I felt that it was easier to steady the camera with the Orbis bracket than with just the camera and lens alone.

orbis_ring_flash.jpg

The bracket allows for adjustment of both flash and camera. So you can configure the rig to your particular photo gear. After a day's use, I consider the bracket a necessity. The Orbis would be unwieldy to use without it.

Thanks to the dedicated flash cord, you have TTL flash metering that makes exposure a snap. I used flash exposure compensation for some of my shots. But for the most part, I just let the camera control the flash while I concentrated on my subject.

The Orbis feels well made, and it should last a good long time. Keep the sturdy cardboard box for storage when the ring flash is not in use.

Even though I purchased the Orbis for the workshop, I know I'm going to enjoy using it for portraits and macro work for years to come. I give it a thumbs up.


The Digital Story on Facebook -- discussion, outstanding images from the TDS community, and inside information. Join our celebration of great photography!


A Beauty in Black and White

I shoot everything in color. Actually, Raw, to be precise. And once I've done my sort and decided which images I like best, I begin to consider the possibilities. One of those considerations is B&W.

Leah Gerber
Model: Leah Gerber.

As others have said before, color sometimes just gets in the way. Not always, but there are those times when I want to experience the composition and tonality without distraction. For those images, I've started a SmugMug gallery dedicated to B&W.

For me, B&W is a frame of mind, I usually don't mix those images in with color photographs. Even in my portfolio, B&W has its own chapter.

As for processing, initial sorting steps are handled in Aperture 3. After I've decided which images are going to be converted to monochrome, I open them in Nik Silver Efex Pro 2,which gives me the control to process the images just the way I want. I use the Aperture plug-in version, so my photos come back to Aperture for finishing touches.

B&W isn't for every shot. But for the right images, it's an amazing way to view the world.


The Digital Story on Facebook -- discussion, outstanding images from the TDS community, and inside information. Join our celebration of great photography!


You can create inkjet contact sheets with Aperture by following four basic steps. These are useful as proof sheets for client review, or as a handy way to tell a story with multiple images. There are a variety of options for adding text to the pages too. Here's how.

Step 1 - Select the Images

Step 1 - Select Images

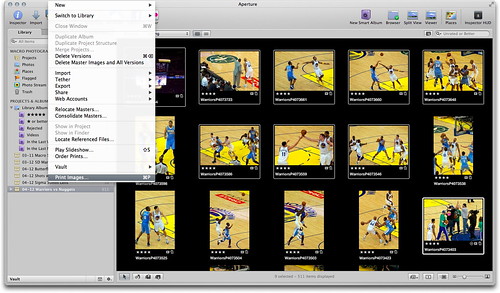
In Aperture's thumbnail mode, select the images you want to add to the contact sheet. Just CMD-click on the shots to choose them. Then go to File > Print Images.

Step 2 - Set Rows and Columns

Step 2 - Set Rows and Columns

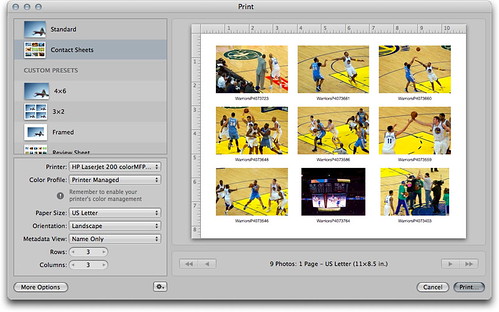
In the following dialog box, select the number of rows and columns you want. The fewer you choose, the larger the images. Don't forget to choose your printer and paper size also! Then click on the "More Options" button in the lower left corner to reveal the Metadata panel.

Step 3 - Choose Metadata

Step 3 - Choose Metadata

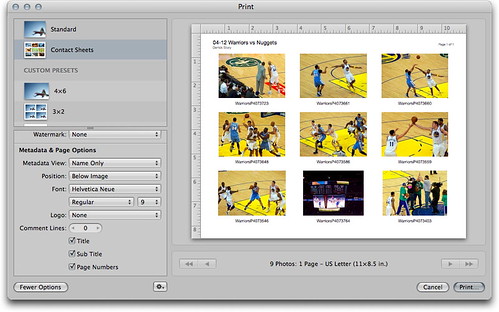
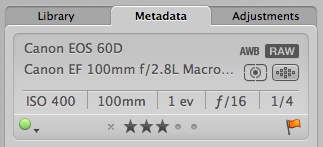
Here you can choose the type of information you want on your contact sheet, such as title, file name, etc. The text itself is pulled from the metadata associated with the picture.This includes EXIF, such as the file name and date of capture, and IPTC, such as the caption information and title you may have entered. Now, click Print.

Step 4 - Print Dialog Box

Step 4 - Print Dialog Box

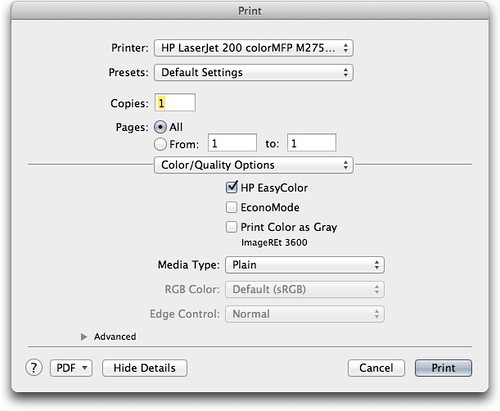
You'll be presented with one more dialog box, this one is part of the print driver software. Make your selections and click Print. In just a few minutes, your contact sheet will emerge from the printer.

Advanced Tips

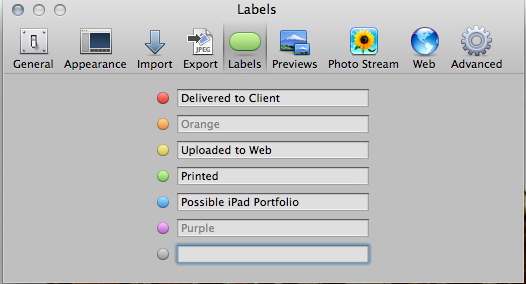
If you want to make a preset of your contact sheet, click on the little gear menu at the bottom of the dialog box in Step 3. Choose "Duplicate Preset" from the popup menu. Give your preset a descriptive name by clicking on it. The next time you want to print this type of contact sheet, just choose your preset.

If you'd rather generate a PDF instead of paper output, click on the PDF button in the lower left corner of the Print dialog box in Step 4. Choose "Save as PDF."

More Aperture Tips and Techniques

To learn more about Aperture 3, check out my Aperture 3 Essential Training on Lynda.com. Also, take a look at our Aperture 3 Learning Center. Tons of free content about how to get the most out of Aperture.

My next open Aperture Workshop is scheduled for Nov. 2012, in Santa Rosa, CA. You can get on the pre-registration list, plus learn about all the other photography workshops offered this season by visiting the TDS Workshops page.


The Digital Story on Facebook -- discussion, outstanding images from the TDS community, and inside information. Join our celebration of great photography!


aperture_info_panel.jpg

Both Aperture and Lightroom provide excellent tools for organizing images in your library. A common question I hear during workshops is about the difference between Flags, Stars, and Color Labels. Here's a quick overview on how I use them.

Star Ratings

I use stars to rate the quality of an image. A great picture will be 4 stars, good is 3, and acceptable is 2. I recommend making two passes to rate photos. First pass is just a "yay or nay" review. If it's an acceptable image, give it 2 stars (a yay). If not, no stars at all (nay).

Then, on the second pass, only review the 2 star photos. I usually put them in an Album (or Collection in Lightroom). You've now had a chance to see the entire shoot and have better perspective on the relative quality of the images. Upgrade the best shots to 3 or 4 stars. These should be the only pictures you spend image editing time on.

Color Labels

aperture_color_labels.jpg

Use the color dots for categories. You could assign one color, for example, to shots that you've uploaded to the web. Another color might be used for images that you've printed. If you have a frequent client, he or she might deserve their own color label. You can assign names to labels by going to Preferences > Labels.

Flags

Flags are useful for temporary collections. Let's say that you want to isolate and look at a handful of images. Mark them with a flag, then in thumbnail mode, go to the upper right corner of Aperture and click on the search icon. Choose Flagged from the popup menu. Only those images will be displayed on your screen. Click on the "X" in the search box when you're done to reveal all of the images in that project.

aperture_flagged.jpg

More Aperture Tips and Techniques

To learn more about Aperture 3, check out my Aperture 3 Essential Training on Lynda.com. Also, take a look at our Aperture 3 Learning Center. Tons of free content about how to get the most out of Aperture.

My next open Aperture Workshop is scheduled for Nov. 2012, in Santa Rosa, CA. You can get on the pre-registration list, plus learn about all the other photography workshops offered this season by visiting the TDS Workshops page.


The Digital Story on Facebook -- discussion, outstanding images from the TDS community, and inside information. Join our celebration of great photography!


Sigma has released a pair of prime lenses for micro four/thirds cameras, such as the Olympus PENs. I've been testing the 30mm F2.8 EX DN($199 US) because it fits nicely between my Olympus 17mm f/2.8($219) and the longer 45mm f/1.8 telephoto($399).

Sigma 30mm on Olympus E-PL2

The first thing I noticed with the Sigma 30mm is that it's larger than the two Olympus primes. On the E-PL2 body (shown above), it looks great. On the PEN Mini, the Sigma looks a little oversized. Despite its greater diameter, it's still very light (135g / 4.8oz). The metal lens mount is nicely finished. But the lens mechanism inside does move around when not in use. Once you turn the camera on, it engages, eliminating movement until you actually focus. I'm guessing that this is a byproduct of Sigma's new linear focusing system.

Comparison of 45mm 30mm & 17mm Sigma 30mm (center) compared to the Olympus 45mm and 17mm primes.

On the camera, autofocusing is fast and smooth. You can manually focus on the fly using the large knurled ring at the front of the lens. Focusing action is nicely dampened.

Sigma 30mm f-2.8 for Micro Four Thirds

Threads on the front of the lens accept 46mm filters and accessories. A lens hood is not included, but you do get a nice zippered case.

Since the 30mm behaves like a 60mm mild telephoto with the micro four/thirds sensor (crop factor of 2X), you can soften the background when shooting wide open. Overall sharpness of the lens is good. It has decent close-up ability allowing for 1:8.1 magnification at 11.8"

Depth of Field Test at f-2.8 You can soften the background when shooting wide open with the Sigma 30mm.

Bottom Line

The Sigma 30mm F2.8 EX DNis an affordable prime lens for micro four/thirds users, especially useful for Olympus PENs because it doesn't have image stabilization built into the lens. It performs best when the camera's firmware is up to date. For example, when I mounted it on my E-PL2 with firmware 1.0, the lens became hyperactive constantly adjusting the aperture with changing lighting conditions, even when locked down in Aperture Priority mode. I would upgrade your camera firmware if you plan on using this lens.

On start up, I also noticed that there's a 1-2 second delay before the lens was ready to shoot. It feels like the lens and camera are establishing communication during this delay. Once everything is ready however, the lens focuses quickly, quietly, and accurately.

I do like having the faster f/2.8 aperture at the 30mm focal length. On the 14-42mm, f/3.5-5.6 Olympus zoom that comes with the PEN cameras, the aperture is f/5.0 at 30mm. So this prime delivers a stop and a half more light at the same focal length.

The lens should also look good on the black version on the new Olympus OM-D E-M5 bodythat is due to be released later this month.

Overall, I rate the Sigma 30mm a notch below Olympus prime lenses. But if you want a mild telephoto with a reasonably fast aperture for an affordable price, you'll probably like shooting with this glass. I'm going to keep mine.


Find great deals at the TDS Photography Store on Amazon.


Derrick Story Speaking at SMUGs

smugmug_logo.jpg

Starting this month, I'm available for speaking at SMUGs (SmugMug User Groups). I'm looking forward to meeting with other photographers who share the same passion for making great images and enjoy the process while doing so.

Currently I have five talks available:

  • "Efficient Aperture for Busy Photographers" (Apple's Photo Management Software)
  • What's in My Bag" (How to pack light yet have everything you need)
  • "Getting Started with Macro Photography" (Sometimes, the closer the better)
  • "Compact System Cameras Are Here to Stay" (And they might be right for you)
  • "Flash Photography for Event Photographers" (Lots of fun modifiers for this one)

Plus, Lowepro is also behind this project, which means there will always be gear giveaways at my speaking engagements. How cool is that?

My SmugMug Bio

Derrick Story is a professional photographer, writer, teacher and photography evangelist for Lowepro. He has authored several digital media books, including, The Photoshop CS4 Companion for Photographers and The Digital Photography Companion (O'Reilly Media, publisher).

Derrick is a Senior Contributor for Macworld magazine where he writes a digital photography column, and he's a regular presenter on the popular training site, lynda.com.

Online, Derrick has formed a virtual camera club called The Digital Story that's open to all photography enthusiasts. The site features weekly podcasts, daily posts, training videos, and reader-submitted photos.

How to Contact Me

If you interested in having me speak at your SMUG, my contact information is listed on the TDS Members page. I hope to see you soon!


The Digital Story on Facebook -- discussion, outstanding images from the TDS community, and inside information. Join our celebration of great photography!


It's exciting to create an image unlike anything you've shot before. That fresh look can lead to a entirely new type of photography. To help jumpstart that process, here are 5 stimulating projects that you can do at home. Each presents its own unique challenge that will add a new dimension to your work. Also, at the end of the podcast, I talk about my latest experiences at Oracle Arena and the $10,000 shot.

Listen to the Podcast

You can also download the podcast here (30 minutes). Or better yet, subscribe to the podcast in iTunes. You can support this podcast by purchasing the TDS iPhone App for only $2.99 from the Apple App Store.


Enter to Win a Nikon 1 with 10-30mm zoom lens by "Liking" Red River Paper Facebook Fan Page.


Monthly Photo Assignment

Macro is the April 2012 Photo Assignment. You can read more about how to submit on our Member Participation page. Deadline for entry is April 30, 2012.

More Ways to Participate

Want to share photos and talk with other members in our virtual camera club? Check out our Flickr Public Group. And from those images, I choose the TDS Member Photo of the Day.

Podcast Sponsors

Red River Paper -- The $7.99 Sample Kit is back! And with free shipping.

Make Your Photos Sizzle with Color! -- SizzlPix is like High Definition TV for your photography.

Need a New Photo Bag? Check out the Lowepro Specialty Store on The Digital Story and use discount code LP20 to saven 20% at check out.


Technorati Tags:
, , , , ,


The $10,000 Shot

The Golden State Warriors have some of the most entertaining acts during timeouts and halftime. But the best was Saturday night when Ronak Desai, a season ticket holder from Dublin, CA, drained a half court shot to earn himself $10,000.

half_court_shot_winner.jpg Ronak Desai in the black T-shirt celebrating after draining a half court shot for $10 K.

Ronak actually had three shots that evening. The first, from the free throw line for $500, which he missed. The second, from the 3-point line for $2,000, which he made. And the finale, from half court for $10K. As you can see from the official Warriors video, he hit nothing but net. It was clean.

I captured my shot of his celebration with an Olympus PEN E-PM1and the Olympus 40-150mm zoomthat barely got by the bag inspectors because it is right at the 3" long limit.

Overall, a great night of action and entertainment. I've posted more shots from the game on my TDS Flickr page.


The Digital Story on Facebook -- discussion, outstanding images from the TDS community, and inside information. Join our celebration of great photography!


Are Lens Hoods Worth the Price?

I recently paid $39 for an Olympus LH-40B lens hood for the 45mm f/1.8 primethat I use on my PEN cameras. Even though it's one of my favorite lenses, I debated for quite some time before spending the dollars on what's essentially a plastic tube. The question I've asked myself many times is: are these accessories really worth the price tag?

olympus_lens_hood_web.jpg

The best answer I've come up with so far is: "sometimes."

I've shelled out similar payments for accessory hoods for my Canon 85mm f/1.8, 15-85mm zoom, and other heavily used glass. Why? Because for me, the lens hood serves a few purposes.

First, it helps protect the front objective glass from impact. The plastic bayonet mounted hoods will absorb the shock and possibly detach all together from the lens itself. This could save your larger investment. It's also why I don't use cheaper screw mount hoods. They transfer the impact to the lens itself and have less odds of saving your glass.

Second, lens hoods do help control flare. Stray light hitting the front of your lens or multi-coated protection filter will decrease contrast. A good lens hood, especially the longer ones for telephotos, will eliminate or at least help control this negative effect.

And finally, a lens hood is helpful when working in inclement weather. It helps keep rain drops or snow flakes off the front glass.

Do I buy hoods for every lens I own? I don't - especially if they don't reverse for easy storage in my bag. But for my telephotos and heavy use everyday zooms, I take a deep breath and shell out the bucks. In the end, I believe they help me get the most out of, and protect, my investment.


Find great deals at the TDS Photography Store on Amazon.


A slight shift in weight or change in angle can make a big difference in the final portrait. Since many of the subjects we photograph aren't professional models, they look to us to help them pose.

Leah Tall

I just read an article that covers the basic tips that every photographer should have in mind during a portrait session. In 7 Killer Portrait Tips by Dustin Olsen, he illustrates how to position the subject to render more flattering outcomes. It's a good read, and certainly a post you'll want to bookmark.

In this portrait that I captured of model Leah Gerber, she demonstrates a few of these basic reminders. She's angled her torso for a more pleasing body line, and the hands are partially hidden. Her chin is at a good angle. I've softened the light using photo umbrellas on light stand. The strobes themselves are simple Sunpak flashes with a connecting cord that I often use in the studio.

A final tip that I would add is, that once you've covered the basic elements in a portrait, take a few more minutes to play. Try a different angle, experiment with another lens, and change the composition. You have nothing to lose because you already have the "safe" portraits, but lots to gain if you find that magical pose.


twitter.jpg Follow me on Twitter


It's the question many filmmakers want answered: Is the Canon 5D Mark III or Nikon D800 best for high-end movie making? The answer, according to Dan Chung in his detailed comparison titled, Video Shootout: Nikon D800 vs Canon 5D Mark III, is: depends on your priorities.

Live View Switch

Dan cites more image detail with the D800, but better moire control with the 5D Mark III. And for his filmmaking, moire control is more important.

If you are debating these two cameras, you should definitely check out Dan's report. He covers everything that you'd want to know.


The Digital Story on Facebook -- discussion, outstanding images from the TDS community, and inside information. Join our celebration of great photography!


windowbox_cactus.jpg

Like a bear that emerges from hibernation, photographers north of the equator are getting ready to venture outdoors and capture the glory of Spring. The problem is, weather does't always cooperate.

I just read a terrific article on Photo Naturalist titled, A Fun Way To Improve Your Wildflower Photography where author Vic Berardi talks about practicing your close-up technique indoors now to prepare for that next beautiful day outdoors.

I love the idea.

I have a glass window box at the studio that is a terrific stage for plant photography even when the weather is miserable. Vic used a variety of different locations within his house to capture some absolutely beautiful flower shots.

By practicing your technique on potted plants, then reviewing your work on the computer, you can help eliminate unfortunate surprises when working in the field.

Take a look at Vic's article, then consider putting together your own Spring training program.


The Digital Story on Facebook -- discussion, outstanding images from the TDS community, and inside information. Join our celebration of great photography!


I rarely get rid of old equipment if it's still serviceable. A perfect case in point is when I needed a few graduated filters for an assignment. I dug out my Cokin Graduated Neutral Grey Filterand filter holder with adapter ringsdiscovering they work great with my digital camera.

cokin_filter_on_k5.jpg

Yes, you can achieve the same effect in post processing with Lightroom. But on this day, I was more in a pre-processing mood.


The Digital Story on Facebook -- discussion, outstanding images from the TDS community, and inside information. Join our celebration of great photography!


Cropped sensor cameras aren't getting as much attention these days as they should. Recent full frame announcements such as the Canon 5D Mark III and the Nikon D800 have many shooters thinking that it's full frame or bust. Not too fast there cowboy! Cropped sensor cameras such as the Canon 7D, Nikon D7000, and upcoming Olympus OM-D offer many advantages. And I cover five of those benefits in this week's podcast.

Listen to the Podcast

You can also download the podcast here (26 minutes). Or better yet, subscribe to the podcast in iTunes. You can support this podcast by purchasing the TDS iPhone App for only $2.99 from the Apple App Store.

Cropped Sensor Comparison Cropped sensors can provide a more satisfying experience for macro photography. Image on the left captured with a Canon 5D Mark II while the image on the right with a cropped sensor Canon 60D.


Enter to Win a Nikon 1 with 10-30mm zoom lens by "Liking" Red River Paper Facebook Fan Page.


Monthly Photo Assignment

Macro is the April 2012 Photo Assignment. You can read more about how to submit on our Member Participation page. Deadline for entry is April 30, 2012.

More Ways to Participate

Want to share photos and talk with other members in our virtual camera club? Check out our Flickr Public Group. And from those images, I choose the TDS Member Photo of the Day.

Podcast Sponsors

Red River Paper -- The $7.99 Sample Kit is back! And with free shipping.

Make Your Photos Sizzle with Color! -- SizzlPix is like High Definition TV for your photography.

Need a New Photo Bag? Check out the Lowepro Specialty Store on The Digital Story and use discount code LP20 to saven 20% at check out.


Technorati Tags:
, , , , ,


For the Feb. 2012 Photo Assignment, TDS shooters got back to basics and worked with the Rule of Thirds for their compositions. But even within these guidelines, the shots are as unique as the shooters themselves. See for yourself in our gallery, Rule of Thirds. And which one will be the SizzlPix Pick of the Month?

Brandon Doran

Photo by Brandon Doran. "For this shot I wanted to contrast the immensity of the architecture vs. the smallness of a person. It worked out that I could center 3 columns and get the scale I wanted. My vision was to capture a person walking directly in front of the rightmost column so that the person would be in the lower right third of the frame." To see all of the other terrific shots from Feb., visit the Rule of Thirds gallery page.


Participate in This Month's Assignment

The April 2012 assignment is "Macro." Details can be found on the Member Participation page. Deadline is April 30, 2012.

Please follow the instructions carefully for labeling the subject line of the email for your submission. It's easy to lose these in the pile of mail if not labeled correctly. For example, the subject line for this month's assignment should be: "Photo Assignment: April 2012." Also, if you can, please don't strip out the metadata. And feel free to add any IPTC data you wish (These fields in particular: Caption, Credit, Copyright, Byline), I use that for the caption info.

Good luck with your April assignment, and congratulations to all of the fine contributors for February.

SizzlPix Pick of the Month for the Jan. Photo Assignment

Congratulations to Ram Gurung for his Mobile Phone image of NY Times Square. Ram will receive a SizzlPix for his winning image, selected by the good folks at SizzlPix.


twitter.jpg Follow me on Twitter

-


Now Available! The Digital Photography Companion. The official guide for The Digital Story Virtual Camera Club.

  • 25 handy and informative tables for quick reference.
  • Metadata listings for every photo in the book
  • Dedicated chapter on making printing easy.
  • Photo management software guide.
  • Many, many inside tips gleaned from years of experience.
  • Comprehensive (214 pages), yet fits easily in camera bag.

Technorati Tags: , ,