March 2012 Archives

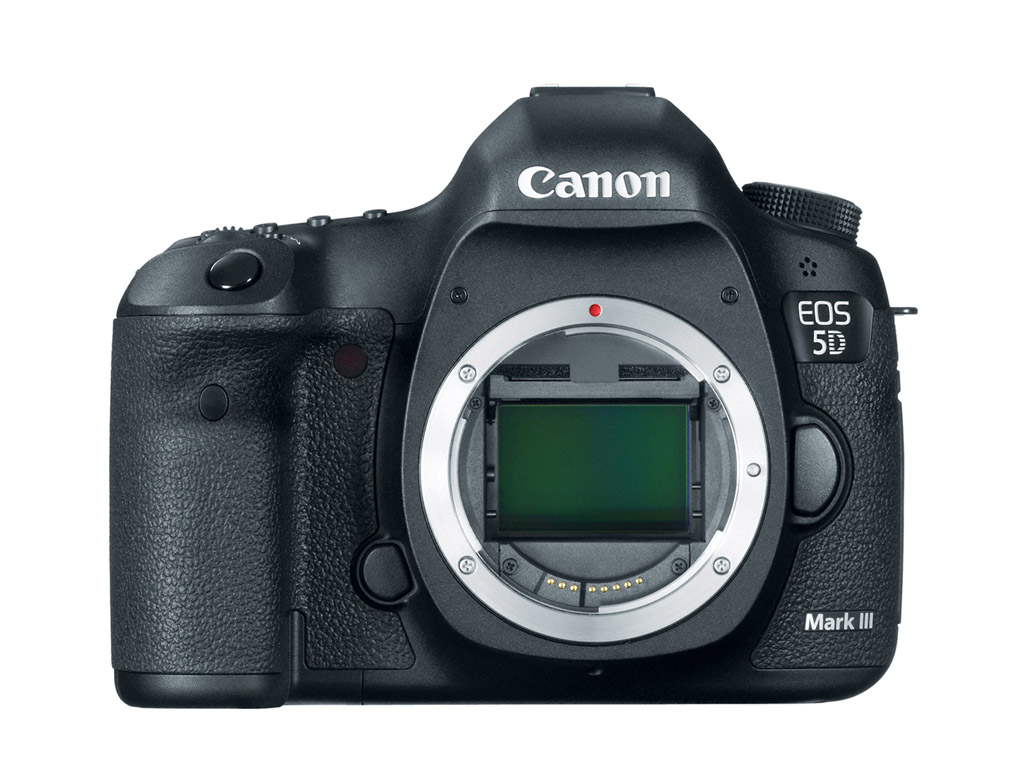
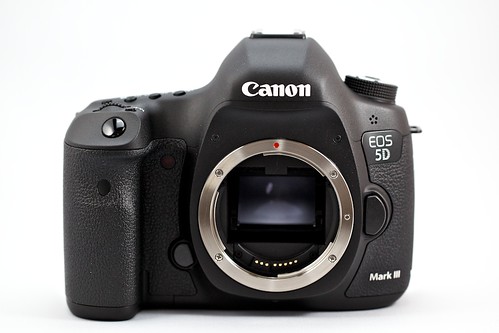
There has been lots of discussion about the changes inside the Canon 5D Mark III, but I've noticed plenty of differences on the outside too. Here are 10 physical changes that caught my eye right away.

Canon 5D Mark III

Repositioned On/Off Switch

On Off Switch

The On/Off switch on the 5D Mark III moves to the upper left beside the mode dial.

Repositioned Menu and Info Buttons

Menu and Info Buttons

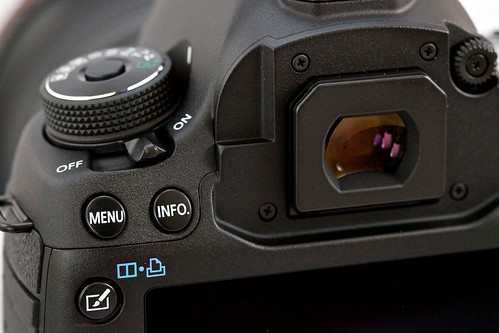
The Menu and Info button are now in the upper left right below the On/Off switch.

Dedicated Magnify Button

New Magnify Button

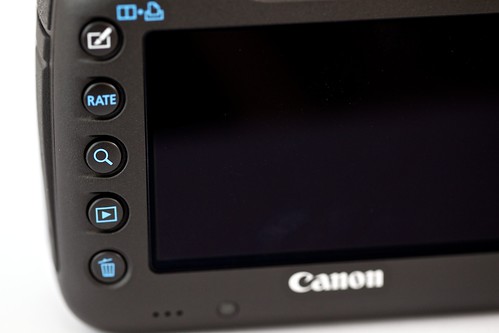
Staying on the left side of the camera, there's now a dedicated zoom button for reviewing your images.

Improved Live View Switch

Live View Switch

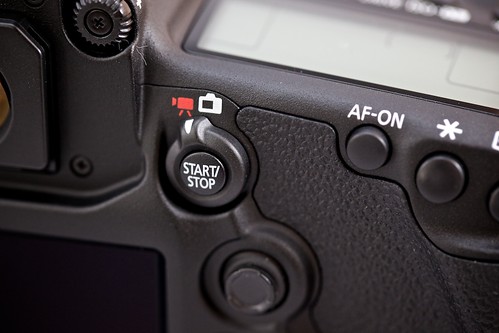
One of the biggest physical improvements is the new Live View switch with a Start/Stop button for movie recording.

Dedicated Q Button

Q Button

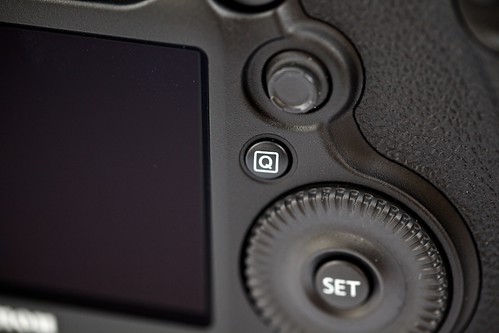
Another nice improvement is the dedicated Q button to the right of the LCD.

Redesigned Lock Switch

Improved Lock Button

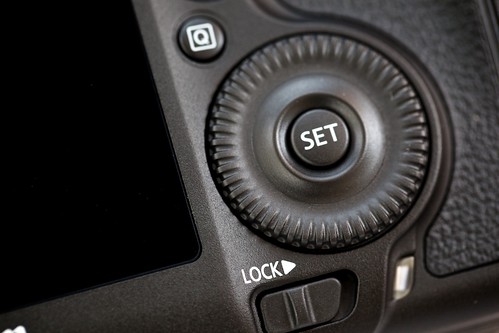
With the 5D Mark III, the Lock switch and the On/Off switch are separated, with the Lock switch by itself at the bottom of the right side.

Dual Memory Card Slots

Dual Memory Card Slots

Love that the 5D Mark III has both CF and SD card slots. The 5D Mark II has only the CF slot. Also in this view, a good look at the improved "thumb grip" channel on the back.

Repositioned Depth of Field Button

Depth of Field Button

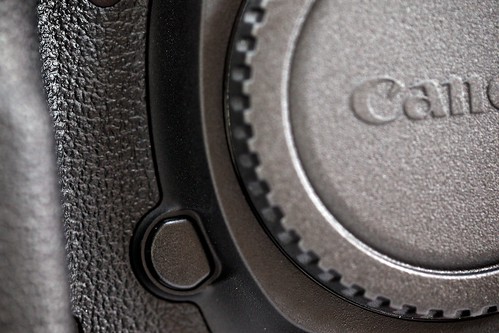
The Depth of Field button has moved to the right side and is easy to activate using the ring finger.

Back Thumb Grip and Shutter Release Button

The last two things that I noticed was there is a very comfortable thumb rest area in the back of the camera. More comfy than the 5D Mark II. Also, the shutter release on the 5D Mark III feels more sensitive than the release on the 5D Mark II, which is stiffer and less sensitive.

Final Thoughts

No question the Canon 5D Mark III is improved under the hood. But I think the physical changes illustrated in this post also contribute to its overall refinement. And that's without revisiting the enhanced menu system. Maybe in another post...

Author's Note

So, did I give in and buy the new 5D Mark III? I did not. A fellow photographer lent it to me for the weekend (nice guy!) And sadly, I have to give it back to him on Monday. Clearly the 5D Mark III is a wonderful machine. But my current Mark II still feels good and will remain my best friend while I watch what happens to Canon pricing and/or the possibility of the 5D X. I'll keep you posted.


The Digital Story on Facebook -- discussion, outstanding images from the TDS community, and inside information. Join our celebration of great photography!


canon_g1x_front.jpg

If I had the disposable income for it, I'd love to try the $799 Canon G1 Xlarge sensor compact. It's handsome on the outside and packs a 14MP 1.5" CMOS sensor on the inside. According to a current review in DP Review, "At high sensitivities the G1 X sets a new benchmark for compact cameras."

But they also caution that this isn't a camera for everyone. The AF is slow, burst rate is 1.9 fps, and the maximum aperture at the telephoto end of the zoom is a sluggish f/5.8. It's not designed to push the photographic envelope, but would be a great camera for the traveler who wants excellent image quality in a relatively compact package.

If you're interested in this camera and want a closer look, read the what DP Review has to say. I think they have a good handle on its pros and cons.

As for me personally, I'm going to wait for the Olympus OM-D release next month. More on that when it's available.


The Digital Story on Facebook -- discussion, outstanding images from the TDS community, and inside information. Join our celebration of great photography!


Basic Poses for Female Portraits

michelle_pose.jpg

In portrait photography, one of the toughest challenges for subject and photographer alike is posing. This is especially true when one or both don't have a lot of experience in this area.

I just found a terrific post on Digital Photography School titled 21 Sample Poses to Get You Started With Photographing Female Subjects. The author presents you with a series of line drawings that illustrate the poses discussed in the article.

Even if you're an experienced shooter, this article could be a useful tool before the session for brainstorming about possible poses. I'd definitely bookmark it.


The Digital Story on Facebook -- discussion, outstanding images from the TDS community, and inside information. Join our celebration of great photography!


Lowepro asked me to shoot a Nimble Photographer movie using their Event Messenger 150 Bag($59 US), which I really like anyway. And since iPhoto for iOS had just been released, it seemed like a great time to make another video.

The setting was old town Petaluma, and there's a fun coffee shop there called The Apple Box Cafe - seemed like a perfect stop for the Nimble Photographer. I shot the scene with the Canon EOS 60Dbecause I can turn its flip-out LCD around to see the composition while filming.

Once set up, I recorded a few minutes of ambient sound to use as a background track. For the dialog however, I opted for voiceover because the coffee shop was a bit too happening for live audio, even with a lapel mic. I pulled all the pieces together using Final Cut Pro X.

The movie storyline is very simple. Packing little more than a digital camera and an iPad 2, I can street shoot, then duck into a coffee shot to edit and upload the images to my online sites. The goal is to show people just how darn easy this is.

Thanks to the good folks at the The Apple Box Cafe for letting me take up a corner of the room for this project. If you're ever in downtown Petaluma (maybe visiting Leo Laporte), be sure to visit and have a coffee or something sweet. And don't forget your iPad.


The Digital Story on Facebook -- discussion, outstanding images from the TDS community, and inside information. Join our celebration of great photography!


Anticipate the Moment

In this week's podcast, I discuss the basic game plan for successful event photography. One of the subtleties during the actual shoot is learning how to anticipate the moment.

anticipate_the_moment.jpg

A toast is a perfect example. The speaker begins to wax about a person or event, and you can feel the anticipation building up to everyone raising their glasses to acknowledge the recipient of praise. At that moment prior to climax, frame your composition, lock in your focus, and have your finger poised on the shutter release. I like to shoot in burst mode so I have variations to choose from in post production.

Beware of being lulled in as a participant. You'll miss the shot. Stay focused, be ready, and have your settings in order. These are the images that please.


The Digital Story on Facebook -- discussion, outstanding images from the TDS community, and inside information. Join our celebration of great photography!


I just finished covering a big 3-day event in Petaluma, CA called the Artisan Cheese Festival. There were so many things going on at once, we needed two other photographers (Rick Roellke and Frank Filice) to help cover all of the action. In this week's episode, I share 5 tips for successful event coverage. Plus, I talk about the event itself, which was a real eye-opener for this "not really a foodie type" of guy.

Listen to the Podcast

You can also download the podcast here (31 minutes). Or better yet, subscribe to the podcast in iTunes. You can support this podcast by purchasing the TDS iPhone App for only $2.99 from the Apple App Store.

In the Pasture In the pasture on a Farm Tour during the Artisan Cheese Festival in Petaluma, CA. Photo by Derrick Story. For more, visit my Artisan Cheese Festival Flicker Gallery.

Monthly Photo Assignment

Eyes is the Mar. 2012 Photo Assignment. You can read more about how to submit on our Member Participation page. Deadline for entry is March 30, 2012.

More Ways to Participate

Want to share photos and talk with other members in our virtual camera club? Check out our Flickr Public Group. And from those images, I choose the TDS Member Photo of the Day.

Podcast Sponsors

Red River Paper -- The $7.99 Sample Kit is back! And with free shipping.

Make Your Photos Sizzle with Color! -- SizzlPix is like High Definition TV for your photography.

Need a New Photo Bag? Check out the Lowepro Specialty Store on The Digital Story and use discount code LP20 to saven 20% at check out.


Technorati Tags:
, , , , ,


Motrr Galileo is raising money through Kickstarter, and it looks to be a promising device. It's an iOS-controlled robotic iPhone platform with infinite spherical rotation capability. Just swipe your finger on the screen of your iPad or other iOS device and Galileo reacts, orienting your iPhone or iPod Touch accordingly.

motrr_galileo.jpg

The applications for iPhone photographers are intriguing. Being able to remotely reposition the iPhone (capable of infinite 360 degrees pan-and-tilt at speeds up to 200 degrees per second in any orientation) during recording or sequence photography opens up a new dimension of imaging possibilities.

For as little as $85, you can become a part of the Kickstarter program for the Galileo, and be one of the first to use it when released to market. To find out more about the project, visit Motrr Galileo Kickstarter page. Personally, I'm signing up for the $95 pledge that will get me a limited edition Galileo in Kickstarter green. (Keep in mind there's always some risk with Kickstarter programs.)


The Digital Story on Facebook -- discussion, outstanding images from the TDS community, and inside information. Join our celebration of great photography!


Photographer Dustin Farrell explains how to combine HDR and timelapse techniques in his post, How to Create an HDR Timelapse. Sounds like a great weekend project to me.

How to HDR Timelapse from Dustin Farrell on Vimeo.


The Digital Story on Facebook -- discussion, outstanding images from the TDS community, and inside information. Join our celebration of great photography!


Pro shooter Dan Patitucci offers plenty of sage advice for travel photographers in his post, Making Respectful Travel Portraits.

Photo by Patitucci Photo

Among the many points Dan makes, he includes, "The ugly photographers, jostling for position, elbowing others out of the way and rudely shoving a lens in someones face have it all wrong, as much for themselves as anyone. Seeing an image but missing it is okay. I'd love to have that shot of the little girl, and hundreds others like it, but they weren't to be. The memory is even more valuable, so much so that sometimes I put the camera away just to witness something."

Good food for thought here from a professional with lots of experience.


The Digital Story on Facebook -- discussion, outstanding images from the TDS community, and inside information. Join our celebration of great photography!


When you want to take a break from taking pictures and texting friends with your iPhone, consider using it to control the iHome iD50 App-enhanced Bluetooth Dual Alarm Stereo Clock Radio. I've been testing one, and I don't think I've ever had this much fun with a clock radio before.

iHome iD50 Clock Radio

The truth is, I generally despise these devices. What I mean is, I like the idea of a clock radio. But the user interface is usually so awful that I give up trying to configure the unit after a few minutes. iHome solved this problem by creating the iHome Set app for iOS devices. Despite some user reviews on the App Store saying it doesn't work for their particular model (which I don't know since I haven't tested it with other versions), it works great with the iD50.

iHome Set Top Screen

You can use the app by docking the iPhone to the clock radio via the connector atop the unit. But it's far more fun to use Bluetooth for communication. Make sure Bluetooth is enabled on the iPhone, then hold down the "EQ/Pairing" button on top of the iD50. Choose "add new Bluetooth device" on your iPhone, and they should pair without incident. From this point on, you're in remote control mode.

If I want to listen to Internet radio, then all I have to do is launch Pandora, and choose "iHome iD50" from the share menu. I can stay in the same Bluetooth mode and play selections from my Music App. Radio functions are also easy to enable from the iOS Set App. And the best part is that the station presets are much more fun to set via the iPhone than on the device itself.

iHome Set Screen 2

Music isn't the only thing you can control. These functions are also available via iHome Set for the iD50:

  • Power On/Off
  • Mode (iPod, FM, AM, Bluetooth, AUX)
  • Radio Tuner (including setting and controlling up to 6 presets each for AM and FM)
  • Volume
  • Alarm 1 and Alarm 2
  • Snooze Duration
  • Nap Alarm
  • Sleep Timer
  • Treble, Bass, and SRS WOW
  • Clock Brightness
  • 24 Hour On/Off
  • Time Set
  • Calendar Set
  • Time Sync
  • Search for Updates

Sound Quality

Clearly the functionality and geek factor is outstanding with the iD50, but how does it sound? Well, iHome included Reson8 speaker chambers, SRS WOW digital processing, and treble and bass controls into the iD50. These are features that you usually don't see on a clock radio. And if you play it like you would your old Sony single speaker unit, you'll miss out. I pushed the treble up to 3 out of 5, bass to 4 out of 5, volume up to 80 percent with SRS WOW on, and the iD50 sounded pretty darn good. This is definitely a "play it loud" clock radio. At lower volume levels it sounds like many other portable units. So kick everyone out of the bedroom and crank it up.

Gotchas

As much as I like the Bluetooth connectivity, it can be finicky at times. I found the best solution is to turn off Bluetooth on the iPhone, then turn it back on. This seemed to solve the problem.

On top of the iD50 itself are a number of physical buttons that can be used to set alarms, choose station presets, etc. I recommend that you don't use most of them. The basic buttons are fine (power, volume, pairing), but for much else, use your iOS device, or that old clock radio feeling may return.

If you're connected via Bluetooth, the unit may beep a few times when you walk out of range. Others left behind in the area may wonder what's going on. You can prevent this by turning off Bluetooth on your iPhone before departing.

Also, since this is a geek-friendly unit, it would have been nice if iHome had made this an RDS-capable receiver so the artist and song title would display on the LCD for stations that are transmitting that information. Seems like a missed opportunity there.

Bottom Line

$169 is a lot to pay for a clock radio. But the iD50 is more than that. Practically speaking, it's a charger for the iPhone and iPad, an alarm clock, AM/FM radio, stereo player for your iTunes music, speaker phone... and it looks pretty good too. But in use, the iD50 feels like more than the sum of its parts. It's one device that can change a room. And the iPhone app certainly elevates this unit to geek toy level.

If it turns out to be a bit too much machine for the bedroom, possibly failing spousal approval, then take it to the office, or nearest man cave, close the door, and crank it up.

I like it.

More Audio on The Digital Story

Bongiovi DPS for iOS - Audio Magic

iHome iW1 Wireless AirPlay Speaker System Review

Review of the Rode VideoMic Pro Compact Shotgun Microphone

"Sound as Good as You Look" - Digital Photography Podcast 261


The Digital Story on Facebook -- discussion, outstanding images from the TDS community, and inside information. Join our celebration of great photography!


The evening of Monday, March 20, 2012 began lighthearted enough. I had a beer in one hand and a bobble head in the other. We were at Oracle Arena in Oakland, CA to honor one of the Bay Area's best basketball players ever: Chris Mullin.

Chris Mullin Honored Chris Mullin thanking the crowd for honoring his career at Oracle Arena.

But the atmosphere changed. Poor play by the Warriors in the first half managed to put the crowd in a bad mood. Many were already upset because management had just traded Monta Ellis, the team's current star. All of these emotions surfaced near the end of the halftime ceremony honoring Mullin when the Warriors owner, Joe Lacob, took the microphone to speak.

In the darkened arena, thousands of fans booed him and persisted doing so even as Mullin came to his rescue. It was a moment that had our group looking at each other in amazement. "Is this really happening?"

As always, Chris Mullin conducted himself with poise and class. That's one of the many reasons he's in the Hall of Fame, and 20,000 others attending that evening are not.


The Digital Story on Facebook -- discussion, outstanding images from the TDS community, and inside information. Join our celebration of great photography!


Working efficiently in Aperture or Lightroom allows you to spend more time being creative and less fooling around with medicore shots. In this week's podcast, I cover the 5 basic workflow steps: Intelligent Import, 2-Pass Sort, Isolate Your Best, Edit to Perfection, and Share Your Work.

This the same approach I teach in my Aperture 3 Essential Training on lynda.com and in the TDS Aperture Workshops.

Listen to the Podcast

You can also download the podcast here (31 minutes). Or better yet, subscribe to the podcast in iTunes. You can support this podcast by purchasing the TDS iPhone App for only $2.99 from the Apple App Store.

Monthly Photo Assignment

Eyes is the Mar. 2012 Photo Assignment. You can read more about how to submit on our Member Participation page. Deadline for entry is March 30, 2012.

More Ways to Participate

Want to share photos and talk with other members in our virtual camera club? Check out our Flickr Public Group. And from those images, I choose the TDS Member Photo of the Day.

Podcast Sponsors

Red River Paper -- The $7.99 Sample Kit is back! And with free shipping.

Make Your Photos Sizzle with Color! -- SizzlPix is like High Definition TV for your photography.

Need a New Photo Bag? Check out the Lowepro Specialty Store on The Digital Story and use discount code LP20 to saven 20% at check out.


Technorati Tags:
, , , , ,


Remote Release for Your iPhone

Small enough to fit in your pocket, but adds big capability to your iPhone photography, the iPhone Shutter Remote is great for group shots, time-lapse, and long exposures.


Buy the The iPhone Shutter Remote at the Photojojo Store!

They are available now for $40.

I was intrigued by a new free photo sharing service called Blinq. In essence, it facilitates seamless image sharing among your computers and iOS devices, even to the point of being able to tap your iPhoto or Aperture library from an iPad or iPhone. Then, beyond that, you can share selected images with friends and via social networking.

Blinq on iPad

This type of widespread capability usually makes me a bit nervous at first, even if I like the flexibility. But after just a short bit of testing with my Mac, iPhone 4S, and iPad 2, Blinq seems more like a smart facilitator rather than a "grab your stuff" service. The images live on your devices, not their servers.

When you share stuff from an iOS device, a folder is created in your Mac's Pictures folder titled Blinq, and the images are placed inside via dated folders. I made an alias of the Blinq folder and placed it on my Desktop for easy access.

The files are compressed during transfer. The screenshot I used for this article originated on the iPad. If I were to email it to my Mac via the Photos app (the old fashioned way), it arrives as a 1.2 MB PNG file. Sharing the same photo with my Mac via Blinq, it arrives as a 215 MB JPG. Both images look about the same, side by side, even at increased magnification.

If you want to tap your iPhoto or Aperture library via an iOS device, Blinq handles that well, as long as you're using a default library name. If you create custom Aperture Libraries, as I do, Blinq can't see them.

Overall, this service and its apps seems useful for photographers with multiple devices, including Windows machines. They have apps for both platforms. I'll keep testing and keep you posted.


The Digital Story on Facebook -- discussion, outstanding images from the TDS community, and inside information. Join our celebration of great photography!


"Awareness" - Grab Shot 219

awareness_grab_shot.jpg

TDS member Brandt Ryan talks about the tip, "always look behind you," and how it led to this photo he captured.

"Not long ago I was in San Francisco (first time) and was trying to get some good shots of the Golden Gate during and after sunrise. I had my tripod and composition setup and had been going at it for much of the morning.

"As fate would have it, I remembered a tip from Martin Bailey about periodically checking behind you, particularly when you have been shooting a setup shot (Golden Gate). For whatever reason, this tip popped into my mind. So I turned around, brought the camera to my eye and noticed the road was a nice S type curve, and that a cyclist was racing down it, completely focused and aware of his "line".

" I quickly set camera to Tv mode (shutter priority), flicked the dial somewhere past 1/500th of a sec and snapped 3 bracketed shots, which had been the setting I was using for the bridge and didn't have time to change. I ended up with 3 images--this one being the last. The previous two show the cyclist about one bike length back from the one before.

"I like the shot--but I really like the fact that I had the awareness to turn around and check out what was happening behind me. The title of the shot, "Awareness," speaks for itself, I think, especially when one reads the story behind the photo :) Cheers to Martin Bailey for the tip, and thanks to you Derrick for a wonderful podcast."

This is our 219th Grab Shot! Wow. If you want to review the collection that began back in 2006, go to our Grab Shots page.

If you have a candid you'd like to share, take a look at our Submissions page, then send us your Grab Shot. We'll try to get it published for you on The Digital Story.

And you can view more images from our virtual camera club in the Member Photo Gallery.


The Digital Story Podcast App is the best way to stream or download weekly TDS podcast episodes. No more syncing your iPhone, iPod Touch, iPad, or even your Android phone just to get a podcast. And the best part is, The Digital Story Podcast App is your way to help support this show. Download it today!


twitter.jpg Follow me on Twitter


iPod mini

Here's a crazy idea for a nimble studio set up: two iPads running Photo Soft Box to illuminate your subject, then take the picture with an iPhone 4S using Camera Awesome. For the finishing touch, open the image in iPhoto for iOS to crop and remove the location data. Now all that's left to do is upload the image from iPhoto to Flickr.

Sounds like a lot of fooling around, doesn't it? But take a look at the picture. Not bad. I know the iPhone isn't a 5D Mark III, but it does OK in a pinch.

I created the whole set up on a shelf in a closet. First, I set the iPod mini on a black iPad case. I then placed one iPad running Photo Soft Box on the left, and another on the right. I moved things around here and there until I got the look I wanted. Since you can set the color temperature in Photo Soft Box, I chose 5500K so I wouldn't have to do any white balance correction later.

photo_soft_box_ipad.jpg The Photo Soft Box interface running on an iPad. Once you tap the settings you want, double-tap the screen to turn the entire iPad display into a soft box.

After I captured the image with the iPhone, I opened it in iPhoto for iOS for cropping and to remove the location data before sending it up to Flickr.

So, two soft box lights ($2.99 for the app) and the iPhone 4S for my ultra nimble studio set up on the go. If I were just using these tools for this, you could say that it's a rather pricy portable studio. But obviously I use the iPad and iPhone for a million other tasks. Well, now make it a million and one.


The Digital Story on Facebook -- discussion, outstanding images from the TDS community, and inside information. Join our celebration of great photography!


When Apple announced the new iPad, many of us got what we had hoped for: a new Retina display, more horsepower under the hood, and 4G connectivity. What we didn't expect was a "built from the ground up" iPhoto app that runs on both iPad 2 and the new iPad. In many ways, iPhoto fills a gap in the nimble photographer workflow. In this week's podcast, I cover the new iPad, then dig into iPhoto to explain its capabilities and how it can help shooters on the go.

Listen to the Podcast

You can also download the podcast here (34 minutes). Or better yet, subscribe to the podcast in iTunes. You can support this podcast by purchasing the TDS iPhone App for only $2.99 from the Apple App Store.

Beaming in iPhoto

Monthly Photo Assignment

Eyes is the Mar. 2012 Photo Assignment. You can read more about how to submit on our Member Participation page. Deadline for entry is March 30, 2012.

More Ways to Participate

Want to share photos and talk with other members in our virtual camera club? Check out our Flickr Public Group. And from those images, I choose the TDS Member Photo of the Day.

Podcast Sponsors

Red River Paper -- The $7.99 Sample Kit is back! And with free shipping.

Make Your Photos Sizzle with Color! -- SizzlPix is like High Definition TV for your photography.

Need a New Photo Bag? Check out the Lowepro Specialty Store on The Digital Story and use discount code LP20 to saven 20% at check out.


Technorati Tags:
, , , , ,


canon_600ex_flash.jpg

I enjoyed reading Sly Arena's first impressions of Canon's New Speedlite 600EX-RT & Speedlite Transmitter ST-E3-RT. But then I calculated the costs. The 600EX-RT flash can be preordered for $629 from B&H, plus the Speedlite Transmitter ST-E3-RT will run you another $319. Add shipping and the tax we're supposed to pay at the end of the year, and you have a $1,000 flash and trigger system.

As David Hobby wrote on his Strobist site: "Official price for the Canon 600EX-RT speedlite was set at: 1 Paul Buff 640WS Einstein + 8" hi-output reflector + 2-grid set + 64" soft silver PLM + 64" diffusion fabric."

I think that sums it up.


The Digital Story on Facebook -- discussion, outstanding images from the TDS community, and inside information. Join our celebration of great photography!


Working with Negative Spaces

A negative space, such as my shadow against this yellow wall, can help you create strong graphical compositions.

Yellow Wall

Elements to watch for include strong, directional light, color, and texture. Play with different compositions, both when shooting, but also later in post production. These types of shots can make interesting prints, as well a cover art. They often have an iconic feel to them. Certainly worth keeping in your bag of tricks.


The Digital Story on Facebook -- discussion, outstanding images from the TDS community, and inside information. Join our celebration of great photography!


Lightroom 4 Pros and Cons

Lightroom Develop Module

Macworld Magazine today published my full review of Lightroom 4, which is now available for $149. Here are my pros and cons from that article.

Pros

  • Develop module has improved organization and functionality
  • Additional brushing tools
  • New soft proofing capability
  • New video management tools
  • New Map module includes reverse geotagging
  • New Book module with Blurb integration and PDF output
  • New DNG conversion options
  • Email capability for sending photos from within the application
  • Lower price compared to previous versions

Cons

  • Can't stitch video snippets together
  • No Mac Address Book integration for email

As you can see, the pros definitely outweigh the cons with this latest release. It's a good value for the dollar.


The Digital Story on Facebook -- discussion, outstanding images from the TDS community, and inside information. Join our celebration of great photography!


You can tell that Apple worked hard to bring iPhoto to the iPad. It's designed from the ground up, and is a joy to use. To help you get started, here are a few tips.

iPhoto for iPad

Use the Help Button

We often shy away from Help because it takes us out of the app and usually down a rabbit hole. But the Help for iPhoto is much better. On any given screen, tap the Question Mark in the upper left corner, and you'll get labels for all of the tools on that screen. Use this frequently in the beginning, and you'll get comfortable with the app much faster.

Get a Stylus

I love that you don't need a stylus to work on an iPad. But iPhoto is one of those apps where you'll enjoy having one. Working with the brushes is a great example. You can lighten, darken, sharpen, and do just about anything else with great precision. Using a stylus is not only more accurate, it's fun. And you can get them for just a few bucks.

iPhoto Brushes

Load it on Your iPhone

I don't think I've heard the phrase, "Beam that to me" since the Palm Pilot days. But it's back. And if you have iPhoto loaded on another iOS device, you can "beam" photos back and forth to their libraries.

I prefer to work on images on the iPad where I have more real estate, but then I do want some of them on my iPhone 4S for immediate sharing with others, since I always have my iPhone in my pocket.

To beam, just go to the Share menu and choose Beam.

Beam Photo

Save to Camera Roll

Once you've edited a photo and decide you really like it, save it to your Camera Roll (once again using the Share menu). Your Camera Roll is the image database for your iPad that allows other applications to access those pictures. If you save important shots to Camera Roll right away, they will be available to you in Keynote, Pages, etc. You'll be glad you did this when you're jamming to finish a presentation.

Create a Journal

This is an innovative way to share a collection of images with others. Instead of sending an email attachment with a dozen photos, create and publish a journal.

I began by flagging a handful of images that will be part of my journal. Then go to the Share menu, and choose Journal. One of the options will be your Flagged photos. You can then choose a design and add all sorts of goodies, such as quotes, map, etc.

Once you've finished, go to Share and choose iCloud. iPhoto will store your journal there, and give you the options to email mail it (Tell a Friend) or view it in Safari. The recipient gets a beautiful overview page, and then can enjoy each photo individually.

Here's a basic Sample Journal that you can view.

Final Thoughts

iPhoto for iPad works great on iPad 2, and it should be even more beautiful on iPad 3. Make sure you upgrade to iOS 5.1 before purchasing. It's available in the App Store for $4.99.


The Digital Story on Facebook -- discussion, outstanding images from the TDS community, and inside information. Join our celebration of great photography!


Working with off-camera flash doesn't have to be expensive. Yes, we see wireless flash systems that cost $1,000 and up, but you don't need those for professional results.

off-camera-flash-ashley Photographers Ed Shields and Ernesto Pono work with model Ashley Tuttle during the TDS Off-Camera Flash workshop.

During the recent TDS Off-Camera Flash Workshop, I showed participants how to put their old flash units to works using affordable gear such as the triple shoe adapter and a soft box. You'd be surprised how often you don't need automated flash. In a home studio, for example, all you have to do is figure out the aperture setting for a flash set in manual mode. That usually takes about 3 shots. Once you see what you like on the LCD, you're set.

I'm using my old Sunpak 283 flashes that have manual output settings, such as full, half, one quarter, etc. By putting one or two of these on a triple shoe in a soft box, I can lower their output to one-half, still get the light I need, but enjoy faster recycling times.

If we add a hair light or background light, we don't have to worry about those messing up the ETTL flash readings - because we're in manual mode. To tell you the truth, there are many situations where manual flash is actually easier.

The next TDS workshop is on Close Up Photography on April 21 and 22 in Santa Rosa, CA. I have lots of creative techniques to share for lighting and composition. You can get more information by using the Send Me Info box on the workshops page.

Also, don't forget about my lynda.com online training, Off-Camera Flash. I provide an overview of the basic gear and techniques that will help you get professional results, even on a hobbyist's budget.


The Digital Story on Facebook -- discussion, outstanding images from the TDS community, and inside information. Join our celebration of great photography!


There's plenty to play with in Adobe Photoshop Lightroom 4with new features such as the book layout tool, video management, and geotagging. But the things I like best about this release are more subtle.

lightroom4_recovery.jpg

At the top of the list is the overhaul of the Basic panel in the Develop Module. Image editing has always been a strength of Lightoom, and they've improved both the usability and the technology under the hood for this release. Making your pictures look great is easier than ever.

A really cool addition is the option to add lossy compression to DNG conversion. The image degradation is virtually unnoticeable, but the file savings are substantial. So if you have 30 shots of a wide receiver catching a football, you can compress the 27 that aren't the picks, and still keep them in your catalog.

Soft proofing is a handy tool to have when you need it. Sometimes I prefer the wilder approach to my printing and don't need soft proofing. But for those jobs where I do have to precisely manage color, it's good to have.

And believe it or not, I'm very happy about the email integration. Seems like we should have had that long time ago. Regardless, it's well implemented, and we have it now.

And finally, I love the price reduction. $149 for full copy; $79 for an upgrade. That is a lot of software for the money.

Just in case you're wondering what I'm not as crazy about... Well, I don't think the video features are fully baked (cannot attach snippets together!) and the Map module seems a little basic. But what the heck. I'm not thinking Lightroom for video anyway.

Overall, I give Lightroom 4 a big thumbs up. Good tools and great value.


The Digital Story on Facebook -- discussion, outstanding images from the TDS community, and inside information. Join our celebration of great photography!


Over the last decade, digital photography hardware has evolved at a fast pace. This led to us buying cameras more frequently than in the film days. But now that the technology has stabilized a bit, do we need to upgrade as often? And camera manufacturers seem keen on charging more than ever for their gear. This came into focus for me when Canon announced that the Canon 5D Mark III would cost $1,000 more than its predecessor. And it got me thinking, "How much am I willing to pay?" I provide the answer in this week's podcast.

Listen to the Podcast

You can also download the podcast here (24 minutes). Or better yet, subscribe to the podcast in iTunes. You can support this podcast by purchasing the TDS iPhone App for only $2.99 from the Apple App Store.

Monthly Photo Assignment

Eyes is the Mar. 2012 Photo Assignment. You can read more about how to submit on our Member Participation page. Deadline for entry is March 30, 2012.

More Ways to Participate

Want to share photos and talk with other members in our virtual camera club? Check out our Flickr Public Group. And from those images, I choose the TDS Member Photo of the Day.

Podcast Sponsors

Red River Paper -- The $7.99 Sample Kit is back! And with free shipping.

You might also want to check out my article, Artistic Gifts You Can Make in an Hour.

Make Your Photos Sizzle with Color! -- SizzlPix is like High Definition TV for your photography.

Need a New Photo Bag? Check out the Lowepro Specialty Store on The Digital Story and use discount code LP20 to saven 20% at check out.


Technorati Tags:
, , , , ,


Camera Awesome

It's rare when all of the hosts on TWiP agree on anything, but we all wanted to choose Camera Awesome as our pick of the week last week. Why? In short, if you have an iPhone 4/4S, this app brings it very close to being a great compact camera.

Camera Awesome (by the cool folks at SmugMug) has three basic modes: shooting, editing, and sharing. In shooting mode you have a number of helpful controls including burst rate, IS, self timer, interval timer, level adjustment, grid lines, and more.

One of its best tricks is allowing you to focus and expose on different parts of the composition. For example, when in Single Shot mode, tap the frame and you'll see a blue circle inside a green box. You can move this anywhere around on the frame and the camera will focus and expose based on where you place the target.

Now, pinch open on the target, and you can separate the "blue circle expose" from the "green box focus" and work with those points independently. If you decide you want to return to something more simple, click on the triangle pop up menu, and choose Big Button. Now you just have to tap the screen to take a picture. Want to go back? Chose Single Shot and get the focus/exposure target.

When it's time to edit, tap on the photo box in the lower left corner. Click on the Magic Wand icon and start with the "Awesomize" filter. In most cases, that's all you'll need. But there are tons of other editing controls included. And if you need more, Camera Awesome offers "in-app" purchases for additional tools.

Now, it's time to share your image with the world. You'd think that SmugMug would be the only option. It's not. You can set up Facebook, Twitter, Flickr, Picasa, Photobucket, Email, and of course, SmugMug. Hats off guys!

There are plenty of other features too, that I don't have time for here, that you should explore once you download the app.

Camera Awesome is available in the App Store for free. Even if you go crazy with the in-app purchases, you'll still only spend a couple bucks. I've replaced my Apple Camera app with Camera Awesome on my home page. The only thing I wish it could do is become my default camera when I double-push the home button. I guess Apple would have something to say about that.

Canon 5D Mark III - Not Now

canon_5d_mark3.jpg

Good news! Canon releases the 5D Mark III. Bad news: Price tag is $3,500 here in the US. That's $1,000 more than I paid for my 5D Mark II. Seriously?

So what do I get for that additional $1,000? 61-point autofocus, 6 fps, DIGIC 5 processor, and better weather sealing. Yes, yes, I know about better high-ISO performance and those other under-the-hood refinements. But I expect those when it's been 3 years since the camera has been updated.

Don't get me wrong. I think the specs for the 5D Mark III look great. It will probably be one of the best DSLRs on the market. I would have been willing to pay $2,999 for it (but with some grumbling). But $3,500 in this economy where photographers are doing our best to keep business afloat, is too high.

So instead, I'm gong to send my 5D Mark II in for a cleaning. Because for now, it will remain my go-to camera for assignments.


The Digital Story on Facebook -- discussion, outstanding images from the TDS community, and inside information. Join our celebration of great photography!


For the Jan. 2012 Photo Assignment, TDS shooters put their callers on hold and snapped photos with their camera phones. You can view a wide variety of on-the-go imagry in our gallery, Mobile Phone. It's a glimpse of the world as it passes by. And which one will be the SizzlPix Pick of the Month?

Bernie Anderson Mobile Phone

Photo by Bernie Anderson. "This is a building across from one of the schools I teach at. Not very welcoming, I'd say..." Bernie captured this wonderful image with his iPhone 4, then color corrected in Aperture 3. To see all of the other terrific shots from Jan., visit the Mobile Phone gallery page.


Participate in This Month's Assignment

The March 2012 assignment is "Eyes." Details can be found on the Member Participation page. Deadline is Mar. 30, 2012.

Please follow the instructions carefully for labeling the subject line of the email for your submission. It's easy to lose these in the pile of mail if not labeled correctly. For example, the subject line for this month's assignment should be: "Photo Assignment: March 2012." Also, if you can, please don't strip out the metadata. And feel free to add any IPTC data you wish (These fields in particular: Caption, Credit, Copyright, Byline), I use that for the caption info.

Good luck with your March assignment, and congratulations to all of the fine contributors for January.

SizzlPix Pick of the Month for the Dec. Photo Assignment

Congratulations to Michael DeBuhr for his image titled, Brothers. Michael will receive a SizzlPix for his winning image, selected by the good folks at SizzlPix.


twitter.jpg Follow me on Twitter

-


Now Available! The Digital Photography Companion. The official guide for The Digital Story Virtual Camera Club.

  • 25 handy and informative tables for quick reference.
  • Metadata listings for every photo in the book
  • Dedicated chapter on making printing easy.
  • Photo management software guide.
  • Many, many inside tips gleaned from years of experience.
  • Comprehensive (214 pages), yet fits easily in camera bag.

Technorati Tags: , ,