Recently in Outdoor Life

BioLite Wood Burning Campstove and Charger

red-hot-and-charging.jpg

The BioLite Wood Burning Campstove ($129) is a marvel of technology and simplicity. The device initially seems basic. You gather a bundle of sticks, put them in the handsome fuel chamber, light with a match, and boil your water.

But there is plenty of magic under the hood to produce an intensely hot flame without smoke. The key is the power module that attaches to the side of the fuel chamber. The module can convert heat to electricity for powering a fan that intensifies the fire and produces surplus juice that is accessible via its USB port.

Essentially, you can brew your morning coffee and top off your iPhone, using only a pile of sticks gathered from your surroundings.

breakfast-cooking.jpg

In my test, using only a moderate amount of fuel, I was able to boil 1 quart of water in 20 minutes. If you pack the fuel chamber with tinder, you can cut that time in half. Also, the hotter the fire the more surplus electricity generated. I added an 8 percent charge to the iPhone in 30 minutes with a moderate fire. Surplus electricity was being generated for only about 10 minutes of that cooking session. If I increased the fire, then I could charge my mobile device at a faster rate.

The BioLite stove is a shade over 8" tall and weighs 2.1 pounds. It's a reasonable size for backpacking, especially considering that you don't have to carry fuel cylinders too. The USB charging port allows for on-demand electricity. You don't have to wait for the sun to shine. If you need to power a small device, build a fire. I'm using it in conjunction with my WakaWaka USB Solar Charger ($69) to provide multiple options for managing my devices.

BioLite-Stove-with-pot.jpg BioLite stove with my trusty enamel coffee pot. But you can purchase a companion high-tech cooking kettle that's more efficient. Photos by Derrick Story.

BioLite makes some nice accessories, including the BioLite KettlePot for efficient water heating and the Portable Grill Attachment ($59) for cooking your burgers.

Initially, I considered the BioLite stove more of a novelty than a serious cooking device. But after use, I've changed my view. If your primary goal is to boil water for backpacking meals, coffee, and purification, then this device is all you need. And the fact that it provides electricity for devices, and is fun to use, is a sizable bonus.

For more articles on outdoor gear and technique, take a look at our Outdoor Life Roundup.

Want to Comment on this Post?

You can share your thoughts at the TDS Facebook page, where I'll post this story for discussion.

Clown Fish

Editor's Note: The following article and photos are by Dennis Adams, co-author of Step Zero: Getting Started on a SCUBA Photo Trip. Dennis is a TDS listener and wanted to contribute his expertise to our Outdoor Life section.

Considering the Canon S90 for UW Photography

I have been a world traveler and Under Water (UW) for many years. While I travel with a large, heavy, very capable DSLR that is enclosed in an UW housing and supported by two large UW strobes to illuminate the dark UW subjects, I also travel with a small P&S with an UW housing. The P&S serves as a walk around camera and a backup UW camera.

Your praise of the Canon S90 sparked my interest, as my current P&S is getting close to 7 years old and newer cameras have much more capability. In addition to your review of the S90, I researched and discovered that there are several manufactures producing UW housings for the S90.

I wanted an UW housing that was of proven durability, repairable, flexible, and lightweight. I tend to use my equipment for many years and only upgrade when there is a substantial performance improvement. Using antique equipment does not bother me as long as it does what is needed.
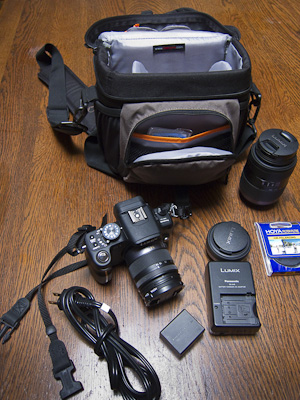
Equipment

I found an excellent review of UW P&Ss at Backscatter.com. I selected the S90 because:

  • It is physically small
  • Has excellent photographic performance and from a world class photo company
  • Will produce RAW image files
  • There are several UW housings to choose from

The S90 has with three excellent housings available:

  • Canon housing $
  • Ikelite housing $$
  • Fisheye aluminum housing $$$$
  • I selected the Ikelite housing because of their excellent demonstrated performance across all their products and world class factory repair support. A wide angle lens may be attached or removed from the housing while underwater. Other manufactures also produce a more capable macro lens for UW use (than what is included with the S90).

    Sea Fan

    I was upgrading my 15 year old strobes to the new Sea & Sea YS-110a, which will connect to my camera via the usual electrical sync cord, or the newer fiber optic sync cord. I connected the camera end of the fiber optic sync cord for these new strobes to a small, home fabricated, plastic bracket held in place on the outside of the housing over the S90 flash with black electrical tape. This held the fiber optic cables in place so the camera flash would travel though them to the optical sync ports on my larger external flashes. The black tape also blocked any light from the camera flash going straight forward and causing backscatter from the particulates in the water. All strobes could then be easily connected either to the new housed S90, or my old housed DSLR with my Ultra Light Control System (ULCS) arms and handles.

    Performance

    The S90 fits snugly into the small Ikelite housing, and all camera controls are accessible by pushing housing buttons, twisting knobs or gear driven rings. I have operated my UW cameras in the manual mode for the past 30 years, and the S90 was no exception. With the camera set to manual mode:

    • The ISO set to 100 (I wanted max quality)
    • The flash set to forced-on and output power set to "minimum" (this low setting saved S90 battery power and still provided sufficient flash power to travel through the fiber optic cables to trigger the optical sync sensor on my external strobes)
    • The aperture setting was controlled via the twist knob on the front of the housing, (the aperture setting and strobe output power determine the subject illumination in UW photography)
    • The shutter speed was set to 1/60, 1/125 or 1/500 via the buttons on the back of the housing to obtain he desired background sea color of nice ocean blue or dark black. (the shutter speed setting determines the background color in UW photography)
    • The focus was set to auto and spot.
    • The image format was set to RAW only.

    (I have not yet tried the video mode UW as I don't have UW video light to bring out the colors, but I may try natural light video in the future)

    With these control settings, I was properly configured and was able to obtain proper subject and background exposure by adjusting camera controls and/or the output power of the external strobes. The S90 performed extremely well. The photos were in focus, properly illuminated, the background as desired and the image quality fully acceptable.

    The Macro camera function enabled me to record small fish and the wide angle UW attached lens enabled me to photograph large subjects while I was very close (being close UW eliminates most the floating gunk between your camera and the subject). While S90 does not have the rapid sequential photo, high focusing speed, or flexibility of my housed DSLR, I was able to take excellent photos with normal P&S planning.

    I recommend without reservation that you or others purchase an UW housing for your S90 so you too may enjoy its UW performance. Which housing you choose will depend on your desired usage and how much you wish to spend.

    Thanks Dennis for that excellent review. I am now inspired to get a housing for my S90! As I mentioned at the top of the article, Dennis Adams is co-author of Step Zero: Getting Started on a SCUBA Photo Trip.
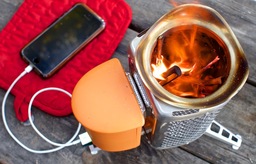
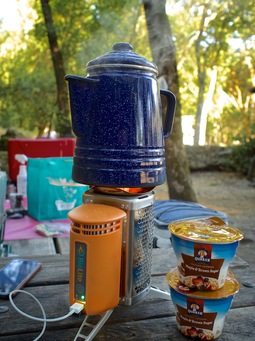
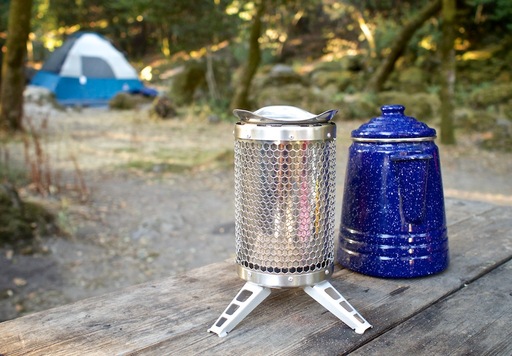
    A good night's sleep is just as important on location as at home. Regardless if you're camping outdoors or crashing on a friend's living room floor, the REI Self Inflating Camp Bed is so comfortable that you'll forget you're on the road.

    REI Camp Bed

    Self-inflating truly works. No pumps or compressors are required. Simply unroll the mat, open both air valves, and watch as the mattress expands to over 3" in thickness. It seems like magic. But it works thanks to the foam inside the 150-denier polyester shell expanding and drawing in air. And unless you need a very firm sleeping surface and blow additional air in through the valves, the Camp Bed does all the work. Another advantage with the foam interior is increased insulation from the cold ground. This mattress has an R-Value of 7, which is excellent protection. Combined with cloth-like top cover, you'll feel at home just about anywhere.

    The downside? The Camp Bed weighs-in a tad over 6.5 lbs. That's too heavy for backpacking, but excellent for car camping. And because of the foam interior, it doesn't roll up as compactly as less luxurious mats. The regular size (72" long by 25" wide) sells for $99 at REI. The X-Large version, which is the model I tested, is 78" long by 29" wide. It sells for $109.

    And how comfortable is the REI Camp Bed? Let me put it this way: I can sleep on my side and not feel the ground on my hips or shoulders. When's the last time you could do that camping?

    More tips and gear reviews in our new Outdoor Life section

    If you enjoy working and playing in nature, take a look at our new Outdoor Life section on The Digital Story. And if you forget the link, just click on Outdoor Life in the top navigation bar on the site. You can also contribute your own reviews of gear by sending them to me.


    twitter.jpg Follow me on Twitter

    -


    Lowepro Nova 160 AW

    We have not one, but two reader reviews of Lowepro bags for the great outdoors. Both Jane and Ed have put these bags through their paces, and they've filed their reports here.

    Lowepro Nova 160 AW

    Like many photographers, I'm always searching for that perfect camera bag. Over the years I've owned many bags by various manufacturers, although I seem to gravitate to various-sized Lowepro Trekkers. As a result, I ended up with the ubiquitous "camera bag closet" in the garage.

    But in recent years I've been on a mission to simplify and downsize -- first my DSLR gear. I've settled on a Panasonic G1 system as my default camera. It's great for everything from around town, hiking, or traveling. The only time I carry my bigger DSLR kit is when doing action photography.

    For this system I've found the Lowepro Nova 160 AW. Dare I say it seems perfect? Only when traveling do I take everything, and yet everything fits in this wonderfully compact and lightweight bag. It even has a stow-away All Weather Cover to boot.

    In my case, everything is a Panasonic G1 with 14-45 mm lens attached, pancake 20 mm f1.7, 45-200 mm zoom, extra SDHC cards, spare battery, charger, and cable, plus circular polarizer. Typical configuration is 20 mm and 14-45, or 14-45 and 45-200 -- sans charger and cable. I've included a photo of the bag and how I pack it with everything. The only thing that doesn't fit is the manual which is about an inch too tall for the zipperd pocket on the back of the bag. But it's easy enough to stash elsewhere.

    The Lowepro Nova 160 AW sells for about $45.

    Ed Shields


    Lowepro Primus AW

    lowepro_primus.jpg

    The Lowepro Primus AW Backpack has enough room for my DSLR, additional lens, and other needed items for photography. The top pocket holds hiking essentials and lunch. There is a side pocket for a water bottle. My tripod straps securely in the tripod holder. The rain cover is important for hiking here in Oregon. (You cannot use the tripod holder with the rain cover though.)

    The side access zipper allows for quick access to my camera. The pack itself is very comfortable and has padded shoulder straps, hip belt, and an adjustable sternum strap. There is a large compartment on the back that will hold extra clothing layers with ease. One caveat: when you take your tripod off the pack, make sure to buckle the top strap so it does fall off the pack and get lost. (My husband learned this one the hard way.)

    The The Lowepro Primus AW Backpack sells for about $110.

    Jane Hamilton


    If you have a reader review of outdoor gear, please send it to me! Visit our Member Participation page.


    Previously in Outdoor Gear for Photographers

    Ultimate Water Bottle for Photogs? GSI DukJug

    Dependable Footwear for Photo Work in the Field

    Day Tripping with the Lowepro Versapack 200 AW

    Shelter on Location: REI Half Dome 2

    String Monopods

    "The Great Outdoors" - Digital Photography Podcast 218

    Portable Camera Stability

    Sunset Portraits

    New Series on Outdoor Gear for Photographers


    twitter.jpg Follow me on Twitter

    -


    gsi_bottle.jpg

    Everyone needs water. And if you're working in the field on a photo shoot, you should have your supplies readily available. I've discovered a great water bottle for photographers who hike, camp, or who are always on the go: the GSI Infinity DukJug.

    The basic specs for the DukJug are good for a container that sells for less than $9. The 1 liter capacity bottle weighs 6.6 ounces empty. It's constructed of BPA-free Polypropylene, has a quick-release cap, sip-it lid, and a very nice silicone grip. One Amazon reviewer complained that his water had a chemical odor to it. I have not had that experience at all. I washed the bottle when I first bought it, and the water has tasted great ever since.

    GSI Infinity DukJug Water Bottle GSI DukJugs with gaffers tape wound around the recessed area, then the silicon grip reapplied. Click on images for larger view.

    But what makes the DukJug different is that you can pull down the silicone grip, wrap gaffer's tape in the recessed area (or duct tape for non photographers who don't need a removable adhesive), and always have tape available for those 1001 situations that are hard to anticipate.

    Applying Gaffers Tape

    To set up your DukJug, just pull down the silicon grip, wind your gaffers tape evenly to keep the surface smooth, then reposition the grip. The tape adds very little weight to the bottle, but can be a huge lifesaver when you need to mend some fabric or hold a reflector in place. Not bad for less than $9.

    Previously in Outdoor Gear for Photographers

    Dependable Footwear for Photo Work in the Field

    Day Tripping with the Lowepro Versapack 200 AW

    Shelter on Location: REI Half Dome 2

    String Monopods

    "The Great Outdoors" - Digital Photography Podcast 218

    Portable Camera Stability

    Sunset Portraits

    New Series on Outdoor Gear for Photographers


    twitter.jpg Follow me on Twitter

    -


    The Lowepro Versapack 200 AW combines a fast access camera compartment with a handy personal storage area into a light, all weather backpack that's perfect for an afternoon outing.

    Lowepro Versapack 200 AW

    My typical set up with this pack starts a 70-200mm zoom on a DSLR in the bottom, quick access area (it's quick access because you don't have to remove the pack to retrieve your camera, just reach around, unzip the pocket, and grab your camera). I keep a wide angle zoom in the top pocket, along with a jacket, protein bar, and whatever personal accessories I need. Maps and other papers store nicely in the front documents pocket. And if I'm on the trail, I hang a water bottle from the chest strap.

    For such a light pack, the suspension system is very comfortable. I can literally wear it all day with no neck or shoulder strain. If rain is in the forecast, the hidden all weather cover can be pulled out to protect the entire pack. The two bottom straps work great for a tripod, ground mat, or rolled up jacket.

    The internal foam protection dividers can be removed from the Versapack, allowing you to fold the entire unit flat to store in a suitcase for travel. When you get to your destination, insert the dividers, and you're ready to explore.

    The Lowepro Versapack 200 AW retails for $99.95.

    Previously in Outdoor Gear for Photographers

    Dependable Footwear for Photo Work in the Field

    Shelter on Location: REI Half Dome 2

    String Monopods

    "The Great Outdoors" - Digital Photography Podcast 218

    Portable Camera Stability

    Sunset Portraits

    New Series on Outdoor Gear for Photographers


    twitter.jpg Follow me on Twitter

    -


    When you're taking pictures in the great outdoors, your footwear is just as important as what's in your photo bag. The last thing you want is to be distracted by sore feet, or worry about your footing on uneven surfaces. I've tested some reasonably priced gear that you might want to consider for your next big outing.

    Merrell Moab Ventilator Hiking Boots

    Merrell Moab Hiking Boots

    The Merrell Moab Ventilator boots don't feel like traditional boots in terms of weight and comfort -- they are as light as many athletic shoes and feel just as good... except they provide wonderful support and traction on the trail. I've worn these shoes with backpacks, photo packs, up hills, down hills, crossing streams, and around camp. And I'm never in a rush to take them off.

    The Moabs breath well to keep your feet at a comfortable temperature. I usually wear one pair of hiking socks, and that's all I need. If you like to wear very thick socks or double pairs, I would order up a size, or at least a half size for the Moabs. Merrells do not run large for their listed size. So if you normally buy size 12 in your training shoes, you might want to try size 13 for the Moabs.

    The Merrell Moabs run about $85 retail. So they are a good value as well as a comfortable, versatile boot.

    Keen Newport Leather Sandals

    When you want total comfort, easy on and off, yet great tread in case you have to sprint off to grab a shot, you might want to look at these Keen Newport Sandals.

    Keen Newport Sandals

    Typically, I wear these Keens around camp and, quite honestly, with shorts most of the summer. But I've also tested them on day hike with reasonable terrain, and they, along with my feet, have held up just fine. When I do day hike in them, however, I wear ankle socks for added comfort and to wick away moisture.

    The Keen Newport Sandals run about $75 retail, but I've had a pair for well over a year, and they are definitely built to last.

    Previously in Outdoor Gear for Photographers

    Shelter on Location: REI Half Dome 2

    String Monopods

    "The Great Outdoors" - Digital Photography Podcast 218

    Portable Camera Stability

    Sunset Portraits

    New Series on Outdoor Gear for Photographers


    twitter.jpg Follow me on Twitter

    -


    String Monopod

    How about a monopod that weighs less than half an ounce? TDS virtual camera club member Brian Reynolds writes:

    "I never really liked traditional monopods. What I have found to be very useful is what some people call a string monopod.

    Here's how to make one version of this device.You need a 1/4x20 eyebolt, two 1/4x20 nuts, and a length of clothes line (or any line that doesn't stretch). Put both nuts on the eyebolt, and then carefully attach the eyebolt to the camera's tripod mount. If you over tighten the eyebolt you can damage the camera's bottom plate. Gently tighten one of the nuts against the camera's bottom plate, and then tighten the other nut against the first. The nuts will prevent you from over tightening the eyebolt when you re-attach the eyebolt later. Now you tie the rope to the eyebolt.

    To use the string monopod attach it to the camera, drop the rope on the floor, step on it, and then pull up to put tension on the rope.

    I've had very good luck with this. For last year's Solo Photo Book Month project, I shot on the streets of Manhattan with a handheld Yashica Mat 124G and a string monopod. I was able to use shutter speeds as low as 1/30 second.

    So, if you're not the trekking pole type, the string monopod might be just the solution for you on the trail.

    Thanks Brian! If you have a great outdoor tip, or favorite piece of equipment, send it along to me. I'll feature reader submitted tips on a regular basis.

    Previously in Outdoor Gear for Photographers

    "The Great Outdoors" - Digital Photography Podcast 218

    Portable Camera Stability - Outdoor Photo Tip #2

    Sunset Portraits - Outdoor Photo Tip #1

    New Series on Outdoor Gear for Photographers


    twitter.jpg Follow me on Twitter

    -


    Nature and photography. Talk about a match created in heaven. In this podcast I give you some background on the brand new series of articles covering life in the great outdoors. I've enjoyed camping, backpacking, and day hiking since I was a kid, and have learned quite a few things along the way. Now, on The Digital Story, I've created a series of articles that combines photography and outdoorsmanship. Whether you're an avid adventurer or armchair naturalist, I think you're going to enjoy this series.

    REI Halfdome 2 Tent

    Photo of an REI Half Dome 2 Tent in the foreground (without rain cover) captured with a Canon S90 compact.

    Listen to the Podcast

    You can also download the podcast here (24 minutes). Or better yet, subscribe to the podcast in iTunes. You can support this podcast by purchasing the TDS iPhone App from the Apple App Store.

    Previously in Outdoor Gear for Photographers

    Portable Camera Stability - Outdoor Photo Tip #2

    Sunset Portraits - Outdoor Photo Tip #1

    New Series on Outdoor Gear for Photographers

    Monthly Photo Assignment

    Flash is the March 2010 Photo Assignment. You can read more about how to submit on our Member Participation page. Deadline for entry is March 31, 2010.

    More Ways to Participate

    Want to share photos and talk with other members in our virtual camera club? Check out our Flickr Public Group. It's a blast!


    twitter.jpg Follow me on Twitter

    -


    Podcast Sponsors

    Red River Paper -- Try the $7.99 Sample Kit.

    Make Your Photos Sizzle with Color! -- SizzlPix is like High Definition TV for your photography.


    Technorati Tags: , , , , ,

    TrekPOD

    Stabilizing your camera, especially if you zoom out the lens for telephoto shots, can be important on the trail. We have a couple options here for you to consider.

    TrekPod GO! PRO Monopod/Tripod/Walking Stick Combination with MagMount Pro Ballhead

    TDS member Ed Shields writes: "I've used a TrekPod GO PRO, which is a great concept; combination monopod, tripod, hiking stick, but at $175, it's not cheap. Also at roughly 30 oz, I find it too heavy to use as a hiking stick, and now rarely use it except on very short hikes."

    "The majority of the time that I shoot with it, I use it in its tripod configuration for long duration shots (water falls and other moving water and/or hiking group shot). If I had it to do over again, I'd just use my current Leki hiking stick and go for a small, lightweight tripod that I can carry with my day pack. I hike with a Panasonic G1."

    LEKI Sierra Antishock Trekking Pole

    Which leads us to a second consideration. Why not use a true trekking pole that has a tripod screw built-in? The LEKI Sierra Antishock Trekking Pole is the model I've been using for recent hiking and backpacking trips.

    leki.jpg

    It's light enough for all day hikes, has a removable rosewood knob on top that reveals a tripod screw with a tightening disk, and it extends to 145 cm for comfortable shooting. When on the trail, I remove the rubber cover to reveal the Carbide tip. The built-in anti-shock system is a real blessing on hard surface hiking. I also use the pole to prop up my backpack and to hang laundry while in camp. At $76, it has already provided many miles of use in the great outdoors.

    If you have a favorite way to stabilize your camera when on the trail, please post a comment!

    Previously in Outdoor Gear for Photographers

    Sunset Portraits - Outdoor Photo Tip #1

    New Series on Outdoor Gear for Photographers


    twitter.jpg Follow me on Twitter

    -


    Sunset Portrait

    Don't miss the opportunity to capture sunset portraits when camping or hiking. If you have a clear horizon, the technique is very simple:

    • Turn on the flash and set it to "slow synchro" or "nighttime portrait."
    • Take a meter reading off the sky so you lock in the sunset. I usually use "exposure lock" to retain this setting while I recompose the shot.
    • Make sure you're within flash range. If the flash is too hot, dial it down to -1 with your "flash exposure compensation" setting.
    • Take the photo. If things look a little muddy or shaky, raise the ISO to 400 or 800.

    These types of images make great keepsakes for members of your camping party. And they make you look like a genius photographer!

    Sunset portrait captured with a Canon S90, ISO 800, Slow Synchro Flash. Click on image to enlarge.

    Contribute Your Outdoor Tips and Equipment Recommendations

    If you have a great outdoor tip, or favorite piece of equipment, send it along to me. I'll feature reader submitted tips on a regular basis.


    twitter.jpg Follow me on Twitter

    -


    One of the great joys of photography is exploring new locations that we might not experience otherwise. If this exploration leads you to the outdoors, then I have good news for you. Over the coming months, I'll be covering outdoor gear and techniques that will help you be more comfortable and productive while working in nature.

    Wildcat Camp, Pt. Reyes, CA

    I'll discuss tents, stoves, shoes, accessories, camera bags, locations, tips, and just about anything relative to this type of photography. We'll begin later this week. So, if you're planning to spend more time working hiking and camping with your camera... stay tuned. We're going to have lots of fun with this.

    And if you have tips and gear recommendations, please drop me a line. I want to include as many viewpoints as possible.

    Wild Mustard in Wildcat Camp, Pt. Reyes, CA. Photo captured with a Canon S90. REI tents in the foreground. Click on photo to enlarge.


    twitter.jpg Follow me on Twitter

    -


    The eye-catching feature of the Solio Mono charger is the 3" solar cell that can charge the internal 1000Amh Lithium-Ion battery. And indeed, this is a selling point for the device.

    But if you're going to be happy with this purchase, you'll have to take a broader view and see this as an all-purpose back-up charger for your iPhone, digital camera, handheld GPS, or other small electronic device. That's because the easiest and quickest way to recharge its Lithium battery is via the USB port on your laptop or with a separate USB charger. This only takes a few hours. If you have to depend on the sun for a full recharge, it will take a few days. And that's only if you have direct sun shining on the device.

    So the way you might want to think about the Solio Mono is that it's a back up charger for you small electronics that his its own back up via its solar cell.

    I purchased one at the Apple Store for $79 specifically to charge my iPhone 3GS while working in the field. This particualar kit comes with the connections required for iPhones and iPods. The same charger is also available on Amazon for $59, but I couldn't tell which specific connections that kit came with. Either charger has the ability to replenish thousands of devices, it just depends on having the right connection, such as an Apple Dock Connector, for your particular gizmo.

    You can tell how full its battery is by the number of green blinks you get when you push the clear button on the back of the device. Each blink indicates 20 percent charge. So, five blinks is full, and one blink is 20 percent.

    I was happy with how the Solio charged my iPhone. For example, when the iPhone was at 59 percent charge, I connected the Solio via its dock connector cable. I pressed the clear button to initiate the charge, and 90 minutes later the iPhone was back to 100 percent full. The Solio charger still had 40 percent capacity, leading me to believe that it can come close to fully charging the iPhone.

    I generally replenish the Solio's battery using its USB cable and the iPhone USB wall charger. It usually takes a few hours to top off the Solio after I've used it. I've also tried recharging the Solio via its solar cell. I got about 20 percent charge for every 5 hours of direct sun. I will use this feature more when camping to gather as much energy as possible, especially for topping off the Solio's battery. I like this option as a back up feature. Just don't get it in your mind that you're purchasing a solar charger that will keep your electronic device running on a daily basis.

    To carry the Solio kit, I'm using the Lowepro 4.3-Inch Navi Shield GPS Carrying Case that holds the charger itself perfectly in the internal pouch, plus all of the cords and connecters in the secure mesh area. It almost seems as though the Navi Shield was designed specifically for the Solio Mono.

    Overall, I like the Solio-Mono. I'll charge it completely before I hit the road, then top it off using the solar cell. By keeping my iPhone charged, I know I'll always have a 3-megapixel camera, voice, SMS, email, and Internet available as long as there's a cellular connection.

    twitter.jpg Follow me on Twitter

    -


    microwave_sneaker.jpg

    I've found another great use for the microwave over. I was shooting some water shots recently and actually found a way to soak my sneakers. I'm not talking about a little wet, I mean drenched from stem to stern.

    I tried just letting them air-dry for a couple days, and got nowhere. Because I was staying in a hotel, I didn't have a traditional clothes dryer available. After a few days, my good ole sneaks started to smell a little funny.

    It occurred to me, that when sponges in the kitchen start to smell funky, a good way to reverse the tide is put em in the microwave for 30 seconds or so to kill the little critters causing the offending odor. Why not for sneakers too?

    So I started alternating shoes in the microwave for 45 seconds a pop, and sure enough, they began to transform from waterlogged sponges to wearable shoes. Just make sure you don't have any metal plates in the soles...

    Technorati Tags: , ,