Recently in Photos for OS X

  Page 10 of 12 in Photos for OS X  

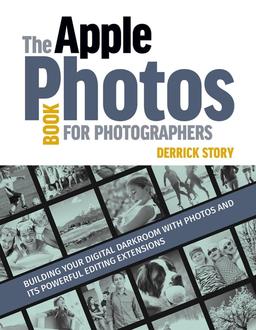
Apple Photos Book Cover.jpg

Do you think that Photos for OS X is some lightweight app just for iPhone-toting snapshooters? You're wrong. And I explain why in my latest guide, The Apple Photos Book for Photographers.

Photos for OS X has two things that neither Aperture nor iPhoto ever had: Amazing iCloud integration and a far more sophisticated architecture for third party software.

Let's address the later first. I'm not talking about roundtripping. Editing Extensions don't require creating bulky Tiff files to send to outside applications. You stay within the Photos ecosystem when applying advanced techniques such as HDR, B&W, skin softening, etc., even to the point that you can undo the changes from the editing extensions in Photos itself. You can even see the before and after in your Photos editing environment.

As for iCloud integration, it's amazing. Work on an image in Photos for OS X or Photos for iOS, and the changes are propagated to the other devices automatically. Backup is handled for you. The flexibility and response time is incredible.

So how do you take features like this and integrate them into a photography workflow? That's just one of the many topics I address for photographers in this book.

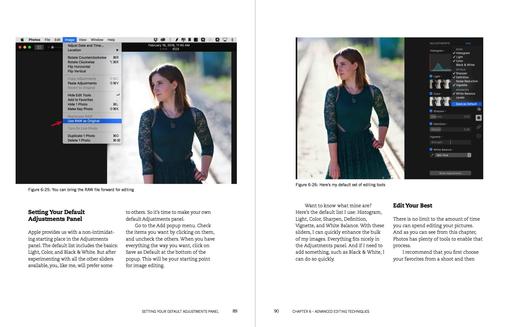
Photos-Book-Spread.jpg

So who is this for? Any shooter who likes the Apple ecosystem, wants powerful simplicity in their software, and enjoys using tools designed by great developers such as Macphun, DxO, and Affinity.

The Apple Photos Book for Photographers takes you on a journey into the world of photography like you've never read in a software guide before. I open chapters with anecdotes about my experiences as they pertain to the subject at hand. I cover the tools and techniques that help you simplify your workflow without giving up craftsmanship or creativity. You're going to love this ride.

We're releasing the eBook version right now. And you can get it for only $15 if you use Coupon Code APPLE15 at checkout. The print book will be out later this year. Start your journey now and explore what Photos for OS X can do for your photography.

I've just finished testing Aurora HDR Pro 1.2.2 standalone app and Editing Extension for Photos for OS X, and this version includes some terrific enhancements plus additional RAW compatibility.

Red-Tractor-1024.jpg "Red Tractor" - Captured with an iPhone 6S and processed in Photos for OS X using its editing tools and Aurora HDR Pro Editing Extension. Image by Derrick Story.

One of my favorite improvements is the ability to sync Favorite presets between Aurora HDR Pro standalone and the Aurora HDR Pro Editing Extension. Very nice. The RAW compatibility for new cameras includes:

  • Canon 80D, 1300D, 1DX MkII
  • Leica M (Typ 262)
  • Nikon D5
  • Olympus Pen F, SH-3
  • Panasonic DMC-GX80/85, DMC-TZ80/81/85/ZS60, DMC-TZ100/101/ZS100
  • Samsung Galaxy S7 (SM-G935F)
  • Sony ILCA-68, ILCE-6300, RX1R II, RX10 III
  • DxO ONE Digital Camera
  • Fujifilm X-Pro2

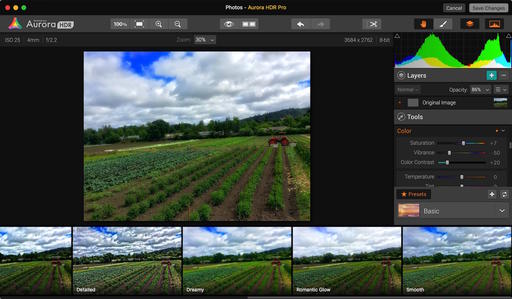
hdr-pro-tractor.jpg To complement all of the powerful slider tools, there are dozens of presets to help you get your image on the right track.

Aurora HDR Pro is a wonderful Editing Extension for Photos for OS X. In addition to being a robust HDR processor, the software includes many advanced sliders such as Top & Bottom Lighting, Tone Curve, Layer Control, and Denoise. Plus, it features seven categories of presets, which is a great way to figure out the starting point for your editing.

You can get $10 Off Aurora HDR Pro plus receive $90 worth of bonuses here.

Master Photos for OS X

(It's More Powerful than You Think)

For hands-on tutorials, be sure to take a look at Photos for OS X Essential Training on lynda.com. I cover everything you need to know to get the most from this surprisingly powerful image management application.

More Help and Insights on Photos for OS X

Don't forget about the Photos for OS X Special Feature Section on The Digital Story. It's a roundup of tutorials, videos, and articles focused on helping you master Apple's latest photo management software. You can also find it under Photography in the top nav bar.

Want to Comment on this Post?

You can share your thoughts at the TDS Facebook page, where I'll post this story for discussion.

Macphun has created a new Editing Extension for Photos users, and it's a blast. Filters for Photos is a quality, editable, effects app that allows you to apply a variety of filters, then edit them with an easy to use masking tool. And if that wasn't good enough, the download is free.
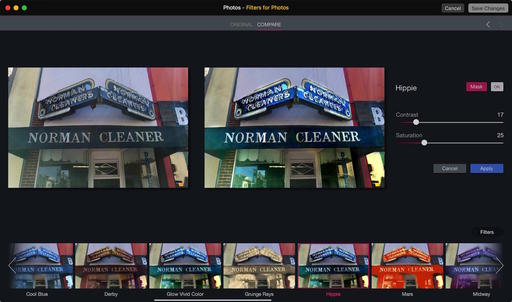
03-Comparing-web.jpg An array of interesting filters to choose from. Images by Derrick Story.

When you first download the app, you get 15 filters. If you opt-in for their mailing list, you'll receive another 15 filters (they're automatically added to the app) for a total of 30. You can use the app as a standalone, or enable it as an Editing Extension for Photos for OS X (System Preferences > Extensions > Photos > Filters for Photos).

When you first load an image, it appears in the browser with thumbnails of the filter options below. Simple click on the effect you want, and it's applied. You can use the contextual sliders to adjust further. Or, click on the Mask button and paint the effect specifically where you want it. The masking toolset has everything you need, and it's easy to use.
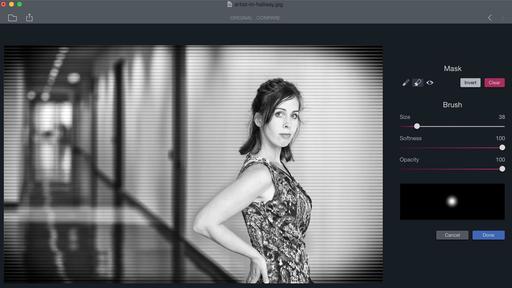
masking-in-filters.jpg The masking tool is easy to use and powerful.

After just a half an hour or so of playing with Filters for Photos, I was quite comfortable applying and editing the effects. And if you're using it as an Editing Extension, which I recommend, then the image is integrated into your Photos for OS X library, and the work is totally non-destructive.

Filters for Photos is a fun app that belongs in the toolbox for any Mac photographer.

Coming Soon: The Apple Photos Book for Photographers
PhotosPromo-1.jpg

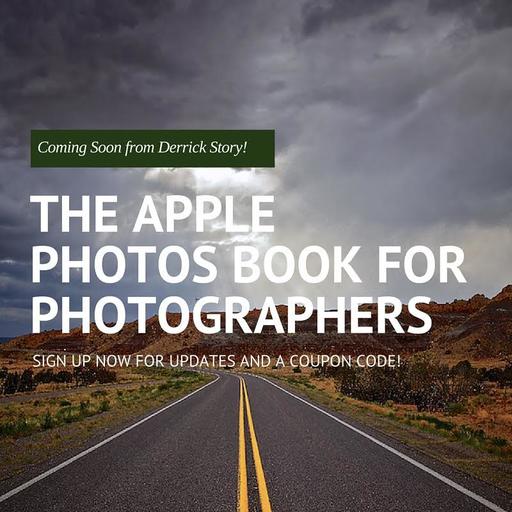
I've been working on a guide to Photos for OS X that's written for photographers who want to use this application at a high level. I cover workflow, iCloud integration, and editing... at the enthusiast level.

We're releasing the eBook version soon, then will go to print after Apple announces its updates to the app at WWDC. This is an exciting, ongoing project that I think you'll want to be a part of. And you can join me every step of the way via the signup page we've created. This is going to be fun...

Master Photos for OS X

(It's More Powerful than You Think)

For hands-on tutorials, be sure to take a look at Photos for OS X Essential Training on lynda.com. I cover everything you need to know to get the most from this surprisingly powerful image management application.

More Help and Insights on Photos for OS X

Don't forget about the Photos for OS X Special Feature Section on The Digital Story. It's a roundup of tutorials, videos, and articles focused on helping you master Apple's latest photo management software. You can also find it under Photography in the top nav bar.

Want to Comment on this Post?

You can share your thoughts at the TDS Facebook page, where I'll post this story for discussion.
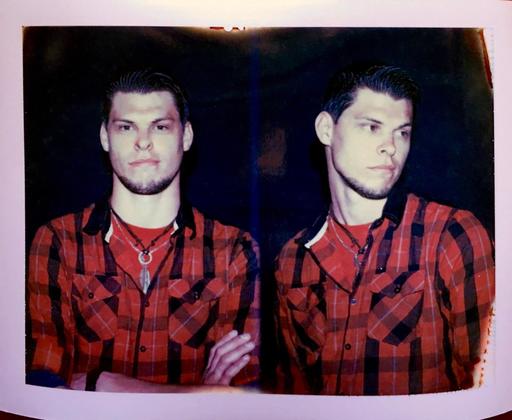
For only $5, you can add an exhaustive (but easy to use) collection of filters to your Photos for OS X app. The editing extension is called Color Filters for Photos, and it's worth a look.

pre-process.jpg

Like any Editing Extension, the easiest route is to purchase and download from the Mac App Store. In this case, Colors will only set you back $4.99. Once the download is complete, go to System Preferences > Extensions > Photos and turn on Color Filters. Now you're ready to have fun.

Open an image in Photos for OS X, then press the Return key to go to editing mode. At the bottom of the list on the right side, click on Extensions, and choose Color Filters from the popup menu.

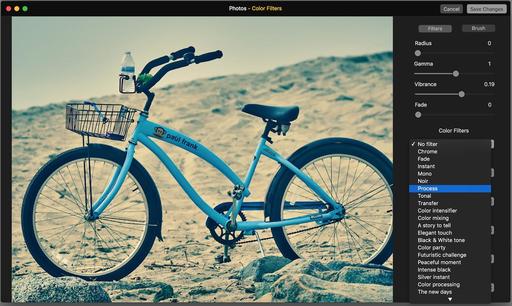
color-filter-applied.jpg

In the Color Filters interface, you're presented with some nice pre-processing adjustments, such as highlights and shadows. Then you can move down to the filters themselves. There are six different sets, each with a healthy list of options. Just mouse over the different items on the list, and you'll see your image temporarily transformed with the filter. Find one you like, and click on it. The filter is applied. Click the Save Changes button to return to Photos.

Just like anything else in Photos, this process is totally non-destructive. While in Edit mode, you can press the M key to see the unedited version of the image, or choose Revert to Original to remove the effect altogether.

Color Filters is a well-coded, well-designed application. The performance is snappy, and the effects are terrific. Seems like a must-have investment for any Photos for OS X photographer.

Master Photos for OS X

(It's More Powerful than You Think)

For hands-on tutorials, be sure to take a look at Photos for OS X Essential Training on lynda.com. I cover everything you need to know to get the most from this surprisingly powerful image management application.

More Help and Insights on Photos for OS X

Don't forget about the Photos for OS X Special Feature Section on The Digital Story. It's a roundup of tutorials, videos, and articles focused on helping you master Apple's latest photo management software. You can also find it under Photography in the top nav bar.

Want to Comment on this Post?

You can share your thoughts at the TDS Facebook page, where I'll post this story for discussion.

pixelmator-ext.png

One of the goodies included with Pixelmator 3.4 Twist is the new Photos Editing Extension that includes some terrific creative tools.

You can download the full version of Pixelmator in the Mac App Store for $29.99. With it you get a wide variety of painting, drawing, and retouching tools that has made this app famous among Mac creatives.

But now, as part of that download, you also get the editing extension that adds Warp, Bump, Pinch, and Twirl to Photos for OS X. And just like all the editing extensions, the workflow is non-destructive.

You can watch an informative video that walks you through its features. Pixelmator is an excellent addition to the growing library of editing extensions available for Photos. And if you have version 3.4.2 of Pixelmator, the editing extension is already on your Mac.

Master Photos for OS X

(It's More Powerful than You Think)

For hands-on tutorials, be sure to take a look at Photos for OS X Essential Training on lynda.com. I cover everything you need to know to get the most from this surprisingly powerful image management application.

More Help and Insights on Photos for OS X

Don't forget about the Photos for OS X Special Feature Section on The Digital Story. It's a roundup of tutorials, videos, and articles focused on helping you master Apple's latest photo management software. You can also find it under Photography in the top nav bar.

Want to Comment on this Post?

You can share your thoughts at the TDS Facebook page, where I'll post this story for discussion.

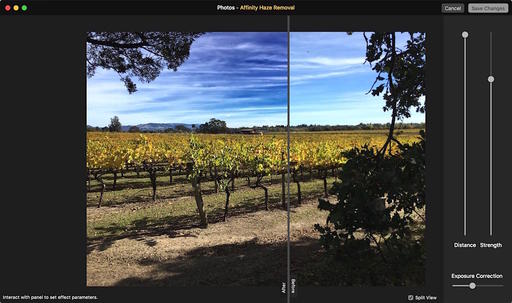
If you've purchased the award winning Affinity Photo ($49, Mac App Store), you also received a handful of editing extensions for Photos for OS X, including my favorite, Haze Removal.

I decided to try Haze Removal with an iPhone shot, because, well, I have a lot of those in my Photos library. Here's how it looked. (Check out the difference in the sky.)

Affinity-haze-removal-web.jpg Three adjustment sliders here: Distance, Strength, and Exposure Correction. Also notice that there's a Before/After slider so you can easily check your work.

When you download or upgrade to the latest version, the extensions are automatically loaded on to the Mac. You can turn them on and off in System Preferences > Extensions > Photos. This panel is also available by clicking on More at the bottom of the Extensions popup menu in Photos.

Speaking of editing in Photos, a great shortcut is to click on a picture, then press the Return key to go straight to ending mode. Once you're there, the Extensions button is at the bottom of the list on the right side.

Affinity Photo includes some other helpful editing extensions in the bundle, but Haze Removal is my favorite of the bunch.

Master Photos for OS X

(It's More Powerful than You Think)

For hands-on tutorials, be sure to take a look at Photos for OS X Essential Training on lynda.com. I cover everything you need to know to get the most from this surprisingly powerful image management application.

More Help and Insights on Photos for OS X

Don't forget about the Photos for OS X Special Feature Section on The Digital Story. It's a roundup of tutorials, videos, and articles focused on helping you master Apple's latest photo management software. You can also find it under Photography in the top nav bar.

Want to Comment on this Post?

You can share your thoughts at the TDS Facebook page, where I'll post this story for discussion.

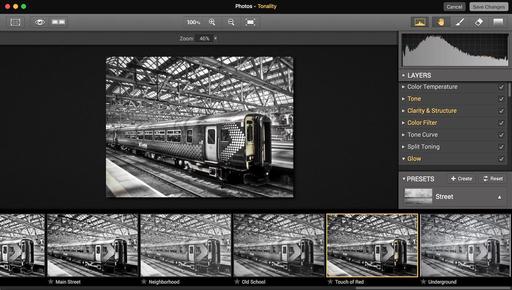
After having spent a week reviewing all of the editing extensions for Photos for OS X, I have a clear favorite: Tonality by Macphun.

tonality-extension.jpg

I bought my version from the Mac App Store for $19.99, which includes the standalone version. But I only use it as an editing extension for Photos for OS X. Personality, I like the integrated workflow.

This app combines two things that appeal to me: an extensive selection of high quality presets, with plenty of controls to fine tune the final image. The preset categories include: Basic, Architecture, Portrait, Dramatic, Outdoor, Street, Vintage, Film Emulation, Toning, and HDR, each with many options within. And for the most part, you could stop right there. However, if you like to tinker, take a look at the tools in the right side adjustments panel.

tonality-adjustments-web.jpg

Once you've finished working with the shot in Tonality, click on Save Changes to return to Photos for OS X. You can press the M key to see the original shot, even though you've left Tonality, and even Revert to Original if you wish.

Chances are, however, that you'll want to share the edited picture using any of Photos extensive publishing tools. Bottom line here: I think Tonality helps me be more creative in my post production work.

Master Photos for OS X

(It's More Powerful than You Think)

For hands-on tutorials, be sure to take a look at Photos for OS X Essential Training on lynda.com. I cover everything you need to know to get the most from this surprisingly powerful image management application.

More Help and Insights on Photos for OS X

Don't forget about the Photos for OS X Special Feature Section on The Digital Story. It's a roundup of tutorials, videos, and articles focused on helping you master Apple's latest photo management software. You can also find it under Photography in the top nav bar.

Want to Comment on this Post?

You can share your thoughts at the TDS Facebook page, where I'll post this story for discussion.

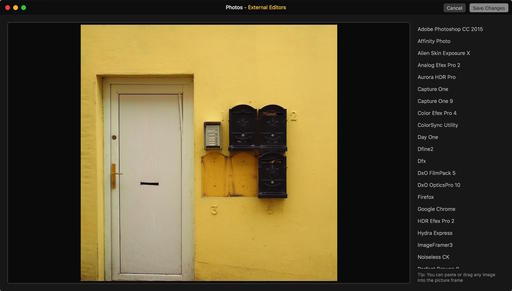
External Editors is one of the most affordable, and exciting, editing extensions for Photos for OS X. It's available in the Mac App Store for 99 cents.

external-editors-photos.jpg

It allows you to connect practically any image editor to your Photos library. I tested it with two of my favorites: Photoshop CC and Alien Skin Exposure X. It worked perfectly on both counts.

The workflow is simple. Open your image in Edit mode in Photos for OS X. Choose External Editors from the list of editing extensions you have loaded. Editors will open your image and present you with all the available editing apps on your Mac. Choose the one you want, then it takes you there for adjustments. After you've finished working on it, just click Save.

You're back in the External Editors interface. Choose Save Changes and your edited image is returned to Photos for OS X. And here's the kicker, if you press the M key, you can see the original version of your shot. And if you want, you can Revert to Original.

As some readers have pointed out, this workflow doesn't work when you send RAW files to Photoshop. So this doesn't sound like a solution for RAW shooters, or for artists who add layers while in Photoshop. So if you fall into these categories, then you might want to save your 99 cents. (Thanks John for the heads up!)

But for Jpeg shooters, this workflow is far better than the old style of roundtripping, because even though you're using an outside app, the workflow remains non-destructive. And in that case, I can't think of a better way to spend a buck.

Master Photos for OS X

(It's More Powerful than You Think)

For hands-on tutorials, be sure to take a look at Photos for OS X Essential Training on lynda.com. I cover everything you need to know to get the most from this surprisingly powerful image management application.

More Help and Insights on Photos for OS X

Don't forget about the Photos for OS X Special Feature Section on The Digital Story. It's a roundup of tutorials, videos, and articles focused on helping you master Apple's latest photo management software. You can also find it under Photography in the top nav bar.

Want to Comment on this Post?

You can share your thoughts at the TDS Facebook page, where I'll post this story for discussion.

This is from a guy who previously would only use Silver Efex Pro for his black and white work, but I've come to appreciate the B&W Adjustment in Photos for OS X, and the optional plugin, Tonality by Macphun.

dibs-in-bw-3.jpg

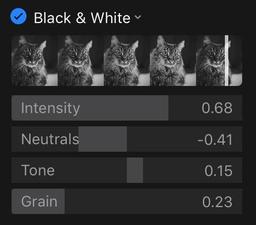
Here's a shot that I'm using for my upcoming book on Photos for OS X. I made some exposure tweaks with the Light Adjustments, then finished it off with the B&W converter. If you're not familiar with what the four sliders do in B&W, this will help you:

bw-controls.jpg

  • Intensity - If you think about how saturation works for color, that's what the intensity slider does for B&W. As you move the marker to the right, Photos intensifies the tones in the image. If one cube of sugar makes your coffee sweet, two cubes makes it even sweeter. That's what intensity does.
  • Neutrals - This slider affects the gray areas of the image by lightening or darkening them. For this image, I thought that darkening the gray areas helped create a nice separation from the white markings of the cat, including her whiskers.
  • Tone - This adjustment could really be called contrast, because that's what it does. Moving the marker to the right increases contrast, and to the left flattens it.
  • Grain - To complete the film-like B&W effect, we can also add grain. Not only does this provide an analog feel to the image, it can make it appear a bit more crunchy.

Tip: Even though we're applying monochrome effects to our picture, it's still color inside. For example, you can still tweak the tones in your B&W by using the temperature and tint sliders in the White Balance panel. Try it. Photos provides an amazing amount of control for your B&W pictures.

For hands-on tutorials, be sure to take a look at Photos for OS X Essential Training on lynda.com. I cover everything you need to know to get the most from this surprisingly powerful image management application.

More Help and Insights on Photos for OS X

Don't forget about the Photos for OS X Special Feature Section on The Digital Story. It's a roundup of tutorials, videos, and articles focused on helping you master Apple's latest photo management software. You can also find it under Photography in the top nav bar.

Want to Comment on this Post?

You can share your thoughts at the TDS Facebook page, where I'll post this story for discussion.

Oddly enough, White Balance isn't part of the default set that appears in the Edit menu in Photos for OS X. And I say "oddly," because it's such a necessary tool, and the Photos version of it is very good.

To make sure it always shows up, open an image in Edit mode, click on Adjust in the righthand sidebar, click on Add, and choose White Balance from the popup menu. Then go back to Add and select "Save as Default." It will now automatically appear in your Adjust panel.

add-wb-1024.jpg

The adjustment itself is quite powerful and very much like the version we had in Aperture. Here's a short video on how to use it.

And for other hands-on tutorials, be sure to take a look at Photos for OS X Essential Training on lynda.com. I cover everything you need to know to get the most from this surprisingly powerful image management application.

More Help and Insights on Photos for OS X

Don't forget about the Photos for OS X Special Feature Section on The Digital Story. It's a roundup of tutorials, videos, and articles focused on helping you master Apple's latest photo management software. You can also find it under Photography in the top nav bar.

Want to Comment on this Post?

You can share your thoughts at the TDS Facebook page, where I'll post this story for discussion.