Recently in Photos for OS X

  Page 9 of 12 in Photos for OS X  

As I talked about in this week's TDS podcast, the Olympus TG-4 is my favorite tough camera. It captures wonderful images in all conditions, including underwater, captures in RAW, and has built-in WiFi and GPS. The geotagging is what I want to cover today.

photos-gps.jpg

The GPS function in the TG-4 works quite well. It requires less than a minute to acknowledge a new location so it can add it to an image. My experience has been that if I pull it out of my pocket, turn it on, and start taking pictures, the first image might not be geotagged, but the subsequent pictures are.

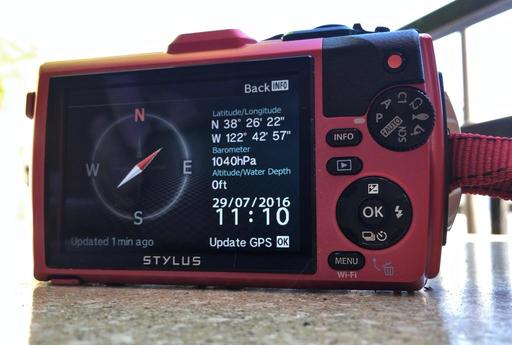
update-gps.jpg

An easy way to check the status of the GPS is to press the Info button a couple times to bring up the readouts. If you see the GPS coordinates in the upper right, as in the illustration above, then you're probably in good shape. If not, you can tell the TG-4 to update by pressing the OK button.

I upload the Jpegs via WiFi to my iPhone 6S or iPad mini (I can get the RAWs later if I need them.) I like using O.I. Share for this. Plus it lets me know if there are geotags for the images via a cute little satellite icon. Those files are automatically added to my iCloud library, which means they are now on all of my Apple devices, including Photos for macOS on the MacBook laptop.

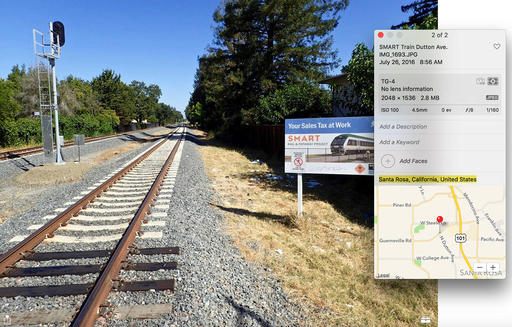
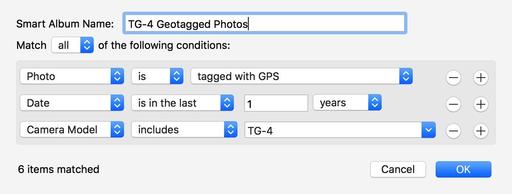
TG-4_Geotagged.jpg

From this point, I can build Smart Albums for the geotagged images, view them on a map by using Get Info for a single image, or by clicking on the general location name in the Moments view to see where an entire group of shots are plotted. Thanks to geotagging by the TG-4, I don't have to rely on my memory to recall where I took a particular shot. And when I'm traveling, this is a wonderful benefit.

Sidenote: a terrific iOS app for viewing and adjusting metadata for tagged images is Metapho in the App Store.

Master Photos for OS X

(It's More Powerful than You Think)

For hands-on tutorials, be sure to take a look at Photos for OS X Essential Training on lynda.com. I cover everything you need to know to get the most from this surprisingly powerful image management application.

The Apple Photos Book for Photographers

For photographers who are more than just casual snapshooters, or who are making the transition from Aperture or iPhoto, The Apple Photos Book for Photographers shines a light on the sophistication of this app and the ecosystem it taps into. Available as an eBook now, and coming to print later this year.

Get it for $15 using checkout code APPLE15!

Want to Comment on this Post?

You can share your thoughts at the TDS Facebook page, where I'll post this story for discussion.
If you're not an Apple developer, but would like a first look at the new features in macOS Sierra, the public beta is now available. You can also help Apple fine-tune the OS for its final release this coming Fall.

macOS-public-beta.jpg

The usual rules apply here. You need to enroll in the program, backup your computer, and install the software. You don't want to use a mission critical machine for testing the beta OS.

That being said, this program is terrific for folks like me who need to start exploring parts of the OS for writing and projects. I'm going to be looking closely at the next version of Photos (lots of exciting new goodies in there). And if you'd rather not go beta, stay tuned here. I'll be reporting on bits and bobs that I discover during my testing.

The Nimbleosity Report

Do you want to keep up with the best content from The Digital Story and The Nimble Photographer? Sign up for The Nimbleosity Report, and receive highlights twice-a-month in a single page newsletter. Be a part of our community!

Want to Comment on this Post?

You can share your thoughts at the TDS Facebook page, where I'll post this story for discussion.
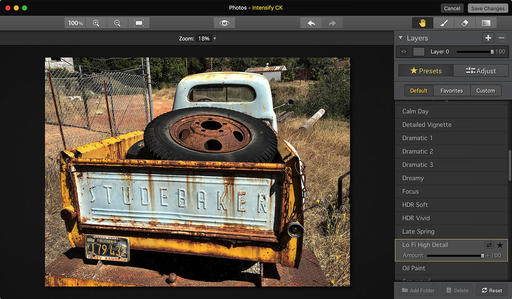
Sometimes when I look at a shot, I think to myself: "I like it, but it needs something." If I'm working in Photos for macOS, that something can be Intensify by Macphun.

intensify-macphun-web.jpg

The reason why I like Intensify is because it's a different approach to image enhancement than HDR. Intensify uses a combination of pro contrast, structure, and detail boost to "bring the image forward." The best way to start is to peruse the presets listed on the right side of the interface, then fine tune your selection with the Adjust tools.

You also have options for working in layers and localized work. Once you've tuned the shot, click on the Save Changes button, and you're returned to Photos. The process is totally non-destructive. You can revert to original at any time, or view the previous version by pressing the M key while in Edit mode.

I've found that Intensify helps me find that little extra juice that I know I want, but am not always sure how to create. It's one of my secret weapons in my Photos for macOS bag of tricks. (Well, I guess not so secret anymore...)

Master Photos for OS X

(It's More Powerful than You Think)

For hands-on tutorials, be sure to take a look at Photos for OS X Essential Training on lynda.com. I cover everything you need to know to get the most from this surprisingly powerful image management application.

The Apple Photos Book for Photographers

For photographers who are more than just casual snapshooters, or who are making the transition from Aperture or iPhoto, The Apple Photos Book for Photographers shines a light on the sophistication of this app and the ecosystem it taps into. Available as an eBook now, and coming to print later this year.

Get it for $15 using checkout code APPLE15!

Want to Comment on this Post?

You can share your thoughts at the TDS Facebook page, where I'll post this story for discussion.
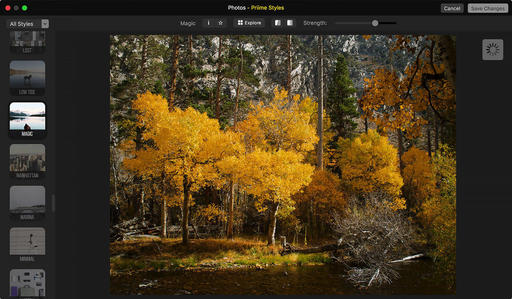
I've been working with the Priime Styles editing extension for Photos for macOS. I've applied its filters to my iPhone Jpegs and RAWs from my Micro Four Thirds cameras, and I've had some excellent results.

BTW: Priime Styles works for Lightroom users too. So if you're not into Photos, then still read on...

The iPhone workflow is straightforward. You open the image in Priime, choose from their vast array of professional filters, and save. But in order to get the most out of the RAW workflow, I have a few tips.

edit-raw-first.jpg Duplicate your RAW file in Photos, then edit it using native tools first. Images by Derrick Story.

Duplicate Your RAW and Edit First

Priime Styles can import your RAW file, but it returns a Jpeg to your Photos library. My recommendation is to duplicate the RAW in Photos, then apply your basic adjustments while it's still in the RAW state. This gives you much better control over recovering highlights and opening up shadows.

Send Edited RAW to Priime Styles

Once your RAW has received its basic adjustments, you can send it over to Priime Styles for finishing. There are lots of filters to choose from. And this part of the process is really fun. All you have to do is click on the thumbnail to apply a filter.

apply-filter-social-version.jpg Load the edited RAW file into Priime Styles and apply your favorite filter.

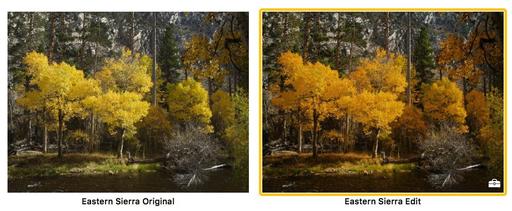
Now click the Save Changes button, and a Jpeg will be returned to your Photos library, right next to the original RAW. You have all of the standard options at this point, such as viewing the master (press the M key) or reverting to the original RAW file.

sidebyside-photos.jpg

When working in Priime Styles, I like to start with the Explore button to view thumbnails of all the possibilities for my image. Once I choose a filter, I generally use the strength slider to adjust the intensity. You have two different comparison buttons so you can really get a feel for the before and after. This editing extension is very easy to use, and it provides a wealth of options for your pictures.

Master Photos for OS X

(It's More Powerful than You Think)

For hands-on tutorials, be sure to take a look at Photos for OS X Essential Training on lynda.com. I cover everything you need to know to get the most from this surprisingly powerful image management application.

For photographers who are more than just casual snapshooters, or who are making the transition from Aperture or iPhoto, The Apple Photos Book for Photographers shines a light on the sophistication of this app and the ecosystem it taps into. Available as an eBook now, and coming to print later this year.

Get it for $15 using checkout code APPLE15!

More Help and Insights on Photos for OS X

Don't forget about the Photos for OS X Special Feature Section on The Digital Story. It's a roundup of tutorials, videos, and articles focused on helping you master Apple's latest photo management software. You can also find it under Photography in the top nav bar.

Want to Comment on this Post?

You can share your thoughts at the TDS Facebook page, where I'll post this story for discussion.
I've been printing fine art greeting cards for years. But the process has never been easier than lately using Apple's Photos app.

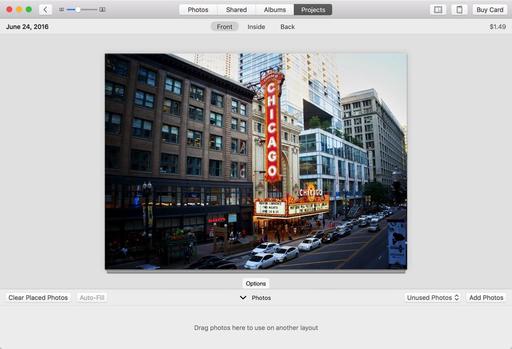
card-layout.jpg

In addition to integrating these projects with my overall Photos library, I have dozens of stylish templates to choose from. And since Photos saves each card that I make as a project, I can easily reopen it, reprint it, or change the photo all together.

I write about this process in my latest book, The Apple Photos Book for Photographers, which you can download right now. But I'll also share the basic steps right here so you can create your own works of art at home with an inkjet printer.

Creating a Fine Art Greeting Card with Apple Photos

I use Red River Paper because it offers a wide selection of card stock at very affordable prices. (Plus you can get envelopes and ink there too.)

For this project I'm using one of my favorites, 60 lb. Polar Matte double-sided 7" × 10" (catalog #1958). It's a bright paper with a nice tooth that feels good in the hands. Your cards will look and feel like works of art.

The reason why you want to go with 7" × 10" paper is because it folds down to a standard 5" × 7" card - the same dimensions that Apple uses for its folded pieces. In a pinch, you could cut down a larger sheet if necessary. But the Red River cards are also scored in the middle, which makes folding so much easier and professional looking.

As for printing instructions, I'll remind you that what appears in the dialog box is based on the print driver. So what you see on your computer might look different than what I'm showing here. Hopefully, you'll be able to take this information and adjust accordingly.

10-14-PrintDialog.jpg

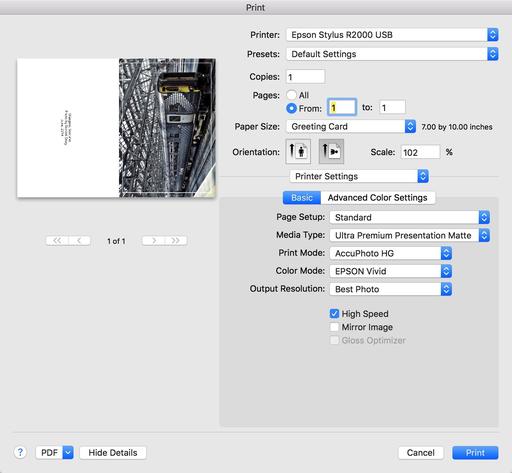
Instead of clicking on the Buy Card button, go to File > Print. You should see something like in the figure above. If you're seeing far less information on your computer, click on the Show Details button at the bottom of the dialog. That should expand the dialog box.

Since I'm only printing the outside of the card (I like to leave the inside blank for a personal message), I choose "Print from 1 to 1." Then we get to paper size. Chances are very good that you're not going to have a 7" × 10" option in this popup menu. But what you will have there is a Manage Custom Sizes option at the bottom. Choose that, and make your own preset. I named mine Greeting Card. The computer will remember the 7" × 10" preset you just created. So you only have to do this the first time.

After you have the paper size right, the card should look pretty good in the preview window. Mine came up just a tad short on the edges. So I set scale for 102 percent. That fixed the problem perfectly.

Now all that's left are the printer settings. You can add those in the popup that's labeled Layout. Click on it, and choose Printer Settings from the list. The most important part is having Media Type set correctly. In my case, the printer needs to know that I'm using matte paper. Check your settings one more time, then print!

Watching the card slowly emerge from the printer is the closest thing we have in digital photography to seeing an image magically appear in a tray of developer. Both are exciting. Let the card cure for an hour or so at room temperature before folding - that is, unless it's one of those emergency jobs you're making as you head out the door to an anniversary party. Then fold and go!

As you're sitting there in the car with the card in your hand, you might feel a little something. Let it wash over you and enjoy it. That's the feeling of being an artist.

The Apple Photos Book for Photographers

For photographers who are more than just casual snapshooters, or who are making the transition from Aperture or iPhoto, The Apple Photos Book for Photographers shines a light on the sophistication of this app and the ecosystem it taps into. Available as an eBook now, and coming to print later this year.

Get it for $15 using checkout code APPLE15!

Want to Comment on this Post?

You can share your thoughts at the TDS Facebook page, where I'll post this story for discussion.
Apple RAW Update 6.20 adds compatibility for 9 new cameras for its Photos app and system wide on Mac OS X. The new cameras are (including the PEN-F):

  • Canon EOS-1D X Mark II
  • Canon EOS 80D
  • Canon EOS Rebel T6 / 1300D / Kiss X80
  • Canon PowerShot G7 X Mark II
  • Panasonic LUMIX DMC-GF8
  • Panasonic LUMIX DMC-GX7 Mark II / GX80 / GX85
  • Panasonic LUMIX DMC-ZS100 / TZ100 / TX1
  • Sony Cyber-shot DSC-RX10 III
  • Olympus PEN-F

olympus-pen-f.jpg

RAW files from these cameras can be processed natively on Mac OS X. For a complete list on cameras supported, see Apple Support Document

The Apple Photos Book for Photographers

For photographers who are more than just casual snapshooters, or who are making the transition from Aperture or iPhoto, The Apple Photos Book for Photographers shines a light on the sophistication of this app and the ecosystem it taps into. Available as an eBook now, and coming to print later this year.

Get it for $15 using checkout code APPLE15!

For hands-on tutorials, be sure to take a look at Photos for OS X Essential Training on lynda.com. I cover everything you need to know to get the most from this surprisingly powerful image management application.

Want to Comment on this Post?

You can share your thoughts at the TDS Facebook page, where I'll post this story for discussion.
The 1.1 version of External Editors, a must-have 99-cent editing extension for Photos, continues to drive this application in the right direction.

External-Editors.jpg Version 1.1 of External Editors brings a new interface and nice improvements.

When I first wrote about the app in February, it didn't have a mechanism for handling RAW file transport. But version 1.1 features many refinements, including being able to convert RAW files to Jpegs or Tiffs in the extension itself.

This leads to many possible workflows. The one I've been using goes like this for RAWs.

  • In Photos, duplicate the RAW file and name it as an external edited version.
  • Open the duplicated RAW in External Editors and use the Convert To command to change it to Tiff or Jpeg.
  • Send it to the processor of your choice and edit.
  • Save the file and return to Photos.

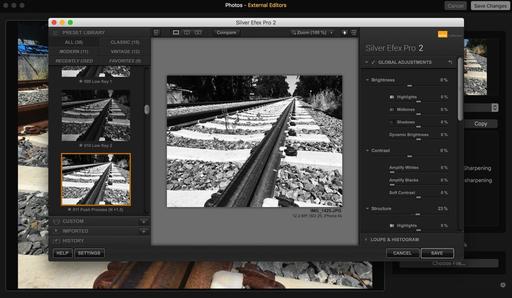
silver-efex-photos.jpg Silver Efex Pro 2 running with External Editors and Photos.

The edited Tiff or Jpeg will be positioned next to your original RAW in the Photos library. You have other workflow options, such as Replace with Image from Disk. It's worth playing with to find the sequence that works best with you. Because the bottom line is this: Exernal Editors opens up all of your image editing tools to your Photos library.

The Apple Photos Book for Photographers

For photographers who are more than just casual snapshooters, or who are making the transition from Aperture or iPhoto, The Apple Photos Book for Photographers shines a light on the sophistication of this app and the ecosystem it taps into. Available as an eBook now, and coming to print later this year.

Get it for $15 using checkout code APPLE15!

And dont forget... For hands-on tutorials, be sure to take a look at Photos for OS X Essential Training on lynda.com. I cover everything you need to know to get the most from this surprisingly powerful image management application.

Want to Comment on this Post?

You can share your thoughts at the TDS Facebook page, where I'll post this story for discussion.
DxO continues to refine their ONE Camera with Firmware Update 1.4. Among the list of goodies, one that really caught my eye was adding author copyright to each image's metadata.

copyright-screen.jpg DxO ONE shooters can now set up automatic inclusion of their copyright, author info, and even watermark to their images.

I updated the DxO ONE via my iPhone. The procedure was simple and fast. In general, I have to say that the software interface for the camera is one of my favorite aspects of it. It's so easy to use. And these days, it's quite powerful too.

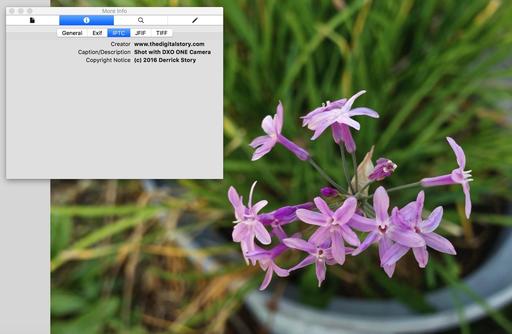
After the firmware update, I added my copyright and www.thedigitalstory.com for the author info. After all, I want people to know how to get a hold of me. I then opened the image in Photos for OS X and ran the picture through the DxO ONE editing extension for fine tuning. I exported the shot to my desktop and opened it in Preview.

Copyright-DxO.jpg

The Get Info window displays all of the information that I entered in the settings for my DxO ONE. This is a wonderful addition to an already full-featured camera.

The DxO ONE is available for $439, featuring a 1" sensor and excellent feature set.

Want to Comment on this Post?

You can share your thoughts at the TDS Facebook page, where I'll post this story for discussion.
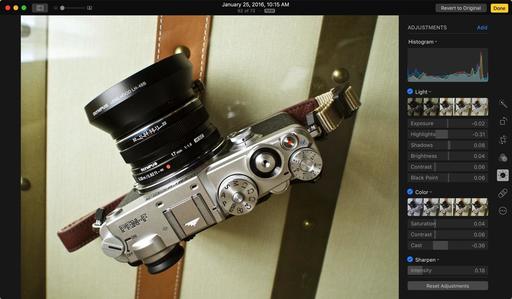
A week from today many of us will be watching the WWDC keynote on our Apple TVs. Most folks will be listening for what's new in their favorite area of technology. For myself, I'm keenly interested in the next chapter of digital photography with Apple tools.

In many ways, I feel like we've been putting together a jigsaw puzzle the last couple years. The evolution of iPhone cameras, iOS photography apps, iCloud, and Mac-based software have all been spread out on a table while we try to figure out how to assemble them.

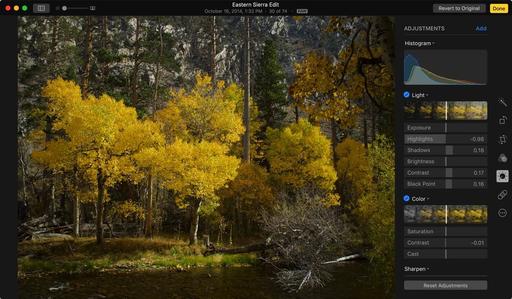
photos-for-osx-edit.jpg

The missing piece has been Photos for OS X. Although a lovely application in its own right, it's hardly the Aperture/iPhone replacement that enthusiast photographers were hoping for... at least at first.

The emergence of Editing Extensions has provided much-needed functionality for adjusting our pictures. And depending on which extensions you have available on your Mac, you can do everything from retouching a portrait to creating an HDR landscape. Add robust iCloud connectivity, and the pieces are truly beginning to make sense.

So what's missing? What I and many others will be hoping for on Monday, June 13 is improved digital asset management. Simply marking a picture as a favorite isn't adequate. If Photos for OS X is ever going to become that software that's it's capable of, then Apple needs to address the front end of post production.

It's then next chapter that I want to write for my book. And if Apple provides that missing piece, the picture that we've been hoping to see should be worth the wait.

The Apple Photos Book for Photographers

For photographers who are more than just casual snapshooters, or who are making the transition from Aperture or iPhoto, The Apple Photos Book for Photographers shines a light on the sophistication of this app and the ecosystem it taps into. Available as an eBook now, and coming to print later this year.

Want to Comment on this Post?

You can share your thoughts at the TDS Facebook page, where I'll post this story for discussion.
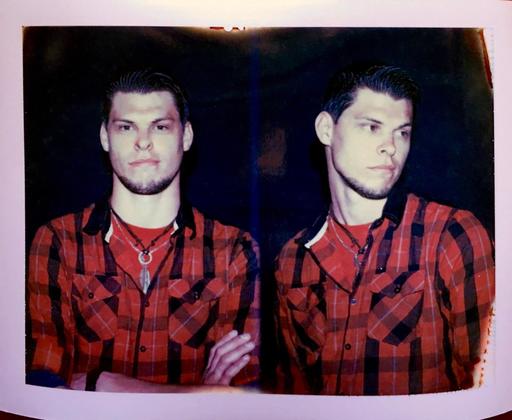
In addition to the Polaroids I want to digitize, I have lots of snapshots that I'd like to share online. I haven't done much of that in the past because, quite honestly, it was just too much hassle. But now, I have a simple workflow using my iPhone and Photos, that has changed all of that.

Chris Polaroid Portrait.jpg "Chris" by Derrick Story with a Polaroid MiniPortrait 203 Passport Camera.

First, I scan the print with the iPhone 6S and the Unfade app for iOS. This gives me an excellent source file that is semi-corrected too.

The image is automatically saved to my iCloud account, so it's there waiting for me on my Mac. I open it in Photos for OS X and apply the Enhance tool in the Edit menu. If I need to do more, I can use one of my favorite Editing Extensions such as Pixelmator Retouch or BeFunky.

The adjusted image is saved back to iCloud and is available on all of my iOS and Mac OS X devices. From there, I can share at will. The entire process takes about 5 minutes.

Do You Like Film?

Take a look at theAnalogstory - Film Photography in the Digital Age. We cover great 35mm cameras, personal stories from film photographers, quick tips, and even a camera shop. Stop by, won't you?

Want to Comment on this Post?

You can share your thoughts at the TDS Facebook page, where I'll post this story for discussion.