Previously, you could view location data in the Info box, but that was about it. Great for iPhone pictures that already had geotags. But what about the other shots captured with regular digital cameras?
 In Photos for OS X 1.1, you can look up location data for any image and apply it to previously non-geotagged pictures.
In the version of Photos that ships with El Capitan, this all changes, giving you much more control. Here's how it works.
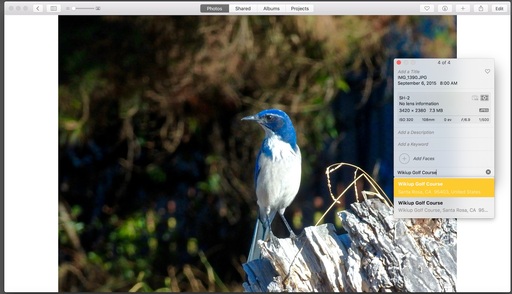
First, open an image in the viewer and enable the Info box (CMD-I). At the bottom of the box, you'll see text that reads, Assign a Location. Start typing the place where the picture was captured. Photos will offer locations matching your entry (see top picture). Pick one that works.
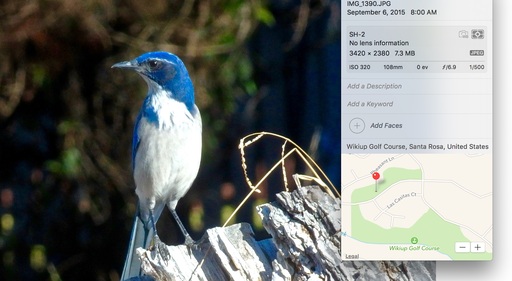
 Location found for this image.
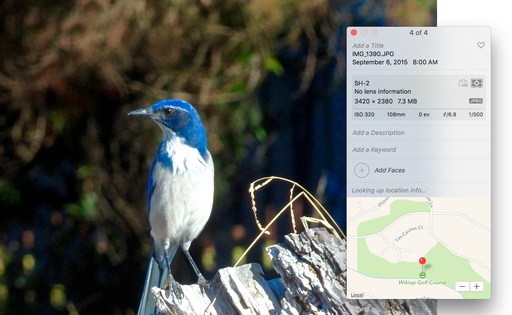
In the case of this blue jay image, the photograph wasn't actually recorded at the club house as initially indicated. I saw the bird alongside a fairway quite a distance from the offices. So I clicked and dragged the pin to the actual location of the capture. It's easier to do this precisely if you use the zooming tools in the lower right corner of the location box. Pinching outward and inward works too.
 I dragged the pin to the proper location for this image.
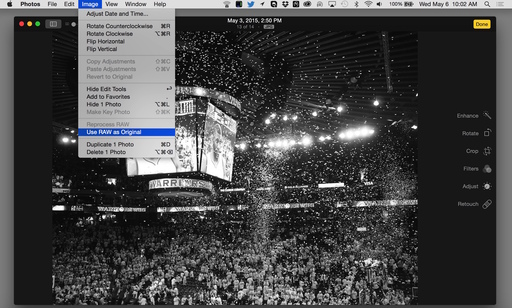
If I decided that I wanted to remove the location at a later date, I can choose Remove Location from under the Image menu (Image > Location > Remove Location). I can also revert to the original location here.
There doesn't appear to be any batch processing for geotagging. But you can copy the location text and paste it in a subsequent picture. it's not super elegant, but it does save a little time.
When you export images out of your Photos library, you may want to do so without the location data. You'll find that control under the General tab in Preferences.
Get Up and Running with Photos for OS X
Want to get up to speed with Apple's latest photo management application? Then take a look at my latest online video training, Up and Running with Photos for OS X. Soon, both you, and your pictures, will be comfortable in their new home.
And don't forget about the Photos for OS X Special Feature Section on The Digital Story. It's a roundup of tutorials, videos, and articles focused on helping you master Apple's latest photo management software. You can also find it under Photography in the top nav bar.
Want to Comment on this Post?
You can share your thoughts at the TDS Facebook page, where I'll post this story for discussion.