May 2010 Archives

The Samsung NX10 is a mirror-less DSLR featuring a 14.6 MP APS-C CMOS sensor, 3" LCD, electronic viewfinder, Raw capability, 720p HD movie recording, and just about every control a serious photographer would want. All of this packed into a body that is smaller than your traditional SLR.

samsung_nx10.jpg

In this podcast, I walk through the performance and handling of this $650 camera by Samsung, plus talk about how its Raw files stack up against the in-camera processed Jpegs.

Listen to the Podcast

You can also download the podcast here (27 minutes). Or better yet, subscribe to the podcast in iTunes. You can support this podcast by purchasing the TDS iPhone App from the Apple App Store.

Monthly Photo Assignment

Float is the June 2010 Photo Assignment. You can read more about how to submit on our Member Participation page. Deadline for entry is June 30, 2010.

Simone Brogini was the "Sizzlpix Pick of the Month" for Photo Assignment 49. Who will be the winner for Photo Assignment 50? We'll know very soon. The prize is an 11"x14" Sizzlpix of the winning photograph.

More Ways to Participate

Want to share photos and talk with other members in our virtual camera club? Check out our Flickr Public Group. It's a blast!


twitter.jpg Follow me on Twitter

-


Podcast Sponsors

Red River Paper -- Try the $7.99 Sample Kit.

Make Your Photos Sizzle with Color! -- SizzlPix is like High Definition TV for your photography.


Technorati Tags: , , , , ,

This gallery will definitely bend your mind. The assignment for April 2010 was "Curve." Check out this outstanding collection of images from members of the TDS virtual camera club. And I mean this is an excellent collection of photographs. It's going to be tough to choose the SizzlPix Pick of the Month from this effort.

David_L_Crooks.jpg

The June 2010 assignment is "Float." Start working on your contribution now. Details can be found on the Member Participation page. You can now submit photo assignment pictures up to 800 pixels in the widest direction.

Please follow the instructions carefully for labeling the subject line of the email for your submission. It's easy to lose these in the pile of mail if not labeled correctly. For example, the subject line for next month's assignment should be: "Photo Assignment: May 2010." Also, if you can, please don't strip out the metadata. And feel free to add any IPTC data you wish (These fields in particular: Caption, Credit, Copyright, Byline), I use that for the caption info.


Photo by David L. Crooks. (Click on it to see enlarged version.) You can read more about how David captured this shot, plus see all of the other great images on the April 2010 Gallery page.


Good luck with your June assignment, and congratulations to all of the fine contributors for April. It's a great collection of images.


twitter.jpg Follow me on Twitter

-


Now Available! The Digital Photography Companion. The official guide for The Digital Story Virtual Camera Club.

  • 25 handy and informative tables for quick reference.
  • Metadata listings for every photo in the book
  • Dedicated chapter on making printing easy.
  • Photo management software guide.
  • Many, many inside tips gleaned from years of experience.
  • Comprehensive (214 pages), yet fits easily in camera bag.

Technorati Tags: , ,

ipad_cam_connect.png

In the few weeks I've been using the iPad Camera Connection Kit, I've found it to be a highly useful accessory. Macworld just posted my official review of the Camera Connection Kit, and it's worth a read if you want to get a fast start to using the accessory.

The highlights for this pair of dock connectors that allow you to directly import images from your camera to the iPad are:

  • It's fast. I was very impressed with how snappy everything worked. Not at all like the old days of uploading photos to an iPod.
  • Maintains the integrity of your images. If you upload Raw files, then connect the iPad to your Mac to transfer the images, you get Raw files coming out too. Same goes for Jpegs and movies.
  • Able to connect iPhones and iPods too. Nice way to move a favorite image from your iPhone to the iPad.
  • Small on size; affordable price. They don't take up much room, which is important for iPad users, and the kit costs $29.99.

Now I can carry any camera I want with the iPad, take photos, go to a local coffee shop, play with the images, and have them on my Flickr account before my cup of French Roast gets cold. Good times!


twitter.jpg Follow me on Twitter

-


What do you do when your referenced masters need to be moved to a different hard drive to maintain the functionality of your Aperture 3 library? At first this may seem like a daunting task, but with a little luck, the process will be easy and painless. I'll explain in this article.

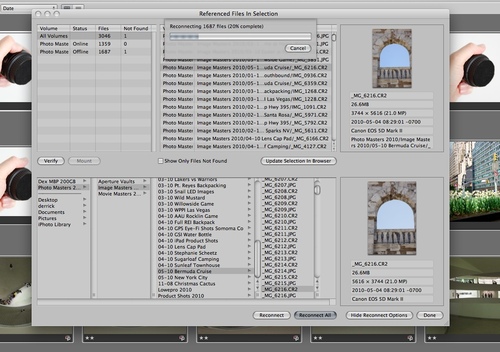
Reconnecting Masters in Aperture 3 Click on image for enlarged view.

I could tell something was amiss with my LaCie Rugged hard drive that contained the master Raw files for my Aperture library. Suddenly it started auto-disconnecting from the computer, even though the cable was intact. I switch from FireWire to USB (Ruggeds have triple interfaces), and at first that seemed to make it happy. But soon the odd behavior resumed. As I've learned in the past, when a hard drive begins to act up, you must move quickly.

I began the process of moving my nicely organized master files for my Aperture 3 library to a fresh drive. This took a few days to accomplish because the beleaguered drive keep conking out before I could finish the transition. But finally they were all there. Even though the file structure on the new drive, including the name for the drive itself, was identical to the ailing hard drive it was replacing, Aperture showed "missing masters" for all of my referenced files.

Fortunately, I could use the "Locate Referenced Files" command (under the File menu) to reestablish those connections. The process is simple:

Steps to Reconnect Master Files

  • Click on the Photos icon in the Library tab of the Aperture Inspector.

  • Click on one thumbnail, then choose Select All from the Edit menu.
  • Go to Locate Referenced Files under the File menu.
  • Establish one photo match between the top and bottom pane of the interface (as shown in the illustration). The top pane is your Aperture library. The bottom pane is the new hard drive with the master files.
  • Click on the Reconnect All button.
  • Take a short coffee break

When you return, all of your referenced master files will have been reunited with their counterparts in the Aperture library. At this point, I would also create a new Vault and back up your work.

More Aperture Tips and Techniques

To learn more about Aperture 3, check out my Aperture 3 Essential Training on Lynda.com. Also, take a look at our Aperture 3 Focus Section. Tons of free content about how to get the most out of Aperture.


twitter.jpg Follow me on Twitter

-


"Sunset Bar" - Grab Shot 197

Sunset Bar Grab Shot 197

"It was the last day of the 7-day cruise between New York City and Bermuda, known to us as MacMania10," writes Randal Schwartz. "Derrick taught some very good classes on this cruise, but it was ending, and I was worn out. I had just finished shooting the last party of the day, and wandered from the private area for our group over to the bar proper around the corner. I didn't have a tripod with me, but I noticed that my Canon 7D sat nicely on the bar, pointed at the shiny surfaces of what normally passes for a dance floor in the 'Crow's Nest.'"

"I thought it would be interesting to try a nice long exposure here, although not so long that I would get a super-deep depth-of-field from a tiny aperture, so I settled on 2 seconds at ISO 200, which resulted in a f/5.0 aperture. Yes, it was very dark, almost so dark that I couldn't see most of image that this picture revealed."

"I carefully placed the camera on the bar, using the "live view" feature to adjust the frame and focal length. Ever so gently pressing the shutter, I got my 2 second exposure without movement (it took three tries :). I was really pleased with the variety of shapes and colors on the screen, but when I got it back into Aperture the next morning, I was amazed at the depth and range of colors! I was also quite pleased that the sunset in the windows had the perfect brightness level to enhance the picture. The range of colors and amorphous shapes -- even the out-of-focus reflection on the bar right next to the camera -- all add interesting elements to this picture."

Photo by Randal Schwartz. Click on image for larger version.

If you have a candid you'd like to share, take a look at our Submissions page, then send us your Grab Shot. We'll try to get it published for you on The Digital Story.

And you can view more images from our virtual camera club in the Member Photo Gallery.


The Digital Story Podcast App is the best way to stream or download weekly TDS podcast episodes. No more syncing your iPhone or iPod Touch just to get a podcast. And there's more! Tap the Extras button for free passes and discounts and the current Grab Shot by our virtual camera club members. Each podcast episode has its own Extras button, too, that contains more goodies such as pro photo tips. And the best part is, The Digital Story Podcast App is your way to help support this show.Download it today!


twitter.jpg Follow me on Twitter

-


Essential gear for photographers is lighter and more powerful than ever. But how light can you go and still have everything you need? How does 5.5 pounds sound? Yes, that's total weight that includes camera, computer (with full keyboard), tripod, bag, extra battery, extra memory, glasses, cables, iPod, and a few personal items. All of this for less than 6 pounds.

nimble_photographer_still.jpg

With this set up, I can shoot Raw+Jpeg, transfer photos from camera to computer, upload them to my website, answer email, write notes, edit my pictures, and just about any other task I need. I can use a local WiFi network or tap a cellular connection.

In this week's podcast, I list every item in my Nimble Photographer kit. Plus I include links to these items here in the show notes. You can certainly substitute items as needed, but this lineup will get you headed in the right direction.

Listen to the Podcast

Watch the Movie

In this video, I show you all of the gear that I use for the Nimble Photographer kit.

Parts List for Nimble Photographer

You can also download the podcast here (33 minutes). Or better yet, subscribe to the podcast in iTunes. You can support this podcast by purchasing the TDS iPhone App from the Apple App Store.

Monthly Photo Assignment

Fire is the May 2010 Photo Assignment. You can read more about how to submit on our Member Participation page. Deadline for entry is May 31, 2010.

Simone Brogini was the "Sizzlpix Pick of the Month" for Photo Assignment 49. The prize is an 11"x14" Sizzlpix of the winning photograph. Congratulations Simone! (BTW: it's pronounced "Si Mon Ne" regardless of how badly I pronounce it on the show.)

More Ways to Participate

Want to share photos and talk with other members in our virtual camera club? Check out our Flickr Public Group. It's a blast!


twitter.jpg Follow me on Twitter

-


Podcast Sponsors

Red River Paper -- Try the $7.99 Sample Kit.

Make Your Photos Sizzle with Color! -- SizzlPix is like High Definition TV for your photography.


Technorati Tags: , , , , ,

I've always felt that shopping for camera batteries is about as exciting as buying tires for a station wagon. Yes, you need them both, but they cost more than you want to spend and are less than thrilling to use.

Since the manufacturer's batteries are pricy, it's tempting to save a few bucks using batteries made by other folks. So I decided to put this to the test with my Canon PowerShot S90 compact camera. When I purchased the second battery, I opted for the ProMaster NB6L Lithium at $24.95 instead of the Canon NB-6L Li-Ion Battery at $41.75.

The specs for both batteries are the same. And after a few months of alternating back and forth between the two, I haven't noticed any performance differences.

So my initial conclusion is: as long as the third party battery is of good quality, I don't see a reason to pay more for the manufacturer's brand. If you've tested this with other cameras, please post a comment with your findings.

The one accessory you never want to forget when traveling to sunny, colorful locals is the polarizing filter. This item alone will separate your images from those around you.

I recently explored the streets of St. George, Bermuda, and the Royal Naval Dockyard with my Canon 5D Mark II with 24-105mm zoom and a circular polarizer. Even though it's only a 2 hour flight from the Atlantic Coast of the US, St. George feels another world away. I was able to better show the texture and color of this town using the polarizing filter on a sunny day.

Later, in class, many of my students asked why my shots looked so much different than theirs. I cited the pola might be a factor, then asked how many remembered to pack one. No one did. Don't let this happen to you!


Rusty beams during a stop over at the Royal Na val Dockyard in Bermuda. Captured with a Canon 5D Mark II, 24-105mm f/4 zoom with a circular polarizer. Click on image for larger version. Visit the TDS Flickr Gallery for more images from Bermuda shot this way.


flickr_st_georges.jpg

To see the entire collection, visit the TDS Flickr Gallery.


twitter.jpg Follow me on Twitter

-


The magnification loupe in Aperture is more versatile than you may realize. In this short video, I show you a few of its tricks.

This video tutorial is from my Aperture 3 Essential Training on Lynda.com. There are more than 8 hours of hands on training there. Go check it out!

More Aperture Tips and Techniques

To learn more about Aperture 3, check out my Aperture 3 Essential Training on Lynda.com. Also, take a look at our Aperture 3 Learning Center. Tons of free content about how to get the most out of Aperture.


twitter.jpg Follow me on Twitter

photoshop_cs5_box.jpg

In addition to the sexy stuff, Adobe does a great job of adding refinements to each release of Photoshop. I just found this article by Jason Anderson, Five Best Kept Secrets of Photoshop CS5, and he lists some nice touches that you might not know of. My favorite of the bunch?

Sharing Your Monitor -- In CS5, the feature has been added where you can share your monitor with others so you can show people exactly what you are looking at. I can totally see this as a feasible solution for clients that are remote to your location, and travel costs need to be kept down. Even training seminars could be conducted this way...imagine sitting at your computer at work (or home) and watching an instructor teaching you live from their own desktop!

Be sure to check out the other four best kept secrets by Jason.

More About Photoshop CS5

How to Tame HDR Toning in Photoshop CS5

"Photoshop CS5" - Digital Photography Podcast 221


twitter.jpg Follow me on Twitter

-


When working with a two-flash set up on the go, you can easily change the power ratios between your main light and the fill light (without having to fiddle with moving light stands around). For my rig, I use the Canon Speedlite Transmitter ST-E2 with a pair of Canon 580EX II flashes.

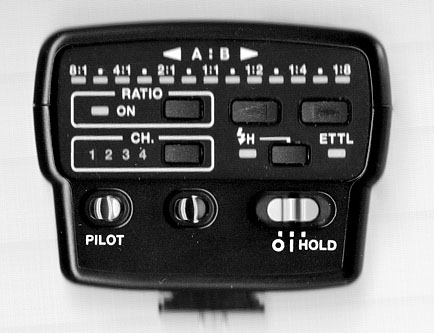
To set up your rig, make sure the flashes are in slave mode and the transmitter is secured in the hotshoe and turned on. Set the 580 EX II flash on your left to "Group A," and the flash on your right to "Group B." Then all you have to do is press the Ratio button on the back of the transmitter, and choose the lighting scheme using the two navigation buttons to the right of the Ratio button.

Canon Transmitter ST-E2

For portraits, I usually start with a 4:1 ratio with this rig. But if I don't like the effect, I can easily adjust. I have a total of 13 ratio settings to choose from! This set up works great.


twitter.jpg Follow me on Twitter

-


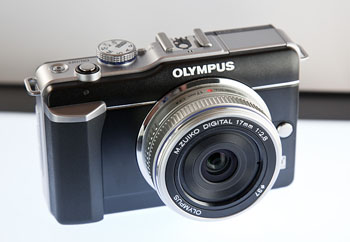
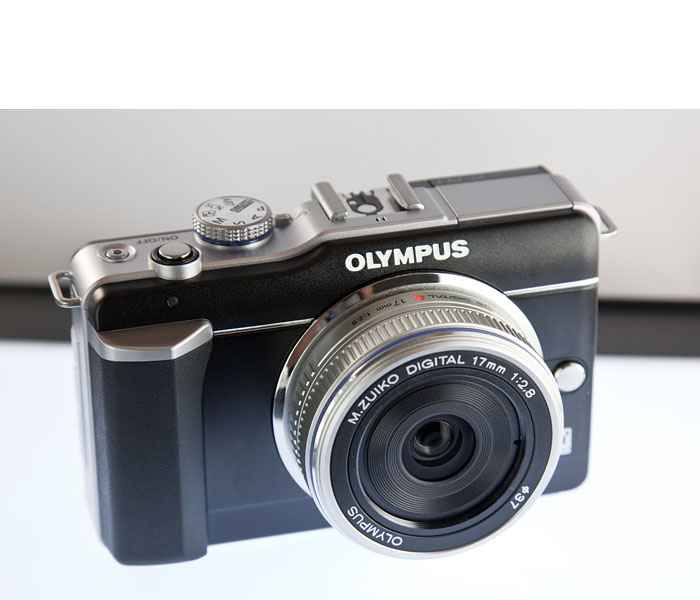
I was curious as to what DP Review would write in their examination of the Olympus E-PL1, a camera that I'm quite fond of. Overall, I think they're on target, especially their assessment of its image quality:

"The most important aspect of any camera is its image quality and it is, without question, the E-PL1's strongest point. By just about any measure, the E-PL1's image quality is very good indeed and, thanks to one the most capable JPEG engines we've come across, is easily accessible to everybody. The camera's metering is dependable, meaning that in most circumstances you get bright, punchy images that make the most of the camera's capability."

I don't completely agree with DP Review's view that the E-PL1 is better for those moving up from a compact rather than photographers looking for a second, more portable DSLR. I think it works for both audiences. But, after all, these are matters of personal taste, and every potential customer has to decide for him or herself.

I think most people will agree that for a price of $575 for an E-PL1 kit, this camera is a good value.


twitter.jpg Follow me on Twitter

-


Business has been tough for everyone the last couple years. But we're starting to see a few bright spots in photography hires. Wedding shooters are reporting a bit of an upswing, both in bookings and in order size. This week, I sit down with working photographer Karen Linsley, the owner of Image Angels, a full service photography studio. Karen provides some great insights on not only the state of photography business, but on how she prepares for weddings and other big shoots. It's a conversation I'm sure you'll enjoy.

Listen to the Podcast

You can also download the podcast here (24 minutes). Or better yet, subscribe to the podcast in iTunes. You can support this podcast by purchasing the TDS iPhone App from the Apple App Store.

Monthly Photo Assignment

Fire is the May 2010 Photo Assignment. You can read more about how to submit on our Member Participation page. Deadline for entry is May 31, 2010.

Simone Brogini was the "Sizzlpix Pick of the Month" for Photo Assignment 49. The prize is an 11"x14" Sizzlpix of the winning photograph. Congratulations Simone! (BTW: it's pronounced "Si Mon Ne" regardless of how badly I pronounce it on the show.)

More Ways to Participate

Want to share photos and talk with other members in our virtual camera club? Check out our Flickr Public Group. It's a blast!


twitter.jpg Follow me on Twitter

-


Podcast Sponsors

Red River Paper -- Try the $7.99 Sample Kit.

Make Your Photos Sizzle with Color! -- SizzlPix is like High Definition TV for your photography.


Technorati Tags: , , , , ,

Wouldn't it be wonderful to build multimedia presentations of your work using HTML5 and publish them online to be enjoyed by iPads all over the world? As of today, you can. And it's easy.

iPad Publishing

Thanks to a new web site called Padilicious, you can download prewritten Automator Actions that allow you to create browser based content for display on the iPad and Internet-connected computers. Simply select the project images in Aperture, iPhoto, or the even the Finder, and run a simple Mac OS X Service that automatically builds an iPad web-app and hosts it on your MobileMe website for others to easily view on their computers and iPads.

I created and published this presentation titled, A New York Short in about 15 minutes. You can view it on your computer, but the real magic happens when you access this URL via your iPad. If you want to watch it full screen on your iPad, simply Bookmark it (use the + symbol in Safari) and choose "Add to Home Screen" from the popup menu. Now all you have to do is tap on the new App icon you've created, and the iPad will allow you to enjoy the presentation in full screen mode.

This authoring tool opens new doors for content creators who want to build custom presentations for the iPad. All the instructions, plus the installers, are available at Padilicious.com. And it's all free.

One tip for MobileMe users. Be sure you publish your content in the Web folder on your iDisk. The path is: yourname > Web > Sites > yourpresentationfolder. I made the mistake of dropping it directly in the Sites folder at the top level. Ack! That doesn't work.

Photographers and writers... have fun with this!

More iPad Articles

Acme Made iPad Cases for Style and Protection

Will the iPad Squish my Photos?

The $2 iPad Stand

Bluetooth Keyboard and iPad - A Powerful Combination

Turn Your iPad into a Live Camera

Lowepro Classified 160 AW is Perfect Bag for iPad Toting Photographers

Coolest iPad Apps for Photogs? Keynote and CameraBag

"iPad for Photographers" - Digital Photography Podcast 219


twitter.jpg Follow me on Twitter

-


Working in full screen mode enables you to dedicate every pixel of display resolution to your photography. Aperture 3 includes many major improvements to this functionality, so many in fact, that you may not be taking full advantage of its capabilities.

In this free 5-minute video tutorial from my Aperture 3 Essential Training on Lynda.com, I show you how to quickly master full screen mode to work more efficiently, and, more enjoyable.

More Aperture Tips and Techniques

To learn more about Aperture 3, check out my Aperture 3 Essential Training on Lynda.com. Also, take a look at our Aperture 3 Focus Section. Tons of free content about how to get the most out of Aperture.


twitter.jpg Follow me on Twitter

"First Ride" - Grab Shot 196

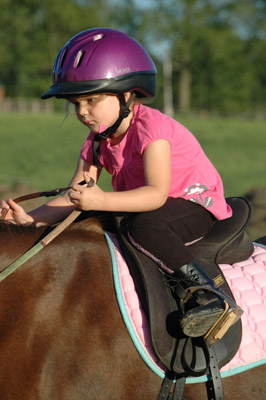
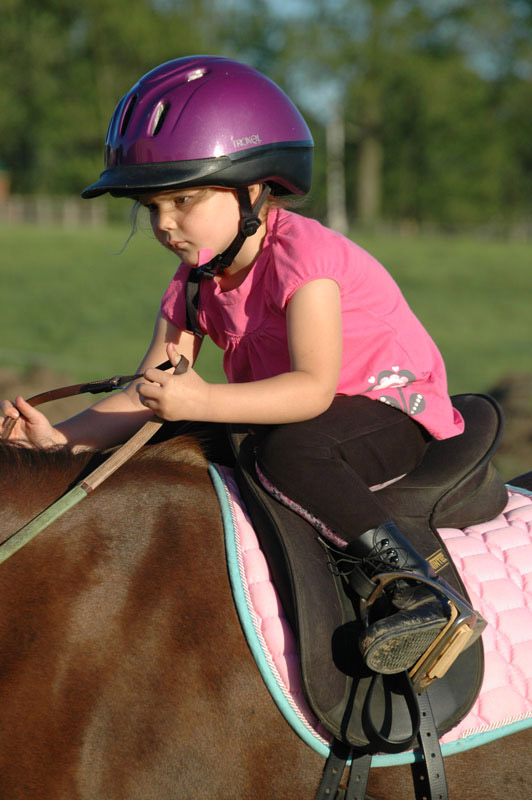
"Lilly is a 3 year old who just started riding horses," writes Fred Brundick. "The first time she came to the farm, all we heard was 'Aunt Debbie, Aunt Debbie, when can I get on a horse?'"

"She has doubled-up a couple of times with the 8 year old girl who takes lessons on Tish. But I took this picture the first time that Lilly rode Tish by herself. I like Lilly's look of concentration, the pink and purple colors against the blurry green background, and the shine in Tish's coat."

Fred used a Nikon D70s with a Nikkor 55-200mm f/4-5.6 zoom lens. He was in aperture priority mode set to f/8. ISO was 400 resulting in a 1/640th shutter speed.

Photo by Fred Brundick. Click on image for larger version.

If you have a candid you'd like to share, take a look at our Submissions page, then send us your Grab Shot. We'll try to get it published for you on The Digital Story.

And you can view more images from our virtual camera club in the Member Photo Gallery.


The Digital Story Podcast App is the best way to stream or download weekly TDS podcast episodes. No more syncing your iPhone or iPod Touch just to get a podcast. And there's more! Tap the Extras button for free passes and discounts and the current Grab Shot by our virtual camera club members. Each podcast episode has its own Extras button, too, that contains more goodies such as pro photo tips. And the best part is, The Digital Story Podcast App is your way to help support this show.Download it today!


twitter.jpg Follow me on Twitter

-


Lowepro Nova 160 AW

We have not one, but two reader reviews of Lowepro bags for the great outdoors. Both Jane and Ed have put these bags through their paces, and they've filed their reports here.

Lowepro Nova 160 AW

Like many photographers, I'm always searching for that perfect camera bag. Over the years I've owned many bags by various manufacturers, although I seem to gravitate to various-sized Lowepro Trekkers. As a result, I ended up with the ubiquitous "camera bag closet" in the garage.

But in recent years I've been on a mission to simplify and downsize -- first my DSLR gear. I've settled on a Panasonic G1 system as my default camera. It's great for everything from around town, hiking, or traveling. The only time I carry my bigger DSLR kit is when doing action photography.

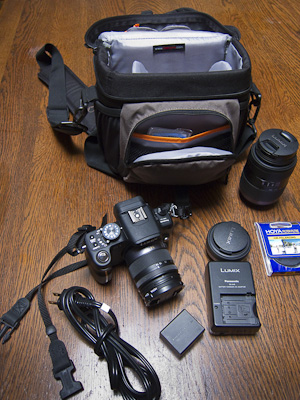
For this system I've found the Lowepro Nova 160 AW. Dare I say it seems perfect? Only when traveling do I take everything, and yet everything fits in this wonderfully compact and lightweight bag. It even has a stow-away All Weather Cover to boot.

In my case, everything is a Panasonic G1 with 14-45 mm lens attached, pancake 20 mm f1.7, 45-200 mm zoom, extra SDHC cards, spare battery, charger, and cable, plus circular polarizer. Typical configuration is 20 mm and 14-45, or 14-45 and 45-200 -- sans charger and cable. I've included a photo of the bag and how I pack it with everything. The only thing that doesn't fit is the manual which is about an inch too tall for the zipperd pocket on the back of the bag. But it's easy enough to stash elsewhere.

The Lowepro Nova 160 AW sells for about $45.

Ed Shields


Lowepro Primus AW

lowepro_primus.jpg

The Lowepro Primus AW Backpack has enough room for my DSLR, additional lens, and other needed items for photography. The top pocket holds hiking essentials and lunch. There is a side pocket for a water bottle. My tripod straps securely in the tripod holder. The rain cover is important for hiking here in Oregon. (You cannot use the tripod holder with the rain cover though.)

The side access zipper allows for quick access to my camera. The pack itself is very comfortable and has padded shoulder straps, hip belt, and an adjustable sternum strap. There is a large compartment on the back that will hold extra clothing layers with ease. One caveat: when you take your tripod off the pack, make sure to buckle the top strap so it does fall off the pack and get lost. (My husband learned this one the hard way.)

The The Lowepro Primus AW Backpack sells for about $110.

Jane Hamilton


If you have a reader review of outdoor gear, please send it to me! Visit our Member Participation page.


Previously in Outdoor Gear for Photographers

Ultimate Water Bottle for Photogs? GSI DukJug

Dependable Footwear for Photo Work in the Field

Day Tripping with the Lowepro Versapack 200 AW

Shelter on Location: REI Half Dome 2

String Monopods

"The Great Outdoors" - Digital Photography Podcast 218

Portable Camera Stability

Sunset Portraits

New Series on Outdoor Gear for Photographers


twitter.jpg Follow me on Twitter

-


Proper Way to Wear Bermuda Shorts

One of the Bermuda namesakes, besides the Triangle, is Bermuda shorts. As I soon learned during my visit, there is a proper way to don this attire. My first sightings were bankers and businessmen in Hamilton. But they were moving at such a fast clip, I could not get a decent shot.

Fortunately, onboard, our friend Vic appeared at dinner one night properly attired Bermuda style. Yes, coat, tie, knee high socks, and loafers are the recommended accessories for the stylish Bermudian. I asked Vic if he would pose for a portrait. At first he was hesitant, being the gentleman that he is. But once these lovely ladies coaxed him further, accepting was the right thing to do. Thank you much, Vic. You are a class act.

"Portrait of a Gentleman Wearing Bermuda Shots" by Derrick Story, captured with a Canon S90 at ISO 400, slow-sync flash with flash exposure set to -2/3. Click on image to enlarge.


twitter.jpg Follow me on Twitter

-


When I'm dashing to a meeting with my iPad, I prefer to tote it in a case. It's easier to hang on to, and I don't have to worry about accidentally dropping it. Initially, I tried the Apple iPad Case. Even though it functions well, it doesn't feel good in my hands. And it's not exactly a fashion statement. I decided to try two cases from Acme Made instead. And I can tell you right now, both feel and look much better.

So I packed up both the Slick Case and the Skinny Sleeve and headed off for a 10-day trip that included New York City and Bermuda. I spent time in cabs, on planes, sailing on a large ship, and hopping around on buses. Most of the time my living space was tight.

I really became attached to the Slick Case. Holding the iPad while in the case feels great. When I want to watch a video or type with the Bluetooth keyboard, I fold the case back and use it as an adjustable stand. The padded pocket is a perfect place to stash a large microfiber cloth for wiping off the iPad screen when it gets smudged. In other words, the Acme Slick Case is now my case of choice.

But I've included brief overviews of both cases, because for some the Skinny Sleeve will be more useful, especially if they want to stow their iPad in a tight space. It's a little thinner than than Slick Case. Read on to see which one is the best for you. 


Acme Made Slick Case for the iPad

acme_slick_case.jpg

The Slick Case has a book-style design that secures the iPad on one side and includes a padded sleeve on the other that can be used for documents, cables, and even your charger. It's fully padded to prevent any rubbing against the iPad glass screen. The Slick Case is idea for business meetings, coffee shops, air travel, and any other environment where you want to look sharp.

The black version has a matte finish neoprene stretch shell that feels great and maintains its good looks. There's also a glossy white edition. The lining is soft to ensure that your iPad's screen maintains its integrity. I also like the convenient double zippers. Once the case is open, you can fold it back like a magazine. This provides a very comfortable grip for the iPad, yet keeps your fingers off its glass surface. You can also use it this way as a stand when you're typing with a keyboard or viewing movies. 

The Slick Case is available for $35.


acme_skinny_sleeve.jpg

Acme Made Skinny Sleeve for the iPad

The Skinny Sleeve is also made of neoprene, but it has a high gloss outer surface with soft protective lining. In addition to its stylish design, the Skinny Sleeve is just that: a super thin case that secures your iPad, and it fits just about anywhere. It's perfect for large handbags, backpacks, and camera bags. It includes extra padding on one side to provide additional protection for your iPad screen. The $29.99 Skinny Sleeve is available in black or white. 

More iPad Articles

Will the iPad Squish my Photos?

The $2 iPad Stand

Bluetooth Keyboard and iPad - A Powerful Combination

Turn Your iPad into a Live Camera

Lowepro Classified 160 AW is Perfect Bag for iPad Toting Photographers

Coolest iPad Apps for Photogs? Keynote and CameraBag

"iPad for Photographers" - Digital Photography Podcast 219


twitter.jpg Follow me on Twitter

St. Gerorge's House, Bermuda

Nothing like a trip to Bermuda to help you get your gear organized and ready for travel. On this recent adventure, I fit all of my camera and computer gear into a Lowepro Fastpack 250 bag. For the most part, I was totally prepared. But I learned a few things along the way. I explain all in this week's podcast.


St. George's House, Bermuda. Photo by Derrick Story with a Canon 5D Mark II and a 24-105mm Canon L zoom. Polarizing filter. Click on image to enlarge.


Listen to the Podcast

You can also download the podcast here (31 minutes). Or better yet, subscribe to the podcast in iTunes. You can support this podcast by purchasing the TDS iPhone App from the Apple App Store.

Monthly Photo Assignment

Fire is the May 2010 Photo Assignment. You can read more about how to submit on our Member Participation page. Deadline for entry is May 31, 2010.

Simone Brogini was the "Sizzlpix Pick of the Month" for Photo Assignment 49. The prize is an 11"x14" Sizzlpix of the winning photograph. Congratulations Simone!

More Ways to Participate

Want to share photos and talk with other members in our virtual camera club? Check out our Flickr Public Group. It's a blast!


twitter.jpg Follow me on Twitter

-


Podcast Sponsors

Red River Paper -- Try the $7.99 Sample Kit.

Make Your Photos Sizzle with Color! -- SizzlPix is like High Definition TV for your photography.


Technorati Tags: , , , , ,

Quest for the Perfect Sunset

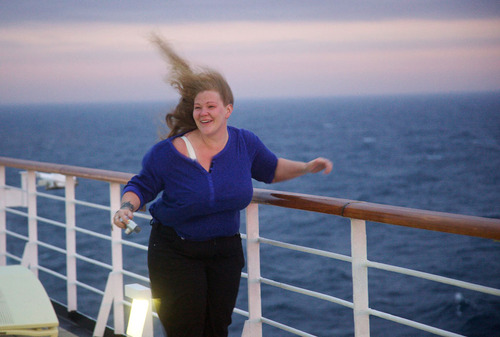
One of the most amazing moments when you're at sea is when a vibrant sunset breaks through the clouds filling your eyes with color. It was our last night on the MacMania 10 Cruise to Bermuda, and we had yet to see one of those spectacular light shows during the trip. Then, suddenly, there it was.

Unfortunately, there were also gale force winds out on deck. So most folks stayed inside and watched the show. That is, except for Sue who braved the wind to get her shot.

Quest for Sunset

I'm not sure which was more amazing: The oranges and reds of a setting sun to my right, or Sue battling nature on my left. So as you can image, I took pictures of both.

Bermuda Sunset

I've come to the conclusion that for some photographers, they will brave just about any challenge to capture those lingering moments of daylight. Hats off to you Sue. And I mean that literally!

Photos of Bermuda sunset and Sue by Derrick Story. Captured with a Canon 5D Mark II and a 24-105mm Canon L zoom. Click on images to see larger versions.


twitter.jpg Follow me on Twitter

-


Getting Out of New York City

Over the coming days you'll read stories and see pictures from my recent visit to Bermuda. It was colorful and pure joy.

But before I can do that, I have to get home. And, as anyone who needs to use air travel these days will tell you, that's no easy task. There used to be a saying, "as busy as Grand Central Station." Well, I've been to Grand Central Station, and it feels tame compared to any airport check-in counter where travelers are jockeying for any flight that will deliver them from the tedious torture of airport madness.

When I left the ship this morning, I had first class tickets to San Francisco. Now I'm sitting in a cramped seat on a completely different airline trying to eat an old sandwich that costs $8. What happened?

The same thing that's happening to thousands of other travelers: flight delays and cancellations for a variety of reasons - some from Mother Nature, many due to a system that is just stretched to its limits. 

I have no idea where our luggage is right now or when I will see it again. And I feel lucky because we'll actually get home tonight and not have to sleep in an airport.

No one loves a good adventure as much as I, but if you're not mindful and keep a positive attitude, the friendly skies can tarnish your fond memories of exploration even before you wrestle your luggage off the spinning carousel.

Speaking of which, I hope to get back to anecdotes and images of Bermuda in the next day or so. Stay tuned. Now, can I have another of those $5 warm beers? 


twitter.jpg Follow me on Twitter


Green Moray Eel, Bermuda

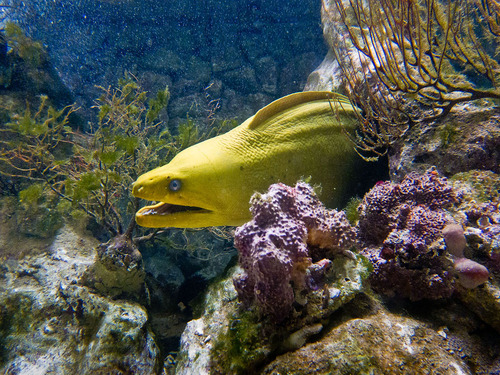
Most of the locals here in Bermuda don't consider getting in the water before May 24. It's just too cold (72 degrees F) and the wind affects visibility underwater. But I won't be here in late May, so I donned my mask and snorkel and dived right in. For this trip, I used my Canon G9 in an underwater housing. It's great having Raw when working on underwater photos.

Green Moray Eel

Photo of a Green Moray Eel by Derrick Story. Image process in Photoshop CS5 (Adobe Camera Raw). Click on image for larger version.

Unfortunately, the locals were right. I had great swims, but didn't capture any stunning underwater shots. So I went to the aquarium in Hamilton, Bermuda, and recorded this fun image of a huge Green Moray Eel with my Canon PowerShot S90. I simply turned off the flash, raised the ISO to 800, and pressed the lens barrel against the glass. I processed the image in the latest version of Adobe Camera Raw included with Photoshop CS5.

I had a great time swimming and diving in Bermuda. But for this trip, knowing how to shoot in aquariums is what provided the fun shots.


twitter.jpg Follow me on Twitter

-


There is a fast and easy way to add captions to your images in Aperture 3. And I show you how in this video tutorial that's also part of my Aperture 3 Essential Training on Lynda.com.

I think the best time to add captions is right after you upload the images. That way the information that accompanies the images is still fresh in your mind.

More Aperture Tips and Techniques

To learn more about Aperture 3, check out my Aperture 3 Essential Training on Lynda.com. Also, take a look at our Aperture 3 Focus Section. Tons of free content about how to get the most out of Aperture.


twitter.jpg Follow me on Twitter

Aperture 3 not only lets you integrate your still images and movies into professional looking presentations, it also allows you to export your work to a variety of video formats. In this video tutorial from my Aperture 3 Essential Training on Lynda.com, I show you how powerful slideshow authoring is in Aperture.

More Aperture Tips and Techniques

To learn more about Aperture 3, check out my Aperture 3 Essential Training on Lynda.com. Also, take a look at our Aperture 3 Focus Section. Tons of free content about how to get the most out of Aperture.


twitter.jpg Follow me on Twitter

Lexington Ave, NYC

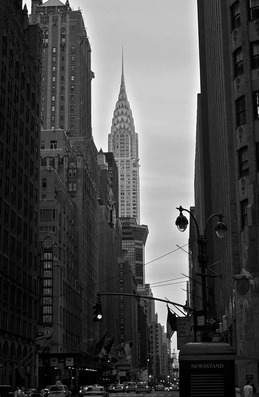
OK, let's start with the bad news: there won't be a TDS podcast this week while I'm working in Bermuda. There just isn't the bandwidth to move those audio files around. (I will be back with a new show next week, however.)

Now the good news. I'm going to have lots of fresh content from St. Charles and Hamilton, Bermuda. And with a little luck, I will have enough bandwidth to post images with these stories.

So stay tuned... I may be out of sight, but hopefully not out of mind.

Lexington Ave., NY NY - photo by Derrick Story on his way to Bermuda.

One of the few times I once had to leave Aperture for Photoshop was to retouch portraits. Well, no more! Thanks to the new Skin Smoothing Quick Brush (along with the existing Retouch brush), I can take care of simple retouching right here in Aperture 3. And I show you how in this video tutorial that's also part of my Aperture 3 Essential Training on Lynda.com.

The big advantage to not having to roundtrip to Photoshop from Aperture is file size management. All of the adjustments you saw in the video are just kilobytes of metadata. If I were to roundtrip, then the file that comes back from Photoshop is many times bigger than the original Raw file we worked on.

More Aperture Tips and Techniques

To learn more about Aperture 3, check out my Aperture 3 Essential Training on Lynda.com. Also, take a look at our Aperture 3 Focus Section. Tons of free content about how to get the most out of Aperture.


twitter.jpg Follow me on Twitter


Draped Laundry, New York City

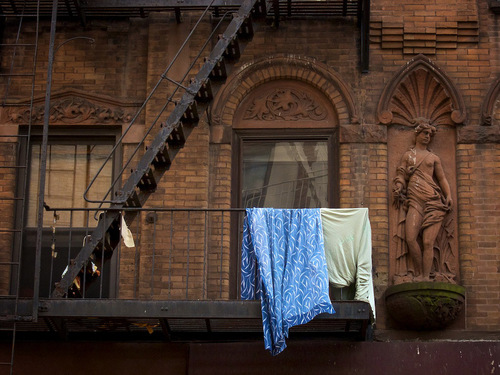
After visiting the Guggenheim Museum today, I wandered off for a little street shooting with my Canon PowerShot S90, and I found this wonderful draped laundry image along a side street. (Click on image to enlarge.)

Draped Laundry, New York City

ISO 250, 1/125th shutter speed. Photo by Derrick Story.

Next stop, Bermuda. More to report soon.


twitter.jpg Follow me on Twitter

-