March 2011 Archives

Jean Liebenberg

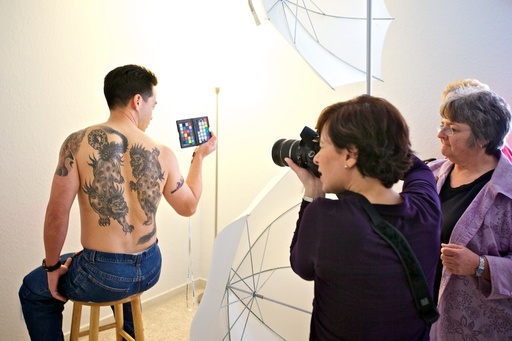
For the Feb.'11 Photo Assignment, TDS shooters got personal and assembled an intimate gallery titled Loved One. These will touch your heart. And which one will be the SizzlPix Pick of the Month?

The April 2011 assignment is "Broken." Start working on your contribution now. Details can be found on the Member Participation page. Submit your photo assignment picture 800 pixels in the widest direction. Deadline is April 30, 2011.

Please follow the instructions carefully for labeling the subject line of the email for your submission. It's easy to lose these in the pile of mail if not labeled correctly. For example, the subject line for next month's assignment should be: "Photo Assignment: April 2011." Also, if you can, please don't strip out the metadata. And feel free to add any IPTC data you wish (These fields in particular: Caption, Credit, Copyright, Byline), I use that for the caption info.


Photo by Jean Liebenberg. (Click on it to see enlarged version.) You can read more about how Jean captured this shot, plus see all of the other great images on the Feb. 2011 Gallery page.


Good luck with your April assignment, and congratulations to all of the fine contributors for February.


twitter.jpg Follow me on Twitter

-


Now Available! The Digital Photography Companion. The official guide for The Digital Story Virtual Camera Club.

  • 25 handy and informative tables for quick reference.
  • Metadata listings for every photo in the book
  • Dedicated chapter on making printing easy.
  • Photo management software guide.
  • Many, many inside tips gleaned from years of experience.
  • Comprehensive (214 pages), yet fits easily in camera bag.

Technorati Tags: , ,

There are very few plug-ins that I'd consider necessay. The editing tools in Aperture 3 and Lightroom 3 are so robust, that I can handle most of the things I need within those applications. But after working with Nik Software's Silver Efex Pro 2 for a few weeks, I've decided that this is my next "must have" enhancement.
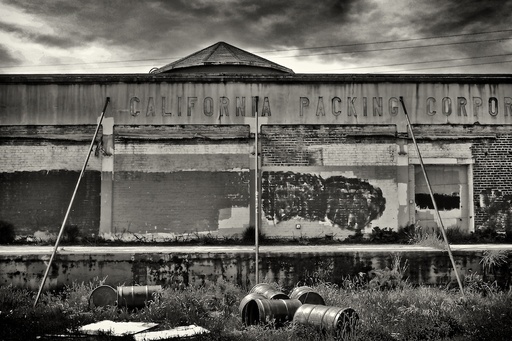
Warehouse - Silver Efex Pro 2 Abandoned Warehouse: processed in Aperture 3 and finished with Silver Efex Pro 2 plug-in using global adjustments only. Photo by Derrick Story with an Olympus XZ-1. Click on image for larger version.

Silver EFEX is a tool to convert your images to Black & White. Now you may be saying to yourself, "I know 10 ways to create a B&W photo." So do I. But none of them work as well at this plug-in. The whole reason I even paid attention to this app in the first place was because I saw images that looked great, and I wanted to know how they were created. Many of them with Silver Efex Pro 2.

Abandoned Warehouse - Original Image Original image captured in mid-day lighting. Click on image for larger version.

New Features in Silver Efex 2

This new version adds many important tools:

  • Refined and improved black and white conversion algorithms
  • Highlight, Midtone,and Shadow Brightness control
  • Dynamic Brightness control
  • Amplify Blacks and Amplify Whites controls
  • Soft Contrast control
  • Highlight, Midtone, and Shadow Structure control
  • Fine Structure control
  • Selective Colorization
  • Image Borders
  • History Browser
  • GPU Processing
  • Improved interface and interaction controls

Most of the images I've worked on have only required the global controls. There are selective adjustments available, using control points, if you need them. I was surprised at how often I didn't. The basic workflow I use is relatively simple.
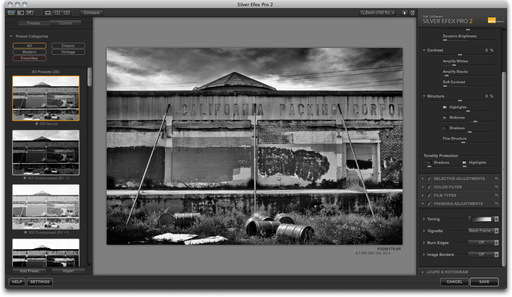
Silver Efex Pro 2 Interface Silver Efex Pro 2 interface. Click on image for full size version.

Basic Silver Efex 2 Workflow

For this example, I'm using Aperture 3 as the host app. But the plug-in works with Aperture, Lightroom, and Photoshop. And you get compatibility for all three in the box.

In Aperture, first I choose a color image, then I go to Photos > Edit with Plug-In > Silver Efex Pro 2. Aperture prepares the image for hand-off. Once the Silver Efex interface appears, make it full screen by pressing the "F" key.

On the left side of the three-paned interface are the presets, with the "000 Neutral" selected at the top of the column. You can preview the other presets by clicking on them. This is helpful to get a feel for the possibilites of your photo. I usually return to Neutral, however, and start working the controls on the right side of the interface. This way, I get the exact look I want.

Typically, the three basic global controls (Brightness, Contrast, and Structure) are collapsed. Click on the triangle next to their names to reveal more sliders. I also open the Loupe & Histogram window at the bottom of the right column, and click on Histogram. This graph is helpful when making tonal adjustments.

Now begin working on the highlights, midtones, and shadows of your picture. Be sure to play with the new Dynamic Brightness slider. It brightens areas of the photo while protecting the darker tones.

Next, I'll use the Amplify Whites and Amplify Blacks sliders to fine tune those areas. But the real killer slider here is the Soft Contrast control that adds mood by selectivly adding contrast in areas of the photo based on an intelligent alograithm.

Then I move to Structure, which is similar to "Definition" in Aperture and "Clarity" in Lightroom. But with Silver Efex 2 you have four Structure sliders, one for each tonal area, plus Fine Structure. Fine Structure can increase detail, as in the building photo. Or, as in this portrait, I decreased Fine Structure to soften the skin tones.

Now, I'll go back to the left column and click on the History Browser Icon. It's at the top of the column, third from the left. Then click on the Compare button. I generally use the Split Screen view to compare the work I've done with the original conversion. You can click anywhere in your "history" to compare that point in your work to the final product.

Once I'm satisfied with my adjustments, I click the Save button, and Silver Efex 2 prepares a Tiff and returns it to Aperture. I "stack" the new Tiff and original image for convenience.

The Bottom Line

Nik Software's Silver Efex 2 runs smoothly on my MacBook Air and keeps me excited about Black & White photography. There are many more features than I've covered here, such as the image borders, film emulators, vignettes, and toners -- plenty to keep you occupied well into the wee hours of the night.

You can see more images processed with this software on the TDS Flickr site.

Update! Hunt's Photo and Video is offering Silver Efex Pro for $129, plus free shipping, and a free upgrade to Silver Efex Pro 2. While supplies last.


twitter.jpg Follow me on Twitter


The Olympus XZ-1 provides most of the features you'd ever want in a compact camera - super bright f/1.8 lens, hot shoe, accessory port, and captures in Raw. But how does it perform in low light at the higher ISO settings? This week, I put the XZ-1 up against my current compact favorite, the Canon S90, to see who survives the ISO smackdown.

You can see the test images for yourself, and read about the results, by checking out Olympus XZ-1 ISO Test 100-3200.

Listen to the Podcast

You can also download the podcast here (31 minutes). Or better yet, subscribe to the podcast in iTunes. You can support this podcast by purchasing the TDS iPhone App for only $2.99 from the Apple App Store.

Monthly Photo Assignment

Blue is the March 2011 Photo Assignment. You can read more about how to submit on our Member Participation page. Deadline for entry is March 31, 2011.

TDS Summer 2011 Photography Workshop

We're making plans now for the Summer 2011 TDS Photography Workshop. If you want your name on the reserve list, just drop me a line.

More Ways to Participate

Want to share photos and talk with other members in our virtual camera club? Check out our Flickr Public Group. It's a blast!

Podcast Sponsors

Red River Paper -- Try the $7.99 Sample Kit.

Make Your Photos Sizzle with Color! -- SizzlPix is like High Definition TV for your photography.

Need a New Photo Bag? Check out the Lowepro Specialty Store on The Digital Story and use discount code LP20 to saven 20% at check out.


Technorati Tags:
, , , , ,


Rogue Grrid

One of the most difficult things to do with off-camera flash is to put the light exactly where you want it, and nowhere else. This task just got a bit easier with the new Rogue 3-in-1 Honeycomb Grid ($49). Like the already popular FlashBenders, the Rogue Grid fits on just about any flash, and looks good in the process. (Guts of the Grid shown here. The kit comes with a very stylish nylon mount and pouch to hold it all.)

There are two honeycomb discs: 25 and 45 degrees. You can use them individually, or put them together to create a 16 degree pattern. I played with the discs today, and was quite pleased at how much control I had over the output.

The entire kit only weighs 3.5 ounces, and it fits easily in most camera bags. Along with a coupe FlashBenders, you suddenly have pro studio power in a very lightweight kit. I'm working on some test shots that I'll post here. Stay tuned.


twitter.jpg Follow me on Twitter


Olympus XZ-1 ISO Test 100-3200

The fast, beautiful Olympus XZ-1has one of the most enticing lenses we've seen on a compact camera -- iZuiko f/1.8-f/2.5 4X zoom. With such a bright lens, you can't help to think about this camera for existing light photography under all conditions... that is, if the ISO performance is good. So I put the XZ-1 to the test.

Olympus XZ-1 ISO 400 Olympus XZ-1 at ISO 400. You can see the complete set of unedited test images on the TDS Flickr site. Photos by Derrick Story.

For the test, I tripod-mounted an Olympus XZ-1 and Canon S90 side-by-side. Both cameras were set in program mode with auto white balance. No exposure compensation. Using the self-timer to trip the shutter, frames were recorded at ISO 100, 200, 400, 800, 1600, and 3200. Jpeg Fine mode was used for each.

Both the unedited Olympus XZ-1 test images and the Canon S90 test images are posted on the TDS Flickr site.

Bottom Line

The Olympus XZ-1logged in an impressive performance for ISO 100, 200, and 400, surpassing the Canon S90 at those settings. At ISO 800, chroma noise begins to degrade the image, getting worse at ISO 1600. I don't recommend using the camera at ISO 3200.

With terrific image performance at ISO 100-400, combined with a fast f/1.8 lens, means that the XZ-1 is a serious photographic tool. I'm even comfortable shooting at ISO 800, although I probably won't set it to ISO 1600 except in extreme cases.

Add the fact that the XZ-1 includes a hot shoe and has wireless flash trigger capability with Olympus strobes, means that you can easily add supplemental light for those situations where existing light does't provide the desired results.

More Articles about the Olympus XZ-1

Olympus XZ-1 Review, Part 1

TDS Podcast about the ISO test coming on March 29, 2011.


twitter.jpg Follow me on Twitter


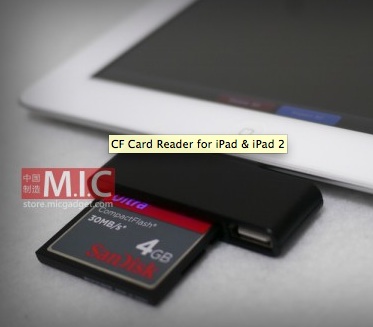
CF Card Reader for iPad

cf_reader_ipad.jpg

It's about time someone produced one of these: a CF card reader for iPad and iPad 2. It also includes a USB port, although I'm not sure what you can do with that. Maybe connect a second camera?

I just placed an order with the M.I.C. Store (stands for made in China, I believe). The item cost $29.90 plus shipping for a total cost of $36.50 US. It will be a couple weeks before I receive it. I'll let you know how it goes.


twitter.jpg Follow me on Twitter


Rogue FlashBender

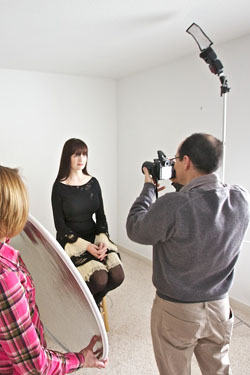
I've been working with all three Rogue FlashBenders in the Rogue FlashBender Kit (bounce card, small and large positionable reflectors, $105) with great results. If you haven't read about these modifiers yet, they are extremely handy for the photographer on the go, or for the shooter who has limited space to work.

The FlashBenders attach to practically any flash and allow you to bounce the light off their reflective white surface. You can position them in a variety of ways to get the exact effect you want. And unlike most modifiers, you can easily pack them in your regular camera bag. I'll soon have a video showing me using these for a live group shoot.

One of the questions I'm often asked is, "If I were to get just one FlashBender, which one do you recommend?" I think the Large Positionable Reflector($39) is the most versatile of the set. You have a big surface to work with, yet it still fits in the camera bag. For fast moving assignments, I'll put a FlashBender on one off-camera flash, and use it to supplement the ambient lighting, or in combination with a light from a second flash mounted on the camera.

In terms of "light hardness," the FlashBender is in-between direct flash and an umbrella. It definitely has more edge than a soft modifier but without the harshness of the direct light from a small flash head.

An effective, versatile set up for portraits is to position a large FlashBender off-camera, with a bounce reflector on the fill side. This combination provides, crisp, flattering results, yet doesn't require a large investment in lighting equipment.


twitter.jpg Follow me on Twitter


Olympus XZ-1 Review, Part 1

Olympus XZ-1

The first two things that struck me about the new Olympus XZ-1 10 MP Digital Camera with f1.8 Lens was the large diameter of the lens housing and how light the camera feels in the hands, even with the metal exterior. Because of these first impressions, I decided that it's first worth focusing on this camera's look and feel, and the menu system.

When you push the recessed power button on the top of the camera, the lens immediately comes to life. It's responsive. Focusing is fast, even in low light. The 3" LCD monitor that supports 610,000 dots is beautiful. The iZuiko f/1.8-2.5 zoom (28-112mm equivalent) provides lots of light to the 1/1.63-inch, 10-megapixel CCD sensor. Even at the telephoto setting it's a bright f/2.5. That means you're not limited to working at the wide end of the zoom in low light.

I love the big, machined control ring around the lens barrel that adjusts ISO in Program mode, f/stop in Aperture Priority Mode, and shutter speed in Shutter Priority Mode. When you're in Manual exposure mode, the lens ring adjusts aperture while the wheel controller on the back of the camera sets shutter speed. You can monitor everything in real time on the LCD. Manual photography is seldom this much fun.

Speaking of exposure settings, the Mode dial on top of the camera gives the usual PSAM options, plus full Auto, Scene, Art Filters, Low Light, and a Custom mode. The shutter button, next to the Mode dial, is firm and responsive.

The Playback button on the back of the XZ-1 can initiate image review even when the camera is turned off. This is a feature that I like on the Canon S95, and am happy to have it on this Olympus too. Above it, there's the dedicated video recording button. Very handy, and it's also slightly recessed to prevent accidental movie making.

Back on top, there's a pop-up flash that you initiate with a sliding button, and an Accessory Port/hot shoe. I tested the FL-14 accessory flash in the hot shoe, and the TTL-Auto exposures looked good. I'll test other accessories for the upcoming second part.

Olympus cleaned up their Menu system for the XZ-1, much to my appreciation. I've been critical of their menus in the past, and I found the control screens on the XZ-1 the best I've seen on an Olympus camera. Well done, and thanks!

My only nit has to do with recharging the battery. Instead of giving us a dedicated charger, you have to keep the battery in the camera and connect it to a charging adapter. That seems so unprofessional for an otherwise pro spec camera.

In an upcoming post, I'll get into image quality and compare the XZ-1 to a few of its prime competitors. Until then, I'll be enjoying how this camera feels while taking pictures. The Olympus XZ-1 10 MP Digital Camera with f1.8 Lens is currently selling for $499 US.


twitter.jpg Follow me on Twitter


Flickr Keyboard Shortcuts

You might not have thought about using keyboard shortcuts with Flickr, but I can tell you, they are fun and efficient. My favorite is the "l" shortcut to switch to Lightbox mode when viewing individual pictures.

To see how this works, plus more tips, take a look at this movie from my Flickr Essential Training title, and see what you think.

More Training Available

We have many more informative movies available in the lynda.com title, Flickr Essential Training. Stop by and learn how to get the most from your favorite photo sharing application.


twitter.jpg Follow me on Twitter


Which paper surface will perfectly complement the image you're ready to print? Glossy, luster, matte? And what are the various characteristics that make each paper unique? In this week's podcast, we talk printing paper and explore some of the different surfaces offered by Red River. It's amazing how different the same picture can look on different stocks.

Listen to the Podcast

You can also download the podcast here (33 minutes). Or better yet, subscribe to the podcast in iTunes. You can support this podcast by purchasing the TDS iPhone App for only $2.99 from the Apple App Store.

Monthly Photo Assignment

Blue is the March 2011 Photo Assignment. You can read more about how to submit on our Member Participation page. Deadline for entry is March 31, 2011.

TDS Summer 2011 Photography Workshop

We're making plans now for the Summer 2011 TDS Photography Workshop. If you want your name on the reserve list, just drop me a line.

More Ways to Participate

Want to share photos and talk with other members in our virtual camera club? Check out our Flickr Public Group. It's a blast!

Podcast Sponsors

Red River Paper -- Try the $7.99 Sample Kit.

Make Your Photos Sizzle with Color! -- SizzlPix is like High Definition TV for your photography.

Need a New Photo Bag? Check out the Lowepro Specialty Store on The Digital Story and use discount code LP20 to saven 20% at check out.


Technorati Tags:
, , , , ,


TDS Spring Workshop was a Blast!

TDS Spring 2011 Workshop a Blast

"I can't believe I'm actually taking these pictures!" exclaimed June H. when she looked at the LCD on the back of her camera. She, along with the rest of the workshop crew, was working on assignment all weekend at the TDS studio. We had three models, seven flashes, more modifiers than you could count, and lots of fun.

After each photo session, the group had to cull and image edit their favorite shots, getting them ready for the portfolio review at the end of the day.

"Not that I'd want to to live my life as a pro photographer, but I really liked the experience of working under pressure," said Doug K. "You learn a lot when you're on the edge."

It wasn't all work however. At the Friday night social, we had the Lowepro Bag Grab and got to know one another over snacks and refreshments. The "Made to Order" lunch was brought in every day, giving shooters a chance to swap stories during their well-deserved break. Some even got together for a Saturday night dinner before reuniting at the studio again on Sunday morning.

If you're interested in being on the reserve list for the TDS Workshop Series, just send me a note with the subject line: "TDS Workshop Reserve List." I'll get right back to you.


twitter.jpg Follow me on Twitter


Much has changed in the Flickr universe since I released the original training title on lynda.com in 2009. So I went back into the recording booth to create a brand new, updated, Flickr Essential Training for 2011.

Right now, you can view 8 free movies that cover really useful stuff, such as keyboard shortcuts, editing your personal information, and tips for using Google to search inside of Flickr.

I even have this short welcome movie to give you a feel for the tone and contents of this title.

Personally, I think Flickr is once of the most enjoyable ways to share photos and view great work by others. And if you invest just a little time with this training title, you'll get more out of this online photography site than you ever imagined.

More Training Available

We have many more informative movies available in the lynda.com title, Flickr Essential Training. Stop by and learn how to get the most from your favorite photo sharing application.

Previously on The Digital Story

Exploring Interesting Places Visually Via Flickr

Become Your Own Museum Curator with "Galleries" on Flickr

Using Google to Search Within Flickr

Flickr Keyboard Shortcuts

Flickr Updates Share Tools for Facebook, Twitter

Introduction to Flickr Essential Training


The Digital Story on Facebook -- discussion, outstanding images from the TDS community, and inside information. Join our celebration of great photography!


Dig In Magazine

So here's something written about me instead of by me. I had fun chatting with Cindy Maram at Dig In Magazine for this interview about my love for photography, passion for technology, and how it all got started. They include a few selected shots from my Flickr gallery, and there's more information in the text that I generally see in this type of article.

If you want to know more about what fuels me for The Digital Story and my other projects, I think you'll enjoy this read.

twitter.jpg Follow me on Twitter


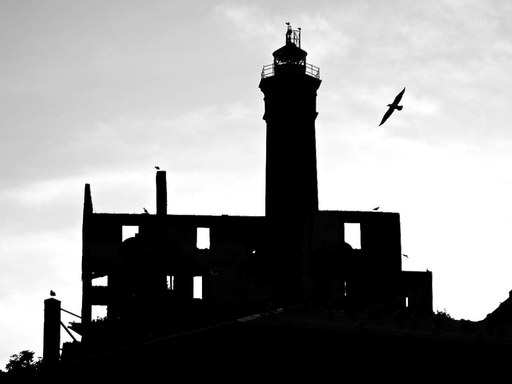
"Alcatraz" - Grab Shot 211

"Here's a black-and-white version of a photo I took of Alcatraz while playing tourist with my son during our recent visit to San Francisco for MacWorld," writes Darryl Esakof. "As the harbor cruise circled Alcatraz in the late afternoon with the sun low in the west, some very interesting silhouettes appeared."

Alcatraz by Darryl Esakof "Alcatraz by Darryl Esakof" Click on image for larger version.

Darryl captured the shot with a Canon S95 , ISO 80, 22mm, f4.9, 1/800 sec., then processed it in Aperture 3.

This is our 211th Grab Shot! Wow. If you want to review the collection that began back in 2006, go to our Grab Shots page.

If you have a candid you'd like to share, take a look at our Submissions page, then send us your Grab Shot. We'll try to get it published for you on The Digital Story.

And you can view more images from our virtual camera club in the Member Photo Gallery.


The Digital Story Podcast App is the best way to stream or download weekly TDS podcast episodes. No more syncing your iPhone, iPod Touch, iPad, or even your Android phone just to get a podcast. And the best part is, The Digital Story Podcast App is your way to help support this show. Download it today!


twitter.jpg Follow me on Twitter


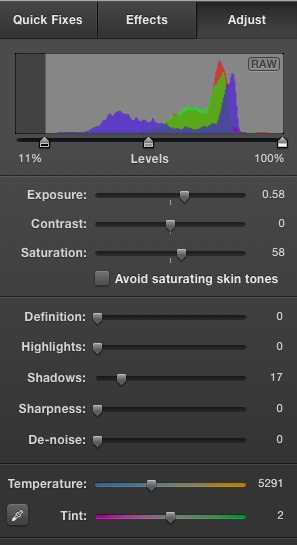
Adjust Tab Before

A challenging aspect of image adjustment for many photographers is figuring out what needs to be done, then choosing the right controls to do it. The good news is, in iPhoto '11, you can let the application analyze the photo for you, have it make an initial set of corrections, then you can fine tune the picture's appearance to your taste. I call this the 3-Step Image Adjustment Technique.

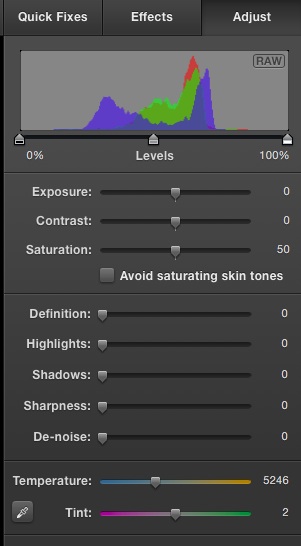
Step 1 - Choose your image in iPhoto, then click on the Edit button in the lower right corner of the application. Then click on the Adjust tab in the upper right corner. Take a look at the Histogram and get a feel for your image. For example, this image is lacking a bit in contrast. We can tell that by seeing that most of the data in the histogram is bunched up in the middle. You don't have to spend a lot of time on this, just a few seconds. We'll return to this view in a minute.

Step 2 - Quick Fix

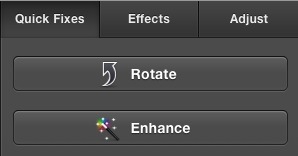
Step 2 - Click on the Quick Fixes tab, then click on the Enhance button. iPhoto will make a number of adjustments for you, based on its analysis of the image. You'll probably like most of what it does, but you may want to make a tweak or two. No problem. This is just a starting point that you can now fine tune.

Step 3 - Return to the Adjustment tab. You'll notice that iPhoto has made a number of adjustments here. This is where you can fine tune.

Step 3 - Adjust After

If you feel it made the photo too bright, move the Exposure slider to the left. If the blacks in the image look too dark, move the Shadows slider to the right. If the colors in the image are now too intense, check the box beneath the Saturation slider (labeled Avoid saturating skin tones) and play with the Saturation slider until you get the look you want. And finally, if you want to make the overall appearance of the image "cooler," move the Temperature slider to the left, and to make it warmer, move the slider to the right.

Once I have the basic tones and colors the way I like, I usually add a little Definition (about 20-25) and a bit of Sharpness (15-25). Don't forget to crop if your image needs it. This entire workflow should only take a minute or two. And with practice, you'll get even faster. To see how much you've improved the picture, hold down the Shift key to see the original version. There will be quite a difference!

Learn More Tips!

There are more ways to learn and have more fun with iPhoto '11: my iPhoto '11 Essential Training ONLINE at Lynda.com, and the new iPhoto '11 Essential Training DVD that you can purchase from the Lynda.com Store for $49.95 US. You can get a feel for how this works by watching Creating Smart Albums in iPhoto '11.


twitter.jpg Follow me on Twitter


Want to learn Lightroom, Aperture, Photoshop, or practically any other major software title? The folks I teach for, lynda.com, offer a 7 Day Trial Period if you sign up. If, after the 7 days of mind-bending training, you decide that lynda.com isn't for you, then just cancel your membership with no obligation.

My training titles on lynda.com include Aperture 3, iPhoto '11, Off-Camera Flash, Portraiture, Getting Pro Results from a Compact Camera, and more.

Each title is presented to you in a series of short, digestible movies that you can watch over and over again until you master that particular technique. I organize the movies in a clear table of contents format, so you can go directly to the technique you're most interested in at the moment. If you want to watch the training from start to finish, then we keep the pace fast and informative helping you absorb as much information as possible.

I have new titles coming out this year, including a revised Flickr training and a live-action training on how to improve your Group Shots. Stay tuned for those debuts.

In the meantime, take a look at what lynda.com has to offer via the 7 Day Trial Period. It's really quite impressive.


twitter.jpg Follow me on Twitter


Packing your camera bag is art and science combined. You want to make sure you have the gear you need, but not too much. Your bag may have to fit in tight quarters, such as in an overhead compartment on a plane, or under the seat. And what about the environment you'll be shooting in when you arrive? Since this is the bag you'll always have with you, what personal items will you include? In this week's podcast, I have 10 great tips that will help you prepare for your next vacation, business trip, or photo assignment. Tune in!

Listen to the Podcast

You can also download the podcast here (33 minutes). Or better yet, subscribe to the podcast in iTunes. You can support this podcast by purchasing the TDS iPhone App for only $2.99 from the Apple App Store.

Monthly Photo Assignment

Blue is the March 2011 Photo Assignment. You can read more about how to submit on our Member Participation page. Deadline for entry is March 31, 2011.

TDS Summer 2011 Photography Workshop

We're making plans now for the Summer 2011 TDS Photography Workshop. If you want your name on the reserve list, just drop me a line.

More Ways to Participate

Want to share photos and talk with other members in our virtual camera club? Check out our Flickr Public Group. It's a blast!

Podcast Sponsors

Red River Paper -- Try the $7.99 Sample Kit.

Make Your Photos Sizzle with Color! -- SizzlPix is like High Definition TV for your photography.

Need a New Photo Bag? Check out the Lowepro Specialty Store on The Digital Story and use discount code LP20 to saven 20% at check out.


Technorati Tags:
, , , , ,


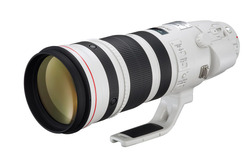
canon_200-400mm_zoom.jpg

I stopped by the Canon booth at NANPA and chatted a bit with them about their announced Super-Telephoto Zoom Lens At The CP+ Event: The EF 200-400mm f/4L IS USM Extender 1.4x Lens. I was hoping that there might be some new news since Canon officially spilled the beans in February.

When I stopped by, there was no one else around... just in case. But sadly, there was no news about the super zoom that will have a 1.4x tele extender built-in that can be switched on and off. Other than, Canon said it was the most-asked question at the Nature Photography Summit.

Bottom line, still no official word on release date, on estimated price, or on how the built-in tele extender might actually work. If you're interested in learning more about the EF 200-400mm, there's a pretty good article about it on The-Digital-Picture.com.


twitter.jpg Follow me on Twitter


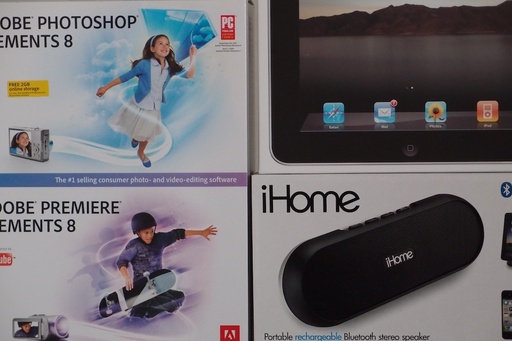
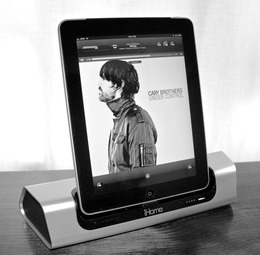
The iHome iD9is a rechargeable speaker system for iOS devices including the iPad. Unlike the iHome iDM12 that I reviewed earlier, the iD9 requires direct connection via dock or mini stereo jack. Like the iDM12 however, this is a rechargeable device that's easy to take with you on the go.

iHome iD9

The iD9 is large enough to dock an iPad in the portrait position. The docking area is designed so that you can leave many of the "skinny" cases on and still use the iD9. Where this unit really shines, however, is its output.

iHome employs its SRS TruBass and Reson8 sound technology for rather impressive audio quality from a portable system. The speakers are positioned on the ends of the iHome, slightly angled toward the listener. I found that I could position the unit in various spots throughout the house to get just the type of sound I wanted. Audio wise, the iD9 is a very satisfying portable device.

When plugged into the wall, it also serves as a charger for your iOS device. The iD9 also works with the iHome+Sleep app for custom alarm settings, social alerts and more; and with iHome+Radio app for global internet radio.

While on the road, I still prefer the iHome iDM12 because of its very compact size and wireless connectivity. But around the house or studio, it's hard to beat the iD9 for beautiful output and stylish design.

You can learn more about the iHome iD9 at the iHome web site. It sells for $99 at Amazonand other retailers.


twitter.jpg Follow me on Twitter


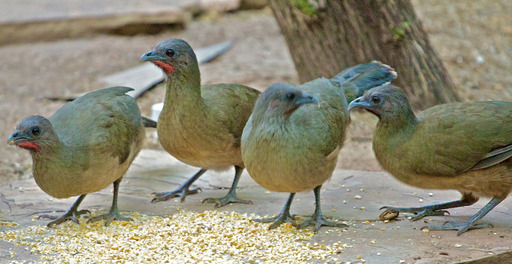
They might not be the prettiest bird you've ever seen, but the Chachalaca in Southern Texas make up for it in personality.

Chachalaca Chachalaca feeding after chasing off a rabbit. Click on image for larger version.

They are fairly big, about 22" in length. I watched one chase-off a Cottontail rabbit this afternoon at the Mazatlan World Birding Center in McAllen, Texas. You can't miss their call once you've heard it: cha cha lac, cha cha lac! And it's so loud that you can't hardly hear anything else.

After just two days in the Rio Grande area, I can tell you already, if you're in to birding, this is an exciting place. In addition to the group of the facilities that comprise the World Birding Center (think of it as the Smithsonian of feathered creatures), there are also private ranches that have converted to conservatories for local habitats. One example is the Santa Clara Ranch that features 300 acres preserved Southern Texas landscape, photo blinds, ponds, and feeders where photographers can capture a variety of birds and wildlife. They even have bunk houses that you can rent for extended stays.

Since about 90 percent of the land in Texas is privately owned, this is a positive trend seeing ranch owners becoming conservationists, and making a living while doing so. If you love wildlife photography, it would be worth your time to investigate the opportunites in Southern Texas.


twitter.jpg Follow me on Twitter


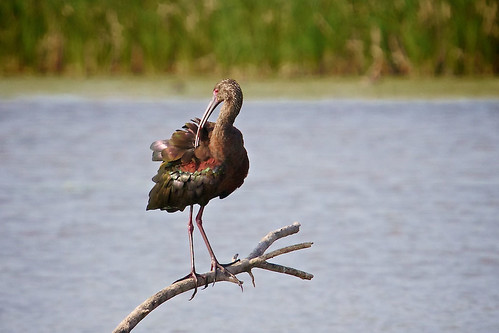
Glossy Ibis Puffed Up


Glossy Ibis, originally uploaded by The Digital Story.

Once the morning light broke through the clouds at Estero Llano Grande State Park outside of McAllen Texas, everything came to life, including the plumage on this Glossy Ibis who was preening.

Image captured with a Canon 60D, Canon 1.4X tele-extender II, and Canon 70-200 f/4 L lens. I use the tripod collar for the zoom, then attach the rig to a monopod to steady the shot since the magnification is increased. ISO 200, 1/500th at f/8.

You can see more images from this shoot on The TDS Flickr page.


twitter.jpg Follow me on Twitter


Portrait at Dusk, McAllen Texas

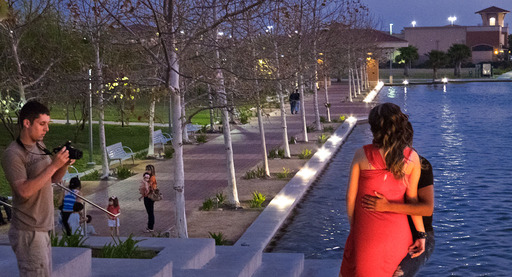
McAllen Texas is a changing city. I spent a couple hours this evening hanging out at the new convention center that has become a community area for locals. I saw a wedding party taking photos, families relaxing on the green, couples portraits, children playing, and people just enjoying the balmy breeze at twilight.

Portrait at Dusk, McAllen Texas Portrait at Dusk -- Captured with a Canon S90, ISO 1000, 1/20th at f/3.5. Photo by Derrick Story. Click on image for larger version.

I asked a few locals about the reported border violence. "Yes, there are certainly areas you must avoid," said one. "Down by the river there are encampments and lots of guns." But there was none of that tonight in the convention area that featured beautiful grounds, restaurants, and shops now open for business.

No one seemed happier about this, than a young couple, posing for a portrait in front of an illuminated fountain as the sun dipped below the horizon.


twitter.jpg Follow me on Twitter


Lots to cover this week, and I'll touch on as much of this as possible: iPad 2, Flash Benders portable light modifiers, Samsung NX 100 ILC camera, Nature Photography Summit in McAllen Texas, "What's in my Bag?" and TDS Podcast App hiccups. Thanks for tuning in and being a part of our virtual camera club. Oh, and I also announce the latest "SizzlPix Pick of the Month."

Listen to the Podcast

You can also download the podcast here (32 minutes). Or better yet, subscribe to the podcast in iTunes. You can support this podcast by purchasing the TDS iPhone App for only $2.99 from the Apple App Store.

Monthly Photo Assignment

Blue is the March 2011 Photo Assignment. You can read more about how to submit on our Member Participation page. Deadline for entry is March 31, 2011.

TDS Summer 2011 Photography Workshop

We're making plans now for the Summer 2011 TDS Photography Workshop. If you want your name on the reserve list, just drop me a line.

More Ways to Participate

Want to share photos and talk with other members in our virtual camera club? Check out our Flickr Public Group. It's a blast!

Podcast Sponsors

Red River Paper -- Try the $7.99 Sample Kit.

Make Your Photos Sizzle with Color! -- SizzlPix is like High Definition TV for your photography.


Technorati Tags:
, , , , ,


Soon, you'll be hearing about the going-ons at the Nature Photography Summit in McAllen, Texas. This should be an interesting trip for a variety of reasons.

Nanpa

At first, McAllen might seem like an unusual choice for this event. It's only a few miles from the US/Mexico border in the Rio Grande Valley. There's enough questionable activity that I've been advised not to go out at night by myself. Hmmm, Las Vegas this isn't.

But this area does support abundant wildlife, including the World Birding Center. So there won't be night shooting during this adventure, rather wildlife photography during the day. Plus, there's the conference itself at the McAllen Convention Center.

So stay tuned. I have a feeling there will be some interesting reports coming from Southern Texas.


twitter.jpg Follow me on Twitter


MacBook Pro 15"

A common question that I get from readers is: "which computer is the best for the traveling photographer?" Now's a great time to look at this, because all of the players have just been revised. The options for Mac users are tempting: iPad 2, MacBook Air (11" and 13"), and the MacBook Pro 15".

Since our focus is travel, let's start with weight, horsepower, battery, and resolution:

  • iPad 2 3G $829 - 1.35 pounds, 1GHz dual-core Apple A5 processor, and 9.7-inch (diagonal) LED-backlit glossy widescreen Multi-Touch display (1024 x 768), 10 hours of battery life.
  • MacBook Air 11" $1,399 - 2.3 pounds, 1.6GHz Intel Core 2 Duo processor with 3MB shared L2 cache, 11.6-inch (diagonal) high-resolution LED-backlit glossy widescreen display with support for millions of colors (1366 by 768), 5 hours of battery life.
  • MacBook Air 13" $1,799 - 2.9 pounds, 2.13GHz Intel Core 2 Duo processor with 6MB shared L2 cache (upgraded option), 13.3-inch (diagonal) high-resolution LED-backlit glossy widescreen display with support for millions of colors (1440 x 1900), 5 hours of battery life.
  • MacBook Pro 15" $2,349 - 5.6 pounds, 2.2GHz quad-core Intel Core i7 processor with 6MB shared L3 cach, 15.4-inch (diagonal) LED-backlit glossy or optional antiglare widescreen display with support for millions of colors (1440 x 1900), 7 hours of battery life.

The next step is to decide what's most important to you in the "processing power vs weight" category. The MacBook Pro 15" is the fastest machine with the most storage. If you're capturing video and large Raw files, you're going to appreciate this muscle. A great machine for serious pro assignment photography.

The iPad with the optional Camera Connection Kit is a great choice for vacation travel, when you won't have as serious processing demands. It can handle Raw files and video, but it works best when you select a handful of favorite shots and play with those. The photo applications for the iPad are also quite affordable compared to the MacBooks. Typical price is $1.99 to $9.99 each.

The MacBook Air 13" strikes a compelling balance between the other two. It's weight is closer to the iPad 2, but it has much of the muscle of a MacBook. It's not as fast or contains as much storage as the new MacBook Pro 15", but it does run Photoshop, Aperture, Lightroom, and iPhoto very well. And the solid state drive does give it a very snappy feel. iPhoto comes with the machine, and you can get Aperture for $79 in the Mac App Store.

I've posted three articles on Macworld Magazine that dig deeper into these scenarios: Field testing the MacBook Air for photographers, A photographer's workflows for the MacBook Air, and A photographer's workflow for the iPad. Once you feel for which direction you want to go, check out the appropriate article for more details.

Bottom Line Considerations

Price -- iPad 2 3G with 64 GBs of Flash memory: $829 US; MacBook Air 11" with 1.6GHz Intel Core 2 Duo, 4 GBs Ram and 128 GBs Flash storage: $1,399 US; MacBook Air 13" with 2.13GHz Intel Core 2 Duo, 4 GBs Ram and 256 GBs Flash storage: $1,799 US; MacBook Pro 15" with 2.2GHz Quad-core Intel Core i7, 4 GBs Ram, 750GB Serial ATA Drive @ 5400 rpm, and 15-inch Hi-Res Antiglare Widescreen Display: $2,349 US

Connectivity -- The iPad comes with 3G cellular built-in ($15 month) so you have access to the Internet practically anywhere. The MacBooks have built-in WiFi requiring a network to browse the Web.

Space -- The iPad 2 and MacBook Air fits in most photo backpacks. The MacBook Pro requires a dedicate laptop storage area, which usually increases the size of your bag.

Power and Battery -- No doubt that MacBook Pro is a beast when it comes to power. The question is, how much power do you need on the road? The MacBook Pro also gives you 7 hours of battery life, 2 hours better than the Air, but not quite the 10 hours you get with the iPad.

I do a lot of traveling, and most of it includes assignment work. I'm currently using the first generation iPad and the beefed-up 13" MacBook Air (as listed in this article) on the road. My video editing is light; I'm usually preparing short movies for YouTube. I do shoot Raw with a Canon 5D Mark II and Canon 60D. I haven't had any problem processing those files using Aperture on the Air. I would consider myself a light-duty pro photographer. Take this information and decide where you fit, then make the perfect choice for you.


twitter.jpg Follow me on Twitter


For the Jan. '11 Photo Assignment, TDS shooters lowered their sights and assembled a rock solid gallery for Ground Level. This collection is outstanding! And which one will be the SizzlPix Pick of the Month?

Emil Trollklint "Ground Level"

The March 2011 assignment is "Blue." Start working on your contribution now. Details can be found on the Member Participation page. Submit photo assignment pictures 800 pixels in the widest direction.

Please follow the instructions carefully for labeling the subject line of the email for your submission. It's easy to lose these in the pile of mail if not labeled correctly. For example, the subject line for next month's assignment should be: "Photo Assignment: March 2011." Also, if you can, please don't strip out the metadata. And feel free to add any IPTC data you wish (These fields in particular: Caption, Credit, Copyright, Byline), I use that for the caption info.


Photo by Emil Trollklint. (Click on it to see enlarged version.) You can read more about how Emil captured this shot, plus see all of the other great images on the January 2011 Gallery page.


Good luck with your March assignment, and congratulations to all of the fine contributors for January. Very, very impressive!


twitter.jpg Follow me on Twitter

-


Now Available! The Digital Photography Companion. The official guide for The Digital Story Virtual Camera Club.
  • 25 handy and informative tables for quick reference.
  • Metadata listings for every photo in the book
  • Dedicated chapter on making printing easy.
  • Photo management software guide.
  • Many, many inside tips gleaned from years of experience.
  • Comprehensive (214 pages), yet fits easily in camera bag.

Technorati Tags: , ,

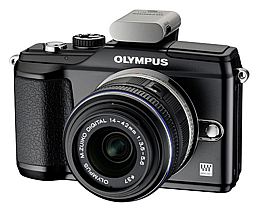
Olympus E-PL-2 with PENpal Bluetooth Adapter

Macworld Magazine has published my review of the Olympus E-PL2 micro four thirds camera. I've talked about this compact interchangeable lens device before, but the full review covers everything from important features, accessories, and image quality; to using the camera with an HDTV and pairing the PENpal Bluetooth accessory with a Mac. We cover a lot ground!

The pros and cons list in the review shape up like this:

Pros

  • Ergonomically comfortable body with textured hand grip, recessed on/off button, mode dial, and control wheel
  • Improved 14-42mm f/3.5-5.6 Zuiko MSC zoom kit lens
  • In-body image stabilization
  • Manual exposure and art filters in movie controls
  • Accessory Port 2 for expanded functionality
  • Built-in wireless flash control

Cons

  • No built-in external mic jack--must buy accessory port adapter
  • Complex menu system
  • Limited to AVI movie format (Motion JPEG OpenDML)

Overall, I think this is an excellent camera for the photographer who wants a compact, lightweight design, but still retains plenty of control and a variety lens options. The Olympus PEN E-PL2 camera kitis available for $599 US.


twitter.jpg Follow me on Twitter


With Spring around the corner, it's time to start thinking about photography workshops for the 2011 season. We have some great events lined up, and here's an overview of the schedule. Also, some notes from the field as I'm in Ventura right now recording a new "Photo Assignment" title for Lynda.com. Yes, another report from a hotel room, somewhere.

Listen to the Podcast

You can also download the podcast here (22 minutes). Or better yet, subscribe to the podcast in iTunes. You can support this podcast by purchasing the TDS iPhone App for only $2.99 from the Apple App Store.

Monthly Photo Assignment

Blue is the March 2011 Photo Assignment. You can read more about how to submit on our Member Participation page. Deadline for entry is March 31, 2011.

TDS Summer 2011 Photography Workshop

We're making plans now for the Summer 2011 TDS Photography Workshop. If you want your name on the reserve list, just drop me a line.

More Ways to Participate

Want to share photos and talk with other members in our virtual camera club? Check out our Flickr Public Group. It's a blast!

Podcast Sponsors

Red River Paper -- Try the $7.99 Sample Kit.

Make Your Photos Sizzle with Color! -- SizzlPix is like High Definition TV for your photography.

Blurb believes passionately in the joy of books - reading them, making them, sharing them, and selling them. Learn more by visiting Blurb on The Digital Story.


Technorati Tags:
, , , , ,


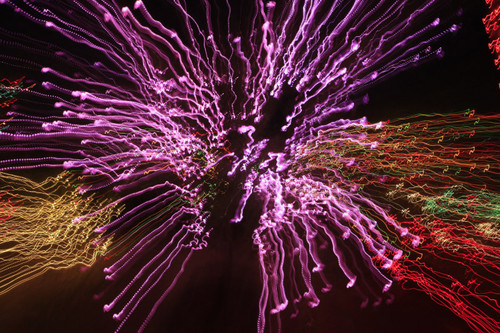
Ralph Ansel Vegas Lights

"While reading Red River's information on their new card paper, I clicked on your link about BOKAH taken in Las Vegas, and enjoyed the image of OOF Lights," writes Ralph Ansel. "During my visit to Las Vegas, I did some photos of lights at the candy factory's decorated cactus garden. I used a Canon 5D MarkII, Canon 24-70mm f2.8 at about f8 in Aperture Priority mode. I adjusted the lens opening to get a 1 to 2 sec. shutter speed and zoomed the lens during the exposure."

Nice shot, Ralph! I think the effect is striking.

Photo by Ralph Ansel.

This is our 210th Grab Shot! Wow. If you want to review the collection that began back in 2006, go to our Grab Shots page.

If you have a candid you'd like to share, take a look at our Submissions page, then send us your Grab Shot. We'll try to get it published for you on The Digital Story.

And you can view more images from our virtual camera club in the Member Photo Gallery.


The Digital Story Podcast App is the best way to stream or download weekly TDS podcast episodes. No more syncing your iPhone, iPod Touch, iPad, or even your Android phone just to get a podcast. And the best part is, The Digital Story Podcast App is your way to help support this show. Download it today!


twitter.jpg Follow me on Twitter