Recently in Capture One Pro

  Page 3 of 8 in Capture One Pro  

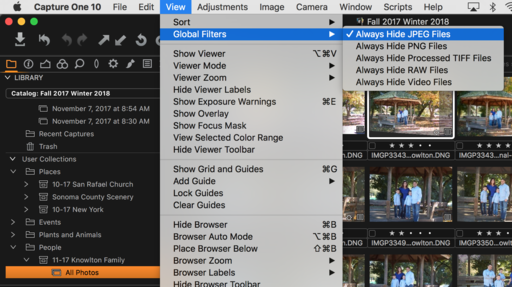
Coming off the holidays, we're very much in a group shot frame of mind. As we should be, right? Gathering people together is an efficient (and fun) way to document the event.

PC271995-Zach-1024-TDS.jpg

But we sometimes forget the value of individual family portraits as well. And over the years, these are just as valuable because they give us as photographers the opportunity to capture the essence of the person we know.


Zach at 22 years old. Photo by Derrick Story. Olympus OM-D E-M1 Mark II with Olympus PRO 45mm f/1.2 at f/1.4, ISO 200. Processed in Capture One Pro 12.


Once you process the shoot, be sure to share a gallery with a variety of poses with your subject. Chances are good that the version they like will differ from your favorite. That's OK. They can use the images for social, resumes, etc. while you build the family archive.

Updating family portraits is an excellent creative project for 2019. After all, we don't want the shoe cobbler's kids to have bare feet.

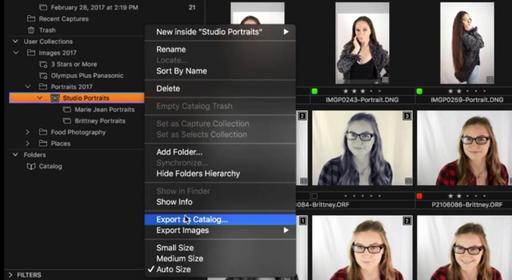
More on Capture One Pro

To learn more about Capture One Pro, take a look at my online course: Capture One Pro Essential Training on LinkedIn Learning. You can also tune in on lynda.com if you prefer your training there. Either way, I have four hours of entertaining education that will help you master this excellent photo management and editing application.

You can share your thoughts at the TDS Facebook page, where I'll post this story for discussion.

I was among the many pleased photographers who exclaimed, "Finally!" when Phase One announced their improved Fujifilm RAW support with version 11.3.

Last of the Garden Tomatoes "Last of the Garden Tomatoes" - Photographed with a Fujifilm XF10 with the RAW file processed in Capture One Pro 11.3. Photo by Derrick Story.

This highlight, of course, is bringing the Fujifilm GFX 50S into the mix. But a dozen Fujifilm cameras and another half dozen lenses were included as well. Among them was my humble, but loved, Fujifilm XF10 compact with APS-C sensor. I was dying to seeing how its RAW files were decoded with Capture One Pro. I was not disappointed. (Take a look at the Garden Tomatoes shot above.)

Capture-1-loupe.png The combination of the Fujifilm camera and Capture One Pro retains all that beautiful detail. Processed RAW file on the left, original RAW on the right.

The XF10 Jpegs are beautiful. And I shoot in that mode most of the time. But I've programmed the back Function button to switch to RAW+Jpeg when I want to extract as much image information as possible. And now, thanks to Capture One Pro 11.3, I can do so with confidence.

Edit Like a Pro with Capture One

Improve your skills with my new course titled, Capture One Pro 11 Essential Training on LinkedIn Learning. You can also tune in on lynda.com if you prefer your training there. Either way, I have four hours of entertaining education that will help you master this excellent photo management and editing application.

You can share your thoughts at the TDS Facebook page, where I'll post this story for discussion.

The Keystone correction tool can be found in the Capture One's Lens Correction tab, and it's definitely worth a look. It makes it easy to straighten both vertical and horizontal converging lines - the types of distortion that we often encounter when photographing buildings from ground level.

Generally speaking, I use it to correct vertical lines. In this short movie, you can see exactly how it works.

Straighten lines with Keystone Correction from Capture One Pro 11 Essential Training by Derrick Story

Not only does this tool work well, it's not difficult to figure it out. And just like everything else in Capture One Pro, it's non-destructive. So you can go back at any time to readjust the picture. And by using it, you can correct an everyday snapshot (such as the iPhone shot below) into a pretty nice photograph.

keystone-correction.png

This video is from my new course titled, Capture One Pro 11 Essential Training on LinkedIn Learning. You can also tune in on lynda.com if you prefer your training there. Either way, I have four hours of entertaining education that will help you master this excellent photo management and editing application.

You can share your thoughts at the TDS Facebook page, where I'll post this story for discussion.

I love the file organization and RAW processing in Capture One Pro 11. But once I have the basic image the way I want, I then like to move my favorites over to Luminar 2018 for the finishing touches. Here's an example from Maui.

maui-hana-falls-2048.jpg "Playing in the Falls, Maui" - Olympus OM-D E-M10 II with a Panasonic 20mm f/1.7. 1 second exposure with a polarizer filter. Image by Derrick Story.

There are a variety of ways to do this, but I go the old fashion route by processing the RAW in Capture One, applying my basic edits, exporting a full resolution Tiff, then opening that file in the standalone version of Luminar 2018. I then save the working file as a Luminar document. When I'm finished with the enhancement, I also send an exported Luminar version back to Capture One Pro.

Each application has its own strengths. And when you take the best from each, image editing becomes really powerful, and quite fun.

Rock Luminar with my new Essential Training

You learn all the ins and outs of Luminar 2018 via my Essential Training on lynda.com and on LinkedIn Learning. It's fun, and I promise, you will learn a lot.

One of my favorite new features in Capture One Pro 11 is redesigned layers. Now, you can access them in practically every adjustment tool, and we have plenty of powerful, yet easy to use masking tools for localized edits on each of those layers.

layers-capture-one-11-web.jpg

If you haven't experienced them yet, I have a treat for you. Here's 5-minute movie that introduces you to the new Layers, how to use them, and the tools available within them. You'll be up and running right away.

Learn about the redesigned layer approach from Capture One Pro 11 Essential Training by Derrick Story

This video is from my new course titled, Capture One Pro 11 Essential Training on LinkedIn Learning. You can also tune in on lynda.com if you prefer your training there. Either way, I have four hours of entertaining education that will help you master this excellent photo management and editing application.

You can share your thoughts at the TDS Facebook page, where I'll post this story for discussion.

I received an image request the other morning for a photo that I captured in 2014. Those were Aperture days for me, so I went upstairs to the archive room, fired up the Drobos, and launched the appropriate Aperture library.

In 2014, I loved Aperture. I thought it was some of the finest software that Apple had designed. But on this morning, I was impatient with it. And for the first time, the interface looked a bit dated. Then I realized... the infatuation was over.

Aperture-Archive.jpg

At that moment, I decided to finally migrate that 1TB archive to Capture One Pro 11. Thanks to the easy import command (File > Import Catalog > Aperture Library), I knew that the computer would handle all of the heavy lifting. All I had to do was use another machine for a day or so. So I set up a new Capture One Catalog, and initiated the process.

Capture One Pro is exceedingly good at this transition. Most of the library structure migrates, sans Smart Albums. Many of the image adjustments carry over as well. And all of the metadata, including my star ratings and IPTC were welcomed in their new home.

A day and a half went by, and the job was complete. At first, performance was a bit funky. So I quit Capture One, counted to 10, then relaunched the app. Ah, much better. And the more I browsed, the better the performance became.

Capture-One-Pro-Archive-web.jpg

The pleasant surprise was the improved RAW processing in Capture One. All of my shots looked better. That subtle contrast enhancement that's in the Capture One secret sauce really played out nicely with my older photos. My cropping carried over as well. Yay!

I recommend that you keep separate Capture One catalogs for your archives. Mine are on Drobos with Thunderbolt connections. Performance is good enough for browsing, enhancing, and exporting older shots.

I still have my Aperture archives as well. It's just disk space, and that seems like a cheap enough insurance policy in case something goes wrong. Aperture and I had a wonderful relationship. But for now, Capture One Pro is looking after my archives.

Master Capture One Pro

Start with Capture One Pro 10 Essential Training that will quickly get you up to speed with this pro level imaging application.

Then drill down into mastering the editing tools with Capture One Pro 10: Retouching and get supremely organized with Advanced Capture One Pro: Catalog Management.

You can share your thoughts at the TDS Facebook page, where I'll post this story for discussion.

I admit it, I shoot RAW+Jpeg a lot - and for many good reasons. These days, I just pile everything into Capture One Pro, then sort things out in the app. I can do this because of the terrific C1P tools, with Global Filters at the top of the list.

global-filtes-c1p.png

Generally speaking, when it's time to rate images and decide which ones are worthy of editing, I just want to work with the RAW files. So all I have to do is go to View > Global Filters > Always Hide Jpeg Files. (There are other options as well, depending on the situation.) The Jpegs remain in the catalog, I just don't see them. So then I can go about my business of working just on the RAWs. Here's a movie that shows this in action.

Use global filters from Advanced Capture One Pro: Library Management by Derrick Story

It's a little thing, right? But little things really add up when you're under the gun with finishing off a shoot.

Master Capture One Pro

Start with Capture One Pro 10 Essential Training that will quickly get you up to speed with this pro level imaging application.

Then drill down into mastering the editing tools with Capture One Pro 10: Retouching and get supremely organized with Advanced Capture One Pro: Catalog Management.

You can share your thoughts at the TDS Facebook page, where I'll post this story for discussion.

Many photographers capture both RAW and JPEGs. I think a lot of that comes out of social networking. We have those JPEGs on our cameras. We can send them via Wifi to our mobile devises and upload them to social sights. And then when we're ready to do the heavy work, right, the serious work on our images, then we want to work on RAW files in applications such as Capture One-Pro.

So we find ourself having both types of files on our memory cards. Now when you bring in the images to Capture One-Pro, you might not want to bring in those JPEGs.

Why? Because Capture One Pro's already going to create JPEGs for you. Plus, if you bring them both in, you'll have to manage them in the catalog. And that's probably extra work you don't need. So here's how to cheery pick the RAWs only off the memory card.

Handle RAW and JPEG files on a memory card from Capture One Pro 10 Essential Training by Derrick Story

Basically your enable a sort in the import dialog box that separates the RAWs from the Jpegs. The you select the RAWs only for copying to your catalog. It seems simple once you know the trick. And it can save you a lot of time up the road with catalog management.

More Capture One Pro 10 Techniques

import-c1-pro.png

You can master Capture One Pro in just a few hours by viewing my LinkedIn Learning Training title, Capture One Pro 10 Essential Training, which also includes an entire chapter dedicated to version 10.1.

Most Capture One users have master catalogs with thousands of images. If, however, you want to take a project with your on the road (and leave the rest of the catalog behind), it's very easy to do.

export-as-catalog.jpg

Once you've exported a project as a catalog, you can copy it to your laptop and take it on the road. If you make changes to the exported catalog, you can integrate them back into the master collection by using the Import Catalog command under the File menu.

Here's a movie that shows you the steps for exporting the project.

Output a project or album as a catalog from Capture One Pro 10 Essential Training by Derrick Story

More Capture One Pro 10 Techniques

You can master Capture One Pro in just a few hours by viewing my LinkedIn Learning Training title, Capture One Pro 10 Essential Training, which also includes an entire chapter dedicated to version 10.1.

Many photographers try to use Spot Removal instead of cloning in Capture One for a very simple reason: they can't find the cloning tool.

enable-clone-layer.jpg

That's because it's tucked away in the Local Adjustments panel. Then, someone could tell you that, and you still might not find it. You'll see adjustments for just about everything else - white balance, exposure, etc. - but not cloning.

The trick is to long-click on the new layer icon (+) until a popup menu is revealed displaying: New Layer, New Clone Layer, New Healing Layer. Choose New Clone Layer, and now when you select the Brush, it will transform into a cloning tool that works pretty much like everyone else's.

Give your layer a name. Then make sure the brush icon is highlighted or press the B key. Use the bracket keys to control the size of the brush, and Shift-bracket keys to control feathering. Option-click on the area that you want to sample. Then paint over the area that you want to clone. When you're finished, tap the V key to disable the brush.

(Another nifty way to go about this is to create a regular Adjustment layer, then change it to a Clone layer by click on the "Adjustment Bubble" that reveals the popup menu.)

There are a variety of options in the brushing tool itself that allow you to control the appearance of the mask. And since all of this work is created on a layer, you can turn it off and on by simply unchecking its box in the Adjustments panel.

After a little trial and error, you should get comfortable with Capture One's cloning tool. And now you can save Spot Removal for what it was designed for... removing sensor dust and other specks.

Master Capture One Pro

Start with Capture One Pro 10 Essential Training that will quickly get you up to speed with this pro level imaging application.

Then drill down into mastering the editing tools with Capture One Pro 10: Retouching and get supremely organized with Advanced Capture One Pro: Catalog Management.

You can share your thoughts at the TDS Facebook page, where I'll post this story for discussion.