Recently in Capture One Pro

  Page 5 of 8 in Capture One Pro  

Global Filters in Capture One Pro

If you shoot RAW+Jpeg, as many of us do these days, then you should know about Global Filters in Capture One Pro.

global-filters.jpg

They allow us to quickly hide various file types - RAW, Jpeg, PNG, Tiff, Video - so that we're only viewing the images we want. So if I have an upload that contains RAWs, Jpegs, and Video files, and I only want to see the movies, I can use Global Filters to temporarily hide the RAWs and Jpegs. Here's a short movie that shows you how this works.

One of the primary reasons I moved from Aperture to Capture One Pro was because of its robust and easy to use image catalog. Global Filters are just another example of how C1 improves my photography life.

Take Control of Your Capture One Library

My lynda.com title, Advanced Capture One Pro: Library Management, shows you how to organize like a pro, covering techniques for referenced and managed catalogs, plus integrating sessions, backing up masters, and configuring your Capture One environment specifically to your needs.

You can share your thoughts at the TDS Facebook page, where I'll post this story for discussion.

capture-one-import.jpg

If you're running a managed catalog in Capture One Pro, you have the option of customizing file names on import. I use this feature 99 percent of the time because having both the original image number and additional data makes it easier to keep track of my pictures once they leave the cosy confines of the C1 environment.

Capture One handles this task through the use of tokens. They are metadata building blocks that you can arrange in any order. My favorite combination is: Image Name-Job Name. The first token retains the original file number, while the second is an editable field that allows me to include a descriptive word or two in the file name itself. Here's a short video that shows how I do this.

Another way I use this functionality is to add my name to the file name itself when I deliver images to a client. Even though my copyright info is in the metadata, I've discovered that many PR folks don't dig very deeply when using my photographs. Having my name in the file name increases the odds of a photo credit in the caption.

If you're a Capture One Pro user, it's worth building a strategy for enhancing the file names of your images. We're in a bumper sticker society, and the more visible your vital info is, the better.

Take Control of Your Capture One Library

My lynda.com title, Advanced Capture One Pro: Library Management, shows you how to organize like a pro, covering techniques for referenced and managed catalogs, plus integrating sessions, backing up masters, and configuring your Capture One environment specifically to your needs.

Want to Comment on this Post?

You can share your thoughts at the TDS Facebook page, where I'll post this story for discussion.

My phobia of color wheels began back in the original Final Cut days. I would look at them, then devise any other method to make the correction. And it wasn't until Capture One Pro that I overcame my prejudice and learned that they are truly helpful... and easy.

color-adjust-with-cb.jpg Fine tuning a portrait shoot with Color Balance in Capture One Pro. Photo by Derrick Story.

Currently, I'm in the middle of recording a Capture One 10 title for lynda.com. (My existing Capture One Pro 9 Essential Training is very popular, and we wanted to integrate the new features.

When I finished the movie on Color Balance, I had to laugh at myself. It's so fun. What was my problem before? So I thought that if you shared my previous phobia, this should help. Here are the basic controls for each of the color wheels.

Color-Balance-CP1-web.jpg The midtone adjustment in the Color Balance panel of Capture One Pro.

  • Drag the point in the middle of the circle to change the color. This could cover the entire image with the Master color balance, or the basic tonal areas with Shadow, Midtone, and Highlight wheels.
  • The tiny handle on the edge of the color wheel is to fine-tune the hue.
  • Once you set the color you want, use the left side slider to adjust saturation.
  • The right side slider is for brightness.

Start by choosing the Color you want to shift to in the shadows, midtones, or highlights, then fine tune it with the Hue handle. Next, work the Saturation slider until the effect is exactly to your taste, then finish off with Brightness. It's easy! And the effects are amazing.

To see the Before and After, hold down the Option/Alt key and click on the Reset arrow in the Color Balance panel. That will show you the image without your adjustments. Let go of the mouse, and your adjustments will appear again.

Start with a simple image to practice. Once you get the hang of it, you'll be visiting the Color Balance adjustment on a regular basis... and dramatically improving your images along the way.

More Capture One Pro Tips and Techniques

Improve your skills by watching Capture One Pro Essential Training now available on lynda.com. More than 5 hours of tips, tricks, and techniques. Plus many free movies using advanced techniques.

I've also created a dedicated Capture One Pro Training page on The Digital Story. You can follow all of the tips and techniques that I publish in one convenient spot.

Thinking About Making the Transition from Aperture or Lightroom? - Download my free eBook titled, Rocky Nook's Guide to Moving to Capture One Pro. I show you the steps to create a test library, then build the foundation for a smooth transition to Capture One Pro.

Want to Comment on this Post?

You can share your thoughts at the TDS Facebook page, where I'll post this story for discussion.

Capture One Pro is one of the most powerful, flexible, photo management applications available. So powerful, in fact, that you may get lost configuring your catalog for optimal organization. If that's been the case for you, I can bring some clarity to your life, or at least to your photo management.

capture-1-library-mgmt-web.jpg

My latest lynda.com title, Advanced Capture One Pro: Library Management, shows you how to organize like a pro, covering techniques for referenced and managed catalogs, plus integrating sessions, backing up masters, and configuring your Capture One environment specifically to your needs. Take a look at this 1-minute introductory video for the course.

These techniques work for photographers using Capture One 8, 9, and 10. I have testing these approaches with my own Capture One catalog that manages my professional photography business. And I think that it will help you tame yours.

More Capture One Pro Tips and Techniques

Improve your skills by watching Capture One Pro Essential Training now available on lynda.com. More than 5 hours of tips, tricks, and techniques. Plus many free movies using advanced techniques.

I've also created a dedicated Capture One Pro Training page on The Digital Story. You can follow all of the tips and techniques that I publish in one convenient spot.

Thinking About Making the Transition from Aperture or Lightroom? - Download my free eBook titled, Rocky Nook's Guide to Moving to Capture One Pro. I show you the steps to create a test library, then build the foundation for a smooth transition to Capture One Pro.

Want to Comment on this Post?

You can share your thoughts at the TDS Facebook page, where I'll post this story for discussion.

I love the RAW editing tools in Capture One Pro. But there are times when I want to tap the magic of Luminar and its extensive set of filters. And I don't want to compromise my digital asset management system to do so. As a result, I needed to figure out how to get these two kids to play together. And that's what I'm going to show you right now.

luminar-in-c1p.jpg Image edited in Luminar, then returned to Capture One Pro for asset management. Photos by Derrick Story.

Going from Capture One Pro to Luminar

Since you're not going to get a clean roundtrip from Capture One to Luminar then back, the next best thing is to use the Open With... command in Capture One (right-click on the image and choose Open With... from the popup menu). Luminar can process your RAW files, so you're sending over a high quality image for editing. Select Luminar from the popup menu, and the image will open in the app.

open-with-command.png

Edit in Luminar

Edit as you normally would in Luminar, using the filters and presets to achieve the look you want. Once the image is ready to send back to Capture One, choose the Export command in Luminar, File > Export. This is the point where you have to think about your file organization.

Sending Back to Capture One Pro

My recommendation is to set up a standard receiving folder for the Luminar images, then import from that folder back into Capture One. Mine is a referenced system, leaving the images where they are and pointing the Capture One database to them. I tend to send back full sized Jpegs to keep file size reasonable. But you can choose Tiffs or another format, if you wish, during the export process.

before-after.jpg The before and after for this image in Luminar.

I add the word Luminar to the file name when exporting it, so I will know a bit about the picture's history when reviewing it in the Capture One catalog. Since the file name for the edited image is the same as the original, except for having Luminar at the end, the picture shows up in the catalog next to the original.

image-in-c1p.jpg Luminar image back in Capture One Pro for asset management.

All my IPTC and EXIF metadata is intact, and I now have another powerful option for working on my images stored in Capture One. If I do a lot of work to the shot in Luminar, multiple layers for example, I may also want to save the image as a separate Luminar file so I can go back and pick up my work at a later time. I can always export the updated version into Capture One Pro for management with the others.

Haven't tried Luminar? You can download a free trial here.

More Capture One Pro Tips and Techniques

Improve your skills by watching Capture One Pro Essential Training now available on lynda.com. More than 5 hours of tips, tricks, and techniques. Plus many free movies using advanced techniques.

I've also created a dedicated Capture One Pro Training page on The Digital Story. You can follow all of the tips and techniques that I publish in one convenient spot.

Thinking About Making the Transition from Aperture or Lightroom? - Download my free eBook titled, Rocky Nook's Guide to Moving to Capture One Pro. I show you the steps to create a test library, then build the foundation for a smooth transition to Capture One Pro.

Want to Comment on this Post?

You can share your thoughts at the TDS Facebook page, where I'll post this story for discussion.

Photography is both my hobby and a substantial revenue stream. I once kept both worlds in the same application (Aperture), but over the last couple years, I've separated my personal work from what I shoot for hire.

Capture-One-Wildspeak.jpg

Technology has had much to do with this. In 2012, for example, I shot just about everything with the same camera. iPhones weren't as good, Cloud sharing not as robust, and my workflow was essentially to remove the card from the camera, insert it into my Mac, and load everything into Aperture.

But 2017 is much different. I love shooting my day to day life with the iPhone, Olympus TG-4, and a variety of 35mm film cameras. The digital images flow right into my Photos for iOS and macOS apps, and they're instantly available to share, print, and post. It's easy and enjoyable. I've never been happier as a hobbyist.

My professional jobs involve higher resolution cameras, bigger files, larger quantities for each session, multiple export options, and serving as an archive for my clients. And for this work, Capture One Pro 10 has become my go-to app. Here are five reasons why.

Old School Organization

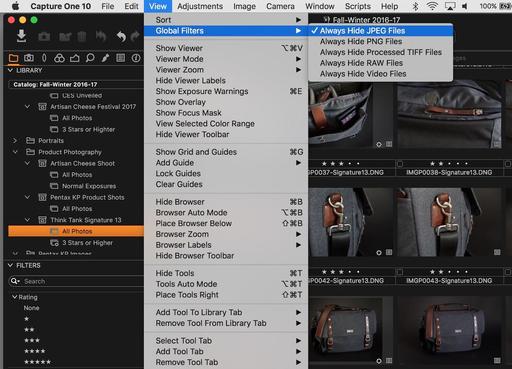
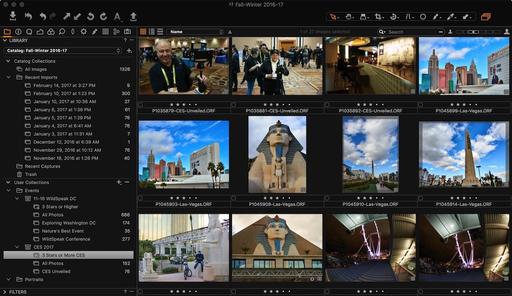
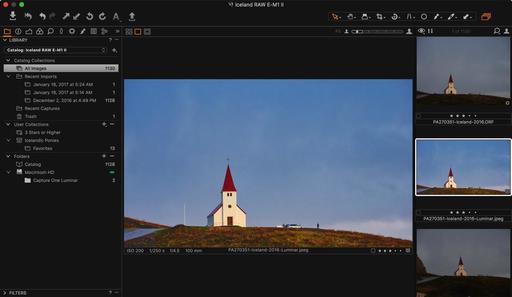
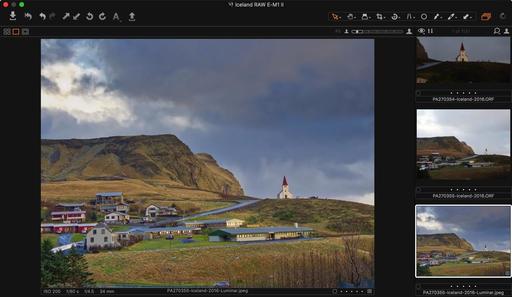
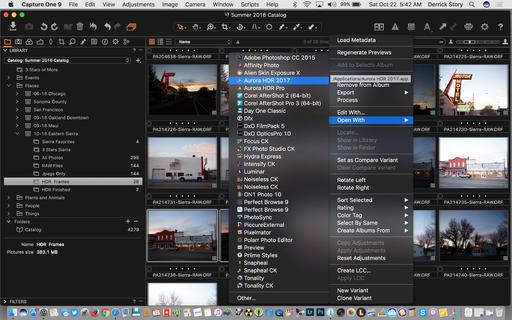
The tools for catalog management include projects, albums, groups (the equivalent of folders in Aperture), and everything else that I need to slice and dice a shoot. Plus, I can also manage content on my hard drives right there in the Capture One interface.

When I load thousands of images into a catalog, I want to be able to tame them as quickly as possible. Capture One makes that easy.

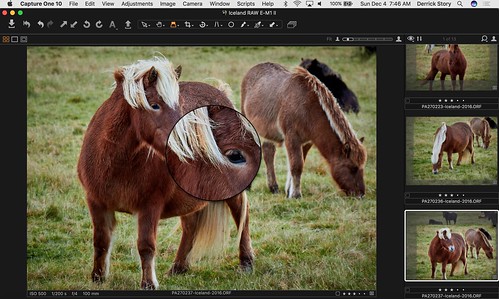
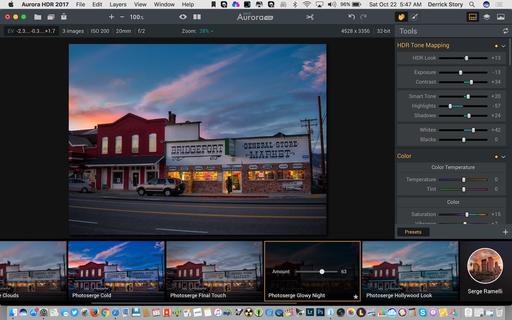
Excellent RAW Processing

The Capture One look is different than any other processor that I've used. It's bold. My RAW files jump off the screen even before I begin editing them.

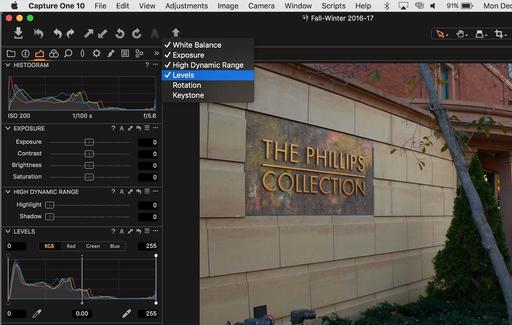
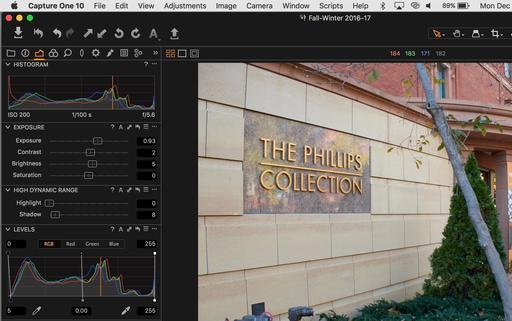
Robust Editing Tools

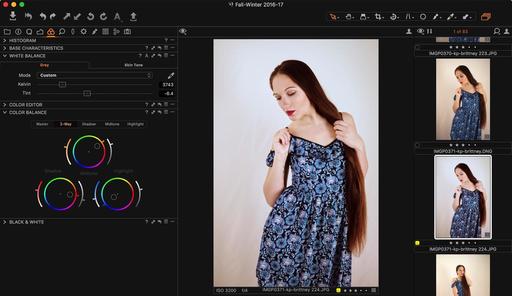
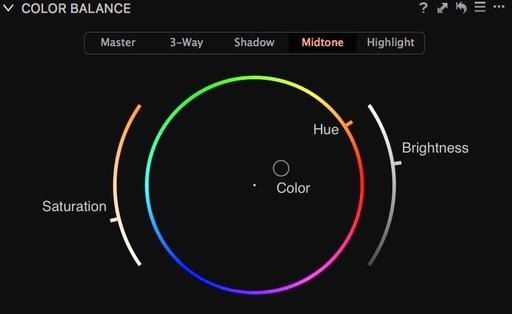
Ninety-five percent of the time, I can handle all of my image editing in Capture One Pro. Starting with the amazing Contrast slider (that is far more than you'd think), to sophisticated color tools, to lens corrections, to localized editing brushes... this app provides what I need to get the most out of my images.

Flexible Output Options

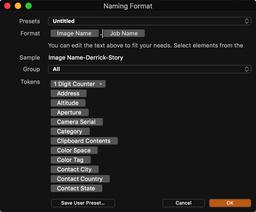
The Output tab screams professional app. Here I can create a variety of custom export options to run individually or all at once. So if I need a set of master images to send to the client, and another set of web shots for an online gallery, Capture One Pro can provide that for me all at once.

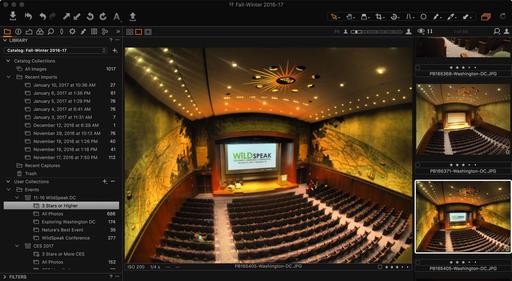
Versatile Catalog Management

I can run a managed catalog or choose to go referenced with external hard drives storing my masters... on both Mac and PC platforms. I can enable a Session while on the road or working on a specific assignment, then incorporate that content into my master catalog. And I can do just about anything else I want with the Capture One Pro catalog structure. Perfect for guys like me who travel and have a master setup back at the studio.

I'm entering my second complete year with Capture One Pro. And I have to say... it feels great to have made a complete transition from Aperture.

Capture One Pro Tips and Techniques

Improve your skills by watching Capture One Pro Essential Training now available on lynda.com. More than 5 hours of tips, tricks, and techniques. Plus many free movies using advanced techniques.

I've also created a dedicated Capture One Pro Training page on The Digital Story. You can follow all of the tips and techniques that I publish in one convenient spot.

Thinking About Making the Transition from Aperture or Lightroom? - Download my free eBook titled, Rocky Nook's Guide to Moving to Capture One Pro. I show you the steps to create a test library, then build the foundation for a smooth transition to Capture One Pro.

Want to Comment on this Post?

You can share your thoughts at the TDS Facebook page, where I'll post this story for discussion.

Maybe it's because Capture One Pro has so many sophisticated tools that enthusiast photographers overlook the handy (and simple) Auto Adjustments option. But in my experience, I've found it quite helpful.

set-up-auto-settings.jpg

Look for the "Big A" in the top toolbar. If you click on its smaller down-pointing arrow, you can selected the adjustments that will be included in the Auto fix. I use the top four: White Balance, Exposure, High Dynamic Range, and Levels, as shown in the illustration above.

To apply these all at once, just click on an image, then click on the Big A button. Presto, your image is adjusted. You can see what Capture One did by checking the Tools panel on the left. You can fine tune any of the sliders that you wish. If you don't like the new look at all, click CMD-R to Reset.

applying-auto-settings.jpg

Auto Adjust can also by applied on Import. Check the Auto Adjustments box in the Adjustments brick in the Import dialog box. Capture One Pro will apply the changes as it generates the previews.

In general, I've found that using Auto Adjust saves me time, especially when processing a big shoot that was captured in a non-controlled environment. If you haven't tried this feature yet, take it for a spin. You might like where you end up.

More Capture One Pro Tips and Techniques

Improve your skills by watching Capture One Pro Essential Training now available on lynda.com. More than 5 hours of tips, tricks, and techniques. Plus many free movies using advanced techniques.

I've also created a dedicated Capture One Pro Training page on The Digital Story. You can follow all of the tips and techniques that I publish in one convenient spot.

Thinking About Making the Transition from Aperture or Lightroom? - Download my free eBook titled, Rocky Nook's Guide to Moving to Capture One Pro. I show you the steps to create a test library, then build the foundation for a smooth transition to Capture One Pro.

Want to Comment on this Post?

You can share your thoughts at the TDS Facebook page, where I'll post this story for discussion.

This is the moment I've been waiting for. I had been sitting on hundreds of RAW files from my Iceland test of the Olympus OM-D E-M1 Mark II, and I wanted to see how those images really looked. And now I know... Stunning.

Icelandic Ponies RAW file from Olympus OM-D E-M1 Mark II with 12-100mm PRO lens processed in Capture One Pro 10. Photos by Derrick Story.

The combination of the E-M1's imaging pipeline, combined with the sharpness of the 12-100mm f/4 IS PRO Lens and the crunchy RAW processing of Capture One Pro 10, makes for quite a trio.

Icelandic Ponies Grazing

PA270237-Iceland-2016-Derrick-Story.jpg

I'll be reporting on additional aspects of Capture One Pro 10 in upcoming posts. But I wanted you to see firsthand what this software does with RAW files from the E-M1 Mark II.

More Capture One Pro Tips and Techniques

Improve your skills by watching Capture One Pro Essential Training now available on lynda.com. More than 5 hours of tips, tricks, and techniques. Plus many free movies using advanced techniques.

I've also created a dedicated Capture One Pro Training page on The Digital Story. You can follow all of the tips and techniques that I publish in one convenient spot.

Thinking About Making the Transition from Aperture or Lightroom? - Download my free eBook titled, Rocky Nook's Guide to Moving to Capture One Pro. I show you the steps to create a test library, then build the foundation for a smooth transition to Capture One Pro.

Want to Comment on this Post?

You can share your thoughts at the TDS Facebook page, where I'll post this story for discussion.

I forgot to adjust one of my cameras to the proper time here in Iceland. And those images were driving me crazy in my Capture One catalog because they were out of order. Unfortunately, I discovered that there was no easy way to fix this problem within Capture One.

PA270026-TG-4 web2.jpg The original time stamp for this shot of Skogafoss Falls, Iceland was 7 hours off. I needed to fix that. Olympus TG-4 in Program mode. Image by Derrick Story.

After a great deal of hunting, I discovered that I must leave the application for my fix. So, I turned to Photos for macOS, which does have a batch time stamp fix tool. The basic task went like this.

  • Export images out of Capture One Pro.
  • Delete the existing shots from the Capture One Catalog.
  • Create a new library in Photos for macOS.
  • Import pictures into Photos.
  • Use the Adjust Date and Time tool in Photos to fix the time stamps.
  • Export the images out of Photos and back into Capture One Pro.

I was very careful along the way and backed everything up, just in case something went wrong. But I have to say that the entire process was a real hassle. In the future, I'm going to be more diligent about checking the time stamps on all of my cameras. I certainly don't want to spend time on this again.

More Capture One Pro Tips and Techniques

Improve your skills by watching Capture One Pro Essential Training now available on lynda.com. More than 5 hours of tips, tricks, and techniques. Plus many free movies using advanced techniques.

Master Photos for OS X

(It's More Powerful than You Think)

For hands-on tutorials, be sure to take a look at Photos for OS X Essential Training on lynda.com. I cover everything you need to know to get the most from this surprisingly powerful image management application.

You can share your thoughts at the TDS Facebook page, where I'll post this story for discussion.

Connecting Capture One to Aurora HDR

Once my RAW file sequences are safe and sound in Capture One Pro, I can open them in Aurora HDR for finishing the work. Here are the four basic steps I use to make this connection.

Step 1 - Select your three shots in Capture One, then use the Open With command. I right-click on one of the thumbnails to reveal this popup menu.

01-open-with.jpg

Step 2 - Check the Alignment box in the following screen, and make any additional choices required for your images.

02-make-settings.jpg

Step 3 - Once Aurora HDR has processed your images, you can choose from the presets to get the look you want. Presets are revealed by clicking on the big, round icon in the lower right corner.

03-choose-preset.jpg

I often adjust the amount of the preset, then fine tune its settings by working the sliders in the Tools panel.

Step 4 - Export the final version of the shot by choosing File > Export to Image in Aurora HDR. Since I'm usually sending this photo back to Capture One, I export a full-size, 8-bit Tiff file. I then import that Tiff back into Capture One and keep it in the same project as the original shots.

04-export-image.jpg

The exported image can be worked on some more with Capture One tools. I keep the finished HDRs in their own album, within the Project. That way they're easily accessible when I want to display them or export out as lower resolution Jpeg.

If you want to save the work you've done in Aurora HDR, then use the Save command. That file can be reopened in the state that you left it for further fine tuning.

Bridgeport-Dusk-2016.jpg "Bridgeport General Store at Dusk" Olympus OM-D E-M5 Mark II with Panasonic 20mm f/1.7 prime at ISO 320, handheld. Images by Derrick Story.

Capture One and Aurora HDR are a terrific tandem for creating and managing high quality dynamic range images from your RAW file sequences.

More Capture One Pro Tips and Techniques

Improve your skills by watching Capture One Pro Essential Training now available on lynda.com. More than 5 hours of tips, tricks, and techniques. Plus many free movies using advanced techniques.

I've also created a dedicated Capture One Pro Training page on The Digital Story. You can follow all of the tips and techniques that I publish in one convenient spot.

Thinking About Making the Transition from Aperture or Lightroom? - Download my free eBook titled, Rocky Nook's Guide to Moving to Capture One Pro. I show you the steps to create a test library, then build the foundation for a smooth transition to Capture One Pro.

Want to Comment on this Post?

You can share your thoughts at the TDS Facebook page, where I'll post this story for discussion.