Recently in Capture One Pro

  Page 7 of 8 in Capture One Pro  

Just because you left Aperture or Lightroom behind, that doesn't mean that you have to abandon your favorite plugins too. I've been using Silver Efex Pro with Capture One, and the two get along just fine. This also works for other apps/plugins too.

What you might not realize is that, even though you've been using Sliver Efex Pro 2 as a plugin, there's an app in your Applications folder: Applications > Nik Collection > Silver Efex Pro 2.app. Capture One Pro can connect with that app using the Edit With command: Control-Click > Edit With > Silver Efex Pro 2.

01-Edit-With.jpg 
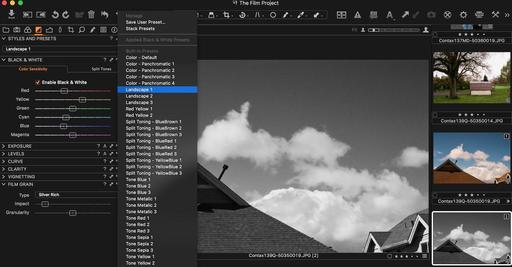
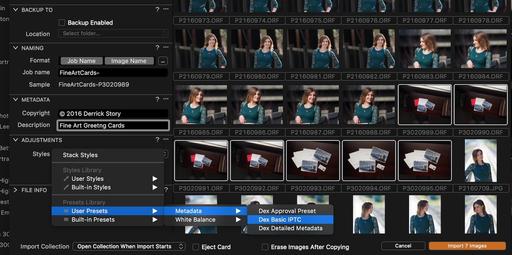
Start with the Edit With command in Capture One Pro.

Going this route allows you to set up an Edit Recipe, where you can choose between Tiff or Jpeg, color space, resolution, and scale. A new file is created from the original RAW, and it is sent to Silver Efex for work. Here's how to do it.

02-Adjust-SilverEfex.jpg

The Actual Steps

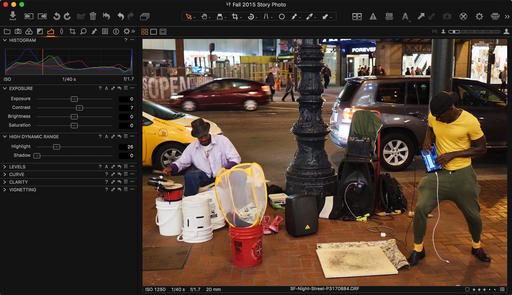
  • In Capture One Pro, start with a RAW file. By doing so, the original image will stay protected.
  • Right-click on the RAW file and select Edit With...
  • Set up the job to your liking, including selecting Silver Efex from the Open With popup menu (see the top illustration). You can choose any of the apps that appear here.
  • Click on the Edit Variant button.
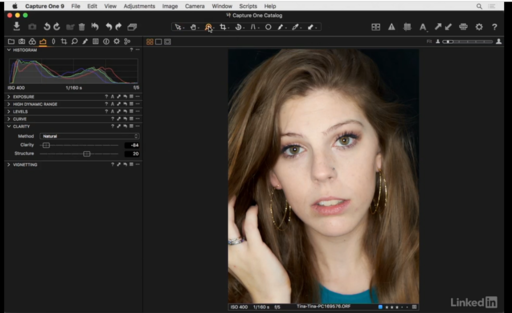
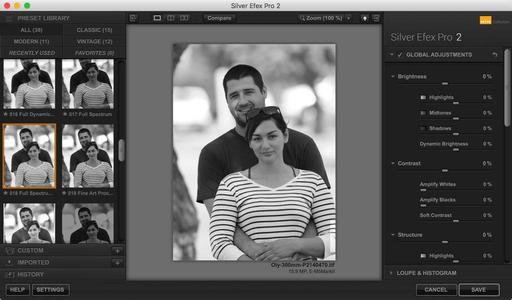
  • Adjust your image in Silver Efex, then click on the Save button.
  • The new Jpeg or Tiff will be returned to your Capture One Pro library.

Tiff-Returned-to-C1P.jpg 
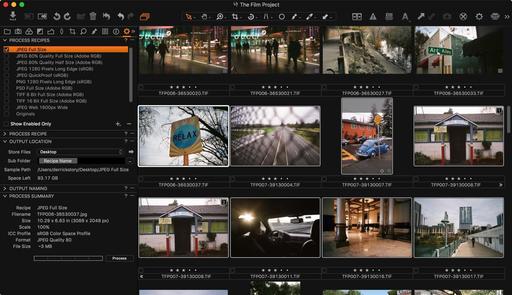
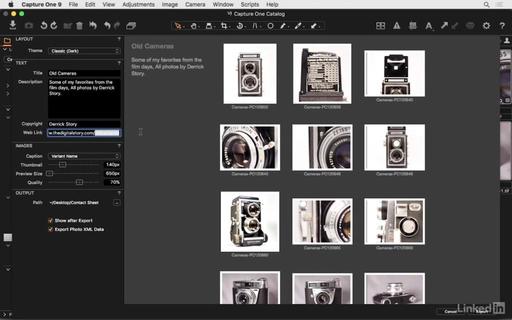
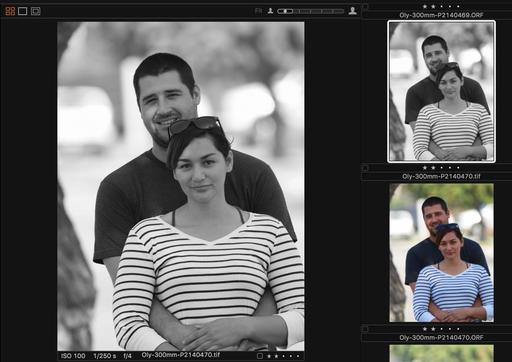
File retured to Capture One Pro and placed alongside the original.

I've just stared playing with this workflow, so I'm sure there's more to learn. But this should get you pointed in the right direction is you want to continue to use your favorite plugins with Capture One Pro.

More Capture One Pro Tips and Techniques

Improve your skills by watching Capture One Pro Essential Training now available on lynda.com. More than 5 hours of tips, tricks, and techniques. Plus many free movies using advanced techniques.

I've also created a dedicated Capture One Pro Training page on The Digital Story. You can follow all of the tips and techniques that I publish in one convenient spot.

Thinking About Making the Transition from Aperture or Lightroom? - Download my free eBook titled, Rocky Nook's Guide to Moving to Capture One Pro. I show you the steps to create a test library, then build the foundation for a smooth transition to Capture One Pro.

Want to Comment on this Post?

You can share your thoughts at the TDS Facebook page, where I'll post this story for discussion.

One of the reasons why I continued using Aperture after Apple ceased development, was because I was fond of the plugins I had acquired for it.

As I became more familiar with Capture One Pro, however, I learned that I might not be giving up all that much after all, especially for Black & White photography. Two reasons for that: 1) The Black & White converter image adjustment, and 2) Styles presets.

Black & White Converter Tool

capture-one-bw.jpg

The adjustment sliders for B&W conversion are very good. But the kicker is all of the presets loaded in to the application. So you can browse the different looks, pick one you like, and then fine tune from there. Here's a video on how that works.

As a finishing touch, take a look at the Film Grain tool. There are a variety of great effects there, including my favorite, Silver Rich.

Film Emulation Styles

There are also some wonderful commercially available Styles that you can download, such as Capture One Styles that load a variety of effects right in to your application.

film-styles.jpg

The nice thing about these is that they don't disrupt the RAW workflow. My previous Aperture plugins required that I converted files to TIFFs and then roundtrip them. With Styles, everything stays in RAW and in the host application.

Thanks to these features, I'm discovering that there is indeed, life after Aperture plugins.

More Capture One Pro Tips and Techniques

Improve your skills by watching Capture One Pro Essential Training now available on lynda.com. More than 5 hours of tips, tricks, and techniques. Plus many free movies using advanced techniques.

I've also created a dedicated Capture One Pro Training page on The Digital Story. You can follow all of the tips and techniques that I publish in one convenient spot.

Thinking About Making the Transition from Aperture or Lightroom? - Download my free eBook titled, Rocky Nook's Guide to Moving to Capture One Pro. I show you the steps to create a test library, then build the foundation for a smooth transition to Capture One Pro.

Want to Comment on this Post?

You can share your thoughts at the TDS Facebook page, where I'll post this story for discussion.

One of the most flexible tools in Capture One Pro is User Styles. I think they're also off the radar for many users. That's too bad because this functionality allows photographers to save a combination of settings and apply them to images as necessary.

user-styles-c1.png

You can use styles to create "your look" for images, apply specific adjustments to portraits and landscapes, and even save them as metadata boilerplates. Take a look at this short movie for an overview on how styles work.

And in addition to the styles you create, you can purchase styles to apply a variety of effects and film emulations to your photographs. Once you enable this secret weapon to your workflow, you'll have a whole new appreciation for the power of Capture One Pro.

More Capture One Pro Tips and Techniques

Improve your skills by watching Capture One Pro Essential Training now available on lynda.com. More than 5 hours of tips, tricks, and techniques. Plus many free movies using advanced techniques.

I've also created a dedicated Capture One Pro Training page on The Digital Story. You can follow all of the tips and techniques that I publish in one convenient spot.

Thinking About Making the Transition from Aperture or Lightroom? - Download my free eBook titled, Rocky Nook's Guide to Moving to Capture One Pro. I show you the steps to create a test library, then build the foundation for a smooth transition to Capture One Pro.

Want to Comment on this Post?

You can share your thoughts at the TDS Facebook page, where I'll post this story for discussion.

I can't be the only photographer who sometimes needs to export just a single image quickly for a web post, then later on send out an entire batch at different resolutions. It all depends on the task at hand, right?

Capture One Pro is quite versatile in this area. There are two distinct ways to export images from your catalog. The first is the actual Export command (File > Export Images), and the second is using the Output tab with its Process Recipes. Take a look at this video for a quick overview of each method.

I tend to use File > Export for those quick tasks when I'm only sending an image or two to the Desktop. But I love having the Output option for the bigger jobs when I want to send images out of the catalog at multiple resolutions, simultaneously.

batch-export-cp1.jpg The Output tab is perfect for bigger export jobs.

This is a terrific system for getting your images out of your catalog and in to clients' hands, social sites, and on your mobile devices.

More Capture One Pro Tips and Techniques

Improve your skills by watching Capture One Pro Essential Training now available on lynda.com. More than 5 hours of tips, tricks, and techniques. Plus many free movies using advanced techniques.

I've also created a dedicated Capture One Pro Training page on The Digital Story. You can follow all of the tips and techniques that I publish in one convenient spot.

Thinking About Making the Transition from Aperture or Lightroom? - Download my free eBook titled, Rocky Nook's Guide to Moving to Capture One Pro. I show you the steps to create a test library, then build the foundation for a smooth transition to Capture One Pro.

Want to Comment on this Post?

You can share your thoughts at the TDS Facebook page, where I'll post this story for discussion.

The Clarity and Structure tools in Capture One Pro allow you to adjust both fine and coarse detail in your images. There are different algorithms to choose from, so you can use "Natural" for portraits and "Neutral" for objects. And because the sliders are centered positioned, you can both increase and decrease the effect, depending on your subject.

In this training video, I show you how to use Clarity and Structure for both objects and for portraits. I review the different modes so you can see exactly how to get the effect you want for your images.

More Capture One Pro Tips and Techniques

Improve your skills by watching Capture One Pro Essential Training now available on lynda.com. More than 5 hours of tips, tricks, and techniques. Plus many free movies using advanced techniques.

clarity-in-c1.png

I've also created a dedicated Capture One Pro Training page on The Digital Story. You can follow all of the tips and techniques that I publish in one convenient spot.

Thinking About Making the Transition from Aperture or Lightroom? - Download my free eBook titled, Rocky Nook's Guide to Moving to Capture One Pro. I show you the steps to create a test library, then build the foundation for a smooth transition to Capture One Pro.

Want to Comment on this Post?

You can share your thoughts at the TDS Facebook page, where I'll post this story for discussion.

in-aperture-exile.png

Recently, David Grover, business support for Phase One, and myself got together for a conversation about moving from Aperture to Capture One Pro. This falls into line with my thinking that C1 is the logical transition from Aperture for professional and demanding enthusiast photographers.

This one-hour video, that you can watch for free, covers topics such as:

  • Similarities between the two photo management applications.
  • Differences and things I miss from Aperture.
  • New tools in C1 that I wish I had had in Aperture.
  • Tips for new Capture One users.
  • Resources for making the move from Aperture to Capture One.

If you're interested in these topics, you might want to spend your lunch break with us. It's a good conversation that I hope you'll find helpful.

More Capture One Pro Tips and Techniques

Improve your skills by watching Capture One Pro Essential Training now available on lynda.com. More than 5 hours of tips, tricks, and techniques. Plus many free movies using advanced techniques.

I've also created a dedicated Capture One Pro Training page on The Digital Story. You can follow all of the tips and techniques that I publish in one convenient spot.

Thinking About Making the Transition from Aperture or Lightroom? - Download my free eBook titled, Rocky Nook's Guide to Moving to Capture One Pro. I show you the steps to create a test library, then build the foundation for a smooth transition to Capture One Pro.

Want to Comment on this Post?

You can share your thoughts at the TDS Facebook page, where I'll post this story for discussion.

From Aperture to Capture One Pro

Aperture users still contemplating their next move may want to read my guest post on the Phase One blog titled, Smooth transition from Aperture to Capture One Pro 9.

P8075103-bricks-n-stairs1900-1-1419x946.jpg

I write a bit about why I chose C1, then delve into the test library concept for those who prefer a smooth ride from one photo management app to another. There's also a 35-percent off coupon code for the book, "Capture One Pro 9, Mastering Raw Development, Image Processing, and Asset Management" by Sascha Erni. Not a bad deal at all!

More Capture One Pro Tips and Techniques

Improve your skills by watching Capture One Pro Essential Training now available on lynda.com. More than 5 hours of tips, tricks, and techniques. Plus many free movies using advanced techniques.

I've also created a dedicated Capture One Pro Training page on The Digital Story. You can follow all of the tips and techniques that I publish in one convenient spot.

Thinking About Making the Transition from Aperture or Lightroom? - Download my free eBook titled, Rocky Nook's Guide to Moving to Capture One Pro. I show you the steps to create a test library, then build the foundation for a smooth transition to Capture One Pro.

Want to Comment on this Post?

You can share your thoughts at the TDS Facebook page, where I'll post this story for discussion.

One of the most handsome contact sheet tools I've ever seen was right beneath my nose in Capture One Pro. There are a variety of styles to choose from, and the functionality is smooth and professional looking.

In this short video, I show you exactly how it works and how good looking the final product is.

There are a variety of applications for this tool, including publishing on your web site, creating smart-looking Flash drive galleries, or for client presentations on your laptop. Plus, you can include clickable links to your website and brand the galleries specifically for your business. And they won't look like the stuff that everyone else is creating.

lynda-web-contact-sheet.jpg

More Capture One Pro Tips and Techniques

Improve your skills by watching Capture One Pro Essential Training now available on lynda.com. More than 5 hours of tips, tricks, and techniques. Plus many free movies using advanced techniques.

I've also created a dedicated Capture One Pro Training page on The Digital Story. You can follow all of the tips and techniques that I publish in one convenient place.

Thinking About Making the Transition from Aperture or Lightroom? - Download my free eBook titled, Rocky Nook's Guide to Moving to Capture One Pro. I show you the steps to create a test library, then build the foundation for a smooth transition to Capture One Pro.

Want to Comment on this Post?

You can share your thoughts at the TDS Facebook page, where I'll post this story for discussion.

The latest release of Capture One Pro includes RAW support for seven new cameras:

  • Olympus Pen-F
  • Olympus Olympus Om-D E-M10 Mk II
  • Olympus Sony A68
  • Olympus Sony a6300
  • Olympus Sony RX1R Mk II (revised implementation) • Ricoh GR II
  • Olympus Pentax K-S2

I've been anxious to see how C1 would handle the images from one of my current favorite street cameras, the Olympus OM-D E-M10 Mark II. So I cruised Market St. last night to record some RAW for a test. I was not disappointed.

capture-one-9pt1.jpg

This shot was captured at ISO 1250 at f/1.7 with the Panasonic 20mm mounted on the E-M10 Mark II. Shutter speed was 1/40th with exposure compensation at +0.3 and auto white balance. The RAW file rendered in Capture One beautifully. The colors, right out of the camera were rich and saturated. I didn't make any color adjustments at all... just a little contrast and clarity. You can see (and download) a standalone version of the shot on my Flickr account.

This is going to be a wonderful combination, both with the E-M10 Mark II and the PEN-F. I also can't wait to see some shots from the Sony cameras that were added to the list.

More Capture One Pro Tips and Techniques

Improve your skills by watching Capture One Pro Essential Training now available on lynda.com. More than 5 hours of tips, tricks, and techniques. Plus many free movies using advanced techniques.

Thinking About Making the Transition from Aperture or Lightroom? - Download my free eBook titled, Rocky Nook's Guide to Moving to Capture One Pro. I show you the steps to create a test library, then build the foundation for a smooth transition to Capture One Pro.

Want to Comment on this Post?

You can share your thoughts at the TDS Facebook page, where I'll post this story for discussion.

My favorite time to add copyright and contact information for pictures is when I import them. You can do this in Capture One Pro by creating and applying a metadata preset. I've established one that contains my name, copyright, contact city, website, and usage terms. If you'd like to see how that's done, take a look at this instructional video.

Now that I have the metadata preset created, I can apply it during import using Styles. The Styles popup menu is located in the Adjustments area of Capture One's import dialog. Click on it and choose User Presets > Metadata > [your preset].

Apply-Meta-Import.jpg

Your contact information will be added to the images as they are imported. Plus, this setting is sticky, so it should remain enforce for your next import too. There's no better time to add metadata than at the very beginning of the workflow.

More Capture One Pro Tips and Techniques

Improve your skills by watching Capture One Pro Essential Training now available on lynda.com. More than 5 hours of tips, tricks, and techniques. Plus many free movies using advanced techniques.

Thinking About Making the Transition from Aperture or Lightroom? - Download my free eBook titled, Rocky Nook's Guide to Moving to Capture One Pro. I show you the steps to create a test library, then build the foundation for a smooth transition to Capture One Pro.

Want to Comment on this Post?

You can share your thoughts at the TDS Facebook page, where I'll post this story for discussion.