June 2009 Archives

Create Artistic Pet Silhouettes from Your Photos

groomer_has_it_web_sm.jpg

Sometimes you just don't know when you'll find inspiration for your next craft project. One of my favorite TV shows, Groomer Has It put a clever spin on the classic art form of black paper silhouettes. In many scenes, the interior walls were decorated with these cute pet profiles, so I was inspired to make one, too.

Take a frontal or profile picture of your pet. Print the image onto an 8.5" x 11" sheet of copy paper. Place your "photocopy" over a piece of black paper and staple the corners to secure the papers together. Use a sharp pair of scissors to cut around the details. Here's cutting a tip: if you move the paper and not the scissors, you'll get a cleaner edges on your silhouette.

When you're done trimming, adhere your cutout to a bright colored, patterned, or neutral background paper using a spray adhesive. Finally, frame Fluffy or Fido, and your artwork is complete!

Illustration from the Groomer Has It show on Animal Planet.

More Creative Output Projects

Be sure to visit our Creative Output studio for more great project ideas.

Hate ICC profiles? Confused by print dialog boxes? You can avoid these headaches and print without pain, if you're willing to give up a little flexibility. In this podcast I use the HP C6380 all-in-one printer as an example of pain-free printing. And of course, I add a few tips and tricks along the way.

Monthly Photo Assignment

Splash is the June 2009 Photo Assignment. You can capture anything from a child jumping in a pool to an olive dropping into a martini. You can read more about how to submit on our Submissions page. Deadline for entry is June 30, 2009 (but you have an extra day or so if you need it). The photo assignment for July is "Soft Background."

Listen to the Podcast

You can also download the podcast here (26 minutes). Or better yet, subscribe to the podcast in iTunes.

You also might be interested in my article, All-in-One Printer Torture Test: HP C6380 vs Kodak ESP 7 Review

Want to share photos and talk with other members in our virtual camera club? Check out our new Flickr Public Group. It's a blast!


twitter.jpg Follow me on Twitter

-


Podcast Sponsors

SiteGrinder lets you take ownership of your websites. Effortlessly output pages right from Photoshop.

Red River Paper -- Try the $7.99 Sample Kit.

Add Magic to Your Slideshows -- FotoMagico presentations are so amazing that your audience will be asking how you did it.


Technorati Tags: , , , , ,

DIY Copy Stand for iPhone 3GS

The camera in the iPhone 3GS has improved close-up capabilities, tap focus, and more resolution than previous models. You can use the 3GS to photograph small objects, business cards, even duplicate 4" x 6" prints. With this DIY copy stand that's easy to make, you can produce high quality images with just a couple taps on its screen.

If you've ever tried close-up work with the iPhone, you know you have two challenges. The first is holding the camera steady enough to avoid camera shake. The second is getting the plane of the camera parallel to the plane of the subject to avoid distortion. This little device helps with both, plus diffuses the light for a more flattering rendering.

I have step-by-step photos showing the key elements of this project on The Digital Story Flickr page. In short, it works like this. You remove the tray from the iPhone packaging, drill a hole in it for the lens to see through, cut an opening in the bottom of a translucent box to set the tray in, and you're done. It's really that simple. I recommend that you start with a box that's at least 6" tall. That will give you enough distance to copy 4" x 6" prints. You can use "risers" such a little boxes to photograph smaller items that need more magnification. Here's a short instructional video that provides a nice overview.

Please feel free to add your comments, improvements, or variations on this project. The iPhone 3GS is a handy little camera, and I want to squeeze every ounce of capability out of it.

More on the iPhone 3GS

iPhone 3GS Movie Making Basics - Video for All

"iPhone 3G S from Photographer's POV" - Digital Photography Podcast 180


twitter.jpg Follow me on Twitter

-


Rim lighting is an effecting approach for both portraits as well as inanimate objects. This May 09 Photo Assignment Gallery shows off some terrific examples of this technique.

The July 2009 assignment is "Soft Background." Start working on your contribution now. Details can be found on the Member Participation page. You can submit photo assignment pictures up to 600 pixels in the widest direction.

jim_stocking_may09.jpg

Please follow the instructions carefully for labeling the subject line of the email for your submission. It's easy to lose these in the pile of mail if not labeled correctly. For example, the subject line for next month's assignment should be: "Photo Assignment: June 2009." Also, if you can, please don't strip out the metadata. And feel free to add any IPTC data you wish (These fields in particular: Caption, Credit, Copyright, Byline), I use that for the caption info.

Photo by Jim Stocking.

Good luck with your July assignment, and congratulations to all of the fine contributors for May. It's a beautiful collection of images.


twitter.jpg Follow me on Twitter

-


Now Available! The Digital Photography Companion. The official guide for The Digital Story Virtual Camera Club.

  • 25 handy and informative tables for quick reference.
  • Metadata listings for every photo in the book
  • Dedicated chapter on making printing easy.
  • Photo management software guide.
  • Many, many inside tips gleaned from years of experience.
  • Comprehensive (214 pages), yet fits easily in camera bag.

Technorati Tags: , ,

The Canon Digital Rebel T1i (500D) is proving to be an excellent field camera. In my first test, I roamed the streets of San Francisco with a Canon 70-200 mm f/4 L zoom. For my next adventure, I visited Bodie State Park off of Hwy. 395 in Northern California. Since CA may be closing most of its State Parks due to the budget crisis, I wanted to visit Bodie again for what I hope isn't a last look.

Setting Up the Canon T1i

This time, I mounted one of my favorite zooms on the T1i, the 24-105mm f/4 L IS. I used a rotating polarizer for most of the outdoor shots, that were captured early to mid morning. ISO was generally set to 200, which works great on the T1i and gives me a little more exposure latitude. Even though battery life is quite good on the T1i, I did use the BG-E5 Battery Grip ($114) for this trip. It allows me to load two LP-E5 batteries or 6 AA cells. I recommend going the LP-E5 route because it feels lighter in that configuration.

Handling

As I stated in the first test, this DSLR is great in the field. It feels good in the hands, is light on the shoulder, records excellent images, and I have my entire inventory of Canon lenses at my disposal. You can see a catalog of 12 images from this shoot by visiting the Canon T1i Visits Bodie State Park photo set on Flickr. All of the images were captured with the T1i and the 24-105mm zoom.

Video Recording

I've been recording video primarily in the 720p mode (1280 x 720) on the T1i. It's a nice fit for publishing HD on YouTube, plus I get the full 30 fps capture. One major difference with the T1i compared to movie making with the 5D Mark II, is that I don't have an external mic jack on the T1i. I get a lot of ambient sound in addition to the subject I'm recording. But the video itself is terrific. I highly recommend using an IS lens for video recording, or you'll be disappointed with the results.

Final Thoughts

I consider the Canon T1i capable of serious field work, especially when you want to travel light. I carried a small bag that had 3 lenses (18-55 mm IS, 24-105mm IS, and the 70-200 f/4), the T1i, battery grip, polarizer, and extra memory. The bag was light and I was able to capture everything I wanted, the way I wanted, using this rig.

There are two major pitfalls with the Canon T1i in the field that you should be aware of. First, this is not a weather proof camera and will not stand up to harsh elements the way the Canon pro models will. So you have to protect the body when things get stormy. Also, as I mentioned before, there isn't an external mic jack for video capture. So your audio options are pretty limited.

Speaking of video, be sure to have a large capacity Class 6 SDHC memory card. Personally, I like the Sandisk SDSDX3-008G-A31 8GB Extreme III SDHC card for $56. It's tough, fast, and dependable for field work. So, a couple cards like this, an extra battery, and a few light lenses, and you can handle just about any challenge in the field with this camera.


twitter.jpg Follow me on Twitter

-


Technorati Tags: , , , ,

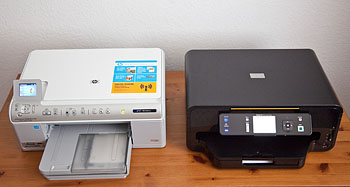
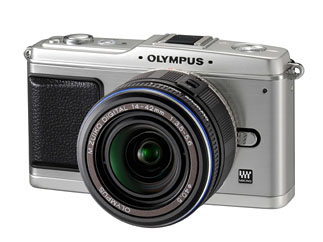
There was a time when photographers would no more consider buying a multifunctional printer than they would go on vacation with only a 64 MB memory card. But technology marches on, and today I have not one, but two "all-in-one" printers that tout excellent photo printing abilities. Behind door number one stands the HP C6380 All-in-One (left), and behind door number two challenges the Kodak ESP 7 All-in-One (right).

So who should consider an all-in-one for light office and photo output? I'd say amateur photographers who don't want to mess with ICC profiles (let the printer choose the settings), who don't need photos bigger than letter size, and who don't print more than 500 images a year. If you fall into that category, you should read on.

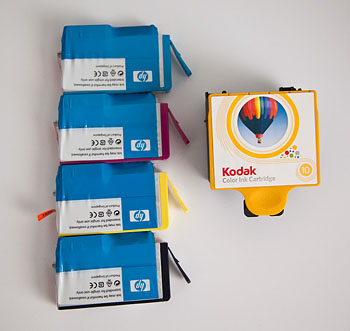
Both the HP and the Kodak are light to carry, have footprints that will fit on a dinner placemat, and provide printing, scanning, copying, and WiFi connectivity. Each printer has two paper trays: bottom for letter size output (plain paper or photo stock) and top for photo snapshots. Even though these printers are Mac and Windows friendly and come with good software, you can go for days without using a computer with them. That's because most functions can be controlled via their respective LCD panels, and they both accept USB Flash drives and standard camera memory cards. Once difference you'll notice is that the HP has four individual photo ink cartridges while the Kodak uses a single photo ink unit. (See the illustration above for a comparison; HP individual cartridges on the left.) Each retails for around $199 US, but until June 28th, the HP is on sale for $149.99 (via the HP web site.

Unpacking and setting up both printers is easy. I averaged 30 minutes for each, and that included connecting them to my WiFi network. Neither include USB cables, so if you don't go wireless, make sure you have a cable available. Both devices are handsome in their own way, enhanced by colorful LCDs that presented me with easy to understand menus. I never had a problem navigating either device. One thing you should note, however, is that both printers are fairly noisy, with the HP spending more time grinding its gears. I would say these are definitely office printers, with hopefully, no one trying to sleep in the same room.

There's been some talking back and forth between HP and Kodak about how much it costs to print with their machines. I'll address that, but it's just as important to me how they perform. So I've put together a small battery of torture tests to see if either printer is worthy of residing in the office of a the hobbyist photographer. I was careful to conduct the tests fairly, using the same originals and a stop watch for timing, with each unit set to "out of the box" automatic settings.

This review is geared toward photo enthusiasts who are considering an all-in-one printer for their home office. Since I happen to be an enthusiast myself, I devised tests that were interesting to me, providing information that I would want to know about costs, output performance, image quality, and paper durability. If you're not a photographer and these issues aren't as important to you, then you might want to check out other reviews of these devices.

Basic Office Skills

Since these are multifunctional machines, we should take a look at copying and scanning. Each device has a letter-sized scanner on top that can be used for black & white or color business copies. In the paper tray, I used Staples Inkjet Paper (letter size, 24 lb, 98 bright). Here's the first battery of tests. The times listed are how long each printer took to complete the task.

Black and White Copies (10 copies from original)

HP - 1:55.7 -- Kodak - 1:57.2. Both printers did a good job of producing clean B&W copies in reasonably fast time. Edge: This one's a tie.

Full Color Copies (5 copies from original)

HP - 3:03.9 -- Kodak - 2:37.3. The HP spent some time going through a printer preparation cycle before beginning job, but its quality was noticeably better on plain paper, especially in the reds and with detail reproduction. The Kodak was a bit faster, but print quality was acceptable at best. Reds lacked saturation and detail. Edge: HP 6380.

Scan Document and Save as Electronic File

HP - 00:27.9 -- Kodak - 00:50.3. The HP saves the scanned document as a Jpeg and wrote it to a USB Flash drive. I converted it to PDF using Preview on a Mac. I would have preferred to skip the conversion step and have the HP save to PDF. The Kodak, however, did not have the option to save to USB Flash drive, so I chose save to my Mac wirelessly. That didn't work. The Kodak constantly hung on the job. So I tried the other option of saving to memory card, and that worked like a champ. The output from the Kodak was also a Jpeg, and it had more saturated colors, but with some artifacts. The HP colors were more muted, and there were no artifacts. Plus, the HP saved the Jpeg file at 300 ppi to Kodak's 72 ppi. Edge: HP6380.

Basic Photo Printing Skills

Now, here's where it gets a bit more interesting for me. Two companies pitted against one another, both take a lot of pride in their photo printing.

Snapshot Reprint Test (4x6 color photo placed on scanner glass and reproduced to 4x6 color output - 1 print -- all settings were on automatic, no computer involved.) Note: I used HP ink and paper designed for the C6380 and Kodak ink and paper designed for the ESP 7. For more on that, see the "Dunking the Prints" section below.

HP - 1:13:4 -- Kodak - 1:15.9. HP print quality was excellent, color reproduction was near perfect, great contrast. The Kodak print displayed a moderate purple shift on blues, less contrast, average detail reproduction. Edge: HP C6380.

iPhoto Print Test 4 x 6 (iPhoto print job sent from calibrated Mac using WiFi -- all settings were on automatic, used manufacturers ink and paper.)

HP - 1:16.9 -- Kodak - 51.4. HP had better contrast, excellent color fidelity Kodak output had less contrast, slight color shift. Edge: Another Tie (HP gets slight nod for output quality; Kodak printed faster).

Letter Sized Output on Third Party Photo Paper (iPhoto print job sent from calibrated Mac using WiFi -- all settings were on automatic, used manufacturers ink and Red River Arctic Polar Luster paper.)

HP - 1:12.9 -- Kodak - 2:07:0. Both output had noticeable color shift and neither print was acceptable. Edge: neither.

Printing Torture Test

The final set of tests were the most demanding of them all. These were designed to see how output from these printers will hold up under adverse conditions. First, I started with the dunk test, where 4" x 6" prints were immersed in water for 10 minutes. Then I hung them off the edge of the counter for the droop test. And finally I let the prints air dry for the curl test.
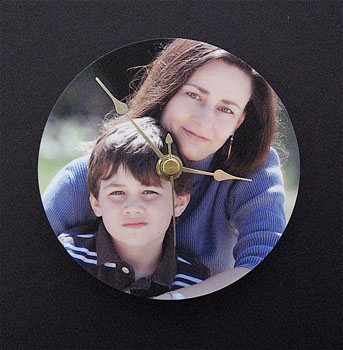
Dunking the Prints

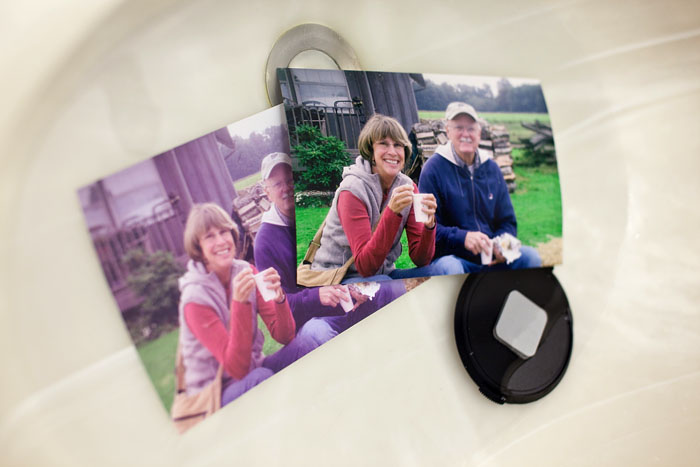
After making prints from the same file, I immersed them in water for 10 minutes. For the HP prints, I used the HP 564 Series Photo Value Pack-150 sht/4 x 6 in that lists for $34.99 US includes enough ink and paper to make 150 4" x 6" prints (which works out to a little over 23 cents a print). For the Kodak images I used the KODAK Premium Photo Value Pack that's selling for $19.99 US and provides ink and paper to make 135 4" x 6" prints (which works out to be about 15 cents a print).

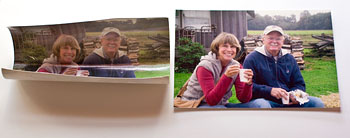
As you can see in the third illustration (Kodak print on the left, HP print on the right), the Kodak paper absorbed water and the the image colors shifted. Edge: HP C6380.
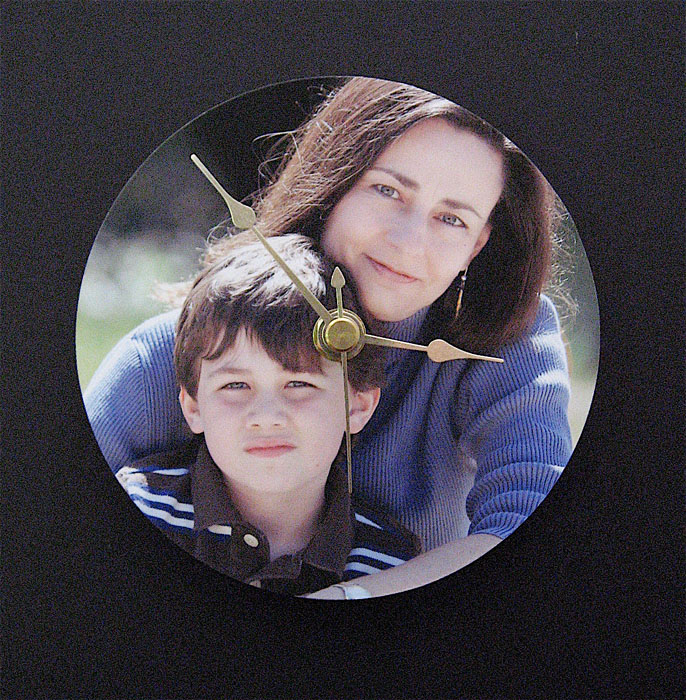
The Droop Test

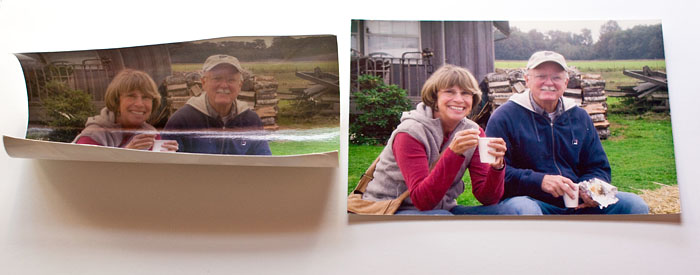
After the prints were soaked in water, I hung them off the edge of the counter. The Kodak print (on the bottom) drooped nearly all the way down to the side of the counter. The HP print (top) still had decent resistance to gravity. Edge: HP C6380.

The Curl Test

While the prints were still wet, I set them up in a dish rack to let them dry at room temperature. Once they were completely dry, I laid them out on a flat surface and photographed them. As you can see in the bottom illustration, the Kodak image (left) curled quite a bit compared to the HP image on the right. Edge: HP 6380

The "Kodak Advantage" vs HP's "Lab Quality"

On their web site, Kodak states "All KODAK Inkjet Photo Papers are porous. That means they dry instantly, so you can go from picture to print in seconds. Plus, our papers absorb inks faster, so your pictures won't smear or smudge." If I read this correctly then, the Kodak papers didn't fare well in my Dunk, Droop, and Curl tests by design. HP, on the other hand, likes to use the term, "lab quality" for their prints, and their materials have a very different feel, again by design.

The price difference per print is about 8 cents using these materials, with Kodak providing the cost savings. If you printed 300 4" x 6" snapshots a year (25 prints a month), then using these Kodak supplies, you would save $24 a year. If you upgraded your Kodak materials to the Ultra Premium Photo Paper, then your per print cost would go up to over 40 cents a print, and the cost savings then would be in HP's favor.

So it seems to me that when you compare Kodak and HP using these devices for primarily photo output, you get what you pay for. HP's prints do feel and look like prints from a traditional photo lab. They're very durable and will hold up well to handling. Kodak Premium paper costs less, and if you're not as picky about color fidelity and contrast, and don't mind a more porous paper, then you can save a few bucks using the KODAK Premium Photo Value Pack in the ESP 7.

The Final Word

When you compare the HP C6380 All-in-One to the Kodak ESP 7 All-in-One from a photography point of view, it really comes down to your priorities. Both units do what they're designed to do and look going doing it. But the photo output is quite different between them.

Personally, I lean toward the HP C6380 because I do like those lab quality prints. And at 23 cents each, they seem like a great value. Plus, the scanning unit in the C6380 produced cleaner images with fewer artifacts. And regardless of which printer you use, make sure you spend a little time learning all of its features. Both the C6380 and the ESP 7 include a lot of capability for the dollar.


twitter.jpg Follow me on Twitter

-


The new Creative Output section of The Digital Story was created to inspire photographers to find new ways to share their images with others. I sometimes refer to this process as, "going beyond the print."

I brought in a true expert in this field, Stephanie Scheetz, to oversee this endeavor. Stephanie has been a craft designer and instructor for major craft companies for more than 15 years. She has taught classes throughout the U.S. and Asia, and has appeared on TV craft shows and home shopping programs in the U.S. and U.K. Her work can be found in craft industry and consumer magazines, in addition to, catalogs, advertisements, and books. In addition to that, Stephanie is an engaging personality.

So she and I sat down in front of the microphone this week to talk about her views on Creative Output and to give you a preview of the types of projects she's working on. You'll come away from the show with great ideas, and hopefully get to know Stephanie a little better.

Monthly Photo Assignment

Splash is the June 2009 Photo Assignment. You can capture anything from a child jumping in a pool to an olive dropping into a martini. You can read more about how to submit on our Submissions page. Deadline for entry is June 30, 2009.

Listen to the Podcast

You can also download the podcast here (26 minutes). Or better yet, subscribe to the podcast in iTunes.

Other Creative Output Projects with Stephanie

Make a Custom Photo Gift Bag (Video Tutorial)

Buckle-Up Frame

A Time to Remember - Make Your Own Photo Clock

Packing Tape Transparencies

Want to share photos and talk with other members in our virtual camera club? Check out our new Flickr Public Group. It's a blast!


twitter.jpg Follow me on Twitter

-


Podcast Sponsors

SiteGrinder lets you take ownership of your websites. Effortlessly output pages right from Photoshop.

Red River Paper -- Try the $7.99 Sample Kit.

Add Magic to Your Slideshows -- FotoMagico presentations are so amazing that your audience will be asking how you did it.


Technorati Tags: , , , , ,

"Thought I'd submit this shot from Jerusalem's Old City," writes Roderick James. "The sign didn't look out of place in this old market, but seemed jarring in our digital world -- especially since I grabbed this image with my Canon G10."

Roderick set his G10 to ISO 80, 1/80th at f/3.2 for this trip down memory lane.

Photo by Roderick James. Click on image to zoom to larger size.

If you have a candid you'd like to share, take a look at our Submissions page, then send us your Grab Shot. We'll try to get it published for you on The Digital Story.

And you can view more images from our virtual camera club in the Member Photo Gallery.


twitter.jpg Follow me on Twitter

-


Technorati Tags: , , ,

Capturing, trimming, and sharing video with the new iPhone 3G S is literally a snap. After a bit of testing, the easiest way to share is directly from the device itself. So if you're tempted to transfer the video to your computer and monkey around with it, you might want to resist. See my examples below for more on that.

iphone_3g_frame.png

The iPhone 3G S records SD video (640x480) and saves it in the H.264 format. The frame rate when I was playing it back on my MacBook was an odd 17 fps (but as some readers pointed out, that was probably because I was recording in low light. Outside I should get a full 30 fps). One minute of video will create an approximate 26 MB file size. The audio is captured with the onboard iPhone mic and saved AAC mono at 44.100 kHz.

Once you capture the video, you can trim it right there on the iPhone by dragging the handles on the timeline, then hitting the Trim button. I recommend that you watch the area you have selected before hitting Trim. I haven't found an "Undo" command yet for hasty edits. But trimming is very easy and fun on the device. And after some testing, I think it's the best place to make these edits.

You can share the video by emailing it from the iPhone, sending to MobileMe, or uploading it directly to YouTube. The YouTube function is great for on-the-fly publishing, and it works well. If you want to save it to you Mac's hard drive, connect the iPhone 3G S and launch Image Capture (in your Applications Folder). Click on the "Download Some" button to reveal the movies and pictures on your iPhone. Movies will have the .Mov extension, and still photos will be .Jpg. Then, if you want, you can further edit or enhance your video using QuickTime or iMovie.

Here's a sample that I captured at "arm's length." I instinctively held the camera horizontally when I recorded the video. But since I was recording a vertical subject (me), I got this video:

The video plays fine, but it's oriented the wrong way. [What one of our readers pointed out, Alan, is that I confused the sensors on the iPhone by not fully rotating the camera. I hit the record button while the camera was in the vertical position, but then didn't do a clean rotate to the horizontal position.] In an attempt to fix the problem, I downloaded it to my MacBook, rotated it in QuickTime, and got this, but now it's out of sync. So even the simple edit in QuickTime compromised the movie (when publishing on YouTube, on my Mac it plays fine).

So next, I recorded the video holding the iPhone in the vertical position and not rotating it after I initiated the recording. When I did that, and uploaded directly to YouTube from the iPhone, it looks like this:

As Alan pointed out when he commented on this article, you have to be careful not to confuse the sensors. So make sure you're explicit in your movements when holding the iPhone to get the orientation the way you want it. I found the easiest way to do this is simply not rotate the camera once you start recording. If you want a horizontal movie, start that way.

Also, I think the video on YouTube actually looks better when you let the iPhone 3G S compress it and upload it directly. When I edited on the computer, just doing a simple rotation command, then uploading to YouTube, things got out of sync.

In other words, just let the iPhone do the work, don't confuse its sensors, and you'll be fine. All my monkeying around simply compromised the output. If I just record, trim and upload directly from the device, things work perfectly.


twitter.jpg Follow me on Twitter

-


Technorati Tags: , , , , ,

When your first mount the 14-42mm micro zoom lens on the Olympus E-P1, you might see this message on your LCD: "Please check the status of the lens." Do not fear. Nothing is wrong.

All it means is that the lens is in the "locked" position. The message is E-P1 speak for "unlock the lens." All you have to do is twist the zooming ring to the left until you hear a click. Then lens extends, and you're in business.

When finished shooting, there's a little switch on the zoom ring that you hold down while twisting to the right. This allows you to lock the lens again so it's as compact as possible. This quickly becomes second nature. But it can throw you for a loop when you first get the camera.

More Information on the Olympus E-P1

If you're interested in the Olympus E-P1, check out my ISO Comparison post. I run at series of photos from the camera staring at ISO 100 all the way up to ISO 6400. I also have a podcast covering the features of the E-P1. I also have a First Look at the Olympus E-P1 article at Macworld Magazine.


twitter.jpg Follow me on Twitter

-


Photo Displays in a Pinch

Sometimes creative photo displays are right in front of you. Paper clamps aren't just for holding a stack of unpaid bills. Believe it or not, they're also suitable for holding a photo of your Aunt Jane and her kids.

Position the arms of the clamp upward so they touch. Place your photo in between the arms and your display is complete! Another option is to decorate the clamp base and arms using paper and ribbon.

Paper clamps come in various sizes and can easily be found in office supply stores. It's important to select a photo that's appropriate for the paper clamp size. If your photo is too large, the display might be top heavy and not stay upright.

And there you have it, a new way of using an ordinary item. Who says creativity has to be time consuming and costly?

What's more fun than shooting the Statue of Liberty? Taking pictures of photographers trying to get their own shot of the grand lady.

On a recent trip to New York to test the Olympus E-P1, we took a water taxi out to Coney Island. On the way, we made a "drive by" stop near the Statue of Liberty for a quick photo op. It was fun to get my own stock photo of the Statue, but maybe just as fun to grab this candid of the photographers working the shot. As we always say on a photo shoot, after you get the first shot, turn around and look to see what's behind you.

Photos by Derrick Story, captured with the Olympus E-P1 digital camera.

If you're interested in the Olympus E-P1, check out my ISO Comparison post. I run at series of photos from the camera staring at ISO 100 all the way up to ISO 6400. I also have a podcast covering the features of the E-P1.


twitter.jpg Follow me on Twitter

-


The number one question I've received since readers knew I was testing the Olympus E-P1 Digital SLR was about its low light performance. So I've put together a batch of images ranging from ISO 100 all the way through ISO 6400 so you can see for yourself how the E-P1 (with new image processing engine) performs.

Both Jpeg and Raw (processed with Olympus Master 2 software) versions are included on the Digital Story Flickr page. The images were captured in Mahattan's Lower East Side around 8 pm on June 16, 2009. Here's how I took the shots.

The Olympus E-P1 was on a tripod using the self-timer to trip the shutter. I had the kit 14-42 mm lens mounted using Programmed exposure and auto white balance. I used the Raw+Jpeg recording format. The Jpegs you see on my Flickr page have not been processed. They are full size and straight from the camera. If you click on "All Sizes," you can see the original image at full size.

This image was captured at ISO 400 in Raw mode on an Olympus E-P1. Click on the picture to see a 100 percent magnification of a portion of it.

The Raw files on that page were processed in Olympus Master 2 using a white balance setting of 7500 K with exposure set to +0.2 EV. Sharpening was set to +1. The images were then exported as Jpegs from Olympus Master 2 and uploaded to the Flickr page without any further editing.

In the Raw files, I like ISO 200, 400, and 1600. I haven't done enough testing to understand why there was some smearing at ISO 100 and 800 with the Raws. ISO 3200 and 6400 should be reserved for special situations where getting the shot outweighs its high level of noise.

ISO performance is a very personal thing among photographers. Everyone has their threshold for image noise. Take a look at this collection of shots and decide for yourself how the Olympus E-P1 performs in low light.

The Olympus E-P1 kit with 14-42 mm lens will be available at Amazon.com for $799 US.

If you want to listen to a podcast about the Olympus E-P1, check out Meet the Olympus E-P1.


twitter.jpg Follow me on Twitter

-


State of the art technology melded with Olympus Pen tradition, the E-P1 digital camera is a new breed of DSLR featuring HD video, Raw format, micro 4/3rds, in a stylish stainless steel compact body. In this podcast, I walk you through the feature set of this latest innovation by Olympus.

Pros

  • Well-crafted, attractive stainless steel body.
  • Raw, JPEG, and 720p recording formats.
  • Excellent image quality with 12.3 MPs resolution.
  • Good combination of manual controls and automation.
  • Many creative features such as multiple exposure.
  • Clear menu system and easy to use camera controls.
  • SD and SDHC memory card instead of xD Picture Card media.
  • HDMI output.

Cons

  • Motion JPEG AVI codec instead of MPEG-4.
  • No external microphone jack.

The Olympus E-P1 kit with 14-42 mm lens will be available at Amazon.com for $799 US.

Monthly Photo Assignment

Splash is the June 2009 Photo Assignment. You can capture anything from a child jumping in a pool to an olive dropping into a martini. You can read more about how to submit on our Submissions page. Deadline for entry is June 30, 2009.

Listen to the Podcast

You can also download the podcast here (24 minutes). Or better yet, subscribe to the podcast in iTunes.

Want to share photos and talk with other members in our virtual camera club? Check out our new Flickr Public Group. It's a blast!


twitter.jpg Follow me on Twitter

-


Podcast Sponsors

SiteGrinder lets you take ownership of your websites. Effortlessly output pages right from Photoshop.

Red River Paper -- Try the $7.99 Sample Kit.

Add Magic to Your Slideshows -- FotoMagico presentations are so amazing that your audience will be asking how you did it.


Technorati Tags: , , , , ,

The Olympus E-P1 digital SLR camera blends traditional looks with modern capability. Visually, it celebrates the styling of the original Olympus Pen camera that was introduced in 1959. But at its heart, it features the latest Olympus technology, including a micro four-thirds lens mount, 12.3 megapixel capture, and Raw, Jpeg, and AVI recording formats. In many ways, it's the most exciting Olympus release in recent history.

On June 19, 09, a handful of photographers will be testing more extensively the Olympus E-P1 in New York City. This will give us a chance to drill down into its features, examine the images it captures, and share those pictures with you. In my case, I already have opinions about the things I like and don't like about the camera. This shoot will help me better articulate those thoughts.

More to report soon. In the meantime, if you want to get the scoop on the feature set for this camera, listed to my podcast titled, Meet the Olympus E-P1 digital SLR camera.


twitter.jpg Follow me on Twitter

-


Technorati Tags: , , , , ,

eye_fi_pro.png

It's almost as if the Eye-Fi folks heard our grumbling. No Raw file transfer, no selective uploads, no Ad Hoc connections. Well, they've fixed all of that with the new Eye-Fi Pro 4GB SD WiFi memory card.

The $149.99 card provides you with both Jpeg and Raw upload capabilities, the option to send-up only the pictures you want to transfer, and still includes Geotagging and widespread HotSpot access. You'll need a SDHC compatible camera, and of course some sort of WiFi access. The uploading can work in the background while you continue shooting.

If you have a hankering to transfer images directly from your camera, and you sometimes shoot Raw, this might be one of your most affordable choices.


twitter.jpg Follow me on Twitter

-


Technorati Tags: , , , , ,

Stephanie Scheetz is a talented artist, engaging personality, and oversees the new Creative Output section on The Digital Story. Her latest video, Make a Custom Notebook Using Your Images shows you how to transform a 99-cent paper notebook into an artistic gift that features your imagery.

In case you've missed it, Stephanie has been busy showing you other great projects that you can easily make at home with your photography. A few examples include:

Make a Custom Photo Gift Bag (Video Tutorial)

Buckle-Up Frame Present for Dad on Father's Day

A Time to Remember - Make Your Own Photo Clock

Packing Tape Transparencies

So, if you haven't met Stephanie yet, please check out her work. And she'd love it if you left her a comment too. The Digital Story isn't just about making great pictures, we want to give you ideas on how to share them with the world.

This week Stephanie begins by taking you shopping to a bargain store, then heads back to the studio to design a custom notebook that features your photography on the cover. Even though they are easy to assemble (and very affordable), these beautiful notebooks make excellent gifts.

You'll learn, step by step, how to take apart an existing notebook, customize the front and back covers, then reassemble it. The final product becomes an expression of your art.

Other Creative Output Projects with Stephanie

Make a Custom Photo Gift Bag (Video Tutorial)

Buckle-Up Frame Present for Dad on Father's Day

A Time to Remember - Make Your Own Photo Clock

Packing Tape Transparencies

"Graduation" - Grab Shot 178

"I was trying some low-light candids during a high school graduation last week." writes Joann Wilson. "It was a little frustrating because the graduates looked bored and fidgety much of the time, making it hard to get a group shot where everyone looked alive."

"The fidgeting was a particular problem since the low light forced me to shoot at about 1/15 sec. I was about to pack up and leave when they announced the last thing on the program: a music slideshow with pictures of the graduates through the years. Suddenly they all woke up and sat in rapt still attention for the whole 5 minute slideshow, allowing me to finally get a decent shot."

Joann used her Canon 20D with a Canon 24-70mm f/2.8L on a monopod. Settings were: ISO 1600, f/2.8, 1/15 sec., and 70mm focal length.

Photo by Joann Wilson. Click on image to zoom to larger size.

If you have a candid you'd like to share, take a look at our Submissions page, then send us your Grab Shot. We'll try to get it published for you on The Digital Story.

And you can view more images from our virtual camera club in the Member Photo Gallery.


twitter.jpg Follow me on Twitter

-


Technorati Tags: , , ,

Buckle-Up Frame Present for Dad on Father's Day

Unfortunately, many people these days have to tighten their belts to make ends meet. It's tough to think about gift giving when so much of your money is put toward paying bills. But that doesn't mean you should forget about good ol' dad on Father's Day (June 21).

Consider making a picture frame that's not only unique looking, but surprisingly inexpensive as well. Pay a visit to your local thrift store and purchase a leather belt and frame. The belt can be any color, however, the width of it should be approximately the same size as the frame's surface.

Measure the sides of your frame, corner to corner. Buckle the belt and cut it into strips that are the same length as the sides of the frame. Position the strips over the frame and miter the corners (45 degree cut) for a clean look. Adhere the pieces of the belt to the surface using a strong adhesive like Beacon's 3-in-1 Advanced Craft Glue.

After the glue dries, it's ready for your photo. Select one that's personal and special to both of you. The frame will look like it was an expensive purchase, and your picture will be a priceless keepsake.

Does the just-announced iPhone 3G S finally qualify as a reasonable compact camera? In addition to its resolution bump to 3 megapixels, the new device includes autofocus with "tap to focus" control, VGA video recording with editing, auto-macro, and improved battery life. I take a closer look at this device to see if it's the mobile camera we've been waiting for.

Monthly Photo Assignment

Splash is the June 2009 Photo Assignment. You can capture anything from a child jumping in a pool to an olive dropping into a martini. You can read more about how to submit on our Submissions page. Deadline for entry is June 30, 2009.

Listen to the Podcast

You can also download the podcast here (21 minutes). Or better yet, subscribe to the podcast in iTunes.

Want to share photos and talk with other members in our virtual camera club? Check out our new Flickr Public Group. It's a blast!


twitter.jpg Follow me on Twitter

-


Podcast Sponsors

SiteGrinder lets you take ownership of your websites. Effortlessly output pages right from Photoshop.

Red River Paper -- Try the $7.99 Sample Kit.

Add Magic to Your Slideshows -- FotoMagico presentations are so amazing that your audience will be asking how you did it.


Technorati Tags: , , , , ,

Good timing for new camera owners. Apple's Digital Camera RAW Compatibility Update 2.6 brings Raw support to the new Canon T1i (500D), Canon EOS Kiss Digital X3, Nikon D5000, and the Olympus E-30. Since the update is implemented system-wide, the upgrade applies to Aperture, iPhoto, and Preview applications.

I had Canon T1i and Olympus E-30 Raw files already in my Aperture library. This meant that I could look at thumbnails, but if I tried to view anything larger, I would get a "file not supported" message with no image. After applying the 2.6 update, the message went away, but Aperture still had a hard time generating full size previews from the Canon T1i Raw files.

When I uploaded new T1i Raw files to Aperture after the update, however, everything worked great, and the new Raw decoding for the camera was quite attractive.

So I guess the moral of the story is not to add Raw files to Aperture until the camera is officially supported.

The Difference is Night and Day

I've been in rapidly changing light the last few days. I could literally stand before a scene at Mono lake, take a picture every two minutes, and have five completely different images without ever moving a step. I had a similar experience in Bodie when the early morning was clear providing vivid colors, then as a storm moved in, the light completely flattened out.

But you don't have to be on a road trip to take into account how the passage of just a few hours can completely change a shot. I have two examples for you to consider. The first shot, captured in Bridgeport, was recorded at 4 pm on June 6 with a Canon Rebel T1i. I love retro signs, and some of the motels in the Eastern Sierra have that great 50s look that I'm such a sucker for. I always make sure I go street shooting, even if the main street is only a half mile long.

Then around 8 pm, I noticed that the sunset had completely changed the appearance of this little Eastern Sierra town. This time I grabbed the Canon G9 and went for another walk, photographing again some of my favorite landmarks.

As you can tell from the examples, the difference is night and day. This effect is something I try to keep in mind, whether on the road or in my home town. These images aren't exactly Monet's haystacks, but I'm glad to have them in my library.

Top photograph captured with a Canon T1i, 24-105 mm f/4 L zoom, ISO 200 at f/8. The bottom image taken with a Canon G9, ISO 100 at f/4. Both pictures processed in Adobe Camera Raw 5 (part of Photoshop CS4). For more information about image processing with CS4, check out my book, The Photoshop CS4 Companion for Photographers.


twitter.jpg Follow me on Twitter

-


I started paying attention to Canon Picture Styles about the time they put a button for them on the back of the camera. I figured if they got their own button, this must be important. When you go to the Picture Styles menu, you choose from a handful of settings: Standard, Portrait, Landscape, Faithful, etc., or you can create your own. Each Picture Style is determined by four parameters: sharpness, contrast, saturation, and color tone. This gives you more control over how the image is processed in the camera.

I've been running field tests with this function to decide how I feel about it. During the latest experiment, in Yosemite National Park, I shot in Raw+Jpeg mode on a Canon Digital Rebel T1i (500D) with a 24-105 mm L f/4 lens. I used the Landscape Picture mode, which affected the Jpegs, and then processed the Raw files in Adobe Camera Raw to my tastes, then compared them.

Yosemite Falls captured with Canon T1i using the Landscape Picture Style. Photo by Derrick Story. Click to zoom.

As you see in the sample photos, the greens and yellows were really pumped up in the stock Landscape Picture Styles Jpeg, almost like a Velvia film slide. Even though the Raw and the Jpeg versions were captured at the same split second, their unique processing renders them much different.

The Raw file was processed using the Adobe Standard profile as the starting point in ACR (Camera Calibration > Color Profile). A lot of people don't realize that all of the Canon Picture Styles are also there in the Camera Calibration tab when you process Canon Raw files in ACR. So if you want, you can switch among the different Styles in post production and choose the starting point you like best. I went with Adobe Standard for this shot.

Yosemite Falls captured with Canon T1i in Raw format then processed in ACR. Photo by Derrick Story. Click to zoom.

So the question is, if you're shooting Jpegs, is Picture Styles worth considering? I would say yes if you did a little pre-work to create your own Styles settings. I think that's where their best value resides. The presets are fine, but they don't really express your photography. Of course, the ultimate control comes with Raw shooting. But if you have a Picture Style that you trust waiting for you in the Picture Styles menu, then you have a reasonable alternative to Raw shooting for those times that need it.

More About the Canon Rebel T1i

"Hands On Review of the Canon T1i (500D) - Digital Photography Podcast 179

Street Shooting with Canon 500D/T1i


twitter.jpg Follow me on Twitter

-


screenshot_01.png

"Workflow" is the kind of word that makes most hobbyist photographers cringe. But the fact of the matter is, if you've taken great photos with your digital camera, don't you want to find the easiest way to organize them and share with others?

If this sounds appealing to you, then you might be interested in my workshop later this month titled, I've Taken Great Photos, Now What?. You'll learn about the coolest photo management applications including Adobe Lightroom, Apple iPhoto, Photoshop CS4, Photoshop Elements, and Apple Aperture. We'll build a workflow tailored specifically for your needs. And by the end of the day, you'll see that managing your images can be as fun as taking them in the first place.

The workshop begins at 10 am on Sat. June 20 at Santa Rosa Junior College in Santa Rosa, California. You can sign up for the class online, or call for more information at 707-527-4372. The course fee is $63.

You can listen to the podcast that gives you a nice overview of the course by checking out Show #176.

twitter.jpg Follow me on Twitter

-


The Canon Rebel T1i is known for its HD video recording and 15 megapixel CMOS sensor. But this camera contains refinements in nearly every category. I recently published a field report with sample images tited, Street Shooting with Canon 500D/T1i, but I wanted to spend a little more time talking about the specifications and usability of the DSLR. And that's exactly what I do in this week's podcast.

Photo by Derrick Story with Canon Rebel T1i using the EF 75-300mm f/4-5.6 IS USM zoom lens. ISO 100, 1/640 at f/4.

Monthly Photo Assignment

Splash is the June 2009 Photo Assignment. You can capture anything from a child jumping in a pool to an olive dropping into a martini. You can read more about how to submit on our Submissions page. Deadline for entry is June 30, 2009.

Listen to the Podcast

You can also download the podcast here (29 minutes). Or better yet, subscribe to the podcast in iTunes.

Want to share photos and talk with other members in our virtual camera club? Check out our new Flickr Public Group. It's a blast!


twitter.jpg Follow me on Twitter

-


Podcast Sponsors

SiteGrinder lets you take ownership of your websites. Effortlessly output pages right from Photoshop.

Red River Paper -- Try the $7.99 Sample Kit.

Add Magic to Your Slideshows -- FotoMagico presentations are so amazing that your audience will be asking how you did it.


Technorati Tags: , , , , ,

lynda_aperture.png

Moving from iPhoto to Aperture can be a smooth transition. That is, if you make the right choices during the upgrade. In my Lynda.com training, iPhoto to Aperture: Going Pro, I show you in detail how to customize your Aperture environment for a successful "reloaction."

Think of this transition as you would moving into a new house. It's an opportunity to clear out junk, reorganize, and start fresh. Use these tips to get a clean start on your photography life.

  • Don't move everything from iPhoto to Aperture -- only your best stuff. Remember, you don't have to get rid of iPhoto. It can serve as your archive that is there whenever you need to look back into the past.
  • First, take some time to organize the images you want to move in iPhoto. Since Aperture can "see" iPhoto albums and import them intact, find your best work and put them in iPhoto albums.
  • Don't move your entire iPhoto library using the "Import > iPhoto Library" command. Aperture brings everything in, and you're just moving the mess from one application to another. Instead, click on the "Import" icon (down arrow), navigate to your iPhoto Library in your Pictures folder, then choose the iPhoto album you want to bring in. Aperture sees iPhoto albums and lets you import them.
  • Spend some time thinking about how you want to organize your new Aperture library. Learn about folders, projects, and albums.
  • Be patient. You can bring in a few iPhoto albums, play around with organizing them in Aperture, learn what works best for you, then bring in a few more albums.

As I mentioned at the top of this post, you can get more detail about all of these tips, and more, in iPhoto to Aperture: Going Pro. And if you're curious as to why you would want to consider the move in the first place, take a look at the free movie on the catalog page titled, "Ten Reasons to Move to Aperture."


twitter.jpg Follow me on Twitter

-


Technorati Tags: , , ,

A Time to Remember - Make Your Own Photo Clock

I absolutely love it when I can create something cool out of an object that would normally get thrown away. Case in point... CD discs. These little silver platters offer the perfect surface for creating decorative and meaningful wall clocks. All you need is a CD, a photograph, and a clock mechanism that's available at almost any bargain store.

When you print out your picture make sure it's about the same size as the disc, if not a little larger. Since a CD is about 4.5" in diameter, a 5" x 7" print will usually do the trick. Adhere your image to the CD using a spray adhesive. Trim off the excess paper from the edges and poke a hole in the center.

To turn it into a timepiece, you will need to insert a clock mechanism through the hole and attach it to the back using an industrial strength glue. Carefully remove the clock arms for this phase of the project. You'll reattach them in good time. Clock mechanisms are available at most craft stores, or you can always salvage one from an old wall clock (that isn't as handsome as your work).

Once the mechanism is adhered to the CD, reattach the clock arms and second hand. Mount on the wall, and you have a timepiece that's pretty as a picture. Or to be precise, pretty as one of your pictures.


Event Calendar

Events! See the TDS Event Calendar for photography workshops, speaking engagements, and trade show appearances.