November 2010 Archives

Ken Latman Fall Photo Assignment

Here's a gallery of images that will dazzle and delight. The assignment for October 2010 was "Fall." Check out this great set of images from members of the TDS virtual camera club. And which one will be the SizzlPix Pick of the Month?

The December 2010 assignment is "Indoor Lighting." Start working on your contribution now. Details can be found on the Member Participation page. You can now submit photo assignment pictures up to 800 pixels in the widest direction.

Please follow the instructions carefully for labeling the subject line of the email for your submission. It's easy to lose these in the pile of mail if not labeled correctly. For example, the subject line for next month's assignment should be: "Photo Assignment: Dec. 2010." Also, if you can, please don't strip out the metadata. And feel free to add any IPTC data you wish (These fields in particular: Caption, Credit, Copyright, Byline), I use that for the caption info.


Photo by Ken Latman. (Click on it to see enlarged version.) You can read more about how Ken captured this shot, plus see all of the other great images on the October 2010 Gallery page.


Good luck with your December assignment, and congratulations to all of the fine contributors for October. I think everyone did a great job this month!


twitter.jpg Follow me on Twitter

-


Now Available! The Digital Photography Companion. The official guide for The Digital Story Virtual Camera Club.

  • 25 handy and informative tables for quick reference.
  • Metadata listings for every photo in the book
  • Dedicated chapter on making printing easy.
  • Photo management software guide.
  • Many, many inside tips gleaned from years of experience.
  • Comprehensive (214 pages), yet fits easily in camera bag.

Technorati Tags: , ,

The EOS 60Dis a creative departure from Canon's normally conservative upgrade philosophy. The magnesium construction that many loved with the 50D has been replaced by an aluminium and polycarbonate resin body. The LCD is now hinged, allowing it to swing and swivel. And in general, the 60D just looks different than its predecessors. It's really a whole new DSLR.

Canon 60D with Articulated Screen

And how does it perform? In this week's show, I walk you through some of its best features, and a few of its missteps. But the bottom line is, if you're looking to upgrade from a Rebel, like to shoot HD video, and want more control over your photography, the EOS 60D is a camera to seriously consider.

Listen to the Podcast

You can also download the podcast here (31 minutes). Or better yet, subscribe to the podcast in iTunes. You can support this podcast by purchasing the TDS iPhone App for only $2.99 from the Apple App Store.

Monthly Photo Assignment

High ISO is the November 2010 Photo Assignment. You can read more about how to submit on our Member Participation page. Deadline for entry is Nov. 30, 2010. Entries must be recorded at ISO 800 or above.

TDS Summer 2011 Photography Workshop

We're making plans now for the Summer 2011 TDS Photography Workshop. If you want your name on the reserve list, just drop me a line.

More Ways to Participate

Want to share photos and talk with other members in our virtual camera club? Check out our Flickr Public Group. It's a blast!

Podcast Sponsors

Red River Paper -- Try the $7.99 Sample Kit.

Make Your Photos Sizzle with Color! -- SizzlPix is like High Definition TV for your photography.

Blurb believes passionately in the joy of books - reading them, making them, sharing them, and selling them. Learn more by visiting Blurb on The Digital Story.


Technorati Tags:
, , , , ,


My 5 Favorite Lowepro Bags of 2010

pro_runner_inside.jpg

As the Photography Evangelist for Lowepro, I get to test all the new gear they produce. And when I say test, I mean load it up and hit the road.


Inside a Lowepro Pro Runner 300 AW. My current favorite mid-sized backpack.


I've traveled to Washington DC with a Fastpack 250, Germany with a Pro Trekker 300 AW, Bermuda with a Pro Runner 300 AW, Kauai with a Exchange Messenger, and on and on.

Over the months, I've become very fond of some of these bags. I have many that I like, but there are 5 that I would not want to live without. I posted an article about them on the Lowepro blog. You might want to hop over there and read the post and check out the links. I'll also list them here for you:

As I said, there are others I use all the time and like, but these are my current favorites.


twitter.jpg Follow me on Twitter


"Wasp Meal" - Grab Shot 205

"As winter was getting nearer in Madrid, the last insects were running for their lives," writes Michel Bricteux. "So was this wasp, feeding on cured ham. Note the wasp's tongue between the two mandibules shaped to cut the food."

Michel Bricteux Grab Shot "Wasp Meal" by Michel Bricteux. Click on image for larger version (Do it! It's worth it.)

Michel captured this compelling image with a Nikon D3X with a Nikon 105mm f/2.8 lens. ISO was set to 320 with a shutter speed of 1/200th.

This is our 205th Grab Shot! Wow. If you want to review the collection that began back in 2006, go to our Grab Shots page.

If you have a candid you'd like to share, take a look at our Submissions page, then send us your Grab Shot. We'll try to get it published for you on The Digital Story.

And you can view more images from our virtual camera club in the Member Photo Gallery.


The Digital Story Podcast App is the best way to stream or download weekly TDS podcast episodes. No more syncing your iPhone or iPod Touch just to get a podcast. And there's more! Tap the Extras button for free passes and discounts and the current Grab Shot by our virtual camera club members. Each podcast episode has its own Extras button, too, that contains more goodies such as pro photo tips. And the best part is, The Digital Story Podcast App is your way to help support this show.Download it today!


twitter.jpg Follow me on Twitter


You're working in cold conditions and get a call on your iPhone. So you have to quickly yank off a glove to use the touchscreen before the ringing stops. Very stressful!

Well, it doesn't have to be that way thanks to the makers of FIVEPOINT Gloves. Their specially-designed conductive fingertips let you touch, tap, stroke, slide and pinch your touch-screen gadgets in any way you choose. This includes iPhones and iPads. Plus, they are nimble enough to use with your camera too.

FivePoint Gloves

You can order FIVEPOINT Gloves directly from the etre shop in either medium or large sizes for the following prices: £24.99 GBP (That's about $39.33 USD or €29.52 EUR.). They ship worldwide.


twitter.jpg Follow me on Twitter


Fall Color

On a crisp, autumn day in Sonoma County, I took the IR modified Olympus E-P1 on a walk. I used an Olympus M.Zuiko Digital ED 14-150mm F4.0-5.6 zoom lens for this shot. Settings were ISO 400, f/9 at 1/400th of a second.

Wisteria Lane, Santa Rosa "Wisteria Lane"- Infrared shot captured with a modified Olympus E-P1. Photo by Derrick Story. Click on image for larger version.

I'll have more information soon on these modifications.


twitter.jpg Follow me on Twitter


Photographers aren't the easiest people to buy gifts for. It's not that there isn't anything they want, but who can afford to get a loved one $1,400 DSLR body? I can help. Here are 10 great gifts for $50 or less that should thrill that favorite shooter in your life.

The Gift List

Listen to the Podcast

You can also download the podcast here (28 minutes). Or better yet, subscribe to the podcast in iTunes. You can support this podcast by purchasing the TDS iPhone App for only $2.99 from the Apple App Store.

Monthly Photo Assignment

High ISO is the November 2010 Photo Assignment. You can read more about how to submit on our Member Participation page. Deadline for entry is Nov. 30, 2010. Entries must be recorded at ISO 800 or above.

TDS Spring 2011 Photography Workshop

We're making plans now for the Spring 2011 TDS Photography Workshop. If you want your name on the reserve list, just drop me a line.

More Ways to Participate

Want to share photos and talk with other members in our virtual camera club? Check out our Flickr Public Group. It's a blast!

Podcast Sponsors

Red River Paper -- Try the $7.99 Sample Kit.

Make Your Photos Sizzle with Color! -- SizzlPix is like High Definition TV for your photography.

Blurb believes passionately in the joy of books - reading them, making them, sharing them, and selling them. Learn more by visiting Blurb on The Digital Story.


Technorati Tags:
, , , , ,


iPhoto '11 gets a lot of coverage for its online output services, but if you have an inkjet printer, you might be impressed with what it can do at home too. The trick is to first open the regular print dialog box (File > Print), then click on the "Customize" button. Go to Full Screen Mode, and you've got an entire print center at your fingertips.

iPhoto Custom Print Dialog Click the "Custom" button in the iPhoto '11 print dialog box to reveal a whole new world. Notice the Adjust panel controls just for that print job. Click on image for larger version.

You have a variety of themes, backgrounds, and borders to choose from. If you want to print multiple photos at one, you can also select from a handful of layouts. But my favorite feature is the Adjust panel of controls that only affect the print job, not the photo in your library.

To enable this, click on the photo itself (in the custom print work area), then click on the Adjust button. You have an entire set of image adjustment sliders, plus 3 presets. This allows you to fine tune the photo for the print job without worrying about changing the image that resides in the iPhoto library.

If you want to make a more permanent adjustment, double-click on the image, and you get iPhoto's 3-tabbed adjustment panel. Now the edits you make will affect the library version too.

One last tip while working in the custom print dialog box. Click on the photo and you'll see a zoom slider appear. You can zoom in on parts of the photo, then drag it to reposition it in the frame. Very handy for last minute composition adjustments.

If you want to save a digital version of the image you've customized, click Print, then click the PDF button and choose the option you want. Using that control, you can even return a Jpeg version of your creation to the iPhoto library. Nifty!


twitter.jpg Follow me on Twitter


Camera Bags for the MacBook Air

Sure, a new MacBook Air with fit in practically any bag designed for laptops. But for nimble photographers on the go, can it squeeze into a regular DSLR camera bag? I tested two of my favorites, the Lowepro Classified Sling 180 AW ($115) and the Lowepro Versapack 200 AW ($99). How do they work? See for yourself in this short video report.


twitter.jpg Follow me on Twitter


Red River Greeting Card Give Away

It may be just in time for the holidays, but the gifts are for you. Red River Paper wants you to have the opportunity to print with your very own Canon ip4820 Photo Inkjet Printer. And it couldn't be easier to participate.

All you have to do is subscribe to their newsletter or become a Fan of their Facebook page. (If you do both, that's two entries!) In order to qualify for prizes, first visit The Digital Story landing page on the Red River site. The links for contest entry are there. It will take you less than one minute.

For your effort, you will have the opportunity to win:

  • Canon ip4820 Photo Inkjet Printer - A top pick for printing Red River note cards
  • Red River Greeting Card Sampler Kit
  • $100 Gift Certificate for use at Red River's website

This event is to celebrate Red River's fantastic selection of greeting card paper that you can use to create fine art gifts (at a very affordable price).

So, let's have a strong turnout for our longest running sponsor (who has so much to do with keeping the TDS podcast on the air). Enter to win today!

Congrats to Mike Kennamer for his landscape shot from the Great Smoky Mountains as part of the Saturated Photo Assignment.

Mike Kennamer SizzlPix Pick of the Month

For his efforts, Mike will receive a free SizzlPix of his image. If you've ever seen one of these high definition images printed on aluminum, you know that Mike is in for a treat.

The current Photo Assignment for Nov. 2010 is "High ISO." If you want to enter an image and be eligible for a free SizzlPix, then send in your photo (captured at ISO 800 or above) by the end of the month. Details for the Photo Assignment are available on the Member Information page.

Thanks to our wonderful sponsor, SizzlPix, and to Mike Kennamer for sharing his good work.

I've always been a fan of infrared photography. But never has it been as much fun to create as with this modified Olympus E-P1 digital camera. Even with the dense 89B filter over the lens, I can shoot at 1/200th at f/8 in late afternoon light. In this week's podcast, I talk about this new rig that I'm testing from Ventura, CA where I'm recording an iPhoto '11 Essential Training for Lynda.com. I'm using the built-in mic on the MacBook Air for this episode. Tune in and see what you think.

Rest Stop, I5 CA "Rest Stop, I5 CA" - Captured with an IR-modified Olympus E-P1 camera. Photo by Derrick Story. Click on image for larger version.

Listen to the Podcast

You can also download the podcast here (15 minutes). Or better yet, subscribe to the podcast in iTunes. You can support this podcast by purchasing the TDS iPhone App for only $2.99 from the Apple App Store.

Monthly Photo Assignment

High ISO is the November 2010 Photo Assignment. You can read more about how to submit on our Member Participation page. Deadline for entry is Nov. 30, 2010. Entries must be recorded at ISO 800 or above.

TDS Spring 2011 Photography Workshop

We're making plans now for the Spring 2011 TDS Photography Workshop. If you want your name on the reserve list, just drop me a line.

More Ways to Participate

Want to share photos and talk with other members in our virtual camera club? Check out our Flickr Public Group. It's a blast!

Podcast Sponsors

Red River Paper -- Try the $7.99 Sample Kit.

Make Your Photos Sizzle with Color! -- SizzlPix is like High Definition TV for your photography.

Blurb believes passionately in the joy of books - reading them, making them, sharing them, and selling them. Learn more by visiting Blurb on The Digital Story.


Technorati Tags:
, , , , ,


A feature on the new Canon 60D DSLRthat intrigued me was the in-camera Raw processing. The thinking is that you can shoot Raw, then if you need a Jpeg version of any of those images, you can process the Raw file in the camera. No computer required. You'll get a new Jpeg according to your settings. I decided to put this feature to the test.

Canon 60D Raw Processing Menu In-camera Raw processing menu for the Canon 60D. Click on image for larger version.

I selected this flower image from a Christmas Cactus. I captured it originally in Raw with the Canon 60D. In playback mode, I pressed the Menu button and navigated to Raw Image Processing. The next menu, shown above, provided me with 10 settings to customize the processing of the file. Included were: Brightness, White Balance, Picture Style, Auto Lighting Optimizer, Noise Reduction, Quality and Resolution, Color Space, Peripheral Illumination Correction, Distortion Correction, and Chromatic Aberration Correction. That's a fairly nice toolbox to work with.

I played with the settings, including sampling the file down to S1 (2592x1728, 4.5 MBs), then processed the photo. Once it was finished, the 60D informed me of the file number of the processed image and the folder in the camera where it resided. The un-retouched processed picture is below.

Raw File Processed In-Camera on a Canon 60D Un-retouched Jpeg processed in-camera from a Raw file with a Canon 60D. Click on image for full sized version.

I'll let you judge for yourself, but I find this feature very convenient. The only thing that would make it better is a cropping tool. For many shooters, in-camera processing could eliminate the need to record in Raw+Jpeg. Just shoot Raw, and double the number of frames you can record in burst mode, then process the images you need to share immediately in camera.You can sample down as far as 720x480. That means with an Eye-Fi SD Card you could upload a properly resized image directly from the 60D to Flickr, even if it began as a Raw file.

Seems like a handy feature to me.


twitter.jpg Follow me on Twitter


Using Shift-Drag in Photoshop CS5 to stack two photos in a layered document...

Fortunately I had a camera with me when I came upon this colorful vineyard during the late afternoon on Saturday. I didn't have much time to "work the shot," so I made two exposures: one for the sky and the other for the foreground.

Autumn Barn, Sonoma County Photo by Derrick Story. Click on image for larger version.

layers_photoshop.jpg

Then in Photoshop, I stacked the two images to create a layered document (hold down the Shift key and drag one photo on to the other.) I then clicked on the top layer, held down the Option key, clicked on the Vector Mask icon at the bottom of the Layers panel and created a mask. Now, with the brush tool set to white, I can reveal the areas from the top layer that I like (the sky) and combine it with the vineyard from the bottom layer.

This two-shot technique allows me to work fast in the field, then quickly composite the image in Photoshop. It's not HDR, but it works nicely.


twitter.jpg Follow me on Twitter


Doug Peek Grab Shot

My brother-in-law and I were in downtown Chicago with the rest of our family walking around," writes Doug Peek. "He had his Nikon and I was armed with my Canon."

"We were exploring south on Michigan Avenue late in the afternoon when we passed by this alley. It had such a spectacular lighting pattern that I had to "grab" the shot. A slider here and a slider there in Lightroom, and this is the result."

Thinking on it though, makes it even a more unusual image. The lighting pattern is from the sun reflecting off the mirrored glass from the building on the other side of Michigan Avenue. Not cool enough though. This pattern is unique in that it will only appear during a certain time of year. Sometimes you just have to take the shot when you see it."

Photo by Doug Peek. Click on image for larger version.

This is our 204th Grab Shot! Wow. If you want to review the collection that began back in 2006, go to our Grab Shots page.

If you have a candid you'd like to share, take a look at our Submissions page, then send us your Grab Shot. We'll try to get it published for you on The Digital Story.

And you can view more images from our virtual camera club in the Member Photo Gallery.


The Digital Story Podcast App is the best way to stream or download weekly TDS podcast episodes. No more syncing your iPhone or iPod Touch just to get a podcast. And there's more! Tap the Extras button for free passes and discounts and the current Grab Shot by our virtual camera club members. Each podcast episode has its own Extras button, too, that contains more goodies such as pro photo tips. And the best part is, The Digital Story Podcast App is your way to help support this show.Download it today!


twitter.jpg Follow me on Twitter


aperture_icon_desktop.jpg

After just a day of testing, there seems to be many benefits to the Mac OS X 10.6.5 update, including Raw file support for 10 new cameras:

  • Canon EOS 60D
  • Canon PowerShot S95
  • Hasselblad H4D-40
  • Nikon D3100
  • Panasonic Lumix DMC-LX5
  • Sony DSLR-A290
  • Sony DSLR-A560
  • Sony DSLR-A580
  • Sony SLT-A33
  • Sony SLT-A55

You can see the complete list of supported cameras here.

Improved Export Speed in Aperture 3.1

But there's another bonus performance update that you might not have found yet. Thanks to Core Image enhancement under the hood, exporting images in Aperture 3.1 has improved also. This is welcome relief, indeed.

I tested this by editing sample "referenced" Raw files from a Canon S90 and 5D Mark II on a MacBook Pro 17" 2.5 GHz with 4 GBs Ram. I worked on one set of images with Mac OS X 10.6.4, then performed the same test on similar images (captured in burst mode) in Mac OS X 10.6.5. I applied these adjustments to all images before exporting them as full size Jpegs: Color, Levels, Crop, Vibrancy, Shadows, Recovery, Definition, and Edge Sharpen. I was very careful to make sure that all processing had completed before I initiated export. There were no other apps running during this test.

Mac OS X 10.6.4 with Aperture 3.1

Canon S90 .CR2 export to Jpeg --> 13.6 seconds
Canon 5D Mark II .CR2 export to Jpeg --> 30.2 seconds

Mac OS X 10.6.5 with Aperture 3.1

Canon S90 .CR2 export to Jpeg --> 7.3 seconds
Canon 5D Mark II .CR2 export to Jpeg --> 11.4 seconds

Since I had a number of burst mode shots in each series, I performed the test on four different images with each version of the operating system, then averaged the numbers.

So, if you run Aperture, make sure you've updated the app to 3.1 and OS X to 10.5.6. You'll get new Raw profiles plus a nice little performance boost too.

More Aperture Tips and Techniques

To learn more about Aperture 3, check out my Aperture 3 Essential Training on Lynda.com. Also, take a look at our Aperture 3 Focus Section. Tons of free content about how to get the most out of Aperture.


twitter.jpg Follow me on Twitter


Built to Order MacBook Air Speed Tests

macbook_air_thumb.jpg

In this week's podcast I talk about using a "built to order" MacBook Air for running Aperture, Lightroom, iPhoto, and Photoshop. And given the dramatic savings in size and weight with the new Air, I didn't feel that I was compromising too much on performance.

Now we have the numbers to go along with my field experiences. Macworld Magazine has released their 2010 MacBook Air: ultimate-edition lab tests. And as I suspected, there is a performance boost in the areas that we care about between the stock models and the built to order (BTO) Airs:

"The 13-inch MacBook Air BTO configuration was 10 percent faster than its stock configuration. Individual application highlights include Aperture and our multitasking tests that were both 15 percent faster, and iPhoto was 14 percent faster."

You also get to see how the new Air compares to the 15" MacBook Pro 2.4GHz Core i5 (Mid 2010) model -- a laptop that many consider the gold standard for photographers on the go.


twitter.jpg Follow me on Twitter


Yojimbo for the Organized Photographer

I've heard good things about Yojimbo for quite some time. But when Bare Bones Software released the companion Yojimbo for the iPad app, I decided that this was something I wanted to investigate for my "staying organized" workflow.

Yojimbo on the Mac The Yojimbo interface on the Mac is clean and easy to use. Click for larger version.

Basically it works like this. While you're working on your Mac, you can copy bits of information that you want to hang on to and put it in Yojimbo. This can be all sorts of stuff: bookmarks, notes, flight numbers, hotel reservations, directions, etc. Once your data is in Yojimbo, you can tag, label, or add a comment about it. Finding the info is a breeze via search or browsing, even if you don't tag.

Here's where it gets even better for the nimble photographer. If you get the iPad app too, it syncs with your desktop version. Both devices have to be on the same network, and boom, you have your complete cache of Yojimbo data right there on the iPad. And for sensitive data, you can encrypt it on the Mac and the iPad honors that encryption.

Yojimbo for the iPad You can sync your Mac data with the iPad via Yojimbo for the iPad. Click for larger version.

This is particularly helpful when traveling. It's much easier to pull out the iPad to check hotel information than to fire-up the old laptop. I tested this duo with a MacBook Air and an iPad, and it was a joy to use.

One thing to keep in mind, however, is that this is a one-way street. The data management is always on the Mac. The iPad is a display-only version of your Yojimbo data. You do have the option to move the data from the iPad via email, but that's about it.

If you're challenged by bits of information that you want better organized, take a look at Yojimbo for the Mac ($39). And if you have an iPad ($9.99), they make a good team.


twitter.jpg Follow me on Twitter


MacBook Air

The new MacBook Air represents both freedom and power for the nimble photographer. This week I talk about how to best configure the laptop and have recommendations for camera bags that will accommodate it.

I've had a chance to actually use the computer in the field. On a recent assignment to New York, I used Aperture 3.1, Photoshop CS5, Adobe Bridge, Adobe Camera Raw, iMovie, Photoshop Elements 9, Premiere Elements, and iPhoto '11 on the MacBook Air. All of my productivity apps such as the iWork suite, Transmit 4, Text Wrangler, and QuickTime also performed well.

The bottom line is that the Air is a blessing for shooters who want to use their favorite photo apps on the go.

Lowepro Bags Discussed in the Podcast

Listeners who have the TDS Podcast App also have a movie showing the Classified Sling 180 and the Versapack with the MacBook Air. Click on the Extras button.

Listen to the Podcast

You can also download the podcast here (34 minutes). Or better yet, subscribe to the podcast in iTunes. You can support this podcast by purchasing the TDS iPhone App for only $2.99 from the Apple App Store.

Monthly Photo Assignment

High ISO is the November 2010 Photo Assignment. You can read more about how to submit on our Member Participation page. Deadline for entry is Nov. 30, 2010. Entries must be recorded at ISO 800 or above.

TDS Spring 2011 Photography Workshop

We're making plans now for the Spring 2011 TDS Photography Workshop. If you want your name on the reserve list, just drop me a line.

More Ways to Participate

Want to share photos and talk with other members in our virtual camera club? Check out our Flickr Public Group. It's a blast!

Podcast Sponsors

Red River Paper -- Try the $7.99 Sample Kit.

Make Your Photos Sizzle with Color! -- SizzlPix is like High Definition TV for your photography.

Blurb believes passionately in the joy of books - reading them, making them, sharing them, and selling them. Learn more by visiting Blurb on The Digital Story.


Technorati Tags:
, , , , ,


Mophie Powerstation - Hands-On Test

Mophie Powerstation

I was able to get my hands on a production model of the Mophie Powerstation to see how well it performed with the iPhone and iPad. I originally wrote about the Powerstation after seeing it demoed at a Mobile Focus event. For being so light and compact (not much bigger than an iPhone), it packs quite a punch. It can fully recharge my iPhone 3GS, and partially refuel the iPad.

Here's a representative test for each device.

iPhone 3GS

My iPhone battery was down to 34 percent. I connected a fully charged Powerstation (6 LED lights showing), and 1:40 later, the phone was showing 100 percent charge. The Powerstation still had energy left also - 4 LED lights glowing. I plugged in the Powerstation to recharge it, and it took 2:30 to reenergize.

iPad 3G

Anyone who's every charged an iPad knows how much juice it takes to replenish those big batteries. I connected my iPad showing a 42 percent charge to the Powerstation, and it reached 82 percent before the Mophie ran out of gas (0 LEDs showing). This process took 2:15.

Additional Features

I like the standby switch that prevents power drainage when the Mophie is not in use. I had misunderstood earlier that it had "pass through" charging, but when I tested it, the Mophie did not have this feature. You have to charge the Powerstation and your i-device separately. The LED indicators are a nice touch and work well.

Bottom Line

The Mophie Powerstation is a 3600 mAh device that charges up to 2 amps, works great on iPods and iPhones, and it can buy you some extra time on the iPad. It's not cheap at $99 -- but it's powerful and well-designed. And if you need juice on the go, you'll be glad to have one in your backpack.


twitter.jpg Follow me on Twitter


Yes, it has some templates that you'd never consider for a moment, but iMovie '11 is a good tool for fast video production, especially for DSLR shooters who don't want to mess with transcoding (you get to edit natively in H.264).

iMovie '11 Interface iMovie '11 interface. Click on image for larger version.

I found this quick-read review of iMovie '11 on Canon 5D Tips that covers the "good" and "less good" aspects of this app. My experience mirrors this review.

I've been using iMovie '11 in the field on a MacBook Air, and have enjoyed the experience. I did hit a limitation trying to use iMovie '11 to manage my Aperture movies (read the comments that follow the article), but for fast video production, iMovie '11 has been easy to learn and includes lots of nice features. And you can't beat the price.


twitter.jpg Follow me on Twitter


Tim Tilden Grab Shot

"Several years ago I became friends with the local Hang Glider pilots here on Oahu," writes Tim Tilden. "They launch from a spot on a ridge 1100 ft above the beach. Using trucks, they drive their gliders up to the launch, and since I live nearby, I volunteer to drive the pickups down to the landing zone."

"While they fly, I take pictures. I've become a visual chronicler of many of their flights. I ended up creating a site on Smugmug to allow them to see how good they look!"

"On Halloween Sunday, I was at the Landing Zone taking pictures of their landings, and the landings of the paragliders who use the same LZ. A paraglider pilot alerted me to a parachutist, who was about to jump from a paraglider high above the LZ. Quickly changing to my long zoom, a Tokina 80-400mm, I got this shot moments after her leap from the glider. She landed safely."

Photo by Tim Tilden. Click on image for larger version (whoa!).

This is our 203rd Grab Shot! Wow. If you want to review the collection that began back in 2006, go to our Grab Shots page.

If you have a candid you'd like to share, take a look at our Submissions page, then send us your Grab Shot. We'll try to get it published for you on The Digital Story.

And you can view more images from our virtual camera club in the Member Photo Gallery.


The Digital Story Podcast App is the best way to stream or download weekly TDS podcast episodes. No more syncing your iPhone or iPod Touch just to get a podcast. And there's more! Tap the Extras button for free passes and discounts and the current Grab Shot by our virtual camera club members. Each podcast episode has its own Extras button, too, that contains more goodies such as pro photo tips. And the best part is, The Digital Story Podcast App is your way to help support this show.Download it today!


twitter.jpg Follow me on Twitter


High ISO Street Shooting

American Flag in New York City

During my last trip to New York City, I carried a Canon Rebel T1i with a Canon EF 50mm f/1.8 lens when I went out at night to eat. I love the challenge of only having one prime lens with me.

My favorite time to shoot is at twilight. Color in the sky makes all the difference. Also having a fast lens and not being afraid to push the ISO provides lots of creative options. This shot, for example, was recorded wide open with the ISO set to 1600. I haven't done any noise reduction at all.

If you also like this stuff, consider entering this month's Photo Assignment, "High ISO." Entries must be shot at ISO 800 or higher.


"American Flag in New York City" -- Recorded with a Canon T1i and a 50mm lens at f/1.8. Thanks to ISO 1600, I was able to expose at 1/30th to give me a good rendering of the flag. Photo by Derrick Story. Click on image for larger version.


twitter.jpg Follow me on Twitter


For the longest time I had decent cell phone reception at my studio in central Santa Rosa, CA. Then one day, as if someone threw a switch, my service was terrible. I could barely complete a call before it was dropped, and sometimes I would have to redial 3 or 4 times just to finish a short conversation. I was so frustrated.

zBoost Metro in Window 
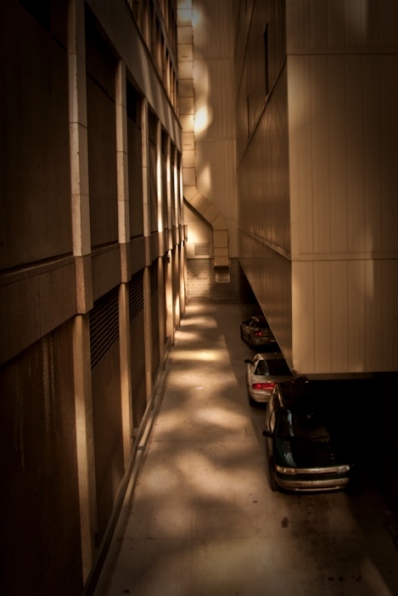
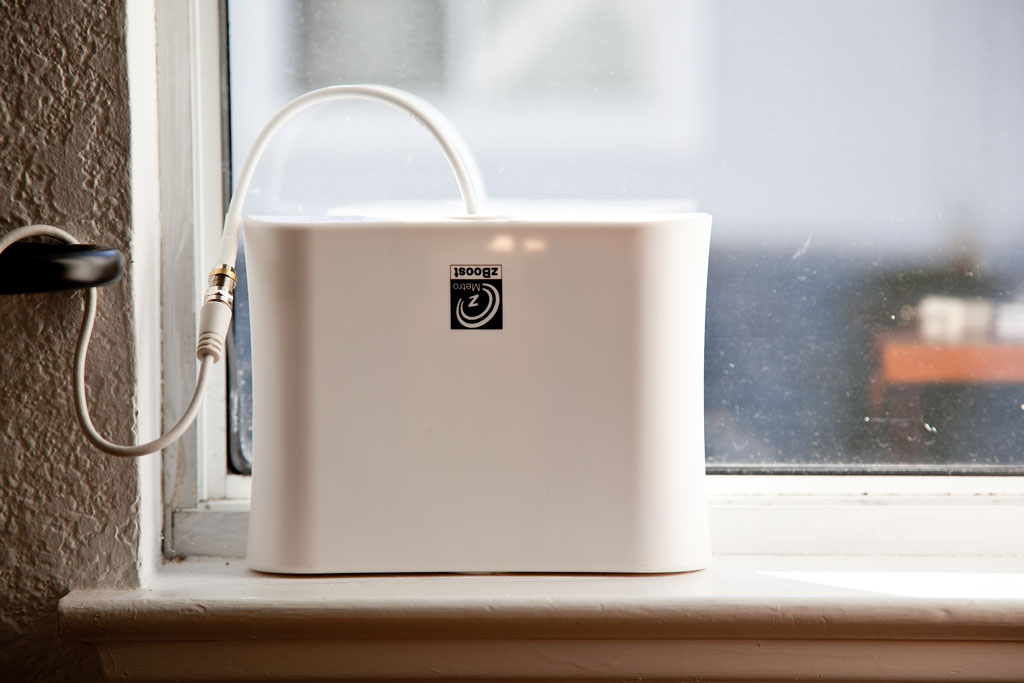
The signal antenna for the zBoost Metro in my window sill. Since this device doesn't require vertical separation like other single amplifiers, you can even use it in a single-level apartment or small office.

I knew the solution wasn't going to be AT&T -- I had contacted them about the problem, and they said everything looked OK to them -- I would have to come up with something on my own. And I did. The zBoost METRO YX540 cell phone signal booster.

How to Set Up the zBoost Metro

It works like this. First you have to find a location in your home or small office that has the best phone reception. In my case, I could get 2 bars upstairs in the room facing south. I placed the signal antenna (shown here) in that window. I set it on the window sill, but the kit includes suction cups if you want to attach it to the glass.

Then I ran the included coaxial cable down the stairs to the bottom floor where I previously had virtually no reception. I attached the zBoost Base Unit and made sure the light was green. I checked my iPhone downstairs, and I went from 1 bar (which quite honestly was really no bars because I couldn't complete calls), to 2 bars and sometimes 3. Before I let myself get too excited, I dialed up a couple friends. Perfect! I actually finished the conversations.

OK, now for the ultimate test. I have a friend who uses a BlackBerry on Verizon. We have not completed a call in months. I dialed her up. We talked for five minutes without disruption. And, on top of that, her voice sounded loud and clear. It was a miracle!

Once I had confidence that the zBoost was going to work, I ran the white coaxial cable along the wall, and for the most part, out of sight along the edge of the carpet. I could push it down in the crack so that it's barely visible.

Networks, Coverage and Stuff

The zBoost METRO YX540 is available everywhere for $199. It works with 800 and 1900 MHz frequencies, except for Nextel/iDEN. No problem for iPhones. It can cover an area as large as 1500 square feet. I have about 1,000 square feet downstairs at my studio, and the zBoost covers it easily. You get a system gain of about 50 dB, and it works with the following networks: CDMA, GSM, GPRS, EDGE, EVDO, 1xRTT, UMTS, HSPA, and 3G. It uses 3W of power in standby mode, and up to 7W when its working hard.

iPhone vs iPad

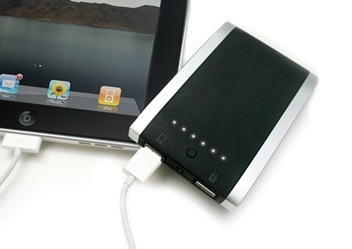
Since many of us have iPads too, I decided to also test the zBoost with that device. The results were a bit surprising.

I made sure WiFi was off for both the iPhone 3GS and the iPad 3G. The iPhone showed 2 bars and the iPad was displaying 3. But when I launched web pages on both devices, the iPhone 3GS beat the iPad every time. Generally, I think the iPad loads pages faster than the iPhone, especially on WiFi. But not using the zBoost.

Using 3G only with the zBoost, DPReview would completely load in 50 seconds on the iPhone 3GS and 1:30 on the iPad. If I turned WiFi back on, the iPad would beat the iPhone, loading in about 10-15 seconds.

So in my case, the zBoost does a great job with voice communication on the iPhone, but isn't really a plus for the iPad. Of course your mileage may vary.

The Bottom Line

You could not pry the zBoost Metro out of my hands. It has brought my cell phone back to life so I can use it with confidence in my studio.


twitter.jpg Follow me on Twitter


"If I hand my camera to another person to shoot a few frames, who owns the copyright for the images?" Or, "Would the outcome be any different if the person is a minor?"

In the article, Q&A - Who Owns the Copyright? - Updated, photo attorney, Carolyn E. Wright tackles these questions and provides some good answers.


twitter.jpg Follow me on Twitter


Over the last few months, I've had a lot of face time with photographers at all levels. And I've noticed that successful shooters often embrace what I call the "flexible mind." This week I take a few moments to share a few key factors that could influence your career, regardless if you're a photographer or not, in a positive way.

Listen to the Podcast

You can also download the podcast here (29 minutes). Or better yet, subscribe to the podcast in iTunes. You can support this podcast by purchasing the TDS iPhone App for only $2.99 from the Apple App Store.

Monthly Photo Assignment

High ISO is the November 2010 Photo Assignment. You can read more about how to submit on our Member Participation page. Deadline for entry is Nov. 30, 2010. Entries must be recorded at ISO 800 or above.

TDS Spring 2011 Photography Workshop

We're making plans now for the Spring 2011 TDS Photography Workshop. If you want your name on the reserve list, just drop me a line.

More Ways to Participate

Want to share photos and talk with other members in our virtual camera club? Check out our Flickr Public Group. It's a blast!

Podcast Sponsors

Red River Paper -- Try the $7.99 Sample Kit.

Make Your Photos Sizzle with Color! -- SizzlPix is like High Definition TV for your photography.

Blurb believes passionately in the joy of books - reading them, making them, sharing them, and selling them. Learn more by visiting Blurb on The Digital Story.


Technorati Tags:
, , , , ,


You can have all of your photos and movies managed by one database, yet still use the necessary tools to get the job done. Many of my current assignments require that I deliver both video and images. A workflow that will keep you from going crazy it to upload everything into Aperture 3.

For simple video pieces, you can edit video in Aperture. If you need more tools, then iMovie '11 can tap into your Aperture library for content, create and output movies, without duplicating the source material. This gives you one set of master footage, but multiple production options.

iMovie 11 iMovie '11 using Aperture 3 to manage assets. Click on image for larger version.

The process is fairly simple.

  • Upload everything into Aperture.
  • Organize as you normally would.
  • Launch iMovie and let it generate thumbnails for all of your Aperture video. This could take a while if you have a lot of content.
  • Edit and produce your video in iMovie. The source material in Aperture will be read, but not altered.

iMovie will create a couple megabytes of material and store it in the "iMovie Projects" folder. But that's about it. And even if you need to move your Aperture library to another hard drive, you can reconnect the content in iMovie (iMovie Help explains how).

It a fairly efficient approach that will help you manage all of your source material. You can also use iPhoto instead of Aperture in this scenario.

More Aperture Tips and Techniques

To learn more about Aperture 3, check out my Aperture 3 Essential Training on Lynda.com. Also, take a look at our Aperture 3 Learning Center. Tons of free content about how to get the most out of Aperture.

If you want to see an example of the Aperture/iMovie connection, here's a video that I produced on assignment for Lowepro at PhotoPlus Expo 2010. I shot the footage with a Canon 5D Mark II, uploaded to Aperture, edited in iMovie, and produced before I returned home. You can work very fast using this set-up.


twitter.jpg Follow me on Twitter