February 2013 Archives

Rode iXY Mic for iPhone

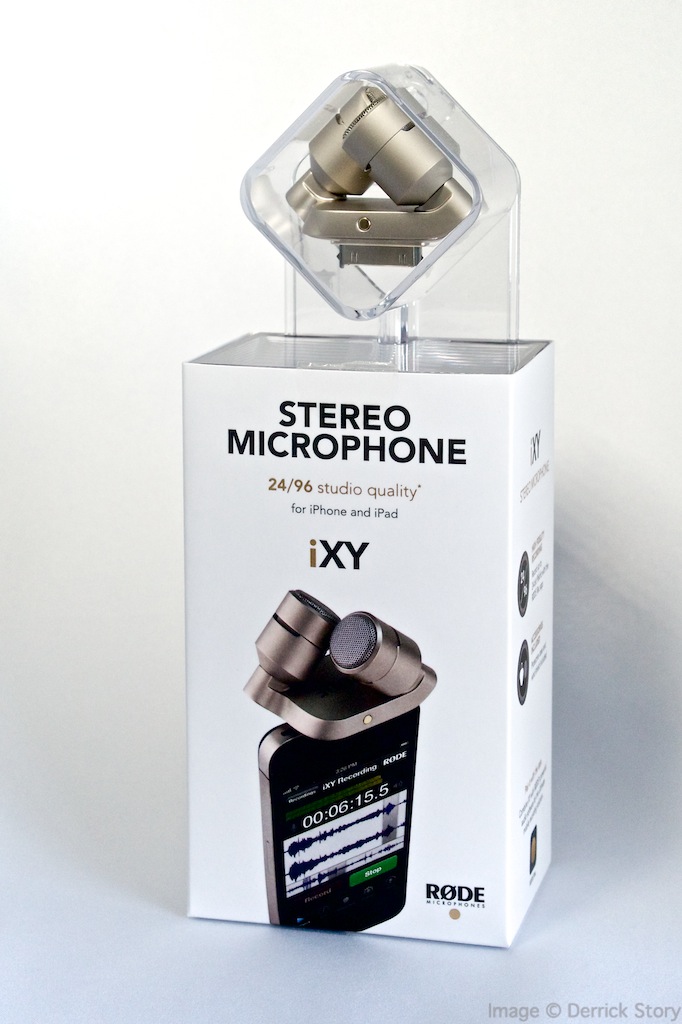
You can record serious audio with your iPhone. With the new Rode iXY Stereo Recording Microphone for iPhone/iPad ($199) combined with the Rode Rec app in iTunes ($5.99), you can create audio for movie voiceovers, interviews, ambient environment, and more.

Basic Features for the Mic

The basic features for the mic include:

  • 30-pin Dock Connector - for iPhone 4/4S, iPad 1st/2nd/3rd gen
  • Two 1/2" cardioid condenser capsules
  • Onboard A/D conversion
  • Up to 24-bit/96kHz recording
  • Works with paid ($5.99) or free Rode app
  • Adjustable input levels
  • Foam windshield for outdoor recording and to control "pops" indoors
  • Reinforced protective zippered case
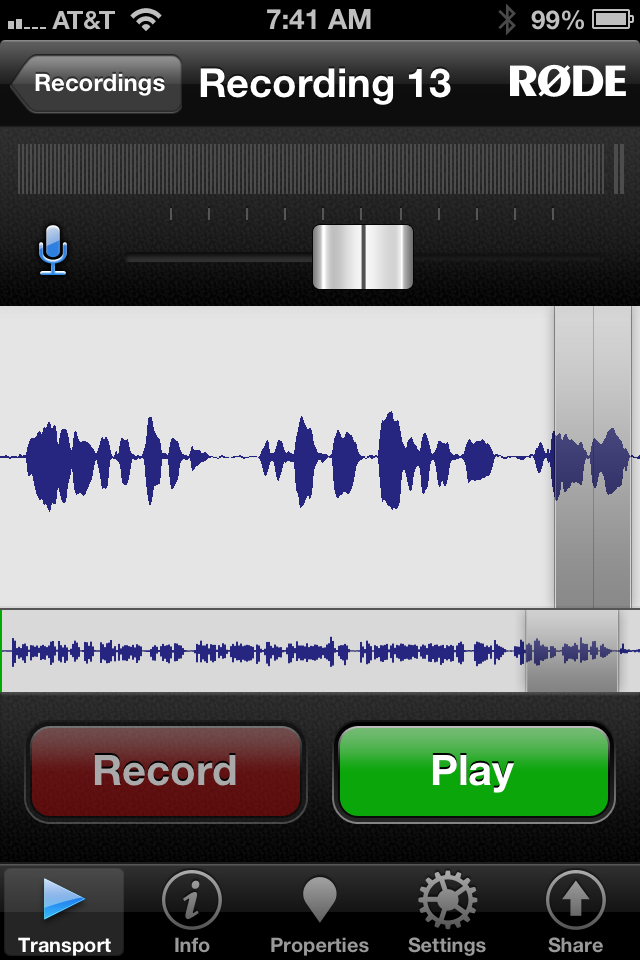
Sample Recording

Here's a sample recording with the RØDE iXY mounted to my iPhone 4S. The recording was captured with me holding the iPhone in my living room. I did not use the included windshield or a pop-screen on the mic. The file is unedited, but compressed to MP3.

You can also download the audio test here (42 seconds).

RØDE Rec App

The $5.99 RØDE Rec app for the iPhone (there is a free version too) is a complete recording, editing, and sharing studio for your iOS device. Highlights include:

Rode Rec app

  • High resolution 16-bit, 48kHz stereo/mono recording (up to 24-bit/96kHz when paired with the RØDE iXY microphone)
  • EQ and dynamics: Compression, high/low-pass filter, and frequency cut/boost
  • Live input monitoring
  • Preset recording profiles for a range of common situations (lecture, concert, interview and more)
  • Complete control of the iXY microphone, including high pass filter and LED behavior
  • Real-time waveform and one-touch markers
  • Landscape mode provides greater visibility when editing
  • Non linear cut/copy/paste/crop
  • Output in multiple formats including WAV, AIFF, AAC, Apple Lossless, FLAC and more

Software and Hardware Working Together

RØDE has put together a powerful tandem of hardware and software. In my sample recording with an iPhone 4S, I chose my living room at home and recorded without the foam windshield that comes with the mic.

I could monitor my input with headphones while I spoke. I used the "Hiss Reducer" preset that's located in the Input menu for the app. Once I finish a capture, it's added to the Recordings menu where all of my "raw" files are listed. I say it that way, because I'm capturing at 44100 Hz (can go to up to 24-bit/96k Hz) and in mono (stereo is available too). But when I share the file, I have the option of sending it out as an AIFF, WAVE, CAF, AAC, Apple Lossless, FLAC, or Ogg Vorbis. The master audio remains in my Recordings menu until I remove it.

Editing in the Rode Rec app 
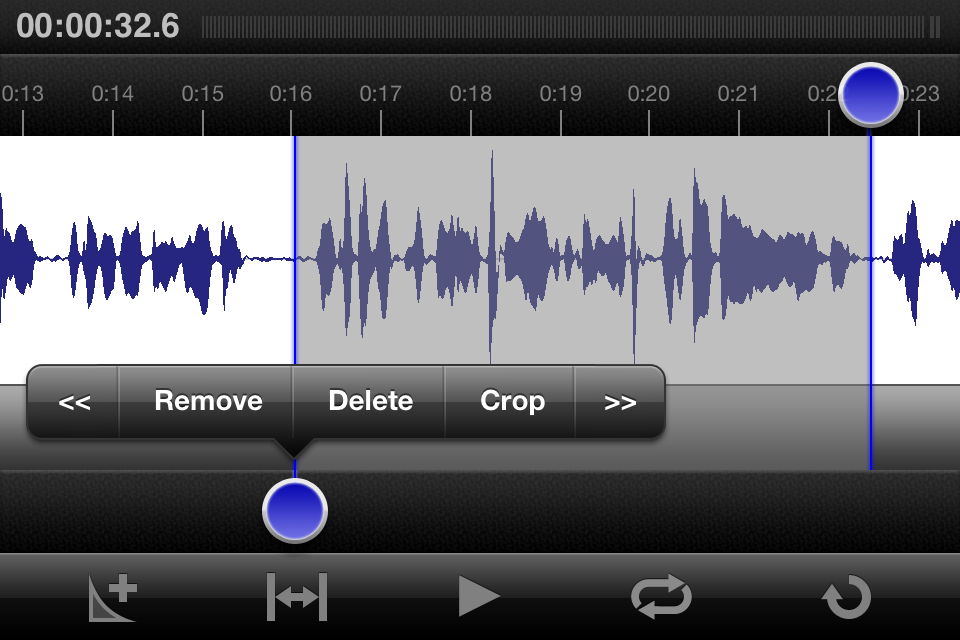
Editing in the RØDE Rec app.

I can edit what I've recorded on the iPhone or iPad before I share it. This is a terrific timesaver when working on the go. Rotate the phone sideways to reveal the editor. Tap and drag downward to select an area. Tap on the blue dot to reveal the contextual menu with options for your selection. It's easy and works great.

Bottom Line

The RØDE iXY Stereo Recording Microphone for iPhone/iPad is a quality stereo microphone that converts your iPhone into a high resolution audio recorder. As nice as the mic itself is, what pulls this package together is the RØDE Rec app that maximizes the hardware's capabilities.

For best results, I recommend using the included foam windshield and mounting your iPhone on stand. The first version of the iXY Mic is available with a 30-pin Dock Connector. But it appears that Rode is working on a Lightning connector version too.

I give the RØDE iXY Stereo Mic a very high Nimbleosity rating. It allows me to use my iPhone for recording on the go instead of having to carry a separate device. I'm sure you'll hear a podcast recorded with it before long.


The Digital Story on Facebook -- discussion, outstanding images from the TDS community, and inside information. Join our celebration of great photography!


When natural light isn't available, you can still create flattering portraits on the go using a ring flash. But which one? In the article, Best camera flash for portrait photography: 6 models tested and rated, you can survey the pros and cons for a half dozen different models.

orbis_ring_flash.jpg

One of the six, the Orbis ring flash with bracket, I've used for both macro and portrait photography. And there are five others to peruse!


The Digital Story on Facebook -- discussion, outstanding images from the TDS community, and inside information. Join our celebration of great photography!


Top stories this week on The Digital Story: LED light panels for product shots anywhere, take the SizzlPix Challenge and get a free 5x7, 7 steps to edit 90 percent of your images.

Story #1 - LED Light Panels - I have an LED on-camera light panel that's about 5.5" wide and mounts in the hot shoe of my camera or on a stand. I've been using it often for product shots.

I have my light panel attached to one of the larger Joby Gorillapodsm the Focus. It's easy to position that way. It's been handy for putting a splash of light here and there, or serving as a small fill light. I often use natural light through the window as my main light with the light panel filling in from there.

Prices range from about $100 to $250. There are bargain units out there too. If you are considering a LED panel, I discuss four points to keep in mind. The model I'm currently using is the Litepanels Micro LED On-Camera Light that sells for $190.

Story #2 - The SizzlPix Challenge - Here's your chance to see your favorite image Sizzled for free. Here's how it works.

For a limited time, fill out an order on the SizzlPix website and put "TDS" or "The Digital Story" in the comments field to take the Challenge. Follow the directions to upload your image.

You'll soon receive a free mini-seven inch section of your own SizzlPix. After examining the free mini-sample, if you don't agree that SizzlPix is the finest output for your photography, you haven't paid a penny. If you love it, then order the full size image. But there's no obligation what-so-ever.

Story #3 - 7-Step Workflow for Aperture - If you're new to Aperture, or you just want a concise workflow that will improve 90 percent of your images, take a look at my latest editing article. The workflow applies to iPhoto, Lightroom, and even iPhoto for iOS.

Listen to the Podcast

You can also download the podcast here (28 minutes). Or better yet, subscribe to the podcast in iTunes. You can support this podcast by purchasing the TDS iPhone App for only $2.99 from the Apple App Store.

Monthly Photo Assignment

The February 2013 photo assignment is Furry Friends.

More Ways to Participate

Want to share photos and talk with other members in our virtual camera club? Check out our Flickr Public Group. And from those images, I choose the TDS Member Photo of the Day.

Podcast Sponsors

Red River Paper -- Keep up with the world of inkjet printing, and win free paper, by liking Red River Paper on Facebook.

Make Your Photos Sizzle with Color! -- SizzlPix is like High Definition TV for your photography.

Need a New Photo Bag? Check out the Lowepro Specialty Store on The Digital Story and use discount code LP20 to save 20% at check out.

One of the regular deals making the rounds via Groupon and other discount sites is the Vibe Aluminum Bluetooth Keyboard Case and Stand for the iPad mini. I decided to risk $22 to try it for my mini, and I'm pleasantly surprised by its performance.

Vibe Bluetooth Keyboard

The Vibe has a rechargeable battery that powers its built-in Bluetooth transmitter. When I first received the keyboard, I charged the battery using the power cord that came in the box. I then paired the keyboard with my mini.

Typing is a little cramped, as you would expect for a small keyboard, but after a few minutes, I was doing just fine. The aluminum keyboard has a metal protrusion near the spacebar that serves as a latch if you use it as a cover for the iPad. The protrusion does interfere a bit with using the spacebar. I'm working around it now, but it did bother me in the beginning. I learned that if I use my left thumb for the spacebar, I rarely have a problem,

I really like the blue function keys that control screen brightness, volume, search, home screen, and more. I find them easier to use than tapping on the glass when the iPad is positioned upward in the slot on the keyboard that serves as its stand.

Because they communicate via Bluetooth, however, you don't have to use the Vibe as a stand. I sometimes use my leather case as a stand with the keyboard positioned in front of it. I find that more comfortable.

You can use this device as a cover too. It locks into place over the iPad's screen. I don't use it that way because I don't want the keys in contact with the glass. So I continue to use my soft case for the iPad and just carry the keyboard separately. And because it's so thin and light, finding room for the keyboard in my shoulder bag hasn't been a problem.

Overall, I've been quite happy with the Vibe as both a part-time stand and keyboard for the iPad mini. It works as advertised, seems to have quality construction, and looks good too.

If you run across a Vibe online at a good price, you'll probably enjoy using it.


The Digital Story on Facebook -- discussion, outstanding images from the TDS community, and inside information. Join our celebration of great photography!


Most photos can be improved with just a few adjustments... especially if you know which levers to pull. In my Macworld article, The 7-step edit in Aperture 3.4, I walk you through an easy image editing workflow that will improve 90 percent of your pictures.

aperture_seven_step.jpg

Aperture Tips and Techniques

To learn more about Aperture, check out my Aperture 3.3 Essential Training (2012) on lynda.com. Also, take a look at our Aperture 3 Learning Center. Tons of free content about how to get the most out of Aperture.


The Digital Story on Facebook -- discussion, outstanding images from the TDS community, and inside information. Join our celebration of great photography!


Flickr 2 Updated

The folks at Flickr are not resting on their recent laurels. They've released Flickr 2.1 for iOS, and it includes a handful of terrific new features, including:

  • Faster uploading
  • Easily save photos from your Photostream to your camera roll
  • Automatically saves your original, pre-filter photos to your camera roll
  • Quickly tag your contacts in photo comments and description by simply typing @screename
  • Get notified when your contacts mention you
  • Higher resolution photo display in lightbox view
  • Take photos in a snap using your iPhone's volume up button

In my testing, images do process faster during uploading. And I love the fact that I can save shots from my Photo Stream to my Camera Roll, especially since I have more than 1,100 images posted on Flickr. I'm also happy to see the Volume Up "+" button making its way back as a shutter button in our photo apps.

If you haven't tried the new Flickr for iOS app, I highly recommend it. You can download it in the iTunes App Store.


twitter.jpg Follow me on Twitter


Real Time Reporting Workflow

I posted a photo of Andris Biedrins of the Golden State Warriors blocking a shot on my Instagram page just moments after it happened using this workflow with an OM-D, FlashAir card, and an iPad mini

warriors_defense_phoenix.jpg Andris Biedrins blocks a shot in the Warriors 108-98 win over the Phoenix Suns at Oracle Arena in Oakland, CA.

I captured the original image (shown here) with an Olympus OM-D and a Zeiss 85mm lens. I had a Toshiba FlashAir SD card in the Olympus that fed the images to my iPad mini. From the iPad, I uploaded the photo to Instagram.

The image looks fine on my iPhone 4S, but it isn't a top quality rendering. That's why I capture in RAW+JPEG for this workflow. The JPEG goes to Instagram, then I process the RAW file in Aperture 3.4 when I get home. That's the image I've posted here.

I like being able to share images in real time, yet still have top quality files for printing and publishing. I'll continue making adjustments to this system, but thought you might find it interesting.


Take a look at the Olympus Micro Four Thirds Gear Guide for an overview of cameras, lenses, and accessories.

Wood Camera for iPhone

Chocolate Heart

If you're in the mood for a new photo app to play with on your iPhone, you may want to take a look at Wood Camera - Vintage Photo Editor. Currently on sale in the iTunes App Store for 99 cents, Wood Camera provides an array of imaging tools to capture, edit, and share your pictures.

The app features 32 lenses, which you'll recognize as filters similar to those found on Instagram and Flickr. You can capture with a filter turned on, or apply the effects afterward while editing. A nice touch is the ability to control the intensity of the lens via a slider. There are lots of other tools too, such as brightness, contrast, sharpen, saturation, hue, cropping, frames, and effects. Plenty here to keep you busy while waiting in line for coffee at Starbucks.

Once you have the image to your liking, you can save to your Camera Roll or post online to Instagram, Facebook, Flickr, and Twitter. I had good luck posting to Instagram, but wasn't as successful sharing to Facebook and Flickr. Maybe the network gods were against me at the moment.

The quality of the output from Wood Camera seems somewhere in between Instagram and Flickr. OK on the iPhone, but not as good as Flickr when examined on a computer screen.

All in all, though, Wood Camera is a blast to play with and a great deal at 99 cents. You might want to see what you can create with it.


Join me on my Instagram site as I explore the world of mobile photography.

Top stories this week on The Digital Story: Five things you can do when you want a new camera, but can't afford one; The Lomography Smartphone Film Scanner; workshops update.

Story #1 - No New Camera! - I talk about 5 things that you can do to protect your credit card when a new, and expensive camera gets under your skin.

Story #2 - The Lomography Smartphone Film Scanner - This is not the solution for the thousands of negatives you have shoeboxed in the closet. But for digitizing a favorite image every now then, this is a cool device.

Story #3 Workshop reservation forms for the June workshop, "Movie Making for Photographers," are going out this week. The April workshop, "iPad for Digital Photographers," has only one slot open.

Listen to the Podcast

You can also download the podcast here (30 minutes). Or better yet, subscribe to the podcast in iTunes. You can support this podcast by purchasing the TDS iPhone App for only $2.99 from the Apple App Store.

Monthly Photo Assignment

The February 2013 photo assignment is Furry Friends.

More Ways to Participate

Want to share photos and talk with other members in our virtual camera club? Check out our Flickr Public Group. And from those images, I choose the TDS Member Photo of the Day.

Podcast Sponsors

Red River Paper -- Keep up with the world of inkjet printing, and win free paper, by liking Red River Paper on Facebook.

Make Your Photos Sizzle with Color! -- SizzlPix is like High Definition TV for your photography.

Need a New Photo Bag? Check out the Lowepro Specialty Store on The Digital Story and use discount code LP20 to save 20% at check out.

Photographer James Duncan Davidson has been carrying the Sony RX1 since the early days of its release and has published his findings in the article, Sony DSC-RX1 Review.

sony_rx1_w_viewfinder.jpg Sony RX1 with optical viewfinder photographed at Photokina by Derrick Story.

A few things to note about Duncan's review. First, he's a working photographer who travels a great deal. So his perspective is very fitting for a full-frame sensor camera that fits in your jacket pocket. Also, if you have a Retina Display Mac, the sample images in his post take advantage of the pixel density of those laptops, and they are absolutely beautiful.

The Sony RX1 lists for $2,800, so it's not an impulse buy. But after reading Duncan's review and enjoying the pictures captured with it, you might find it a bit harder to resist.


twitter.jpg Follow me on Twitter


We're just about finished with the cover design for iPad for Digital Photographers,and I thought you might enjoy the "inside story" about the model who graces the front cover.

iPad-Photog-Cover.jpg

Her name is Lovely LadyJ. This was my first shoot with her. (I'm hoping she will be available for the TDS workshop in April.) Those portraits of her holding a photo umbrella were captured at Schulz Museum, across the street from the TDS headquarters.

I liked how Lovely LadyJ had prepared her hair and makeup on that rainy day she showed up at the front steps of the studio. After we finished the first series of photos inside the portrait room, I asked if she would be OK posing for a second series outside, even though the conditions were a bit challenging. She loved the idea.

By using the photo umbrella to protect her from the rain, it also served as a light diffuser and white background. I set the Olympus OM-D E-M5to ISO 800 and mounted the Olympus 60mm f/2.8 portrait/macro lenson the body. We shot in the rain for about 20 minutes, then dashed back to the studio.

When it came time for me to create the front cover image for the book, I loaded Lovely LadyJ's portraits on an iPad and an iPad mini. I set the devices on stands in the studio with an Olympus Pen mini and a few lenses, then shot the set live. In other words, the images were not "dropped on to the iPads" in post. What you see is how I shot it. I sent the cover image to Wiley Publishing, and designer Michael E. Trent took it from there.

My philosophy is to "walk the talk" with this book. I've written big chunks of it in Pages on an iPad, and shot most of the images with an iPhone or micro four thirds camera. If I can't do it in real life, it doesn't go in the book.

iPad for Digital Photographers,is scheduled for release on May 7, 2013. I'll have more behind the scenes anecdotes to share between now and then.


twitter.jpg Follow me on Twitter


Here's an ode to the Super Bowl Chrysler ad, "Farmer," created by the Richards Group. But this time the subject is "photographer."

I enjoyed this. Hope you do too.


twitter.jpg Follow me on Twitter


In an attempt not to undermine the sales of its popular EOS 5D Mark III, Canon may have constrained the features a bit too much on the promising EOS 6D. At least that's the viewpoint of DP Review in their test of the 6D DSLR.

canon_6d_web.jpg

Even though you get built-in WiFi and GPS, which they like, they were unimpressed with the 11-point autofocus array, slow burst rate, and average video performance. You can purchase the 6D new for $2,100, compared to $3,500 for the 5D Mark III. That's a substantial price difference. But you still might want to look at the feature comparison closely before making a final decision.


twitter.jpg Follow me on Twitter


You can create attractive portfolio pages and share them wirelessly with others around you -- all served securely from your digital camera. Sounds crazy, right? It isn't.

Renee Light Table Portfolio page served from an Olympus OM-D to an iPad mini using the Toshiba FlashAir memory card.

In short, what I do is create the portfolio pages using Light Table in Aperture 3.4, then write those files to a Toshiba FlashAir Wireless SD Card($55). After that, all I have to do is insert the card into my Olympus OM-D and turn on the camera.

If I want to display this portfolio page on my iPad, or someone else's iPad, I have them log on to my FlashAir card and it will serve the page wirelessly to their device. If they want a copy of it, they can save the page to their Camera Roll.

This is all made possible by the FlashAir card's ability to create its own secure web server. I talk about how this works on this week's podcast, Ingenious Toshiba FlashAir. Not only can this wireless-capable SD card share images from your camera to computers and mobile devices, it can actually serve web pages, PDFs, and other content.

I created the portfolio page in Aperture 3.4 using the Light Table tool. Once the page was designed, I saved the Light Table as a PDF, then converted it to a JPEG to reduce file size.

Print Light Table I created the Light Table in Aperture 3.4, then saved it as a PDF using the Print command.

Once I have the JPEG version of the portfolio page, I copy it to the FlashAir SD card via drag and drop on my Mac. I then eject the card from the computer, insert it into my OM-D, and turn on the camera.

As soon as the camera is powered up, it turns on the web server in the Toshiba FlashAir card. Now, all I have to do is open Settings on the iPad, choose the FlashAir WiFi Network, and direct my web browser to http://flashair/

I can share pictures on the camera, plus any additional files that I've added to the card. It's secured by WPA2 Personal security. So only those I give a password to can access the content on the FlashAir card.

It's the perfect combination of geeky technical plus design using the elegant Light Table tool in Aperture. And best of all... it' easy!

Aperture Tips and Techniques

To learn more about Aperture, including how to build Light Tables, check out my Aperture 3.3 Essential Training (2012) on lynda.com. Also, take a look at our Aperture 3 Learning Center. Tons of free content about how to get the most out of Aperture.


Top stories this week on The Digital Story: the ingenious Toshiba FlashAir wireless memory card, personal photo projects, and workshops update.

Story #1 -If you've liked the idea of wireless photo transfer from your camera to the iPad, iPhone, or computer, but got fed up with the configuration hassles of using Eye-Fi cards or wonky built-in WiFi, then I have great news for you. The Toshiba FlashAir Wireless SD Card($55) is easy to set up and it works with practically any camera or device.

I've been testing the 8GB FlashAir with my Olympus OM-D, and I couldn't be happier with the results. Why is this technology better than what we've seen in the past? Toshiba has embedded a WiFi access point in the card. All you have to do is logon to the network with you iPhone, iPad, or computer, and you can grab your photos using a simple web browser or from a handful of apps designed for wireless transfer.

Currently I'm using the free Olympus Image Share app and ShutterSnitch 2.9 with the FlashAir card. The procedure is simple:

  • Insert the card into your camera and turn on the power.
  • After a few seconds, go to the WiFi settings on your computer or mobile device and choose the FlashAir card.
  • Enter password 12345678
  • Launch Olympus Image Share, and you should connect to your camera.

At some point, you might want to create your own 8-character password by launching your web browser and typing in http://flashair/ This will log you on to the card and allow you to change its settings. It uses WPA2 Personal security.

Downsides to the FlashAir card are few, but you should know:

  • Limited to 8 GBs of camera storage.
  • Class 6 speed.
  • Doesn't seem to change WiFi channels when in a network congested area. This affected performance in my testing. (It stayed on channel 6 even though two other access points in the area were using channel 6 too.)
  • Performs best for me when I use Raw + SM Jpeg on the OM-D.

Bottom line. I've just left it in my OM-D, especially when I'm on the go and want easy file transfer.

Story #2 - Personal Project - I'm a big fan of personal projects and encourage others to do them too. My current project is "Overpasses of I-5" that I wrote about recently on TDS. Even though we share these pictures with others in our community, the projects are designed for personal gratification. By focusing solely on a subject of interest to the photographer, we often try new things without worrying about what others will think. The upshot is often growth.

Story #3 Workshop reservation forms for the current batch of listed workshops are going out this week. I'm also accepting applications for an advanced workshop on March 22-24, 2013 to cover the Artisan Cheese Festival in Petaluma, CA. This is an "Event Workshop" where photographers will work every aspect of the event with me and receive bylines for their published photos. Two spots are open, course fees are $250. Write me at derrick@thedigitalstory.com to apply.

Listen to the Podcast

You can also download the podcast here (27 minutes). Or better yet, subscribe to the podcast in iTunes. You can support this podcast by purchasing the TDS iPhone App for only $2.99 from the Apple App Store.

Monthly Photo Assignment

The February 2013 photo assignment is Furry Friends.

More Ways to Participate

Want to share photos and talk with other members in our virtual camera club? Check out our Flickr Public Group. And from those images, I choose the TDS Member Photo of the Day.

Podcast Sponsors

Red River Paper -- Keep up with the world of inkjet printing, and win free paper, by liking Red River Paper on Facebook.

Make Your Photos Sizzle with Color! -- SizzlPix is like High Definition TV for your photography.

Need a New Photo Bag? Check out the Lowepro Specialty Store on The Digital Story and use discount code LP20 to saven 20% at check out.

Overpasses of Interstate 5

As I travel up and down the interior of California, I notice something different each trip. As the lighting shifts, colors change, and sky evolves, landmarks look different from day to day. One thing that remains constant are the solid, concrete overpasses that allow vehicles to traverse the Interstate without disruption.

Truck

As a way to occupy myself during my 450 mile journey, I photograph the overpasses as I approach and pass through. You may think that all of the shots would look the same. But they don't. And the simple designs of the overpasses complements a variety of landscapes and lighting conditions.

Passing Under

I think these would make an interesting series of big prints, so you could feel their impressive bulk. Maybe dedicate a wall of the studio to a series. Some viewers would be intrigued by them, and others would ask, "Why do you take pictures of overpasses?"

Green Trim


twitter.jpg Follow me on Twitter


Easy Photo Sequence Using Aperture 3

I created this photo sequence of Blake Griffin shooting a free throw using the "Sequence" preset in the print dialog for Aperture 3.4. It's an easy way to create these types of images.

Blake Griffin Freethrow Sequence Blake Griffin shooting a free throw. Image by Derrick Story

To create a sequence, select three photos in Aperture, then go to File > Print Images. When the print dialog box opens, select the "Sequence" preset. Your three photos will be placed as slices on a single sheet. You can fine tune their individual positions by clicking and dragging on each slice.

aperture_print_dialog.jpg

Click the "More Options" button in the lower left corner to reveal controls to create borders, add slices, and more. Once you have the image to your liking, click the Print button. In the next dialog, click on the PDF button in the lower left corner. Choose "Open PDF in Preview." Here you can export the image as a Jpeg.

The entire process just takes a minute or so, but the results are terrific!

Aperture Tips and Techniques

To learn more about Aperture, check out my Aperture 3.3 Essential Training (2012) on lynda.com. Also, take a look at our Aperture 3 Learning Center. Tons of free content about how to get the most out of Aperture.


The Digital Story on Facebook -- discussion, outstanding images from the TDS community, and inside information. Join our celebration of great photography!


instagram_ipad.jpg

Viewing the Instagram app on an iPad has been annoying at best. The notion of browsing photos in the iPhone-sized interface felt like a waste of real estate.

Now a better experience is available for iPad photographers. They can point their web browsers to instagram.com, then log in with their credentials. After doing so, their Instagram photo feed now makes better use of the iPad's larger screen. I tested the site on both my iPad mini and the full size iPad Retina display. What an improvement.

In addition to viewing the picture feed, you can comment and like the images too. If you want to view your profile, tap on your name in the upper right corner. Unfortunately, you can't add pictures via the web interface -- you still need the app for that. But it's certainly more fun looking at photography using the site.

I added an "Instagram Web" button to my iPad Home Screen by tapping the Share button in Safari and choosing "Add to Home Screen."


Join me on my Instagram site as I explore the world of mobile photography.

This week's stories: More tempting f/4 pro lenses. Do our high ISO camera bodies make these zooms the smart choice? A review of my day at Macworld/iWorld. What I'm recording right now in Carpinteria at lynda.com. Plus Photo Assignment winners!

Story #1 - Is f/4 Right for You? Both Canon and Nikon have recently updated their stable of pro f/4 lenses, with Nikon touting the The Nikkor 70-200mm f/4G ED VR and Canon released the 24-70mm f/4L IS USM. This has prompted many serious photographers to consider these lighter, less expensive alternatives to f/2.8 maximum aperture lenses, and for good reason.

The Canon 24-70 f/4 costs $1,500 and weighs 1.32 lb compared to $2,300 and 1.77 lb. Plus you get image stabilization with the f/4 model.

The Nikkor 70-200mm f/4G ED VR costs $1,400 and weighs in at 1.87 lb compared to $2,400 and 3.39 lb.

I personally own both the Canon f/4 and f/2.8 70-200mm zooms, and have found myself using the 70-200mm f/4 at least as often as the f/2.8.

With the improved high ISO performance of today's Canon and Nikon bodies, there are many situations where the f/4 models will produce fantastic results. You do lose that one stop of "soft depth of field," but other than that, these new f/4 models are worth considering, especially if the budget is tight.

Story #2 - My Day at Macworld/iWorld - I was able to attend Day 1 of Macworld/iWorld at Moscone West in San Francisco last week. The big thing that jumped out at me is that the event is really iWorld. The focus is on mobility with iOS hardware and apps. This is in-step with surging interest in iPads and the continued love affair with iPhones.

I covered the expo floor in about an hour. But I also enjoyed many of the live events upstairs and catching up with TDS members who attended, and of course tech friends I've known for years. All in all, it was an enjoyable day.

Story #3 - Recording at lynda.com - I'm in Carpinteria right now recording a new "iPhoto & Aperture" title. What's cool about this, is that we're using the absolute current versions of both apps, and showing how they stack up against each other for a variety of tasks. This is perfect for those considering moving up to Aperture from iPhoto. Plus, I show how to use the two applications together, drawing from the strengths of each.

Listen to the Podcast

You can also download the podcast here (27 minutes). Or better yet, subscribe to the podcast in iTunes. You can support this podcast by purchasing the TDS iPhone App for only $2.99 from the Apple App Store.

Monthly Photo Assignment

The February 2013 photo assignment is Furry Friends.

More Ways to Participate

Want to share photos and talk with other members in our virtual camera club? Check out our Flickr Public Group. And from those images, I choose the TDS Member Photo of the Day.

Podcast Sponsors

Red River Paper -- Keep up with the world of inkjet printing, and win free paper, by liking Red River Paper on Facebook.

Make Your Photos Sizzle with Color! -- SizzlPix is like High Definition TV for your photography.

Need a New Photo Bag? Check out the Lowepro Specialty Store on The Digital Story and use discount code LP20 to saven 20% at check out.

Want to capture the moment with a friend or your sweetie? Lauch Pocketbooth on your iPad or iPhone and snap an old time photostrip that you can post, email, print, of have delivered.

pocketbooth_ipad.png

This 99 cent app is like having you own portable photo booth with you everywhere you go. Enjoying a great night out? Launch Pocketbooth and record the moment. You can use a number of effects including B&W, 1975, Antique, Color, and Sepia. Plus there are 9 more that you can purchase in-app.

You can use the front camera if you're taking the portraits yourself, or the back-facing camera if someone else is operating the photo booth. Other options include number of photos in the strip and border style.

Once you've captured the series, ala flashing light warning from the traditional photo booths, you can post the series on Facebook, Twitter, share via email, save to your camera roll, send to an AirPrint printer, or order a traditional photo output to be mailed to you. Current special price is $1.99 per strip.

Might be fun if you go out for Valentine's Day...


twitter.jpg Follow me on Twitter


For the Dec. 2012 Photo Assignment, TDS shooters left their shutters open. See for yourself in our gallery, Long Exposure. And which one will be the SizzlPix Photo Assignment Pick of the Month?

mark_houser_pa_dec_2012.jpg

"This was taken with a Canon 7D around 30 seconds with an ND 10 filter," writes photographer Mark Houser. "My friend on the rock, Chris, agreed to remain motionless for 30 seconds. I think it turned out ok. I did have to bring out the details as I had some vignetting and knock down the sky a little. This was taken in the Linville Gorge in Western North Carolina." See all of the great images from this month's assignment by visiting the Long Exposure gallery page.


Participate in This Month's Assignment

The Feb. 2013 assignment is "Furry Friends." Details can be found on the Member Participation page. Deadline is Feb. 28, 2012.

Please follow the instructions carefully for labeling the subject line of the email for your submission. It's easy to lose these in the pile of mail if not labeled correctly. For example, the subject line for this month's assignment should be: "Photo Assignment: Feb 2013." Also, if you can, please don't strip out the metadata. And feel free to add any IPTC data you wish (These fields in particular: Caption, Credit, Copyright, Byline), I use that for the caption info.

Gallery posting is one month behind the deadline. So I'm posting Dec. 2012 at the end of Jan., the Jan. gallery will be posted at the end of Feb., and on and on.

Good luck with your Jan. assignment, and congratulations to all of the fine contributors for December.

Recent SizzlPix Winners

Hats off to our recent SizzlPix Pick of the Month winners.

  • September (Bokeh): Deborah Eves (golden apple)
  • October (Panorama): Nicholas Nieto (golf)
  • November (Flash): Jennifer Rhoades-Dannatt (bridal at zoo)


twitter.jpg Follow me on Twitter

-


Now Available! The Digital Photography Companion. The official guide for The Digital Story Virtual Camera Club.

  • 25 handy and informative tables for quick reference.
  • Metadata listings for every photo in the book
  • Dedicated chapter on making printing easy.
  • Photo management software guide.
  • Many, many inside tips gleaned from years of experience.
  • Comprehensive (214 pages), yet fits easily in camera bag.

Technorati Tags: , ,