Recently in Mobile

  Page 3 of 16 in Mobile  

iPad photographers are enjoying the best days ever. First, the release of iPadOS with improved Photos and file management. Now, the bar has been raised again with Pixelmator Photo 1.1.
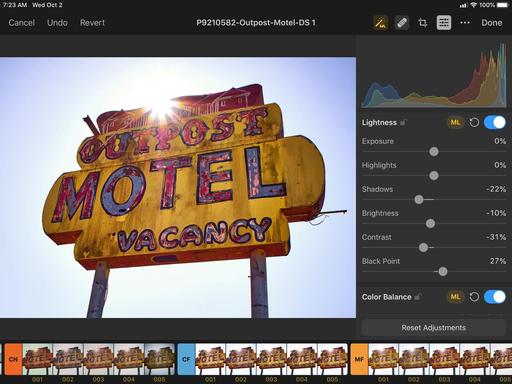
editing-mode.jpg Editing interface for Pixelmator Photo.

My recommendation is that you skip the trip to Starbucks this morning and spend your $4.99 on this app. It's full featured, powerful, fast, and it integrates seamlessly with Photos for iPadOS and iCloud Drive. Honestly, the workflow couldn't be easier.

Show Photos vs Show Files

If you're already using Photos for iPadOS, the Show Photos view is a natural way to begin. You control the view by tapping the "Show Files / Show Photos" link at the top of the interface.
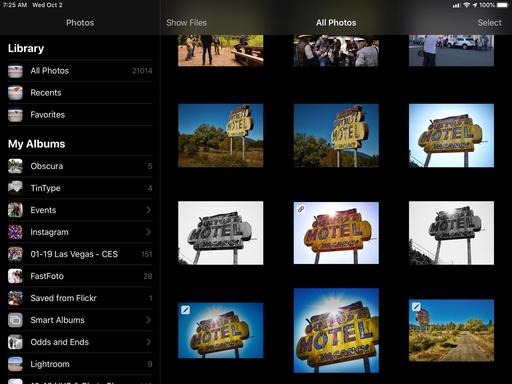
photos-library-view.jpg Show Photos view that lets you access your entire Photos library.

Pick an image, work on it with Pixelmator's excellent tools, then click the Done button. Pixelmator will ask you if it can modify the image in your Photos library. Give it permission, and it's updated. The edits are fully non-destructable, so you can return to the original at any time.

After a number of tests, this system worked very well. The image showed up as advertised in Photos, and if I wanted, I could continue working on it there using its adjustments such as Brilliance and Definition. A long-press on the picture would show me the original - how it looked before both the Pixelmator and Photos edits. Very nice.
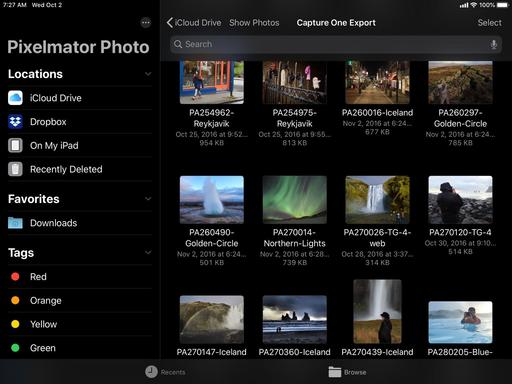
icloud-drive-view.jpg Accessing iCloud Drive in Show Files mode.

In Show Files mode, I can open any compatible image from my iCloud Drive, stored on the iPad itself (outside of the Photos library), or in Dropbox. This is more like the traditional: open a file > work on it > save it > and go back to browsing mode workflow. It's easy and straight forward.

Export Options

Regardless of where the image came from, you can export it using a variety of options. Just tap on the 3 dots (...) in the upper right corner of Pixelmator and choose Export from the popup menu.
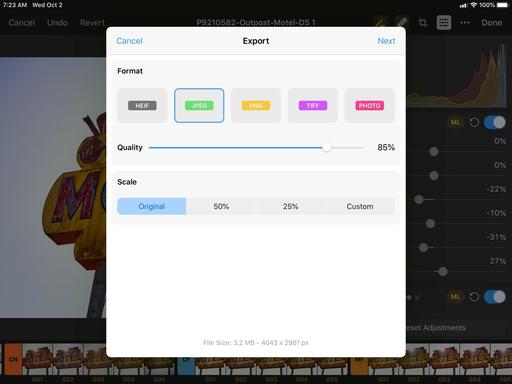
export-mode.jpg Exporting options in Pixelmator.

Lots of great options here. It feels like a real export dialog. I know that sounds funny, but I'm not used to these sort of things on my iPad mini. And I'm loving it.

I decided to open an image from my iCloud Drive, edit it in Pixelmator, then export it to Photos. Worked great. Lots of options here. Have fun.

Batch Processing

This is an unexpected and welcomed perk. Batch processing is one of those things that we think we need a computer for, instead of being able to depend solely on a tablet. For many jobs, that's no longer the case.
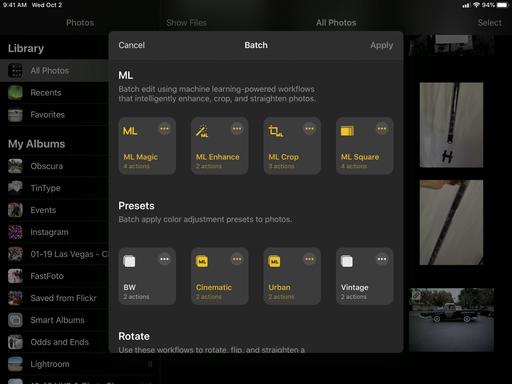
batch-processing.jpg Some of the Batch Processing presets.

Get started by tapping on Select on browsing mode. Choose the pictures that you want to batch process, then tap on Batch. You have a number of presets to choose from including machine learning enhance, cropping, visual presets, rotating, straightening, and file format. The presets with three dots (...) allow you to customize them. Once the batch has been run, you can save the images or share them with all of the usual options.

Image Editing

The first thing that I liked about the image editing tools was that I could use my Apple Pencil for everything. Not only is this fun and precise, it feels much more professional than using the Healing Tool with my finger.
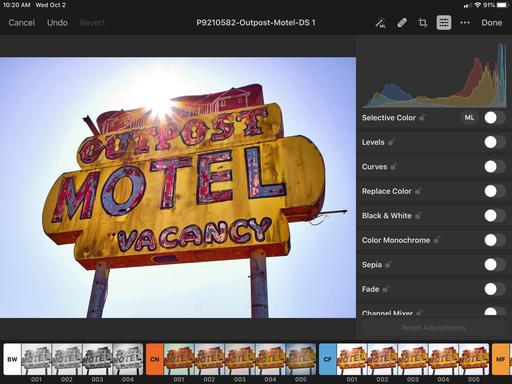
more-editing-tools.jpg Just a few of the editing tools in Pixelmator.

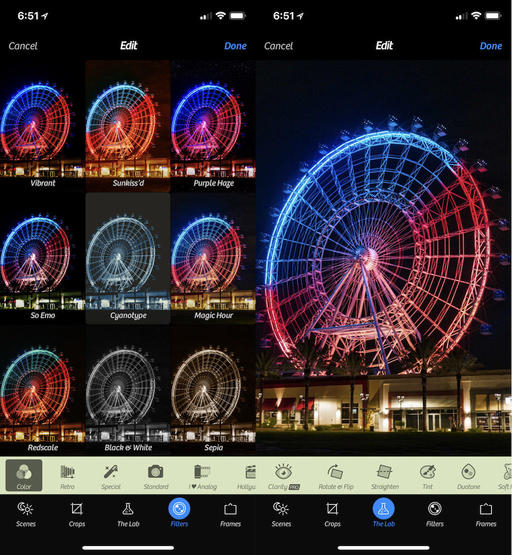
There are editing tools for just about everything you would want, including adjustments for tone, color, sharpening, vignette, healing, cropping, and machine learning auto correct. There are also a bounty of presets divided into categories such as Black & White, Cinematic, Classic Films, Modern Films, Landscape, Vintage, Urban, Night, and all the presets from Pixelmator Pro. And you can create custom presets as well.

The workflow is non-destructive. And if you start by working on an image from your Photos library, you can seamlessly bounce back and forth between the two environments, taking advantage of the best tools from each app. It really couldn't be easier.

The Bottom Line

If you're running iPadOS and love photography, run don't walk to the App Store and buy Pixelmator Photos for $4.99 before they come to their senses and charge what this app is really worth, which is at least double the asking price. Highly recommended.

You can share your thoughts at the TDS Facebook page, where I'll post this story for discussion.
First Look at Editing Photos in iPadOS

One of the reasons that I upgraded from the iPad mini 2 to the 2019 version was to be ready for iPadOS and the redesigned Photos app. And after my preliminary testing, I can tell you that I'm not disappointed.

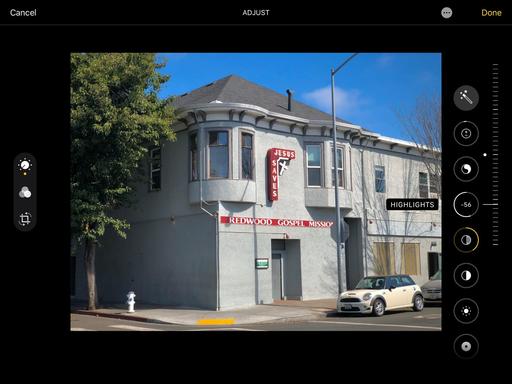
IMG_0033.jpg Highlights adjustment in iPadOS

There's a lot to unpack in iPadOS, and even the Photos app is worth a few articles itself. But I thought that I should start with the new editing tools, since that's what many of us have been waiting for.

New Adjustment Sliders

The interface is redesigned. It's clean and easy to navigate. When you enter Edit mode, you have adjustment categories on the left side: Adjustments, Filters, and Cropping. When you click on a category, the tools appear on the right side. Click on Adjustments, for example, the the following tools are available:

  • Auto
  • Exposure
  • Brilliance
  • Highlights
  • Shadows
  • Contrast
  • Brightness
  • Black Point
  • Saturation
  • Vibrance
  • Warmth
  • Tint
  • Sharpness
  • Definition
  • Noise Reduction
  • Vignette

Next to each tool, there's an adjustable scale that allows you to apply the effect in the desired amount. With Auto, you can move the scale up and down to fine tune the appearance of the image. So it's no more "all or nothing" for Auto.

Having the additional adjustments are welcomed. I can perform many of the basic edits that I need in the Photos app, which wasn't the case before. And the quality of the adjustments are quite good.

A Few Missing Pieces

There are still a few missing pieces, however. I would love a Retouch brush for simple spot removal. I'm happy to have Vignette, but I wish I could control its shape as well as the amount applied. At the moment, it's just amount. And Apple has abandoned the B&W tools. I loved those.

There is some compensation for taking away the B&W panel by making the Filters amount adjustable. So I'm no longer stuck with just Mono, for example, I can apply the filter at different percentages. But it's still not the same as the excellent B&W panel that we once had. Gone are Intensity, Neutrals, Tone, and Grain. Maybe they will come back some day.

Beefed Up Cropping Tool

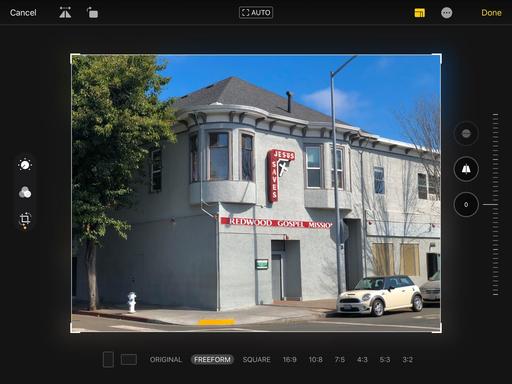
IMG_0034.jpg The Crop tool in iPadOS Photos.

The Crop tool now supports vertical and horizontal transform tools. We have flip and rotate. And the Auto correct is now an option and isn't automatically applied.

Filters Are Now Adjustable

Apple didn't add any additional filters. But as I mentioned earlier, all of the existing ones are now adjustable from 0 percent to 100 percent. This definitely makes them more useful.

Edits Saved to iCloud

Once I tapped the Done button in Photos, my edited image was uploaded to iCloud and shared across my devices, including the Mac that is running Mojave. On the iPhone running iOS 13.1, I could see the individual edits in the Photos app. On the Mac, the picture had been enhanced, but no sliders we modified. I'm guessing that that will change with Catalina.

Bottom Line

The new Photos app on iPadOS is a substantial improvement over its predecessor. I really like it now. And I hope Apple continues with its evolution.

I will cover more aspects of Photos and iPadOS in upcoming articles.

You can share your thoughts at the TDS Facebook page, where I'll post this story for discussion.

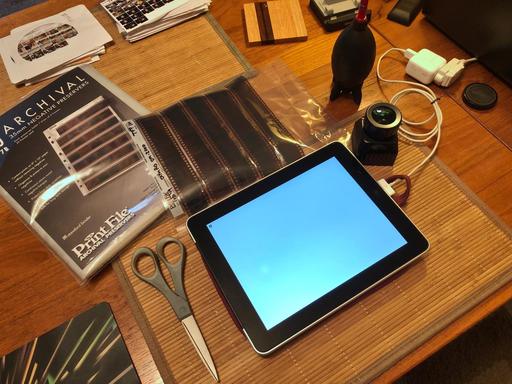
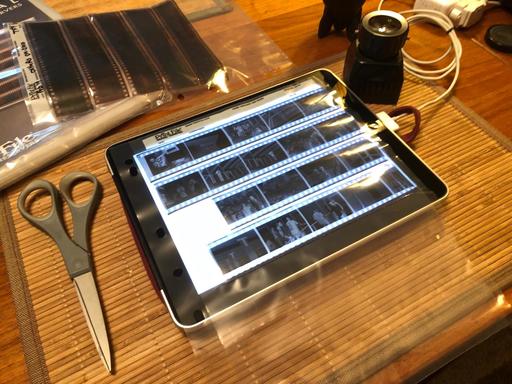
I have a traditional lightbox anchored at the studio that I use for viewing slides and negatives, and sometimes product photography as well. It's big, bulky and works great. But sometimes I want to work in other places as well. And in those instances, the iPad makes a great light source.

IMG_5194.jpg

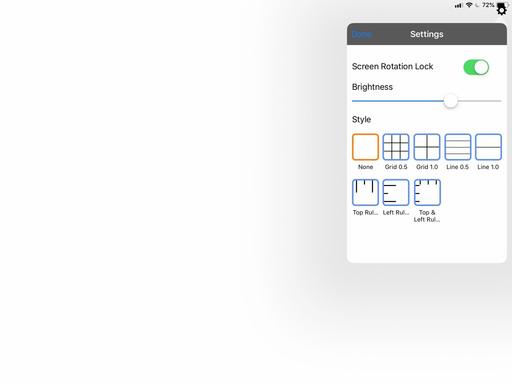
There are several apps you can use to enhance this experience. I like Light Box - Illuminator Viewer that I bought a while back for 99 cents. It keeps the screen lit without the iPad going to sleep, and makes it easy to adjust brightness. Plus it has some cool grids available as well that I've used for product shots.

IMG_0029.jpg The 99-cent app, Light Box - Illuminator Viewer

Different iPad Resolutions

I have the original iPad that was released in 2010. And yes, it still works great. I use it for sleeving negatives and organizing slides. Because it isn't a retina display - only 1,024 x 768 pixel at 132 ppi - it isn't as good for critical viewing of negatives and slides via a loupe because you can see the pixels of the screen itself when magnified.

IMG_5196.jpg

It's great for sleeving negatives, however, because the illuminated surface is the exact width of 5 frames, which is the length that I cut my negative strips. And if I want a closer look with a loupe, I can certainly do that as well.

If you're going to spend a lot of time with the loupe, then you'll probably want to use a tablet with a higher resolution screen. My iPad mini 5 display has 2048 x 1536 resolution at 326 ppi, and it's great for examining image detail with a magnifier. The pixels aren't an issue.

So it really depends on what you're going to do and the needs you have. I actually use both devices for my work, and I have the Light Box app on each iPad.

Other Illuminating Uses

The iPads also make great light sources for product photography. And because we're just talking about continuous light output, the resolution doesn't really make a difference. Just position the iPad like you would any softbox and fire away. You can even use your smartphone as the camera (why not?) to complete the super mobile studio.

I also use the older first gen iPad as an illuminated platform for product work. For a high tech look, I sometimes use the Grid 1 in Light Box. It looks pretty cool.

Bottom Line

The continuous, adjustable illumination from a tablet can be used in many ways. I find it interesting that I leverage the iPad for traditional film work all the way to a modern photo studio. And the fact that a 9-year-old device is still productive today just makes it all the better.

You can share your thoughts at the TDS Facebook page, where I'll post this story for discussion.

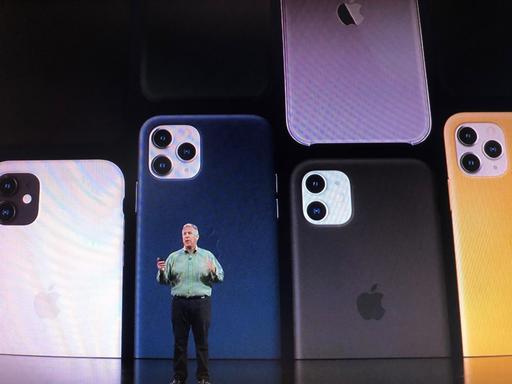
By the time Tim Cook and Phil Schiller took the stage on Sept. 10, 2019, most of us knew that the latest iPhone wouldn't support 5G connectivity. We had seen the pictures of the third camera, however, so it was time to learn about some of the details. And for the most part, they were quite good.

IMG_5184.jpg

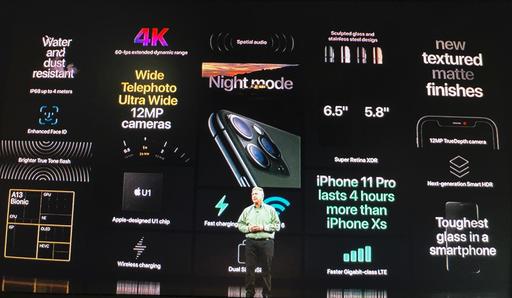
The bottom line is, if you like smartphone photography and videography, then you're probably going to love the iPhone 11 Pro and Pro Max. They are computational photography beasts. Starting with the A13 Bionic processor, adding a third camera that covers ultra wide (13mm equivalent f/2.4 5-element optic that provides a 120 degree field of view), and topping it off with a beautiful Super Retina XDR screen, iPhone 11 Pro has some serious game for picture lovers.

IMG_5182.jpg

Other noteworthy enhancements include night mode, beefed up battery life, and a few imaging tricks including Deep Fusion, which Phil Schiller gushed as, "computational photography mad science."

As Macworld more calmly described it: "It's Night Mode on steroids. When snapping pics in low to medium light, the AI engine will snap 9 images - 8 images before the shutter is snapped and then a long exposure shot when the button is pressed - to get every possible exposure. Deep Fusion will then examine every pixel to optimize the shot for detail and noise, creating the best possible photo."

IMG_5191.jpg

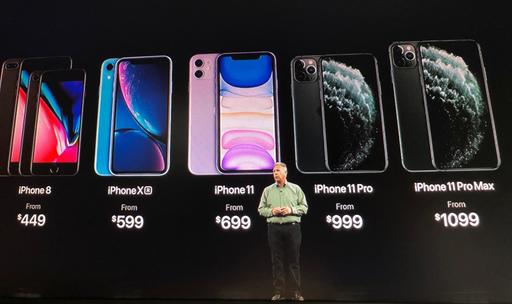
Pricing is about what one would expect, with iPhone Pro starting at $999, and iPhone ProMax weighing in at $1,099. If you're fine with just two cameras and more modest features (probably not many in this audience), then the regular iPhone 11 starts at just $699.

The big question for many of us is: do we want to hitch our wagon for the next 2-3 years to a smartphone without 5G? Unless you're the type to upgrade every year, the prospects of entering 2021 without a 5G phone that you're still paying for is worth thinking about.

If 5G isn't an issue for you, however, and you just love the thrill of computational photography, then the iPhone 11 Pro is a tempting device for sure. And I'm sure the images it produces will look great on that new Super Retina XDR screen.

You can share your thoughts at the TDS Facebook page, where I'll post this story for discussion.

We've all experienced this. You're out in the world trying to load a web page on your smartphone, and you get the message: "Server not available." Here's the fix that works practically every time.

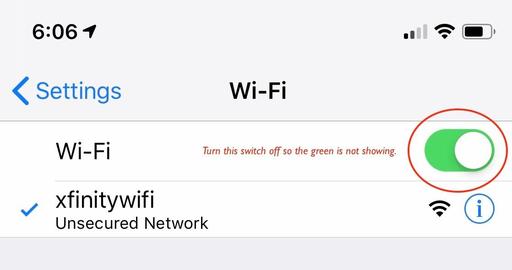
Turn off your WiFi.

That's right. Our mobile devices are adept at grabbing any network that happens to be in our vicinity. That's great, except that often those options are not functional for us. Even the pervasive Xfinity WiFi is a hit or miss option. So you've hitched your wagon to a horse that's going nowhere.

Since our phones tend to give WiFi priority over cellular, our connection to a funky WiFi network often leads to, in reality, no connection at all - except that we don't realize it. So we can't load that web page or access that service, and we don't know why.

turn-off-wifi.jpg Sometimes you need to turn off WiFi for better connectivity.

On an iPhone, go to Settings > WiFi and turn it off via the top slide button. This forces your phone to use the cellular network, and your web page or online service should now load seamlessly (granted that you do have cellular connectivity in that location).

Once you're done with the session, remember to turn WiFi back on, so it's available when you return home or to a useable connection.

You can share your thoughts at the TDS Facebook page, where I'll post this story for discussion.

Better Image Importing in iOS 12

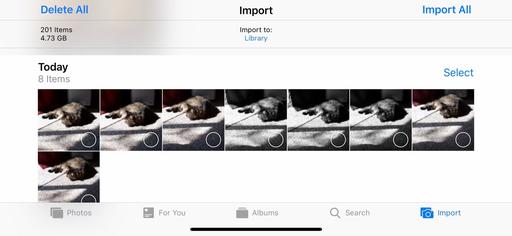
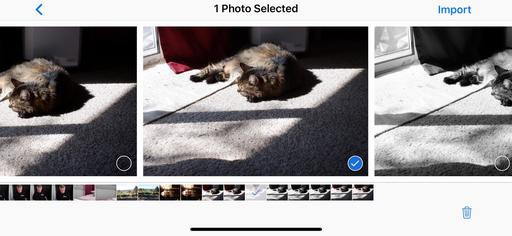
Apple fixed one of my most frustrating nits with importing images from a camera card to my iPhone: those tiny thumbnails.

IMG_3272.jpg Tiny thumbnails on an iPhone.

In previous versions, it was difficult to tell which shots I wanted, and those I did not, because I had to make decisions based on thumbnails too small to tell.

Now, I can pinch-zoom on any of the images to unlock a bigger view to make it easier to decide which ones I want, and those that I don't.

IMG_3273.jpg Relief! Bigger views of my images.

This improvement has made it far more fun to bring in images from my mirrorless cameras, then incorporate them into my Photos workflow.

I'm still learning iOS 12. But at the moment, this is my favorite photo improvement.

The Apple Photos Book for Photographers, 2nd Edition

Updated for macOS High Sierra, the The Apple Photos Book for Photographers, 2nd Ed. provides you with the latest tips, techniques, and workflows for Apple's photo management and editing application. Get your copy today!

You can share your thoughts at the TDS Facebook page, where I'll post this story for discussion.

iPhone X in New York City

IMG_2486.jpg

This was a crazy trip from the start. Zach and I caught a red eye flight to JFK from San Francisco on Saturday night. Then we bused in to Midtown at 6 AM and were planning our day an hour later hunched over coffee at the McDonalds across from the New Yorker. Things never slowed down from that point.

I knew that this was going to be the ultimate Nimble Photographer trip. I had my laptop and Micro Four Thirds kit stashed in my backpack. But from the minute we checked in, until I caught the red eye back home 3 days later, my bag stayed in the room, and it was just Zach and I on the streets of New York.

Kids and Pigeons, Central Park "Kids and Pigeons, Central Park" - iPhone X. Processed in Photos for macOS and Luminar 2018. Photo by Derrick Story.

This is precisely the situation that motivated me to spend the extra money for the iPhone X last year. With temperatures hovering around 90 degrees F and high humidity, neither of us wanted to carry a bag of any type. Our kit for the day were shades, wallet, and smartphone.

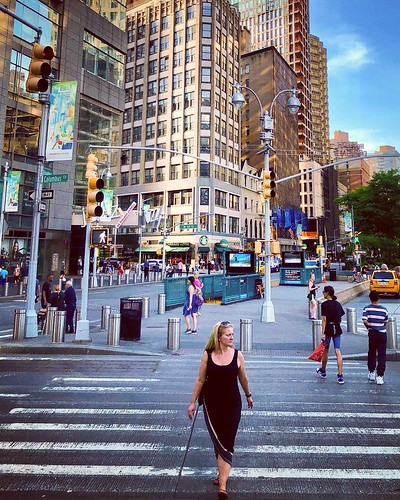
Columbus Circle
"Columbus Circle, NYC" - iPhone X. Processed in Photos for macOS and Luminar 2018. Photo by Derrick Story.

The thing about it was... I was in NYC, one of my favorite places for street photography. So I wanted to be able to capture the world as we maneuvered through it. And the dual-camera iPhone allowed me to do just that.

I worked quickly and without drawing attention to myself. Zach and I kept our pace as we worked through our ToDo list (he's getting settled for a Summer internship with the NBA), while I also recorded images of us, New York City, and the people who make it interesting.

Inside Out
"Inside Out, Time Warner Building" - RAW file captured with iPhone X. Processed in Photos for macOS and Luminar 2018. Photo by Derrick Story.

I did process most of the images on my laptop once we returned to the hotel. I used Photos for macOS (the images were there waiting for me thanks to iCloud) and Luminar 2018. The changes were saved back to all my devices for sharing on social.

I could never be limited to a smartphone for all of my photography. Just like I could not survive with just a Phillips head screwdriver in my toolbox. But for this whirlwind trip to New York, the iPhone allowed my to stay focused on my son, yet come home with many wonderful visual memories.

After the second red eye home, I'm a little bleary-eyed today, but very happy.

New Photos for macOS High Sierra Training!

Is it time for you to learn the ins and outs of the latest version of Photos? Take a look at Photos for macOS High Sierra Essential Training on LinkedIn Learning, or on lynda.com. Maximize your iPhone photography and complement the work you do with your mirrorless cameras as well. You'll love your cameras even more...

Also be sure to check out my new book, The Apple Photos Book for Photographers, 2nd Edition. It's completely up to date!

You can share your thoughts at the TDS Facebook page, where I'll post this story for discussion.

I read the announcement about Camera Plus 2 on DP Review and decided to give it a spin. I had been a big fan of the original, and thought the new version might be good for RAW capture with my iPhone.

camera-plus-2-tds.jpg

After an evening of testing, I do like the updated interface. I had no problem controlling my captures and getting the results that I wanted. As for RAW photography, as long as I shot RAW+Jpeg, the images showed up perfectly in Photos on my Mac. They appeared as RAW+Jpeg pairs with the Jpegs on top - the same way images come in from my Olympus and other interchangeable lens cameras.

If I shot the RAWs and Jpegs as separate files, however, there appears to be a bug where the RAW comes in as a thumbnail only. My guess is that this will be fixed soon. But in the meantime, I would stick with RAW+Jpeg as a combined file for Mac photographers.

All the other features worked great (including the wonderful editing interface). And for a one-time fee of $2.99, this app is a gem. I'm going to continue to test it during my assignment in Orlando. If I discover anything new, I will update here and on social.

New Photos for macOS High Sierra Training!

Is it time for you to learn the ins and outs of the latest version of Photos? Take a look at Photos for macOS High Sierra Essential Training on LinkedIn Learning, or on lynda.com. Maximize your iPhone photography and complement the work you do with your mirrorless cameras as well. You'll love your cameras even more...

Also be sure to check out my new book, The Apple Photos Book for Photographers, 2nd Edition. It's completely up to date!

You can share your thoughts at the TDS Facebook page, where I'll post this story for discussion.
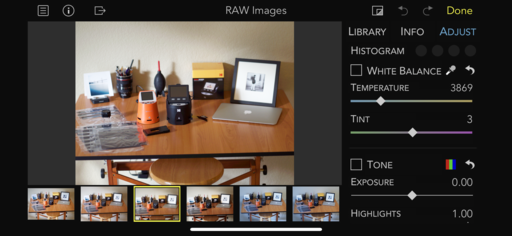
There was a time when working with RAW files in a mobile device seemed like a crazy idea. But the processing power of today's handsets like my iPhone X has made this proposition quite feasible. And one of my favorite apps for this task is RAW Power 1.1, just released from Gentlemen Coders.

raw-power-update.PNG RAW Power 1.1 on an iPhone X.

RAW Power brings to iOS the impressive RAW decoding and editing that was formerly only available in Apple's Aperture professional photo application. Using adjustments like Boost, you can improve your images using this powerful core technology. It works great for Jpegs as well. Here's what's new in 1.1:

  • New "RAW Images" Smart Album and ability to filter any album to show just RAWs
  • View complete folder and album hierarchy
  • Export images to Files.app as TIFF-8 and TIFF-16, JPEG, and PNG
  • DPI and Compression preferences
  • Delete image in the single photo view ("1-up")
  • Greatly improved Share features
  • Improved Layout and UI with larger controls
  • "Gear Down" sliders for 10x more precision when adjusting
  • 3D Touch in 1-Up
  • Full-size Curves adjustment in vertical screen mode
  • Show / Hide Thumbnails in Edit
  • Adjustable Thumbnail size in 1-up and Edit
  • Auto-histogram shows and hides itself to avoid covering the image
  • Revert Image feature greatly improved
  • Re-center button for Map

The improved user interface and the clever RAW Images smart album show that Gentlemen Coders is now focusing on our visual experience using the app as well as its under-the-hood muscle. You don't need an iPad to process and enhance your RAW files. I've been taking care of business right there on my iPhone X.

library-mgmt.PNG

RAW Power 1.1 is free to download in the iTunes App Store on your device. I recommend purchasing the one-time in-app purchase, Advanced Adjustments Pack for $4.99 that unlocks Curves and a couple other controls. This software is a great value and a joy to use.


Nimble Photographer Logo

RAW Power 1.1 has a high Nimbleosity Rating. What does that mean? You can learn about Nimbleosity and more by visiting TheNimblePhotographer.com.

Want to Comment on this Post?

You can share your thoughts at the TDS Facebook page, where I'll post this story for discussion.
I've been on the road for a week now. And having moved from one island to another with lots of exploration along the way, how does the iPhone fit in with the rest of the gear I've packed?.

beach-bike-1024.jpg Beach Bike - iPhone X back dual camera 6mm f/2.4 - Photo by Derrick Story

As it turns out, the iPhone plays quite nicely with the other kids, but not in the ways that you might think. First, it has been a wonderful reference camera. In other words, if I'm shooting a scene with the Leica Type 109, then I also record it with the iPhone to capture the location data so that the Leica images are organized correctly in the Photos library.

rock-stacks-leica.jpg Cairns on the Manoa Falls Trail. (Gaelic for heap of stones.) Leica D-LUX. Photo by Derrick Story.

For example, I know that I captured the image of the cairn on the Manoa Falls Trail because I have an iPhone image with a similar timestamp and the location data. Speaking of timestamps, it's imperative that all the cameras are in sync for this system to work. So in essence, the iPhone becomes my journal for all the photographs I capture, regardless of which camera I use for the final image.

I've also been transferring shots from all the cameras to the iPhone via WiFi for social sharing. The images you've seen over the last week on Instagram were recorded with other cameras. I've been shooting RAW+Jpeg, and I love the flexibility of being able to share any photo, from any camera, online virtually from anywhere. And the iPhone is the hub that makes it all work.

I'll also use it to document my film project, which starts this week. So anything that I shoot with the 35mm Contax, gets recorded with the iPhone, and organized in a journal with notes about the subject. I've been using Day One as my journal app for nearly two years now, and I love it.

I do take the occasional final picture with the iPhone itself. It's inconspicuous and handy. But with all the great gear that I get to use for work, my smartphone is more of a facilitator than it is the star of the show.

You can share your thoughts at the TDS Facebook page, where I'll post this story for discussion.