September 2006 Archives

maui_diver.jpg

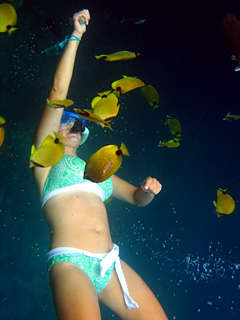
What better place to test the Canon SD700 IS with its $160 underwater housing than in Maui? I caught an early morning Catamaran to the reserve at Molokini and spent the next 3 hours snorkling in beautiful 74 degree water that had about 20 feet of visibility, if not more.

I was very impressed with how easily I could work the controls on the WP-DC5 housing. I used the "underwater" selection from the scene modes and fired away. I could use Canon's bright 2.5" LCD to frame the shots about half the time, depending on the angle of the light from above. Sometimes, the glare and reflection off the housing would wash out the LCD, and I'd just have to guess while lining up a shot. Some of those guesses, however, turned out great.

I also shot topside with the SD700 still in the housing. Those images also turned out well, with no detectable degradation from the camera being inside the housing. This makes the SD700/WP-DC5 combo useful for all sorts of inclement weather, not just underwater.

The housing is rated to 130 feet. I never dove beyond 20 feet, so I can't vouch for the housing's depth rating beyond that. My only complaint was that my right thumb once changed the scene mode from "underwater" to "movie" without me knowing until many minutes later. The dial is positioned where I normally rest my thumb while pressing the shutter button.

Other than that interesting movie digression, I was very satisfied with the results. The shot included here was captured near the reef in Turtle Town, not far from Molokini.

Technorati Tags: ,

David Shough Takes the Lensbaby Challenge

David Shough Photo

"I've been following and enjoying your podcasts, and you are usually right on the money with your advice and observations," said David Shough.

"But I have to disagree with you regarding the Lensbaby lenses. It's an awesome tool... I use it nearly every shoot (studio, product, and weddings). The reason a lockable Lensbaby is so appealing is that is lets you shoot with long exposures, as well as giving you a way to get repeatable studio shots. At less than $300, it's a steal. I'll be getting one soon."

Well, David, I'd say you rose to the Lensbaby challenge admirably. This shot of a bride's ring is quite powerful. And now I can say that I've seen a great shot made with a Lensbaby. Well done!

Technorati Tags:

Lensbabies 3G Now with Locks... But Why?

lensbaby.jpg

I was just reading about the new Lensbabies 3G that have mechanisms allowing the user to lock the devices in any position. They look a bit like a lunar landing module, don't they? The locking device does seems like a nice convenience, but I certainly won't be rushing out to buy one.

Why? Have you ever noticed that you see people using Lensbabies to take bunches of pictures, but that you rarely see the results? This certainly has been my observation. Yes, it does look fun to use. But how many useable pictures do you really get? Especially when you consider that Lensbabies 3G cost $270 US. That's a hefty chunk of change.

So here's what I'm thinking. If you have a great shot captured with a Lensbaby, send it to me. I'll take the best of the bunch and post it as a grab shot. I'd like to be proven wrong about this. But as things stand now, I see them more as expensive toys rather than creative tools. What do you think?

Technorati Tags: ,

Grab Shot 63 - Alpha Goose

alpha_goose.jpg

"On my way back home from work, I stopped my bike and shot few pictures of three birds flying after that deltaplano (no idea what you call it in english)," said Nish. "They took him for the Chief! They kept flying wing to wing for almost 10 minutes."

Nish captured this shot with a Canon PowerShot A530, 1/400th at f-5.5.

If you have an interesting candid you'd like to share, take a look at our Submissions page, then send us your Grab Shot. If we publish it, you'll receive an ultra cool custom carabineer keychain.

Technorati Tags: , , ,

sky_dish.jpg

Are you a photographer in search of money? Sounds like an ad you'd find in the back of a trade magazine. But many serious shooters could use a few extra dollars to upgrade their equipment and pay for incidental expenses associated with their photography.

In this podcast, I talk about my own money making adventures plus tips I've gathered from other shooters. Here's the deal: if you only need to augment your income with photography, chances are good you'll be successful. If you want to generate all of your income with a camera, you'll probably have a rougher road to travel. That isn't to say that you can't make your living with photography. With enough talent, luck, and determination you can. But this show is more about adding income to your day job through photography. I think this is a great way to test the waters. Listen in and see if this discussion stirs your creative business juices.

Listen to the Podcast

Now that I've piqued your curiosity, it's time to listen to today's audio show titled, "Money Making Tips." You can download the podcast here (28 minutes).

Technorati Tags: , ,

Aperture 1.5 Ups the Ante

aperture_announce.jpg

Bang bang! First Adobe shoots out Lightroom Beta 4, then Apple drops the Aperture 1.5 bomb. I would say that Apple has surprised a lot of people with new functions such as Flexible Library Management (managed library or reference files), XMP sidecar files for exported images, and luminance-based sharpening.

There are lots of little goodies too, such as drag and drop Jpegs out of your Aperture library, Apple Remote capability for Aperture presentations, iPod syncing, iLife integration, and third-party plug-ins. Hmmm, maybe those aren't so little after all. And the really good news is that this update is free to current Aperture owners, and should be available via Software Update on Friday.

You might want to read Ben Long's First Look at Aperture 1.5 on CreativePro.com. He's spent some time with the app and has a good feel for its features and performance.

Technorati Tags:

Lightroom Beta 4 is Worth the Download

lightroom_beta4.jpg

Adobe announced the release of Lightroom Beta 4 today at Photokina. This version is a substantial update for both Windows and Mac users. I've been testing various builds of Beta 4 on a Mac since the Iceland Lightroom Adventure, and I can tell you from experience, that it's worth the download.

Of all the new features, and there are plenty, take a look at the Develop module in Beta 4. New tools such as Fill Light are some of the most photography-friendly and useful image processing controls I've ever used. I really like refining my pictures with Develop in Lightroom.

One word of caution however... Lightroom is still under development itself. And the team has been very candid about the fact that things will change between the betas and final release. So don't get too married to features, and keep in mind that work you do in the beta version may not carry over to the final release -- Beta 4 included. This is for testing and enjoyment only.

That being said, whether you're on Mac or Windows, Beta 4 is a substantial move forward for Lightroom. You might want to take a look at it.

Technorati Tags: , ,

Grab Shot 62 - Coyote

coyote

"This shot was taken on an early summer day in Rocky Mountain National Park in Colorado," said Scott Elias. "As you can tell the coyote is still a bit scruffy from his winter coat."

"It was a gray, overcast day so we decided to do a shorter trail from the Bear Lake Trailhead up to Dream Lake. Since rain (or snow!) was a possibility, I decided not to bring my Digital Rebel on the hike. All I had was my trusty old Canon G1."

"Good thing, too, since as soon as we got to Dream Lake (only a mile from the trailhead) it started to thunder. We practically ran back down the trail to get back in the truck and decided it would be best to head into Estes Park for lunch and a nap. On the way down from Bear Lake, this guy wandered lazily onto the road in front of us. Since I didn't have a long zoom, I had to get pretty close for a decent shot. I stepped out of the truck keeping the door open between me and the coyote, steadied the camera in the window frame, and squeezed off this shot before he bolted back into the forest."

If you have an interesting candid you'd like to share, take a look at our Submissions page, then send us your Grab Shot. If we publish it, you'll receive an ultra cool custom carabineer keychain.

Technorati Tags: , , ,

Drool Factor: The Seitz 6x17 Digital

Seitz 6x17 Digital

This one is just for the dreaming of it... a high resolution 6x17 (160 million pixels - 7,500 x 21,250 resolution) digital camera that records shots in just one second. Impossible? No says Seitz, the maker of this amazing device.

The image sensor was developed by DALSA Corporation exclusively for Seitz. It has very high sensitivity and broad ISO range: 500-10,000, high image quality thanks to 48-bit color depth, low noise, high dynamic range, DALSA anti-blooming feature, Seitz image optimization algorythms, and you have the freedom to use your own raw-conversion workflow. It accepts world-class Schneider or Rodenstock large format lenses (on Seitz lens board) or Linhof Technorama, Fuji and other large format lenses (on adaptor plates). Bottom line, you get a gigantic digital panorama at nearly the speed of many "regular" digital cameras.

The price? It's big too. The Seitz 6x17 Digital will set you back 28,900 Euros (that's about $36,800 American). Oh my...

Technorati Tags: ,

QuickTip: Make a String Tripod

digicam_tile.jpg

Here's a trick that only requires a 1/4" bolt and some sturdy string. The result? A super portable tripod that helps you steady your camera up to 2-f/stops of light or more! Call it a poor man's image stabilizer.

First, take a sturdy length of string and create a loop at one end big enough to slide your foot into. Then determine the length your need to hold the camera up to your eye. Attach the 1/4" bolt to the other end of the string at the proper length. You're now ready to shoot.

Slide your foot through the loop, attach the bolt to the camera's tripod mount socket, and pull the camera upward until the string is taut. You'll be amazed at how steady you can hold the camera as you gently squeeze off a shot.

Normal acceptable handheld shutter speeds are 1/30th of a second. With the string tripod, you should be able to shoot all the way down to 1/8th of a second. Give it a try!

Technorati Tags: , ,

Grab Shot 61 - Groovy Metal Ramp

Groovy Metal Ramp

"I'm drawn to texture wherever I travel," said Jane Lang. "This shot was taken at the Rockport harbor in Maine. The situation started out less than pleasant. The keys got locked in the car, and while we were waiting for the key savior to arrive, I roamed off with my trusty Canon Rebel XT and came upon this groovy metal ramp leading down (low tide) to a dock. I was struck by the geometric form and its unexpected presence in this haven of natural beauty."

Jane used a Canon Rebel XT set to 1/250th at f-13. ISO 400 and focal length at 34mm.

If you have an interesting candid you'd like to share, take a look at our Submissions page, then send us your Grab Shot. If we publish it, you'll receive an ultra cool custom carabineer keychain.

Technorati Tags: , , ,

sandisk_extreme3.jpg

Some things you just have to learn by experience. In this week's show, I share tips from working pros who can't afford to miss a shot. These gems are invaluable for all photographers, because let's face it, none of us want to miss an opportunity to make a great photograph.

Also, I want to note that this is the 50th Digital Story podcast. So fire up your iPod, put in those earbuds, and check out this sage pro advice I have to share.

Listen to the Podcast

Now that I've piqued your curiosity, it's time to listen to today's audio show titled, "Inside Pro Tips." You can download the podcast here (30 minutes).

See It in Person

If you're in Northern California on the weekend of October 7, stop by the Macintosh Computer Expo and sit in on my iPhoto 6 Tips and Tricks session. It's free, and I'll show you this tip plus lots of other cool iPhoto goodies. For those who really want to dig into some shooting techniques, stick around another day and sign up for my Digital Photography Made Amazing half day workshop on Oct. 8. But sign up early because seating is limited.

Technorati Tags: , ,

Add Voice Memos to Your iPhoto Library

Most compact cameras enable you to record voice memos to accompany photos you've just captured. To get the most out of this function, however, you want to store the audio with the appropriate image.

Unfortunately iPhoto doesn't let you add straight audio files to its library. There has to be an image attached the audio file. So the dream of having voice memos associated with your pictures is only that, a dream. Or is it? By using this easy technique and QuickTime Pro, you can include voice memos with your images in iPhoto.

After you've uploaded your pictures to iPhoto, leave the memory card mounted on your Desktop so you can examine its internals. This is where card readers have a real advantage over uploading your images directly from the camera. Find the audio file, usually with a .wav extension, and the corresponding image file. The two should have the same number in their file names.

find the wave file

Drag the photo on to the QuickTime logo on your Dock to open it in QuickTime. You're going to convert it into a movie by exporting it selecting File > Export then choosing "Movie to QuickTime Movie" under the Export pop up menu. Click the Options button and choose "Photo Jpeg" as your compressor and 640 x 480 as the size. After you hit Save, your image will become a QuickTime movie. Double-click it to open it

Now drag your camera's sound file to QuickTime to open it. You have two QuickTime movies open -- the converted photo and the audio file. Go back to your photo and go to Edit > Select All, then choose Edit > Copy. Your picture movie is now on the clipboard. Go back to your voice memo and choose Edit > Add to Selection and Scale. The photo movie is now added to your voice memo. You can listen to the audio by clicking the play button. (You need the Pro version of QuickTime to use this technique. You can upgrade on the Apple site for $29.95.)

color_accent_screenshot.jpg

You're almost finished. Now choose Save As and select "Save as self-contained movie." Give your movie a name and click Save. Drag your voice memo photo movie into the iPhoto album where the other photos are stored. Now, in addition to all of the still images, you have a descriptive movie to accompany them that explains the technique you used to capture them.

You can download a sample movie here. Try it. It's really cool.

Spot Color

What used to be an agonizing process in Photoshop, now only takes seconds using the "Color Accent" feature in the Canon PowerShot SD630, SD700 and their brethren. This is one of those gimmicks that you might pass by in the owner's manual without ever trying. My advice, if it's included in your camera, go try it now.

Color Accent works like this. First you look at a composition and decide what color to feature. Navigate to Color Accent mode, point your spot meter marker in the LCD viewfinder at the color, and press the appropriate button on your camera to "mark" it. Your camera notes that color. Now, when you take a photo, everything else in the composition turns to black and white, except for the items that contain the color you marked. You can even control the density of the color rendered right there on the LCD.

In the photo above, I marked the red of the ceramic canister holding the kitchen utensils. I also picked up some red in the tomato and apple. Everything else went to black and white -- all done in camera, and with a point and shoot at that. Now if I connected the camera to a direct print dye sub printer, such as my CP330, I can output a 4x6 inch spot colored photo without ever touching a computer or image editor.

I've been having a blast with Color Accent. It really gets the creative juices flowing. If you have this on your camera, give it a try. If you're shopping for one, this is a feature to look for.

Technorati Tags: ,

Camera Raw Sharpening

Almost every RAW file requires some degree of sharpening to counter the effect of blurring that occurs at some stage of image capture or image processing. But when do you apply the sharpening? In Camera Raw or later in Photoshop? The answer isn't as straightforward as you might think. In this excerpt from "Photoshop CS2 RAW", Mikkel Aaland shows you how to sharpen your images with confidence.

I worked with Mikkel on a chapter of Photoshop CS2 RAW, and have some images in there that I captured at Pt. Reyes. The entire book is good, and this excerpt on sharpening is particularly useful.

Technorati Tags: ,

Grab Shot 60 - Dune Hike

Dune Hike

"Our annual family vacation took us to Traverse City, Michigan. We have been going to this location for many years, but this year we decided to take a day trip to the Sleeping Bear Dunes National Lakeshore," said Brian C. Davenport.

"There were many photo ops here... almost too many. This shot keeps drawing me back. It's a photo from the Lake Michigan overlook, 450 feet above the lake. There's a small trail that leads down to the lake for brave souls who want to endure the hike. It takes about 15 minutes to get down to the lake, but about an hour climb back up... not for the faint of heart or unprepared hiker -- very steep incline. There were many warning signs around to that effect."

"As you can guess... there were many that were unprepared. Most ended up crawling on their hands and knees to make it back up. Those specks you see... are people trying to climb the dune."

If you have an interesting candid you'd like to share, take a look at our Submissions page, then send us your Grab Shot. If we publish it, you'll receive an ultra cool custom carabineer keychain.

Technorati Tags: , , ,

Canon G7

Among Canon's latest round of pre-Photokina announcements, they debuted the new Canon PowerShot G7. Its impressive features include: 10 MP sensor, 6X optical zoom (35-200mm equiv.), image stabilizer, 2.5" LCD, hot shoe, DIGIC III processor, custom white balance setting, and ISO 1600.

What's missing? No RAW mode and the viewfinder is mounted to the back of the camera no longer swinging out as in earlier G models. If you want RAW on a Canon camera, you have to move up to the Digital Rebel. I'd better understand this move if Canon were having a hard time selling Rebels. But that ain't the case. The PowerShot G7 is a sophisticated camera that should include RAW.

The Canon G7 should be available in October '06. No price was announced.

Technorati Tags: ,

Woz on a Segway

Woz on a Segway

I was hanging around the front of the Apple Media Event yesterday, taking some outdoor shots of the Yerba Buena Theater and all the goings on around it. Out of the corner of my eye I see Steve Wozniak, Apple Computer co-founder, approach on his Segway. I was able to quickly recompose the shot to capture Steve in the foreground zipping by with the all the Apple decor in the background.

I was shooting with a Canon Digital Rebel XT, ISO 100, 1/250 at f-9.5. Fortunately I was in Raw mode, which helped me tame the intense contrast of the scene later in Adobe Camera Raw.

As we've discussed before in our virtual camera club... always take your camera.

You can see more images here from the Apple Media Event

See It in Person

If you're in Northern California on the weekend of October 7, stop by the Macintosh Computer Expo and sit in on my iPhoto 6 Tips and Tricks session. It's free, and I'll show you this tip plus lots of other cool iPhoto goodies. For those who really want to dig into some shooting techniques, stick around another day and sign up for my Digital Photography Made Amazing half day workshop on Oct. 8. But sign up early because seating is limited.

Technorati Tags: ,

Grab Shot 59 - Flags of Honor

flags.jpg

"Five years ago, my youngest son and I were in Washington state on vacation" said Kevin Miller. "We received a call early in the morning from a friend back home in Las Vegas regarding the attack on the Twin Towers."

"To remember the events of five years ago, a local mortuary set up a memorial here in Las Vegas. A flag was posted for each victim from September 11, 2001. Accompanying each flag was a small plaque with the victim's name and in many cases, personal information is given as well."

"For those of us who are visual, to see a flag for each of the nearly 3,000 victims of the 9/11 attack is very impressive."

Photo taken with Canon 30D, Canon 24-105mm f4.0 L series lens set at 105mm. Exposure was f11.0 at 1/200 second with -.67 exposure compensation using aperture priority at ISO 100. Shot in RAW, processed in CS2.

If you have an interesting candid you'd like to share, take a look at our Submissions page, then send us your Grab Shot. If we publish it, you'll receive an ultra cool custom carabineer keychain.

Technorati Tags: , , ,

formal_group.jpg

Sooner or later, every photographer is asked to take a group shot. In this podcast, I explain the ins and outs of this type of assignment so you can get satisfying results every time. I've also publish a blog post titled, Tips for Great Group Shots that complements this podcast.

Listen to the Podcast

Now that I've piqued your curiosity, it's time to listen to today's audio show titled, "Great Group Shots." You can download the podcast here (32 minutes).

Photo of Larry Lessig speaking at an O'Reilly Conference by Derrick Story.

See It in Person

If you're in Northern California on the weekend of October 7, stop by the Macintosh Computer Expo and sit in on my iPhoto 6 Tips and Tricks session. It's free, and I'll show you this tip plus lots of other cool iPhoto goodies. For those who really want to dig into some shooting techniques, stick around another day and sign up for my Digital Photography Made Amazing half day workshop on Oct. 8. But sign up early because seating is limited.

Technorati Tags: , ,

Canon SD 700 IS

I'm researching an article on image stabilizers for compact cameras. I'm going to start out by testing the Canon PowerShot SD700 IS, which I should have in my hands within a week or so. But I would like to test other image stabilizer compacts too, and am interested in your comments about them.

If you have experience with any current image stabilizer compacts, or have one you recommend that I test, please post a comment. Also, I'm fascinated by the technology behind these cameras. So if you have any inside info on image stabilization, point me in the right direction.

I'll be sure to report back on what I find...

Tips for Great Group Shots

Group Shot

The two key components to great group shots are composition and lighting. Start with lighting. You could position everyone in the bright sun, snap a frame or two, and move on. But I doubt that your subjects will be thrilled with the results. Harsh direct illumination creates unflattering shadows and high contrast.

Diffused, even illumination will help everyone in the shot look their best. I often schedule group shots for early or late in the day to take best advantage of sweet light. Slightly overcast days are a blessing because nature creates a giant softbox in the sky for you. If conditions are less than ideal, use open shade from a tree or patio, then turn on your flash letting it serve as a fill light. Keep in mind, however, that you have to stay within the range of your flash, which is usually about 8 feet.

When composing the shot, position your subjects as close together as possible. People tend to stand too far apart, and this space between them is accentuated by the camera. I'll often position some of the subjects at a 45 degree angle to the camera. This creates variety in the composition and enables them to stand closer to others in the group. Before you snap the shutter, check everyone's hair and clothing to make sure nothing is out of place, then ask, "Can you see the camera? If you can't see the camera, it can't see you." Reposition as necessary.

Once you have a group shot you like, ask folks if they have a few more minutes for something fun. You can let them strike poses, lean against one another, try interesting angles such as you shooting up at them, or anything else that comes to mind. Often this will be the shot that they like the best, and it ends the session on an upbeat note.

Grab Shot 58 - Gone Wrong

Gone Wrong

Brian Davenport writes, "I have a request and a grab shot (kind of... actually, it really is a "grab" shot). My "The Digital Story" keychain really takes a beating, and it has malfunctioned. The click don't click... it sticks."

"Now I know I'm abusive to the poor thing. I carry alot of keys for my job. Any chance of another one? I am including evidence as a grab shot. Thanks for the great site and show."

My reply, "Hey Brian, would love to send you a replacement. And thanks for sharing your work with The Digital Story virtual camera club."

BTW folks, I hope to send out the next batch of keychains next week. Keep on shooting and submitting! (and Happy Friday).

Technorati Tags: , ,

Canon PowerShot SD630

The Canon PowerShot SD630 has all the bells and whistles that you'd expect from a quality 6-megapixel compact, and more... more ISO speed. Most compacts have a hard time controlling image noise above ISO 200. This is one of the compelling reasons to use a DSLR -- you can shoot at ISO 800 and 1600 and get quality images.

I just read a very good review on Imaging Resource that waxes positively about the SD630's image quality at high ISOs. Here's what Stephanie Boozer and Dan Havlik had to say:

"To me, digital noise has always resembled that obnoxious snowy fuzz you get on your TV when it's stuck between channels. The triumph of Canon's recent digital SLRs is that they've been able to shoot at high ISOs with low incidence of noise. With these new ELPHs it appears Canon has been able to bring its low-noise/high ISO expertise to a non-professional audience which is very good news for consumers. Most people have gotten so used to shooting with a flash in low light that they're amazed when they see the results without one. Instead of blown-out faces and blacked out backgrounds you have nice natural skin tones and detail of the room behind your subject. While there's still a greater chance of blur when you shoot without a flash -- even at the SD630's speedy ISO 800 setting -- if your subject's relatively still, results with the Canon SD630 look sharp."

There's lots of other good info in their review, and I think it's worth a read if you're shopping for a quality compact in the $300 range that can shoot in existing light with good results. You can also check out Canon's product page.

Technorati Tags: , ,

Use iPhoto 6 to Create Custom Postcards

custom_postcard

With iPhoto 6 and a compact photo printer, you can create stunning postcards right at your desk. In previous posts, I've talked about using the greeting card function in iPhoto to create title graphics for slideshows, and then how to animate them. Now you have another use -- print your own postcards.

I use a older Canon CP-330 compact printer, but any of the models will work for this project including the new SELPHY CP720. These are affordable little units that output 4"x6" dye sub prints with UV coating that last for 100 years. Each print is made of durable card stock with postcard markings on the back. I would guess that similar printers are made by other companies too, such as Epson and HP.

To make you custom postcard, just follow these instructions, except when it's time to print, choose the "from 1 to 1" option in the print dialog box and output to your compact printer. Make sure you have the card stock oriented the right way so you're not printing upside down on the card stock. The postcards look simply amazing, better than what's on the rack at the local souvenir shop. And they don't cost more either. Each card you output sets you back about 28 cents. Give it a try!

My postcard illustrated here will be used to promote The Digital Story site. You can create cards to promote your online galleries and send them to interested parties. Something to consider...

See It in Person

If you're in Northern California on the weekend of October 7, stop by the Macintosh Computer Expo and sit in on my iPhoto 6 Tips and Tricks session. It's free, and I'll show you this tip plus lots of other cool iPhoto goodies. For those who really want to dig into some shooting techniques, stick around another day and sign up for my Digital Photography Made Amazing half day workshop on Oct. 8. But sign up early because seating is limited.

Technorati Tags: , , ,

My interview with James Duncan Davidson covers the ins and outs of event photography. This type of assignment is challenging on any level. James is a professional photographer who specializes in big conferences such as those organized by O'Reilly Media and Apple's WWDC. But all of us can apply the lessons of pro level event coverage to our own assignments. Weddings, graduations, anniversaries, and other common assignments present many of the same challenges as big conferences.

James and I cover both the technical aspects and the human relations required for success. Yes, you need to be able to work with the clients and assure them that everything is going well. But there is also a bit of a knack to helping attendees feel comfortable while you photograph them in action. We cover it all in this podcast.

Larry Lessig

Listen to the Podcast

Now that I've piqued your curiosity, it's time to listen to today's audio show titled, "Event Photography." You can download the podcast here (30 minutes).

Photo of Larry Lessig speaking at an O'Reilly Conference by Derrick Story.

See It in Person

If you're in Northern California on the weekend of October 7, stop by the Macintosh Computer Expo and sit in on my iPhoto 6 Tips and Tricks session. It's free, and I'll show you this tip plus lots of other cool iPhoto goodies. For those who really want to dig into some shooting techniques, stick around another day and sign up for my Digital Photography Made Amazing half day workshop on Oct. 8. But sign up early because seating is limited.

Technorati Tags: , ,

"Red" - Results from Photo Assignment 6

matt_kuperus_heun

The August Photo Assignment was "Red," and we have quite a gallery for you. Nineteen images submitted by The Digital Story members illustrate a bounty of creativity and craftsmanship. In many aspects, this may be our best gallery yet.

Due to the number of excellent submissions, I switched to a new format. The pictures were first loaded into Aperture. I then added the accompanying stories to the IPTC caption field and combined it with the EXIF data from the photograph. The final step was to create a web gallery in Aperture and upload it to the Digial Story server. You can view this month's photo assignment here.

The September assignment is "Circle." Start working on your contribution now. Details can be found on the Submissions page. Because of our new gallery format, you can now submit photo assignment pictures up to 600 pixels wide for horzontal shots, 400 pixels wide for verticals.

Good luck with your September assignment, and congratulations to all of the fine contributors for August. It's a great collection of images.

Photo by Matt Kuperus Heun

Technorati Tags: , ,

Grab Shot 57 - Shark Bite

Eaten by Shark

"After 30 years of traveling around the world, I went back to Italy" said Nish. "My new job is to shoot pictures of people putting their heads in the mouth of the shark. This shark is next to a big aquarium full of real sharks. I've never been a photographer, and started listening to Derrick's digital story podcast, and now I am totally addicted to it."

Nish

"During work, I use an Olympus Camedia in program mode," Nish continues. "This shot of my girlfriend was taken with my Nikon Coolpix 5200. In the last 3 months, I've taken more then 3000 pictures of people going into the shark. I try to be creative, finding new ways to place people inside. Lots of fun and actually good money."

If you have an interesting candid you'd like to share, take a look at our Submissions page, then send us your Grab Shot. If we publish it, you'll receive an ultra cool custom carabineer keychain.

Technorati Tags: , , ,

iLifeZone

Ben Long has just published not one, but two books on Aperture. And does he know this application. We invited Ben to join us on the latest iLifeZone to talk about Aperture with Scott Bourne -- both pros and cons. It's a great conversation with a terrific guy. You might want to check it out.

I also chime in with some solid iPhoto tips. And Chris Breen poses the question: "What's the best way to convert color digital images to black and white?" We try to answer his query.

You can subscribe to the iLifeZone via iTunes Music Store.

Technorati Tags: