January 2006 Archives

"Ice" - Results from Photo Assignment 1

This month's Photo Assignment displays the work of 11 participants from The Digital Story community. The following shots are their interpretations of the theme, "ice." Terrific work, all of you!

thumbnail
Maarten Sneep

I had no idea you were going to do this assignment when I made the shot. While on vacation in Switzerland, we went to a glacier at the end of a valley (this is the Roseg glacier). Some peices of the glacier had broken off, and were floating in the lake in front of the glacier. The shot was taken at iso 100, f/4.5, 1/100 of a second shutter time, focal length of 78 mm with the Sigma 55-200 mm lens.

thumbnail
Jennifer Tofani

The Icicle

I went out right away and photographed the ice, for me ice has always been icicles. Perhaps its the memory or our winter holidays in at various ski towns. Invariably my brother and sister and I would go out in search of icicles. These were the wonderful swards of winter, the crystalline blades would glint in the sun and ultimately shatter in our battles. However here in Italy our house does not make such long and luscious icicles, only small ones from the drain. The long ones of my childhood were created from the redwood cabins roof and our warm fires within. But with a bit of looking and fantasy I found a small icicle that would do.
Camera RAW
Manual Exposure
Lens 70-210 at 70mm
1/3000s at f/4
ISO 200
NIKON D70

thumbnail
Jeramy Phillips

I hunt from a boat with friends, mainly on weekends and at public lakes. During a down time, my friend was outside of the boat walking around, walked up to the tree branch and said "Look! There is a decoy in there," and was about to break the ice to get at it. I stopped him so I could take a quick snap shot, which you see the results here. It was one of those moments that I had not even seen the decoy because I was so focused on the thick icicles, and also shows why having a point and shoot along is handy.

thumbnail
Matt Jorgensen

I was experimenting with a macro lens for the first time. I rented a Nikon 60mm macro lens for the weekend and this is one of the first shots I took. Just an ice cube in a glass. I didn't like the first shot so I changed the WB to Incandescent. Taken with a Nikon D70, 1/40 sec, f/5.

thumbnail
Andreas Bachofen

The Photo I send was taken in Saig, Black Forest, Germany, at the 1st of January. The ISO at 1600 was a mistake, I had it there from the night before. And I hadn't really been back on track again then.

thumbnail
Darin Duphorne

Fox Glacier in New Zealand
Camedia C-3040Z
21mm focal length
f 7 1/800 (no tripod)
Spot metered on average brightness
I loved the blue cast from the light diffraction.

thumbnail
Ginny Brady

I took the photo on a morning when you could see the ice crystals in the air. This shot was taken around 8am in the parking lot where I work in Northern NY. I used my Casio Ex-Z750. Your blog and podcast have given me the courage to experiment with different settings. I used the following for this shot: BS mode, ISO 100, EV +0.7, White Balance Cloudy Day, F2.8

thumbnail
Eric Knapp

I used a Pentax *ist DS with a Tamron 90mm macro lens. The settings were f 4.0, 1/180 sec, and ISO 200. I was walking in the park near my home and this leaf trapped in the thawing lagoon was striking. I took a bunch of pictures and this is the best one.

thumbnail
Lou Ann Madden

First photo shoot with new camera.... Nikon D100.... experimenting with several different settings.... liked the flashes of sunlight dancing off the water.... using a manual focus lense... I did not keep track of the settings.... : )

thumbnail
Phillip Resuggan

Elephant on Ice

There isn't much ice to be found in Memphis, TN...especially this year. It was almost 70 degrees today. I chose the elephant because he is used to the limelight (He's from Barnum and Bailey's Circus). Taken just after he shot water out of his trunk. Nikon D50.

thumbnail
Bruce Mickelsen

Here's a shot of new ice on our local hockey rink in Bozeman, MT. I'm a player & coach - also Zamboni driver & ice maker. We just finished putting the final coat on, after 4 days of flooding, painting, flooding, line painting & more flooding.

This shot was taken with my Casio EX-Z750, which I always carry for such
"emergencies". No fancy settings, just wider aperture to capture more natural light.

The Photo Assignment for Feb. 2006 is "fur." If you'd like your shot considered for publication, send it in by Tuesday, Feb. 28. For more information, see our Submissions page.

Technorati Tags:

"Scanning Tips" - Podcast 17

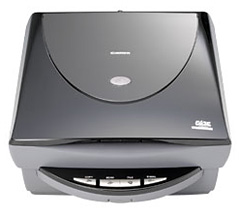
Canoscan 9950F

How do you best set up your scanner when archiving all of those prints and slides that you have in storage? It's really not too bad once you know the numbers you have to plug in, and the resulting digital files they produce. That's what this podcast is about.

The first thing I want to mention is how much flatbed scanners have improved since I last bought one (which was about 5 years ago). While working on an article for Macworld Magazine, I got to test a number of scanners and really took a liking to the Canon 9950F scanner. The 9950F is both Mac and PC compatible, provides both USB 2.0 and FireWire connectivity, and scans many different sizes of film as well as prints. I use its driver with Photoshop, and when in the "Advanced" mode, have complete control over the scanning process. The results have been beautiful.

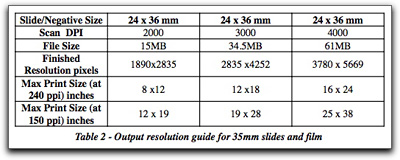
As easy as the interface was to use, I still had to make decisions about what numbers to plug into the "Output Resolution" box. Here's where a lot of people get confused. Do you put 150, 300, 600, or 1200? And what are the ramifications of each of those settings?

The general rule of thumb is that if you want to make photo-quality prints the same size or smaller than your hardcopy source material, choose 300 dpi. (I actually prefer "ppi" pixels per inch, but used the older term "dpi" dots per inch because that's what the scanning software used.) So if your original photo is 4"x6", then if you scan at 300 dpi, you'll be able to make photo quality 4"x6"s. Actually, I think you can go up to 5"x7" at that setting, so that's what I list in Table 1.

As you increase "Output Resolution," let's say to 600 dpi, you can then make bigger prints from your source material. The tradeoff is that the file size gets much larger too. So the trick is to find the balance between having enough Output Resolution to make the prints you want and controlling the file sizes so you have enough storage to handle all of this digitized material. Take a look at the following tables to help you choose the settings best for you.

Print Scanning Guide

------------------

Film Scanning Guide

------------------

In the Macworld article that comes out in a month or two, I get into the whole process from scanning, to cataloging, to output. But for now, you can begin to digitize with confidence some of those great shots you have from the "old film days."

Listen to the Podcast

Now that I've piqued your curiosity, it's time to listen to today's audio show titled, "Scanning Tips" You can download the podcast here (33 minutes).

Technorati Tags: , , ,

Cruise Ship Tips for Photographers

Cruise Ship

This coming Saturday, I'm boarding a Holland America liner as part of the staff for a Photoshop Fling Geek Cruise to the Mexican Riviera. We'll be visiting Cabo San Lucas, Mazaltlan, and Puerto Vallarta. The Geek Cruise concept is quite interesting. While we're at sea, we have a full conference with classes on Photoshop and digital photography. When we port, it's just like any other cruise. The tourists invade the destinations.

Here's the deal. This is my first cruise. And I'm wondering if those of you who have sailed before could share some tips for me, and for others who are considering cruises. I'll be packing a DSLR and a compact camera. I think I have a handle for photography while on the ship (although could use any suggestions you might have), but am really wondering about when we port in Mexico. How much equipment should I take? Any tips for getting great shots? Things like that.
Please post your sage words of advice in the comments area of this blog. It will help me next week, and countless others who are packing a camera on the big ship.

Oh, and BTW... I'll have an Internet connection while sailing, so I'll continue to post all week at sea.

Technorati Tags:

Round Ups!

If you're looking for a collection of photo tips or product reviews on The Digital Story, take a look at our new Roundups feature. You can find the links at the top of the page below the logo. These roundups will continue to grow as I add posts to each category. There's tons of good information there now. So go take a look at the Photo Tips and the Product Reviews roundups. They're a hoot!

Technorati Tags: , ,

Apertue

Apple announced that Aperture customers will not have to pay an upgrade fee for the Universal Binary version that will most likely be released in March. This is good news on a couple fronts. First, we avoid the $49 charge that many other Apple users will have to pay for UB upgrades. But beyond that, it's rumored that there will be other improvements beyond MacIntel compatibility.

Mac G4 and G5 users should be able to download the new version, when it's available, via Software Update. I'm unclear right now about how MacIntel users will get the update and load it on their new machines. More to be revealed.

Technorati Tags:

Grab Shot 14 - Goats to Market

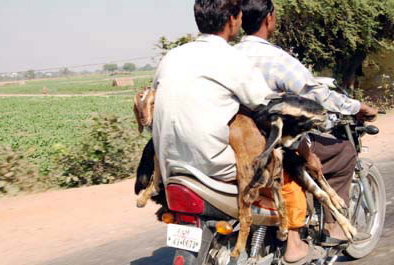
Goats to Market

"I took this photo out the window of a moving car with my Nikon D50, using the stock 18-55mm lens at 38mm," said Phil Sager. It really shows how things are done just a little bit differently in India.

This was also the day I finally started to appreciate my new Digital SLR. I am used to traveling with my faithful Canon Elf 230 (it had been run over by a taxi an keeps on clicking), and I was seriously annoyed with the weight of the SLR until I got the shots I took that day. The lens options and the speed at which it can operate make it worth the trouble of lugging it around."

If you have an interesting candid you'd like to share, take a look at our Submissions page, then send us your Grab Shot. If we publish it, you'll receive an ultra cool custom carabineer keychain.

Technorati Tags: ,

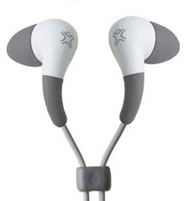
FS1 Earphones

Back in December, I posted an overview of the XtremeMac FS1 High Definition Earphones and the Griffin TuneBuds. For my testing, I removed both items from their packaging and plugged them into three different iPods. I also had three other people blind test both sets of earphones, right out of the package. My conclusion was that the Griffin earbuds sounded good for $20, but I was disappointed with the $149 XtremeMac FS1 earphones.

I received a few notes about my review. I listened to what the company reps had to say and agreed to revisit the FS1 earphones.

This time I skipped the silicon sleeves altogether and tested with the foam sleeves only. I paid particular attention to using the right size sleeves so I had a perfect seal. This did change the quality of the sound considerably. I still had impressive audio at low volume -- something that the FS1s do better than any other earphone I've listened to (and that I praised in the original review even with the silicon sleeves). But the bass response improved dramatically with the foam sleeves -- much better than previously tested with the silicon sleeves.

Overall, the FS1s are different earphones with the foam inserts. If you buy a set, they will come out of the package as shown here with the silicon inserts. My recommendation is to toss the silicon sleeves and use the appropriate size foam sleeves. This adjustment makes a tremendous difference in the earphones' performance... so much so, I wonder why the manufacturer includes the silicon sleeves in the first place.

So back to my original question... are the XtremeMac FS1 High Definition Earphones worth $149? I think for some listeners they are. Of all the different people I've talked to about these earphones, the ones who praise them the highest are those who say they are in the music business, usually as sound engineers. Non-pros seem more divided about the value of the FS1s, mainly because of the price and that the foam sleeves are a bit of a visual turn-off for everyday listeners. They're not totally comfortable either, that is if you fit them correctly to get the best sound.

My guess is that if you're picky about your audio, you will like the FS1s with the foam and not care about how they look. One other note: the fact that you can enjoy your music at lower levels with these earphones is a big deal, and worth consideration alone.

Technorati Tags: ,

Digitizing Your B&W Prints

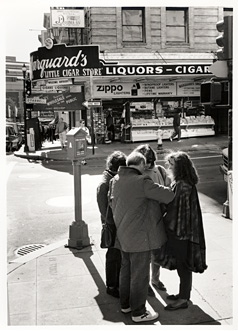
Cigar Store, SF

Like many traditional photographers, I have an extensive collection of B&W fiber and RC prints. Some of these images are very important to me, but I haven't been able to use them in my daily work because they haven't been digitized and cataloged on my computer. I'm changing that now.

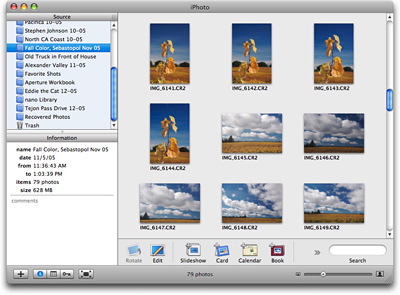
This project began with a piece that I'm working on for Macworld Magazine. I like to write my "How To" articles while I'm actually doing whatever it is I'm writing about. So I pulled a number of my favorite B&W prints, scanned them on a very nice Canon 9950F scanner, then went about organizing the images and cataloging them in iPhoto 6. This has been a very satisfying project, and one that I will continue for months to come. I'll be sure to let everyone know when the Macworld article comes out so you can read every step of the process.

I chose this image of a San Francisco cigar shop for a reason. During a recent visit to the city, I noticed that the shop was gone and there was another business on this corner. I had visited Marquard's many, many times over the years, and was sad to see it go. This photo now means a great deal to me because it reminds me of things I experienced during those times in the past.

If you find this topic interesting, let me know and I'll put together an audio show and more written details about the system I use for digitizing my old prints.

Technorati Tags: , ,

iPhoto 6

iPhoto 6 is arguably the most exciting release of Apple's venerable digital shoebox. New features in the current version includes:

  • 250,000 photo library capacity.
  • Full screen editing.
  • Online publishing with iWeb.
  • Non-managed library option for images on your hard drive.
  • Direct connect to Adobe Camera Raw.
  • Photocasting.
  • Lots of output options.
  • Included in the iLife '06 suite for $79.

One of the most notable new features in iPhoto 6 is that you can point to images already organized in the file system on your hard drive. This is a big change from its "managed library system" that has been your only option in the past. I've posted more details about this in What Happens When You Edit an Image Stored Outside of iPhoto 6. I've also published a more extensive piece titled iPhoto 6 First Impressions where I cover some of my favorite features in iPhoto 6, including Full Screen Editing mode. Here's what I had to say:

"Just click once on any thumbnail, tap the Full Screen button, and watch your image fill up the screen against a black background. You have all of your editing tools hiding on the bottom and the thumbnails hiding on top. A simple mouse-over reveals them.

"CMD-click up to 8 images in thumbnail mode, then tap the Full Screen button and compare them all at once. You can magnify each image using the slider at the bottom of the screen, or by simply pressing the 1 key (100%), 2 key (200%), or the 0 key to return to "fit in screen" size. You can rate your photos using the floating info box (and add comments too). Everything works great in full screen mode. If you have really big Photoshop images, they may take a few seconds to reach full resolution. But for my cameras, including the Canon 5D, the performance was excellent."

In the podcast, I also discuss one of my favorite 3rd party plug-ins for iPhoto: iPhoto Library Manager. I think this handy app helps you keep your iPhoto libraries to a manageable size. If you'd like to read about more of my favorite iPhoto add ons, take a look at iPhoto 6 and 3rd Party Apps.

=====================

Listen to the Podcast

Now that I've piqued your curiosity, it's time to listen to today's audio show titled, "Is iPhoto 6 Right for You?" You can download the podcast here (31 minutes).

Technorati Tags: ,

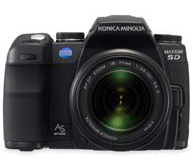
konica_minolta

With last Thursday's announcement that Konica Minolta will be withdrawing from the camera and photo business, I was wondering if their recent partnership with Sony will carry on the Maxxum/Dynax lens mount. In a separate release last Thursday, Konica Minolta stated:

"...on March 31 2006, Sony will receive certain assets from Konica Minolta PI that are necessary for the development, design, production and so forth of digital SLR cameras compatible with Konica Minolta PI's Maxxum/Dynax lens mount system. Sony will accelerate development of new digital SLR cameras based on and compatible with the Maxxum/Dynax lens mount system with a view to marketing these models this summer."

Looks like Sony will soon be releasing DSLRs with Maxxum lens mounts. Just for the record, there are 16 million Maxxum/Dynax lenses in use now, all of which should work on the new Sony DSLRs. This could be an interesting evolution of the Minolta tradition.

Technorati Tags: , ,

Adobe Camera Raw 3.3 Available

Adobe Camera Raw

Adobe's Camera Raw 3.3 plug-in and DNG Converter is available for download. This latest version supports 17 additional cameras (and a total of 113 camera models).

New cameras supported include Canon EOS 5D, Canon EOS 1D Mark II N, Canon EOS 20Da, Fujifilm Finepix E900, Fujifilm Finepix S5200/5600, Fujifilm Finepix S9000/9500, Kodak EasyShare P850, Kodak EasyShare P880, Mamiya ZD, Nikon D200, Olympus E-500, Olympus SP-310, Olympus SP-350, Olympus SP-500UZ, Pentax *ist DL, Pentax *ist DS2, and Sony DSC-R1. The Adobe Camera Raw 3.3 plug-in requires Photoshop CS2, Photoshop Elements 3.0 or Photoshop Elements 4.0

I've just tested the new plug-in with .CR2 files from my Canon 5D, and it works wonderfully.

Technorati Tags:

Watch Your Step While Shooting

Horses in Pasture

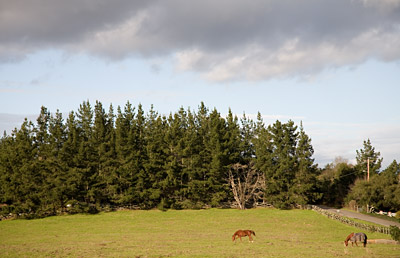
I wanted to test the new Canon 24-105mm IS L Zoom Lens, which I'll write about in more detail in a later post. Fortunately for me, there was a break in the rain up here in Northern California, so I mounted the 24-105mm on my Canon 5D and dashed off for a walk. I'm lucky because I have some great walking paths that provide lots of wildlife and vistas. A while into my stroll, I noticed a tempting shot and scampered up this slight grassy rise to capture a scenic with horses feeding in an open field.

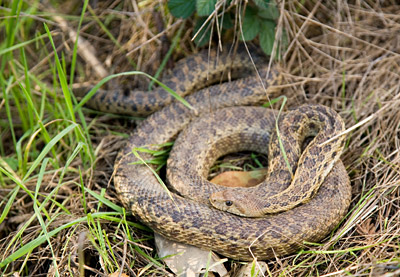
After recording a few frames, I pivoted around to step down from the grassy rise and return to the trail. In mid-step, with right foot in the air, I noticed a snake curled up right where I was going to plant my foot. I awkwardly redirected my landing spot to the left of the snake so as not to cause harm to either of us. Because it was cold, he continued to watch me with a wary eye, but not move.

Since I managed to avoid stepping on him, I then took a short series of frames with the new Canon 24-105mm lens. He continued to watch me until I backed away and went about my business.

Snake in the Grass

I pass this tale along because it was a good reminder for me to watch my step while shooting. I tend to get absorbed in what I'm doing, sometimes forgetting about my surroundings. This can be dangerous in nature.

If you have a anecdote along these lines, please share it with others in the comments below. In the meantime, beware of snakes in the grass...

Technorati Tags: ,

iPhoto 6 Changes for Raw File Editing

iPhoto 6 Advanced Prefs

iPhoto 6 adds some terrific options to Apple's digital shoebox application, including better handling of Raw files, ColorSync management, and a non-managed library choice. Today I want to give you a brief overview of how Raw file editing has evolved in this latest release.

First, let me describe how Raw file management worked before in iPhoto 5. If you had Photoshop selected as your external editor, double-clicking on a thumbnail from a Raw file in iPhoto 5 would open a Jpeg interpretation of that Raw file in Photoshop. You could edit this Jpeg and send it back to iPhoto by saving in Photoshop. If you wanted to work in Camera Raw, you had to drag a thumbnail from iPhoto 5 on to the Photoshop CS icon on your Dock (this worked only if you haven't edited the file previously in iPhoto 5) or export it as "Original" and open that file in Camera Raw.

After editing in Camera Raw, you would click the open button to move the image to Photoshop where you could save it in any format you wished, or just hit save and choose your format there. You could then add the edited and saved PSD, Tiff, or Jpeg back to your iPhoto 5 library as a new image.

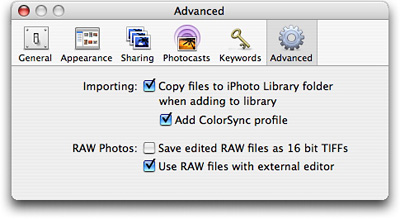
In iPhoto 6, you now have the Use Raw files with external editor option in the Advanced Preferences pane (iPhoto > Preferences > Advanced). Using this option changes your workflow considerably.

When the "external editor" box is checked, your double-click on a Raw thumbnail opens that image in Camera Raw (if you have Photoshop CS selected as your external image editor). Now, as far as I can tell, you can't "roundtrip" the changes back to iPhoto 6 just by hitting the "Done" button. But you can save to another format and import the edited Tiff, PSD, etc. back into iPhoto 6. So even though it doesn't technically "round trip" your Raw edits, this new method does save you a step... and is a welcomed improvement.

What's interesting though, is that iPhoto does remember your Raw adjustments made in Camera Raw. If you double-click the thumbnail again, it opens it in Camera Raw with your previous settings in place. [Update from a reader: it's actually Camera Raw that remembers your settings. Thanks Rafa]

If you want to edit your Raw file in iPhoto using the Adjust palette, you can go back and change the preference. But I prefer to leave the preference setting as it is and simply Option double-click to switch to iPhoto's editor, or CTRL-click on the thumbnail and choose either "Edit in a separate window" or "Edit using full screen." In my testing, I seemed to be working with the original Raw data using these options, opposed to building upon any instructions I've added using Camera Raw.

Now, if I uncheck the Use Raw files with external editor option, iPhoto 6 behaves just as it did in iPhoto 5 -- I'm working with a Jpeg interpretation of the Raw file, and my changes are saved back to iPhoto 6.

There's more to discover here, but I hope this gives you a good start with the editing options for your Raw files. If you would like my overall initial take on this application, take a look at iPhoto 6 First Impressions.

Technorati Tags: ,

Morning Light in the City

SF Buildings

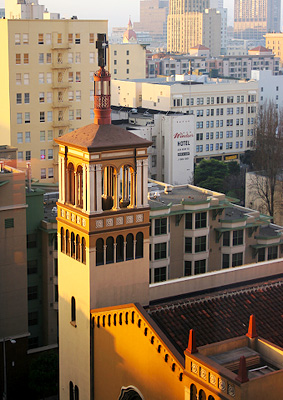
One of the great things about travel is taking advantage of the high vantage points that hotel windows provide. Usually I'm enamored with shooting at twilight, capturing the last light in an inky blue sky while building lights begin to illuminate the foreground. But one morning, I left the curtains open and was reminded that dawn light adds new dimensions to cityscapes.

This shot of Glide Memorial Church was recorded at 7:45 am from the 12th floor of the Hilton across the street. A few hours later, everything had flattened out and there wasn't a good shot in sight.

Captured with a Canon Digital Rebel XT through the hotel window, 1/30 @ f-4.5, ISO 100.

Technorati Tags: , , , ,

"White Balance" - Podcast 15

White Balance Menu

The White Balance menu on your digital camera is one of your most powerful tools. Regardless if you have a compact or a DSLR, you can compensate for many difficult lighting situations by simply changing settings in this menu.

I often say that the white balance menu is like having an entire set of filters built right into your camera. The cool thing is, unlike glass filters, you don't have to buy, store, or clean white balance settings. You just have to find the settings.

The easiest way to talk about color temperature, which is what white balance is all about, is in degrees Kelvin. This helps you correlate numbers to lighting situations and the controls on your camera. Most camera manuals will list the lighting situations in degrees Kelvin that their white balance menu items are designed to compensate for. To give you a taste of degrees Kelvin, here are some examples. (This information is from page 146 of the Digital Photography Pocket Guide, 3rd Ed).

Dawn, dusk, candle flame -- 1800-2200K
100W incandescent bulb -- 2800-3000K
Photographic daylight -- 5500K
Open shade outdoors, overcast sky -- 8000-9000K

At the lower end of the Kelvin scale, the light is recorded as warmish red, and at the higher end the camera sees coolish blue.

Our eyes naturally compensate for these varying conditions. But cameras have a more difficult time. That's why we have white balance compensation.

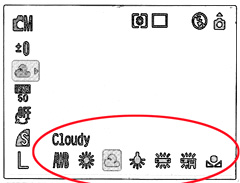
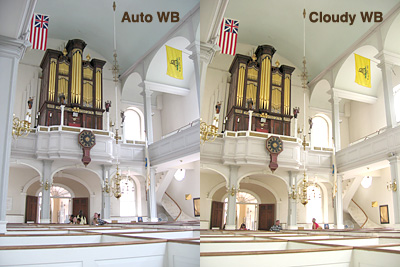
Take a look at the following comparison of a church interior. I captured these images with a Canon Digital Elph with the flash turned off. The image on the left was recorded with the auto white balance setting. For the picture on the right, I turned on the cloudy white balance setting. (Refer to the screen shot at the top of the page to see the actual setting.) Notice that the tones are cool in auto white balance, but warm up considerably in cloudy mode. Which one looks better? That's up to you. But the point is that you have more control over how your camera records color temperature by finding your white balance menu and learning its settings.

White Balance Comparison

=====================

Listen to the Podcast

Now that I have your curiosity piqued, it's time to listen to today's audio show titled, "White Balance." You can download the podcast here (29 minutes).

Technorati Tags: , , , ,

Grab Shot 13 - The Eyes Say It All

Kresser Grab Shot

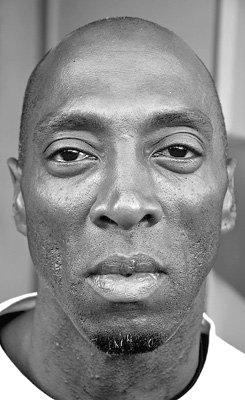
"I was walking in Downtown Berkeley the other day with my camera," said Chris Kresser. "The man in the photo asked me for spare change. When I turned to look at him, I was deeply struck by the story told in his eyes. He agreed to have his photograph taken."

"Afterwards, I gave him some change from my pocket. 'I guess that was my first modeling job,' he said. Two days later I returned with an 8 X 10 print of this shot and handed it to him. His whole face lit up and he began showing it to everyone on the street."

Chris used a Canon Digital Rebel XT in program mode. The ISO was set to 100. He captured it with existing light with no flash (1/25 @ f-5.6). One thing that Chris did that I really appreciate is that he made a print and gave it to his subject. This type of follow through builds good will, for all photographers.

If you have an interesting candid you'd like to share, take a look at our Submissions page, then send us your Grab Shot. If we publish it, you'll receive an ultra cool custom carabineer keychain.

Technorati Tags: , ,

lightzone

LightZone was demoed at the recent Macworld Expo and caught the attention of many photographers. It is a "designed from the bottom up" image editor that protects your original files and only associates editing instructions to it. This is a popular (and welcomed) approach also embraced by Apple's Aperture and Adobe's Lightroom.

Even though LightZone has an image viewer and file browser, its real appeal is how it analyzes your pictures then displays the shapes and densities of the tonal zones for easy editing. This visual approach should feel very natural to photographers.

LightZone is currently a Mac application that requires OS X 10.3.9 or later. A Windows version is coming soon. You can download a demo and try if for free for 30 days. If you like what you see, LightZone can be purchased for $249.

Technorati Tags: , ,

Aperture Workshop Notes PDF

Aperture Class Notes

For my recent Inside Aperture Power Tools workshop that I led with Scott Bourne at Macworld SF '06, I compiled class notes to accompany the workbook. I promised the class that I would make those notes available online. I'm also offering them to everyone in The Digital Story community.

These notes are in PDF format (5.8 MB download -- 30 pages). Topics include importing images into Aperture, comparing and rating, editing tools, vaults and backup, exporting images, and printing. In part, I'm releasing these notes because there are many misconceptions about Aperture, such as limits on export configurations (based on the presets Apple provides that are totally editable). I think that publishing good information is the best way to help photographers understand the potential this application presents.

My copresenter, Scott Bourne, also has lots of great tips on his site, ApertureTricks.com. He has, for example, a goodie I submitted about using the DigitalColor Meter utility to read RGB values in Aperture (thanks Joe for this one!).

If you're using Aperture, or want to learn more about how it works, please download the "Inside Aperture" PDF (5.8 MB). Feel free to share it in its entirety, but please don't take out excerpts. If you have questions, post a comment here or write me directly. And most importantly: enjoy this wonderful application!

Technorati Tags: , ,

Grab Shot 12 - Chess Players

Chess Players

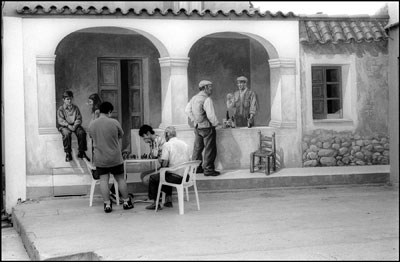
"I was walking in the little Sardinian town of San Sperate, well known for its "murales" or wall paintings and came across this scene outside a coffee shop," said Nina Contini Melis. "Several people playng chess at a table in the courtyard, who seemed to be perfectly in proportion to the painted scene on the side of the coffee shop. I decided to turn it into BW because I liked it better that way."

Nina used a Nikon 70S to capture this interesting juxtaposition shot.

If you have an interesting candid you'd like to share, take a look at our Submissions page, then send us your Grab Shot. If we publish it, you'll receive an ultra cool custom carabineer keychain.

Technorati Tags: ,

iPhoto 6 Editing

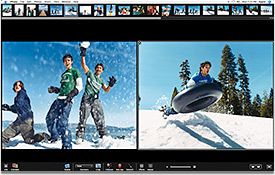
Looks like the iPhoto engineers have been having coffee with the Aperture guys. iPhoto 6 has not only adopted Aperture's full screen editing mode, but you can "compare" up to eight images onscreen at once while doing so. Clearly, iPhoto is becoming one of the premier consumer apps on the Mac platform.

In full screen mode, you can view your images without the distractions of the user interface, enabling you to concentrate on the image itself. If you want to edit the picture, activate the Adjust palette (Apple did not rename it the Heads Up Display as in Aperture) and tweak brightness, contrast, temperature, etc. And if you're not sure which image in a series is the best, put it along side your initial favorite in full screen mode and compare it. Once you figure out which one is the best, mark it as a favorite.

When you consider that you also get One-Click Effects, Photocasting, greeting cards, calendars, RSS publishing via iWeb, and a performance boost, iPhoto 6 seems like the deal of the year. How much does it cost? Only $79. Oh, did I mention that you also get iMovie HD, iDVD, GarageBand, and iWeb? Yup, still $79 for the whole collection. Apple calls the package iLife '06.

You can buy iLife '06 right now at the Apple Store. Shipping is free.

Technorati Tags:

"Lightroom vs Aperture" - Podcast 14

Lightroom (top) & Aperture

Adobe has just announced the public beta Lightroom, right on the heels of the recent Aperture announcement by Apple.

Both applications are robust photo editors, which is different than image editing. Photo editing is the process of choosing the best images from any given shoot. It is comparing and then selecting. Image editing is adjusting the actual pixels of a picture, such as changing its brightness.

Even though Aperture and Lightroom provide solid image editing tools, their real strength is their ability to help you quickly organize and output the best shots from your shoots.

When comparing these two applications, I would say that Aperture has more features and more innovative tools, such as Stacks and the digital loupe. Lightroom gets the nod for its better performance on the average modern laptop and for providing options for managed or unmanaged libraries. A managed library is where your pictures are uploaded into a container (library) that the application maintains. Unmanaged means that you store your pictures wherever you want, and Lightroom will create pointers to them. The advantage of managed libraries is that you can add metadata on import, and even change the format and content of the file names. Aperture favors the managed library approach while Lightroom gives you the option.

You can download a copy of Lightroom here. Anyone wanting to try out the beta should have Mac OS X 10.4.3, a 1GHz PowerPC G4 processor or better, 768MB of RAM, and a 1,024-by-768-resolution screen, according to the beta's tech specs.

After having worked with both applications, my feeling is that each has a place in the world of digital photography. Which one is right for you? Listen to this week's podcast and decide for yourself.

You can download the "Lightroom vs Aperture" podcast here (35 minutes).

Technorati Tags: , ,

Get Ready for New Version of iPhoto

iLife

Most likely we'll have a new version of iPhoto in the iLife 06 suite that Steve Jobs will probably announce during his Tuesday morning keynote address at Macworld SF. The question is, what will the new iPhoto have? Since Apple has made a big splash in the pro photo market with Aperture, we might see some of those features included in the next version of iPhoto.

No matter what happens, just like the release of the public beta of Adobe's Lightroom, photographers are bound to win. After tomorrow's keynote, Mac users will have not one (Aperture), not two (Lightroom), but three (iPhoto 06) excellent photo editors to choose from.

Technorati Tags:

Best Way to Convert to B&W

Black & White Train

I've read many articles about converting color digital images to black & white. This is something I have to do on a regular basis for my personal and wedding photography. The question is, "is there any single right way to do this?" My answer, "no."

Black and white conversion is like black and white photography itself. It's a fertile environment for experimentation. Some photographers feel that they get better results when they set their digital cameras to record in B&W from the get-go. This makes some sense, but also eliminates the opportunity to have a color version of the image too.
Lately, I've been leaning toward shooting in color, then converting to B&W by either using desaturation or the channel mixer in Photoshop. To desaturate in Photoshop CS, go to Image > Adjustments > Hue/Saturation... Then I drag the Saturation slider all the way to the left.

To use the Channel Mixer, I go to Image > Adjustments > Channel Mixer, then click the Monochrome box. You can then play with the sliders to get the effect you want.

For the shot of the train I've run with this post, I used the Monochrome Mixer adjustment in Aperture. It's similar to the Channel Mixer in Photoshop, with monochrome already selected for you.

If you have a favorite method for converting color to B&W, please post a comment and share it with others. This is one of the joys of digital photography.

Technorati Tags: , ,

Photography Mayhem at Macworld SF
Macworld SF

I thought I'd pull my head out of my Aperture for a few minutes to share a few things that will be happening at Macworld SF next week.

There's going to be some truly exciting photography news. Apple and its (partners/competitors... depending on what day of the week it is) are going to be firing some heavy artillery. The upshot for those of us who love photography: good times! Be sure to check The Digital Story on Monday for the latest news.
Speaking of Monday, I'll be leading my Inside Aperture Power Tools workshop. Scott Bourne from ApertureTricks.com will be joining me on stage. Plus, I'm meeting with the Apple product manager today, and I think he'll also be there to handle some Q&A sessions. This is going to be the Aperture event next week. There's still room if you want to join in.

I'm also leading a User session on How To Use Your Digital Camera, which will be more fun tricks than boring How To.

There's some really cool stuff going on with Digital Photography Day(s) on Tuesday and Wednesday. Macworld Magazine is conducting their own cool photography event at 1pm on Wednesday. I'll be joining them on stage showing off some photo techniques.

And if you're a User Group member, I'll be hanging out in the User Group Lounge at 4pm on Thursday. Finally, the O'Reilly Booth is going to be teeming with activity, including talks by David Pogue and the rest of us. Be sure to check out the schedule.

So, stay tuned for all the announcements early in the week. It's going to be a good time for photography enthusiasts.

Technorati Tags: ,

Sansa e200

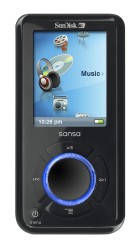
Sandisk chose the spotlight of the CES show to unveil their new digital audio players dubbed the Sansa c100 series. They will be available in March in 1GB and 2GB models. The features include:

  • Color screen (up to 64,000 colors) displays cover art and photo thumbnails Plays MP3 and WMA audio files
  • By capacity, holds large number of MP3/WMA songs and hours of playback (see above capacity matrix)
  • Easy-to-use interface for sorting and playing back your music
  • Digital FM tuner with 20 preset stations FM "on the fly" recording and voice recording
  • Supports Subscription Music Stores
  • Includes one AAA replaceable battery
  • High-speed USB2.0 for fast and easy file transfer

These devices are designed to sync with Windows computers. The 1GB models will sell for $119 and the 2GB model will cost $169.

Technorati Tags: ,

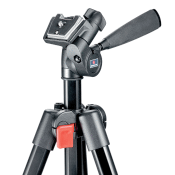
Manfrotto 718b

This is the time of year when outdoor conditions are challenging, and there's usually less light for shooting. In other words, it's tripod weather. But I don't always want to lug around my heavy Bogen 3021 for a mere casual hike. Photography is supposed to be fun. That's when I'm glad I have Manfrotto's 718b Compact tripod with pan and tilt head.

Not only are these sticks light (3.1 lbs with head), but they provide enough height for most shooting situations -- 55" with center column collapsed, 65.5" with center column extended. The Manfrotto is constructed of black anodized aluminum and will support cameras up to 5.5 lbs.

I like the "easy flip" locks for the center column and legs. This approach is a blessing in cold weather. The 3-way head includes a quick release plate for quick camera mounting, and you can buy extra plates making camera switching a snap. The 718b even includes rucksack-styled carry bag for easy toting. But, if you're using the Tamrac Expedition 3 or Expedition 4 compact camera backpacks, the Manfrotto will strap on the outside of the backpack nicely. Don't forget the Lowepro photo gloves for added comfort while handling the aluminum tripod in cold weather.

You can purchase the Manfrotto 718b online for for about $95. It feels well-built, so I'm confident it will serve your well for years to come.

Technorati Tags: , , ,

Histogram Example

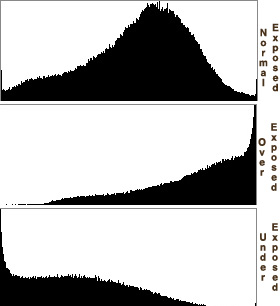
The histogram is a useful tool for determining and correcting exposure on both the camera and in your computer's image editor. The histogram is actually very easy to understand once you learn its basic components. The information on the left side of the graph represents the dark tones in your picture. On the right side you see a graphical representation of the highlight detail. The middle area represents the "gamma," or middle tones.

The Histogram on Your Camera's LCD Monitor

When you take a picture and review the image and its histogram on your camera's LCD monitor, you can accurately determine the exposure by looking at how the information on the histogram is distributed. If, for example, you're shooting a normal outdoor landscape with a broad tonal range, your histogram should have information throughout the graph from left to right. If the information is skewed to the left, however, then your picture is probably underexposed. If the information is tending to the right side of the graph, then your picture is most likely overexposed.

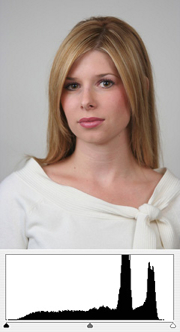
Uncorrected Portrait
Using the Histogram in the Levels control panel can help you easily make exposure adjustments. Here's an uncorrected portrait. Notice the open gap on the right side of the graph information.

The above interpretation works for most shooting situations. But, if you're in very bright conditions or a dark environment, then you have to keep a couple things in mind. A bright scene, such as a skier on a snowy slope, should produce a histogram that is skewed to the right. That's because most of the information in the shot is bright. An evenly distributed histogram would actually produce a dull snowy scene. Same goes for dark interiors. They should be skewed to the left. Once you get the hang of matching histograms to shooting situations, they become a powerful ally in determining the proper exposure.

Using the Histogram in Photoshop

You can also use the histogram to make exposure adjustments in Photoshop (or your favorite image editor) after you've moved the images from your camera to your computer. Generally speaking, you can find the histogram in the "Levels" adjustment panel (Image > Adjustments > Levels).

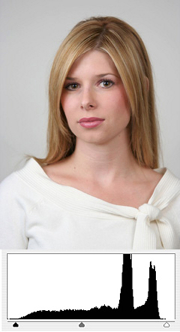
Corrected Portrait

Using the controls is straightforward. I usually start by moving the highlight pointer (right) to the right edge of the histogram, the shadow detail pointer (left) to the left side of the histogram, then adjusting the gamma (middle pointer) to my taste. This isn't a hard and fast approach, but it's a good starting point. Take a look at the adjusted image and how the histogram pointers have changed.

Photo Assignment

It's official. I've launched the Photo Assignment project. This month's theme is "Ice." You can read all of the details in this weblog post. We're going to have a lot of fun with Photo Assignment, so be sure to join in.

=====================

Listen to the Podcast

Now that I have your curiosity piqued, it's time to listen to today's audio show titled, "Learning the Histogram." You can download the podcast here (30 minutes).

Technorati Tags: , ,

New Feature: "Photo Assignment"

Photo Assignment

If you tuned-in to my last podcast, you know we've been kicking around an idea called "Photo Assignment." Well, we're kicking no more. It's a go.

You can always refer to the details on our Submissions page. But I'll provide the skinnies here too.

Each month you can participate in a photo assignment with other members of The Digital Story audience. The topic for the assignment will be revealed in the first podcast of the month. Then all you have to do is photograph your interpretation of that theme, and send it in via email.

Title your subject line: Photo Assignment [month, year]. Attach your entry making sure that it is no wider than 400 pixels. Include a sentence or two about why you took this approach, the camera you used, and any setting details that you think are important. Address your email to: derrick@thedigitalstory.com.

Each month at least one winner will be published on The Digital Story site. Sometimes multiple entries will be featured. You can review past winners by choosing "Photo Assignment" from our "Jump To" menu in the upper corner of the web page. Enter up to 3 photos for each assignment.

The theme for January? Ice. Start looking for those frozen masterpieces now...

Technorati Tags: ,

Shooting in Snow

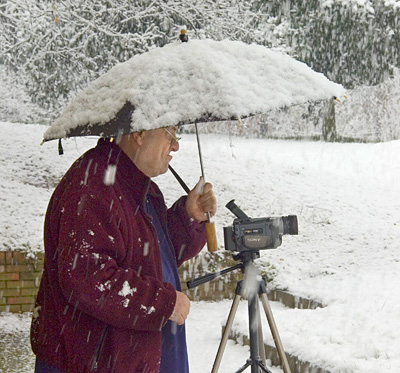
Here's a shot that will put a smile on your face for the New Year...

"When this wonderful snow began falling, my husband and I decided to go out into it," said Jennifer Tofani. "I with my still camera and he with his DV camcorder. When we came back, I took cover under the awning, but he continued shooting out in the elements. I looked over at him and couldn't help but smiling at what I saw."

Jennifer used a Nikon D70 in manual exposure mode. She exposed the scene at 1/30 sec and f/11 with her zoom lens (70-210mm) set at 70mm.

If you have an interesting candid you'd like to share, take a look at our Submissions page, then send us your Grab Shot. If we publish it, you'll receive an ultra cool custom carabineer keychain.

Technorati Tags: ,