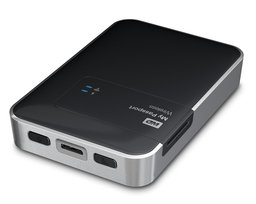
The WD My Passport Wireless HD ($179) is a compact, spinning platter hard drive with built-in WiFi and a DNLA server. It wirelessly connects computers, tables, and smartphones, and includes USB 3.0 for hard wire access. Its built-in battery and SD card reader round out an impressive feature set for mobile photographers.
After 2 weeks of testing, it has earned a permanent home in my everyday camera bag and will be accompanying me to PhotoPlus Expo on assignment. The WD Wireless isn't perfect, but it is impressive.
Wireless Options
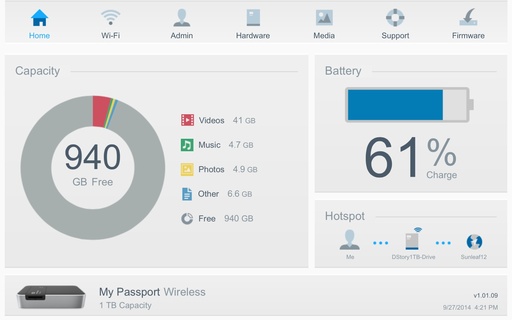
You have three wireless connectivity options, each useful depending on your situation: Direct Connection, Hotspot, and Home Network.
Direct Connection establishes a link between you and the My Passport via its WiFi server. The advantage is fast bandwidth. The disadvantage is that the Internet is not available using this method.
Hotspot leverages an existing network allowing both communication with the My Passport and online activity. Others on the network do not have access to your hard drive. You most likely give up a little performance, but gain Internet access. This is the method I use most often.
Home Network also leverages an external network, but makes the drive visible to all who have access to it. Great for sharing work among users in an office or around the house.
Seeing Drive Content via iOS
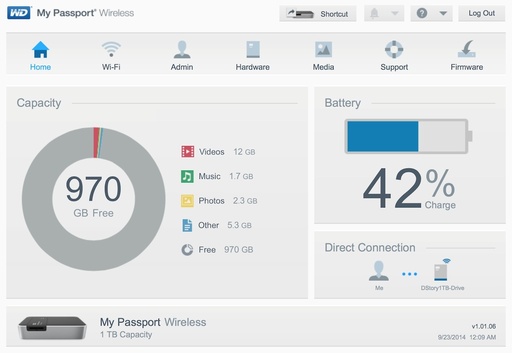
 WD Dashboard as shown in Safari on an iPad Mini.
Once you've connected to the My Passport via Settings, you can use the WD My Cloud app to customize the hard drive and access its content. Plus you can monitor battery life, drive capacity, and other vital signs.
I also log-in to its server as an admin via the browser on my iPad for even more configuration options. The dashboard is well designed and easy to use.
Backing Up Photos
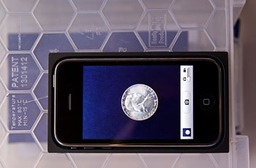
I have the My Passport set up to automatically backup the photos from any SD card I insert into its reader. All of the content is copied to the hard drive and organized in folders using this hierarchy: SD Card Imports > SDCard_XXXXX > DCIM > 100OLYMP > images.
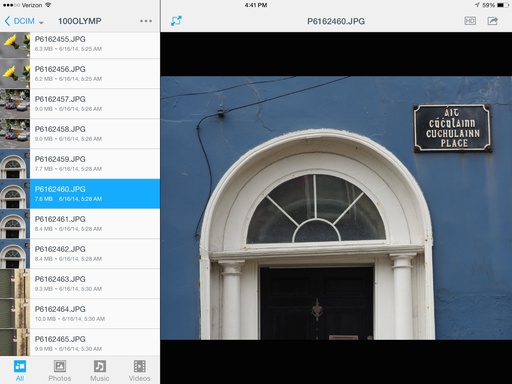 Images copied to the My Passport drive via its SD card reader and viewed on an iPad.
The WD My Cloud app can display the Jpegs, but not the RAW files. However, the RAW files are there for when you return from your trip. The simplest method is to shoot RAW+Jpeg, use the Jpegs while on the road, and tap the RAWs at home.
You can copy an image to your device's Camera Roll by selecting it, then tapping the Download icon. Other sharing options include Email, Print, and Open In.
Being able to backup photos from the camera's memory card, then view them on your mobile device is the killer feature I've been waiting for.
More Functions Than I Can List

In addition to the photographer-friendly goodies, you can stream music and video via the drive's built-in DNLA media server. I also store work documents that I can securely read while on the road, even if I don't have cloud services available. And, now while on the plane, I have dozens of movies to choose from instead of just the one or two my iPad could accommodate.
And if you wish, you can use other apps, such as MoliPlayer HD to view your content. Any software that is DLNA compliant will work.
The battery life is good, about 4-5 hours. The WiFi access point remains active, even when not being used, as long as the device is booted up. The My Passport is also easy to recharge. I've used its compact wall plug as well as my solar Waka Waka charger with great success. WD did a good job with the battery technology for this unit.
A Few Quirks
The drive ships with a dummy SD card in the reader slot. Remove it to activate WiFi. Otherwise the drive will try to read the dummy card. And you don't get an indication of when the drive has finished backing up an SD card when in Automatic mode. I've been leaving it in the reader for about 5 minutes, just to be safe. In the future, I could test the actual copy time using the WD My Cloud app in manual copy mode.
The user interface is robust, but it is a bit odd at times. For example, you can create new folders to organize your work using the iOS app. But in order to put files in the new folder, you have to select > copy > paste. I wasn't used to copy/paste for moving files around. But once I figured it out, it was easy to remember.
You can also back up images from your iOS device to the My Passport drive. To do so, select Add Photo, navigate to the image in your Camera Roll, and tap Upload. The file will be copied to the drive at root level.
To move it to the desired folder, tap Select > Cut > (navigate to the directory) Paste. It's a bit weird, but it works.
Bottom Line
The WD My Passport Wireless HD allows me to travel with just my iPad and iPhone, leaving the laptop behind. Yet, when I return home, it connects to my MacBook Pro via USB 3.0 or wireless... my choice. I'm impressed with its feature set, design, and battery life. Quite honestly, it's the best new gadget I've tested in a while.

The WD My Passport Wireless HD has a very high Nimbleosity Rating. What does that mean? You can learn about Nimbleosity and more by visiting TheNimblePhotographer.com.
Want to Comment on this Post?
You can share your thoughts at the TDS Facebook page, where I'll post this story for discussion.