Recently in Photography

  Page 317 of 381 in Photography  

olympus_e-30.jpg

Macworld has just published my review of the Olympus E-30 DSLR. I think this is one of the best digital cameras Olympus has produced to date. It feels solid and professional, but isn't too heavy or bulky to stash in your backpack when on the go.

The PROS are: Real-time focusing in Live View mode; support for multiple aspect ratios; image stabilization in camera body; unique features such as Multiple Exposure and Digital Leveler; 98 percent field of view through optical viewfinder; exposure bracketing in three or five frames. As for the CONS, I only had two: No movie mode; battery charger requires cord instead of plugging directly into wall outlet. I gave it rating of 4.5 mice.

You can read the complete review of the Olympus E-30 here.


twitter.jpg Follow me on Twitter

-


Technorati Tags: , , , ,

PT-E06__front_M.jpg

Lots of talk today about the new compact Olympus E-620 DSLR, and for good reason. This affordable, full featured camera is small enough to go just about anywhere. But what I think is also exciting is that Olympus announced an underwater case designed specifically for the E-620.

Because of Live View mode, underwater shooters now have a bright, 2.7" LCD they can use for composing shots underwater. This is much easier than previous methods (of guessing the composition). The new Olympus housing is rated down to 40 meters underwater. It has five interchangeable lens ports available, so you can use your favorite lens underwater too. And it accepts an Olympus flash bracket.

I think for many photographers, this rig is going to change their approach to underwater shooting.


twitter.jpg Follow me on Twitter

-


Testing the Eye-Fi Explore Card at Home

eye-fi_explore.jpg

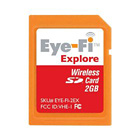
The Eye-Fi Explore provides a geotagging alternative that doesn't depend on GPS. Instead, it taps the Skyhook Wireless database that contains thousands of WiFi hotspots and their location data. These hotspots have been surveyed by Skyhook and are constantly updated by users.

The Eye-Fi Explore Workflow

The Eye-Fi Explore system is straightforward. You insert the SD card into your camera's memory slot. It provides you with 2 GBs of storage plus WiFi connectivity. You use the Eye-Fi Manager software to set everything up. When you configure the card, you make it aware of your home network. That way it can automatically access it (even if it's password protected) and upload images as they are captured. During this process, Eye-Fi consults the Skyhook database, retrieves the geodata, then adds that information to the Jpegs it is transferring.

I have the card set up to transfer files to both my MacBook and to my Flickr account. The images that go to Flickr are kept private until I approve them for public viewing. Both versions of the image contain geodata that can pinpoint where I took the shot on a map.

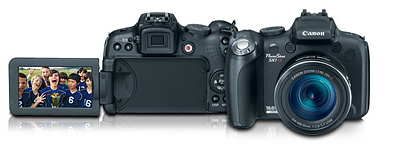
I tested the Eye-Fi Explore card at my studio using a Canon G9 in Raw+Jpeg mode. When I took a picture, the Jpeg version was uploaded wirelessly to my MacBook and to Flickr. The Raw version of the image was left alone. To verify this process, I took the card out of the camera, inserted it into the Eye-Fi card reader, and looked at it on my computer. Both the Raw and Jpeg versions were on the SD card, and neither were tagged with geodata.

So, if you want to location data added, keep in mind that you can only do so if you use the wireless upload, and that it only affects the Jpegs. Raw files are not part of this workflow.

A Few Quirks

Hang on to the card reader that comes with the Eye-Fi Explore. For some reason the Eye-Fi card wasn't recognized by my regular card reader, so I'm now using its bundled mate instead.

Concerning accuracy of the geodata... that depends a lot on the accuracy of the Skyhook database. I noticed that the images shot at my studio were mistagged. The location was about a block away. The reason for this is that I had moved during the summer, and Skyhook still had the location for my AirPort Extreme at the old studio. So I went to the Skyhook Submit WiFi AP page and updated the database. I'm still waiting for update confirmation, even though I submitted the information a week ago.

And finally, you don't really have any control over the upload process. What you shoot gets uploaded and that's that. So for a lot of people, this process might not be a good fit.

The Bottom Line

The Eye-Fi Explore is selling for $105 on Amazon. It works as advertised, and it is a reasonable geotagging solution for urban settings and other areas that have WiFi access points. If the Skyhook database is accurate, so will be your geodata. You can shoot Raw+Jpeg with the card, have your Jpegs tagged and uploaded, then deal with your Raws later using your normal workflow.

Shooting around my studio, I liked the card. In my next installment, I'll take it out into the field and see how it works with Wayport hotspots.

See My Other Posts on Geotagging

Geotagging a Journey with photoGPS, iPhoto, and Flickr

iPhoto '09 as Your Geotagging Tool?

First Look at Jobo photoGPS Device and Software

Update to Geotagging Workflow, Including Jobo photoGPS

Finding a Reasonable Geotagging Workflow


twitter.jpg Follow me on Twitter

-


Technorati Tags: , , , ,

Canon announced that their zoomerific PowerShot SX1 IS will be Raw enabled this spring. They will release a firmware update that will unlock this capability giving shooters the added benefit of Raw capture on this compact camera. By doing so, Canon has provided a nice alternative for those who want the 28mm to 560mm zooming range of the SX1, but aren't interested in lugging around a DSLR and telephoto lens.

canon_sx1_is.jpg

The Canon SX1 has many interesting features for the photographer on the go. It uses AA batteries that are easy to find anywhere in the world. It can record HD video (1920 x 1080) and high resolution Raw (3648 x 2736), and it accepts a Mini-HDMI to HDMI cable so you can plug it directly into an HD television for movie or slideshow playback. (You can read a good review of this camera on photographyBLOG).

If you want to shoot 10 megapixel Raw on a compact camera with a powerful zoom and HD video capture, then take a look at the Canon PowerShot SX1 IS. You should be able to download the Raw firmware update next month.


twitter.jpg Follow me on Twitter

-


Technorati Tags: , , ,

red_river_logo.gif

You can now post and read reviews for all of the Red River paper stocks on their site. This new feature was just launched, and I thought that our virtual camera club could help get things rolling by posting reviews of your favorite papers. Red River is a solid supporter of The Digital Story, and their product is outstanding. I just posted a review of Arctic Polar Luster, the surface that I like best.

If you haven't tried Red River paper yet, you can get their Sample Kit for $7.99, including free shipping. You get two 8.5" x 11" sheets for 19 different papers. It's a great way to discover the best stock for your printing needs.

Other Posts About Red River Paper

Getting Started with Inkjet B&W Printing

Red River's Arctic Polar Luster and the HP B8850 Printer

Welcome Aboard Red River Paper


twitter.jpg Follow me on Twitter

-


Technorati Tags: , , ,

sitegrinder_video_utube.jpg

Have you ever watched those timelapse videos of someone building a house or creating something else cool? I just found this nifty SiteGrinder movie on YouTube by Fmlad where an entire web site is designed in 8 minutes. I think this piece does a good job of giving you a feel for the power of SiteGrinder 2.

Previous Posts about SiteGrinder

Introduction to SiteGrinder for Beautiful, Easy Web Design


twitter.jpg Follow me on Twitter

-


Technorati Tags: , , ,

serbian_wedding.jpg

After the wedding was over, our next challenge was to cull the best images from the 2,300 shots we captured over the course of the day. Between the two of us, we had amassed over 32 GBs of Raw files, and we had to transform that data into a customer-friendly deliverable.

My assistant, Danielle, uses Adobe Photoshop Lightroom for her post production. I use Apple's Aperture. By midweek, Danielle had worked through the entire shoot, and delivered a CD to me of high quality Jpegs (at full 5D Mark ll resolution). I had already winnowed down my shoot to a collection of favorites.

I integrated Danielle's picks with mine in Aperture, then sorted by "time captured." This put the entire shoot in order. The only slightly strange parts were when I went off to shoot the boys before the ceremony, and she was shooting the empty reception hall. But other than that, everything meshed together perfectly.

The final gallery count was 447 -- that included both Danielle's and my best shots. I then exported the images out of Aperture as high quality Jpegs constrained at 2200 pixels in either direction. The pictures were uploaded to my Shutterfly Pro account, and I sent the URL out to as many family members and wedding participants as I had email addresses for, encouraging them to pass along the link to anyone they wish.

On Shutterfly, viewers can watch a slideshow or manually click through the images in the gallery. If they see something they like, they can order a print on the spot. Shutterfly handles the printing, business transactions, and delivery. I can monitor activity via my Shutterfly Pro account.

I also prepare a CD of high resolution Jpegs and send it to the clients. I know a lot of photographers don't believe in this, but I want my clients to have their own master collection that they can play with and print as they wish. That will be the last step for me in the assignment. Then I can check it off my list and move on to next week's work.

Photo of happy couple after the ceremony by Derrick Story, captured with a Canon 5D Mark ll using fill flash.

Previous Installments of the Wedding Photographer Chronicles

Wedding Photographer Chronicles: Chapter 1, the Rehearsal

Wedding Photographer Chronicles: Chapter 2, Analyzing the Church

Wedding Photographer Chronicles: Chapter 3, During the Ceremony


twitter.jpg Follow me on Twitter

-


Technorati Tags: , ,

joel_meyerowitz_utube.jpg

Joel Meyerowitz is a serious photographer who specializes in street shooting. Since this month's Photo Assignment is "Street Shot," I thought you might enjoy this video by Joel on street photography. He provides lots of tips on how to position yourself and what to look for.

As I mentioned earlier, Street Shot is the February 2009 Photo Assignment. Time to hit the pavement and discover the interesting moments of life that happen all around you. You can read more about how to submit on our Submissions page. Deadline for entry is Feb. 28, 2009.


twitter.jpg Follow me on Twitter

-


Now Available! The Digital Photography Companion. The official guide for The Digital Story Virtual Camera Club.

  • 25 handy and informative tables for quick reference.
  • Metadata listings for every photo in the book
  • Dedicated chapter on making printing easy.
  • Photo management software guide.
  • Many, many inside tips gleaned from years of experience.
  • Comprehensive (214 pages), yet fits easily in camera bag.

Technorati Tags: , , ,

wasabi_printer.png

I was reading about the new Wasabi Ultramobile Photo Printer that fits in your back pocket and enables you to produce 2"x3" prints from your mobile phone or via USB connection. The key to this device is a very interesting technology called ZINK paper, which means "zero ink."

"ZINK Paper is an advanced composite material with cyan, yellow, and magenta dye crystals embedded inside and a protective polymer overcoat layer outside. When heat is applied in just the right way, full color images appear like magic on the paper."

All of this seemed too good to be true. So I did a little price evaluation of the printer and the paper. You can get the Wasabi Ultramobile Photo Printer from Dell right now for $99 US, and the paper is available from folks like B&H for $9.99 for 30 sheets. In other words, this seems like an affordable technology.

This could be a good device to have in your bag when you shoot events. You could make prints on the spot, or have an assistant to it. If you're a Raw shooter, make sure you capture in RAW + JPEG mode. You can make the prints from the JPEGs and use the RAWs to create the final product.


twitter.jpg Follow me on Twitter

-


Technorati Tags: , , , ,

marin_airporter.png

Now that there's a Mac version of the Jobo photoGPS software, I could streamline my workflow for geotagging a journey home from a business trip. As I left the last meeting of the day at Lynda.com, I mounted the Jobo photoGPS Geo Tagging Flash Shoe on my Canon 5D Mark ll and documented my departure. I snapped pictures all along the way. It was a car-plane-bus-car trip making it perfect for documenting.

Once I returned home, I had the photoGPS write the geodata directly to the Jpegs on my memory card via the photoGPS software and my card reader, then I launched iPhoto '09 and imported the images off the card and into the application. This two-step process actually went faster than I anticipated. I chose the images I liked, put them in an iPhoto album, then uploaded directly from iPhoto to Flickr.

In order for your geodata to travel with your images into Flickr, you have to set the permissions in your Flickr preferences. Go to Your Account > Privacy & Permissions > Import EXIF location data (yes). Do this before you upload your images from iPhoto. Also in iPhoto, you can add descriptions for each image, and those captions will travel with the photos in to Flickr.

In my case, I told the story of a business trip home. You can see it by visiting From Lynda to Home. As you click from image to image, you learn about each stop along the way. If you click on the map link for each photo, you can see the location where it was taken. You can also click on the map link for the set to see all of the pins for the entire journey.

lynda_map_flickr.jpg

By clicking on the detail link for the set, you're presented with medium thumbnails for the trip with captions and map links. Flickr provides you with many different views and lots of information. It's really quite useful.

I'm going to keep playing around with this particular workflow. But I thought you'd like to see what can be done, even at the early stages. If you don't have a geotagging device such as the photoGPS, you can add the geodata in iPhoto '09, then upload to Flickr. You don't get as much geodata that way, but it's still a great option.

See My Other Posts on Geotagging

iPhoto '09 as Your Geotagging Tool?

First Look at Jobo photoGPS Device and Software

Update to Geotagging Workflow, Including Jobo photoGPS

Finding a Reasonable Geotagging Workflow


twitter.jpg Follow me on Twitter

-


Technorati Tags: , , ,