Recently in Photography

  Page 276 of 381 in Photography  

Someday I will pay $400 for Z-Finder Pro because they are clear, secure, and adjustable. But today isn't that day. Budget is too tight at the moment. But I do need a bright, crisp LCD magnifier for some upcoming video projects. So for the time being, I'll do it myself.

LCD Magnifier for Canon 5D Mark II 
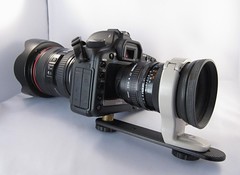
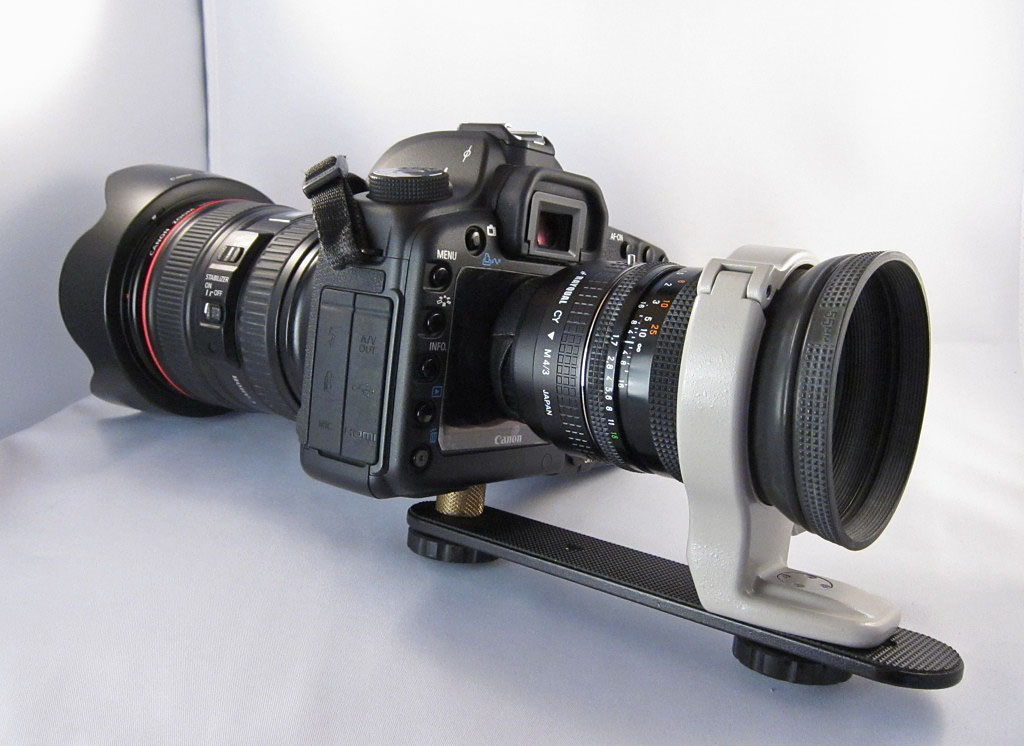
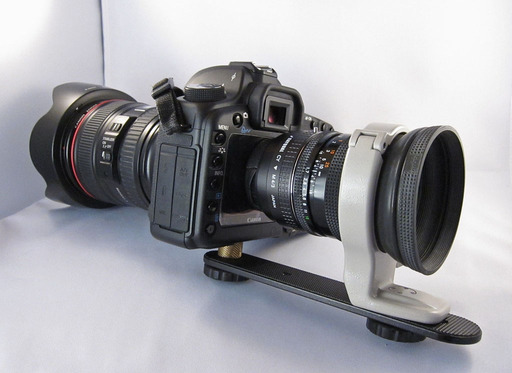
DIY LCD magnifier uses a 50mm f/1.7 Zeiss lens extended by using a Rayqual adapter. The mount is built around a Canon 70-200mm f/4 Tripod Collar.

Figuring Out the Optics

I went upstairs into my mad scientist lab and started playing with lenses and mounts. My magnifier is based on the old "reverse lens trick" to increase magnification. I chose a Zeiss 50mm f/1.7 lens because of its wide opening. To get the right viewing distance from the LCD screen, I needed to add a couple spacers. I used my Rayqual Micro 4/3 adapter because it also had a large diameter opening. It was close to the right distance, but just a tad short. So I took a real lens cap, cut a large diameter hold in it, and mounted it to the Rayqual adapter. Perfect!

I added a little gaffers tape to the open end as to not scratch the LCD on the Canon. On the other end, I screwed in a rubber lens hood to serve as my eyepiece. That way I can use the rig in bright light.

Designing the Mount

I wanted something solid that didn't look too cobbled together. It dawned on me that the tripod collar for my 70-200mm f/4 Canon lens might work. You can get these cheap, BTW -- $12.99 from Meritline. For the bottom plate, I repurposed a flash bracket that had two tripod screws. One for the camera and the other for the Canon ring mount. The only problem was, it sat a little high. So I found a brass spacer in my lighting bag that lined everything up nicely. It doesn't look too bad, does it?

Pros and Cons for this Set Up

Cons: The image is beautifully crisp, but it doesn't cover the entire LCD, only the central area. This isn't a problem when the camera is tripod mounted because I can set up the shot, then remove the magnifier. But for action shooting this would be a problem.

Pros: Aside from being very sharp, I can fine tune the focus via the lens focusing ring. Also, I used stuff I already had (no cash outlay!). And, when I want to use the 50mm on my Olympus PEN camera, I just remove the bottom lens cap (that has a hole in it) and mount the lens to my micro 4/3s camera. So I can get double use out of this set up. (Since the PEN doubles the focal length, that means I have a 100mm f/1.7 lens for my E-PL1. Tell me that isn't useful at times.)

Final Thoughts

At some point this DIY rig will drive me crazy. Hopefully by then I'll have the money to buy a real LCD magnifier. Until then, however, I'm in business.


If you like do it yourself gear, be sure to check out our DIY Section here on The Digital Story. Lots of great ideas there.


twitter.jpg Follow me on Twitter


Image Editing Tips for iPhoto 09

iPhoto 09 is deceptively adept at image editing. Yes, it looks simple, but the essential tools are there for both Raw and Jpeg adjustments. Some of the best goodies, however, are tucked away out of site.

In my recent Macworld article, Six essential iPhoto editing tricks, I show you some of my favorite iPhoto maneuvers. A few are simple, such as holding down the Shift key to view "before and after" versions of an adjusted picture. Others are less obvious, such as seeing the readouts for the Enhance tool, as shown below.

iPhoto Adjust Panel Before and after views of the Adjust panel when the Enhance Tool has been applied to an image.

And there's more. So if you want to improve your iPhoto 09 image editing chops, take a look at Six essential iPhoto editing tricks.


twitter.jpg Follow me on Twitter


Many photographers believe that they need an entire suitcase full of lights to create a professional looking portrait. In this video, I show you how to use one light, a stand, and an umbrella to capture a portrait that looks absolutely great.

This movie is from my Lynda.com training series, Off Camera Flash. By spending just an hour with this course, you can dramatically improve your indoor portrait photography, whether you're on location or in your own environment.


twitter.jpg Follow me on Twitter


Many of the specialty apps for the iPad transform once-difficult manipulations into simple fun. Such is the case for TiltShift Generator for iPad. You can create radial and linear blurs, plus add vignetting for any image on your iPad. And the final product can change your image into something quite special.

Maria Sharapova by Derrick Story Linear blur applied to top and bottom of this image of Maria Sharapova. Click for larger view.

When it's time to export, you have options that include: 480x640, 600x800, 768x1024, 900x1200, 1200x1600, and original size. You can send the edited version as an email attachment or upload to twitpic, twitgoo, or yfrog. If you just want to save the edited version to your iPad, you can do that too. It will be placed in your Saved Photos album, while the original remains intact in its original album.

Maria Sharapova Serve by Derrick Story Radial blur applied to this image of Maria Sharapova serving. Click for larger view.

TiltShift Generator for iPad is available for $2.99 in the iTunes App Store. It feels like Photoshop made easy... and a lot cheaper too.

If you enjoy women's tennis, you may want to visit my Maria Sharapova & Elena Dementieva gallery from the Bank of the West Classic, 2010.


twitter.jpg Follow me on Twitter


Raw files and video clips really pile up the gigabytes when I'm on the road. I've been testing hard drives that have both speed and capacity, and my latest favorite is the OWC 500GB Mercury Elite-AL Pro mini.

OWC 500GB Hard Drive

It spins at a speedy 7200 RPMs, holds 500GBs of data, allows for both FireWire 800 or USB2 connectivity (eSATA too if you need it), includes an on/off switch, and it *does not* require external power for FireWire and USB connections. It's a little bigger -- 5.5in(L) x 3.8in(W) x 1.1in(H) -- than the LaCie Rugged that it replaces. But it also feels more solid and looks beautiful. Cables and plenty of software are included with the drive.

The OWC Mercury Elite-AL Pro mini isn't the lightest drive I've carried recently, but it performs well and inspires confidence. And at $149, it's a good value too.


twitter.jpg Follow me on Twitter


Once you move the flash off the camera, you might want to soften the quality of its output. Here's a brief tour of light modifiers to consider for your off camera flash work.

This movie is from my Lynda.com training series, Off Camera Flash. By spending just an hour with this course, you can dramatically improve your indoor portrait photography, whether you're on location or in your own environment.


twitter.jpg Follow me on Twitter


The Smash, originally uploaded by The Digital Story.

I charged the batteries for the Olympus PEN E-PL1 and headed to Palo Alto, CA to photograph the evening match between Maria Sharapova and Elena Dementieva. At the time of the match, Elena was ranked #5 and Maria #17 in women's pro tennis.

To freeze the action, I knew that I would need shutter speeds of 1/250th or higher. I prefer 1/500th if I can get it under the lights of a night event. My E-PL1 is solid up to ISO 1600, so then it was a matter of lens choice. I opted for my Zeiss 135mm f/2.8 prime lens that I used for years on my Contax 35mm bodies. Since the micro 4/3 bodies double the focal length, I was shooting with an effective 270mm f/2.8 lens - plenty of reach for the intimate tennis center at Stanford University.

I always shoot wide open for these types of events. After a few minutes, I get a feel for where the players are most comfortable on the court, then prefocus in those areas. I always bring a magnifying loupe that I place on the back LCD to get as accurate a focus as possible. You can also use the electronic viewfinder for the E-PL1 if you have it.

It was a terrific match with Maria Sharapova defeating second-seeded Elena Dementieva 6-4, 2-6, 6-3. Maria also won her Saturday semi final event and is in the Bank of the West final today.

I've posted a Sharapova photo gallery captured with this rig. It's amazing what you can do with these compact micro 4/3 cameras.

Cassie McFadden - Float

Here's a collection of images to lighten up your day. The assignment for June 2010 was "Float." Check out this soaring set of images from members of the TDS virtual camera club. And which one will be the SizzlPix Pick of the Month?

The August 2010 assignment is "Tandem." Start working on your contribution now. Details can be found on the Member Participation page. You can now submit photo assignment pictures up to 800 pixels in the widest direction.

Please follow the instructions carefully for labeling the subject line of the email for your submission. It's easy to lose these in the pile of mail if not labeled correctly. For example, the subject line for next month's assignment should be: "Photo Assignment: August 2010." Also, if you can, please don't strip out the metadata. And feel free to add any IPTC data you wish (These fields in particular: Caption, Credit, Copyright, Byline), I use that for the caption info.


Photo by Cassie McFadden. (Click on it to see enlarged version.) You can read more about how Cassie captured this shot, plus see all of the other great images on the June 2010 Gallery page.


Good luck with your August assignment, and congratulations to all of the fine contributors for June. Once again, it's a great collection of images.


twitter.jpg Follow me on Twitter

-


Now Available! The Digital Photography Companion. The official guide for The Digital Story Virtual Camera Club.

  • 25 handy and informative tables for quick reference.
  • Metadata listings for every photo in the book
  • Dedicated chapter on making printing easy.
  • Photo management software guide.
  • Many, many inside tips gleaned from years of experience.
  • Comprehensive (214 pages), yet fits easily in camera bag.

Technorati Tags: , ,

I have a couple hard drives without enclosures that weren't being put to use. What a shame! All that disc space just sitting there. So I decided to take a chance on a $30 hard drive docking station. Now I'm putting those discs to use.

Hard Drive Docking Station

The $30 docking station isn't going to win any awards for craftsmanship or design, but it does work. Insert the drive, push the power button, format it, and start working. Since it's the drive that requires integrity, not so much the docking station, this should serve me just fine for moving my data around.

It also includes a card reader and a USB hub with two ports. Don't get your hopes up for the card reader, but the USB hub seems to work fine.


twitter.jpg Follow me on Twitter


Upload to Flickr from iPhoto

iPhoto is a terrific tool for managing your pictures on your Mac. But iPhoto 09 also lets you manage Web albums for Flickr, Facebook, and MobileMe. This helps you stay organized online as well as on your computer.

In my latest article for Macworld Magazine, Control your online albums with iPhoto, I show you how easy this process is.

Don't keep those great images all to yourself. Share them with friends, family, and even the world!


twitter.jpg Follow me on Twitter