We have not one, but two reader reviews of Lowepro bags for the great outdoors. Both Jane and Ed have put these bags through their paces, and they've filed their reports here.
Lowepro Nova 160 AW
Like many photographers, I'm always searching for that perfect camera bag. Over the years I've owned many bags by various manufacturers, although I seem to gravitate to various-sized Lowepro Trekkers. As a result, I ended up with the ubiquitous "camera bag closet" in the garage.
But in recent years I've been on a mission to simplify and downsize -- first my DSLR gear. I've settled on a Panasonic G1 system as my default camera. It's great for everything from around town, hiking, or traveling. The only time I carry my bigger DSLR kit is when doing action photography.
For this system I've found the Lowepro Nova 160 AW . Dare I say it seems perfect? Only when traveling do I take everything, and yet everything fits in this wonderfully compact and lightweight bag. It even has a stow-away All Weather Cover to boot.
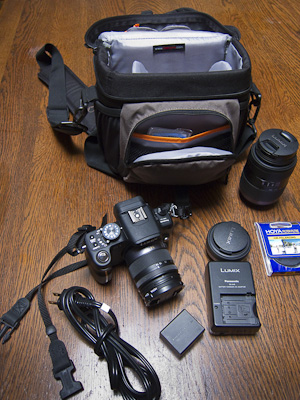
In my case, everything is a Panasonic G1 with 14-45 mm lens attached, pancake 20 mm f1.7, 45-200 mm zoom, extra SDHC cards, spare battery, charger, and cable, plus circular polarizer. Typical configuration is 20 mm and 14-45, or 14-45 and 45-200 -- sans charger and cable. I've included a photo of the bag and how I pack it with everything. The only thing that doesn't fit is the manual which is about an inch too tall for the zipperd pocket on the back of the bag. But it's easy enough to stash elsewhere.
The Lowepro Nova 160 AW sells for about $45.
Ed Shields
Lowepro Primus AW

The Lowepro Primus AW Backpack has enough room for my DSLR, additional lens, and other needed items for photography. The top pocket holds hiking essentials and lunch. There is a side pocket for a water bottle. My tripod straps securely in the tripod holder. The rain cover is important for hiking here in Oregon. (You cannot use the tripod holder with the rain cover though.)
The side access zipper allows for quick access to my camera. The pack itself is very comfortable and has padded shoulder straps, hip belt, and an adjustable sternum strap. There is a large compartment on the back that will hold extra clothing layers with ease. One caveat: when you take your tripod off the pack, make sure to buckle the top strap so it does fall off the pack and get lost. (My husband learned this one the hard way.)
The The Lowepro Primus AW Backpack sells for about $110.
Jane Hamilton
If you have a reader review of outdoor gear, please send it to me! Visit our Member Participation page.
Previously in Outdoor Gear for Photographers
Ultimate Water Bottle for Photogs? GSI DukJug
Dependable Footwear for Photo Work in the Field
Day Tripping with the Lowepro Versapack 200 AW
Shelter on Location: REI Half Dome 2
String Monopods
"The Great Outdoors" - Digital Photography Podcast 218
Portable Camera Stability
Sunset Portraits
New Series on Outdoor Gear for Photographers
 Follow me on Twitter
-