Recently in Photography

  Page 175 of 381 in Photography  

Google+ users who favor the Chrome browser have an entire set of online editing tools waiting for them. To experiment with what looks like Snapseed for the Web, I opened up this wonderful image by photographer Kitty Gallannaugh. Beautiful pictures are just more fun.

Kitty Gallannaugh image in Google+

To get started, open your image in Google+ and click on the Edit link at the top of the page. A new column appears on the right with Snapseed like icons. The tools range from basic image adjustments to frames and tilt-shift effects. The effects are shown in realtime. You can apply the look you want, or cancel and move on to another set of tools.

At the top of the window you have four additional controls: Undo, Redo, Compare, and Revert. So you're in complete control of the appearance of your photograph. Once you have the image adjusted to your liking, click the Done Editing link at the bottom of the page.

If your image has been shared with others on Google+, the changes you make will be applied to those pictures too. That's pretty wild, when you think about it.

This capability works nicely in a mobile workflow. You can get your images posted quickly in the field to the best of your ability. Then, if you decide later that you want to adjust it while reviewing on your computer, you can do so without having to upload another version. You will need Google Chrome to access the tools.

BTW: This image by Kitty Gallannaugh remains in its original state. Some things you just don't mess with.

Want to Comment on this Post?

You can share your thoughts at the TDS Facebook page, where I'll post this story for discussion.


PhotoHelpDesk.com is a down-to-earth resource for curious minded photographers. Submit your questions, and we'll post an answer.

This week on The Digital Story photography podcast: Samsung's impressive NX300 compact system camera, Photo Help Desk: how to test for image stabilization, and retouching portraits in Aperture - All of this and more on today's show with Derrick Story.

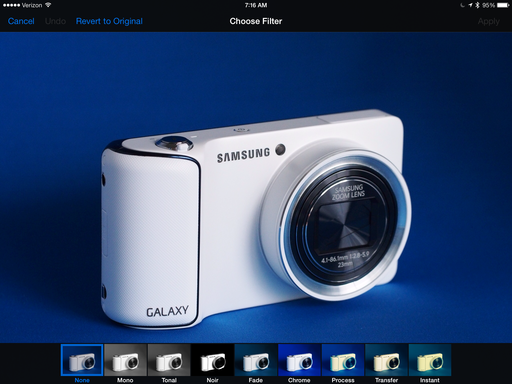
Story #1 - The Samsung NX300 camera with 18-55mm zoom lens ($649) features a 20.3 megapixel CMOS APS-C sensor. The hybrid autofocusing system uses both contrast and phase detection systems. And its burst mode records at 8.6 fps.

Samsung NX300 Front

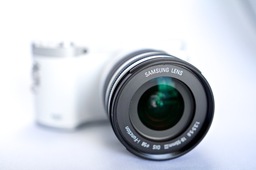
Built-in WiFi makes it easy to connect to a variety of services and devices, including your iOS or Android smart phone.

Cons: LCD-only composition, No accessory viewfinder option, Lack of built-in flash, in-camera battery charging unless you buy accessory charger.

Bottom line - Excellent WiFi, outstanding image quality, well-implemented Smart Mode (with Beauty Face and Light Trace), large APS-C sensor and excellent high ISO performance make this camera a true competitor in the mirror less category.

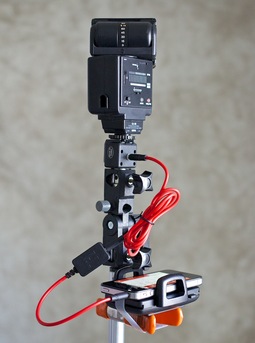
Story #2 - Photo Help Desk: Larry wants to know how to test for image stabilization.

To test image stabilization, start with a lens that you know is working properly. Turn on IS and use 1/8 of a second shutter speed (Shutter Priority mode is an easy way to do this). Hold the camera with one hand and take a picture. Then turn off IS and repeat the procedure. Compare both shots at 100 percent on your computer.

The image captured with IS on should be noticeable sharper. Once you have your testing system down with a good lens, then apply that procedure to the lens in question. You should be able to tell if its image stabilization is working.

Story #3 -Portrait Retouching with Aperture 3 is a new title on lynda.com that helps you master Aperture's image editing tools.

Some of the techniques I cover include: Retouching blemishes, enhancing skin texture, adding highlights to the hair, adjusting clothing and backdrop color, brightening and sharpening eyes, and converting to black and white.

I really had fun recording this title, and I think you're going to have a blast watching it.

And don't forget, I have an Aperture Workshop coming up on Nov. 16 and 17. Write me at derrick@thedigitalstory.com for more details.

Listen to the Podcast

In addition to subscribing in iTunes, you can also download the podcast file here (34 minutes). You can support this podcast by purchasing the TDS iPhone App for only $2.99 from the Apple App Store.

Monthly Photo Assignment

The September 2013 photo assignment is Grab Shot.

More Ways to Participate

Want to share photos and talk with other members in our virtual camera club? Check out our Flickr Public Group. And from those images, I choose the TDS Member Photo of the Day.


iPad for Digital Photographers

If you love mobile photography like I do, then you'll enjoy iPad for Digital Photographers-- now available in print, Kindle, and iBooks versions.

Podcast Sponsors

Red River Paper -- Keep up with the world of inkjet printing, and win free paper, by liking Red River Paper on Facebook.

Make Your Photos Sizzle with Color! -- SizzlPix is like High Definition TV for your photography.Special Summer Sale! Just add "TDS: in the comments space of your SizzlPix! order, and you will get 20 percent off the entire order. Sale ends Sept. 21. Take advantage now.

Need a New Photo Bag? Check out the Lowepro Specialty Store on The Digital Story and use discount code LP20 to save 20% at check out.

Want to Comment on this Post?

You can share your thoughts at the TDS Facebook page, where I'll post this story for discussion.

Ricoh GR Pros and Cons

Ricoh GR

The Ricoh GR 16.2 MP camera is designed for enthusiast photographers who might appreciate its quality, design, image quality, and impressive array of functions. Despite its fixed 28mm optic, the GR is a surprising versatile camera.

But like any other camera, the GR has its highlights and its shortcomings. Here's my pros and cons list.

Pros

  • Sturdy, light, magnesium alloy body
  • 16.2 MP APS-C sensor in a super compact body
  • Excellent image quality
  • A plethora of enthusiast features
  • Excellent menu system and physical controls
  • Handsome 1,230,000 dot LCD
  • Excellent Raw files with in-camera Raw processing
  • High quality complement to smart phone for travel photography

Cons

  • Separate battery charger sold separately; must otherwise plug-in camera to charge
  • Movie recording options more basic than functions for still photography
  • No built-in WiFi
  • No image stabilization
  • Jpegs not as snappy and colorful as the Raw versions
  • Exposure compensation rocker switch convenient, but prone to accidental changes

You can read my complete review of the Ricoh GR over at TechHive.

Want to Comment on this Post?

You can share your thoughts at the TDS Facebook page, where I'll post this story for discussion.


PhotoHelpDesk.com is a down-to-earth resource for curious minded photographers. Submit your questions, and we'll post an answer.

The thing about colored backgrounds, sometimes they get a bit too intrusive. Fortunately, it's very easy to adjust not only the color, but the brightness and saturation of your backdrops... without affecting the subject itself.

In my lynda.com title, Portrait Retouching with Aperture, I have the following tutorial to help you get your backgrounds just the way you want them.

More Aperture Tips and Techniques

In addition to Portrait Retouching with Aperture, you may want to check out my other Aperture titles, including Aperture 3.3 Essential Training (2012), Using iPhoto and Aperture Together, and the latest, Enhancing Product Photography with Aperture. Also, take a look at our Aperture 3 Learning Center. Tons of free content about how to get the most out of Aperture.

Aperture Workshop Coming on Nov. 16 and 17, 2013

Want to learn Aperture in a hands on environment? My next Aperture workshop will be Nov. 16 and 17 in Santa Rosa, CA. We'll review all of the basics, plus work on portraiture (including a live model shoot), product photography, and more. Write me at derrick@thedigitalstory.com for more information and a reservation form.

Safari Pop-Up Flash Booster on a Canon 70D

I've seen wildlife photographers use a Fresnel lens to extend the distance of their shoe-mounted flash.

But I haven't seen an accessory that effectively extends the distance of the humble pop-up flash... until now. The Rogue Safari Flash Booster ($34.95) is the model of simplicity, that really works. It's brought to us by the designers at Rogue, who also created the popular FlashBenders.

My quest was to capture a photo of a hummingbird that frequents my garden at the back of the studio. I mounted the Safari on my new Canon 70D, then activated the pop-up flash. After a bit of experimentation, I settled on full power manual flash mode, Aperture Priority exposure (f/14 at 1/60th), and ISO 200. I used the Canon 70-200mm f/4 at 200mm.

Hummingbird with Flash

What I found so impressive was the intensity of light output from my humble pop-up flash. The hummingbird was feeding about 12 feet away. I had to stop down to f/14 in order not to overexpose the shot. And this was at ISO 200. I cropped the center part of the image for better impact, but even after cropping, I still have a 6MP image captured from distance.

Safari Pop-Up Flash in Package

The Safari Flash Booster works best at 100mm or greater. It's designed for both Canon APS-C and Nikon DX DSLRs, and it weighs only 2 ounces. If the pop-up flash isn't centered inside the housing, Rogue includes a 5mm and 8mm spacer to improve alignment. You can use it in TTL flash mode or manual. In my testing, I preferred manual flash mode so I could control the output.

I'm going to continue testing this accessory, including during an upcoming shoot at Safari West African animal preserve in Santa Rosa, CA. But based on my initial results, I have to say that the Rogue Safari Flash Booster is a clever, well-designed accessory that potentially has a variety of applications.


Join me on my Instagram site as I explore the world of mobile photography. And now Instagram features 15-second movies too.

Want to Comment on this Post?

You can share your thoughts at the TDS Facebook page, where I'll post this story for discussion.

I finally have a comfortable way to hold my DSLR while working in the studio or in the field. The Joby UltraFit Hand Strap with UltraPlate ($49.95) is the most comfortable strap I've used on my Canon 5D Mark II, 60D, and now 70D.

Joby UltraFit Hand Strap with UltraPlate

Here's the kicker. The hand strap comes with the Arca-Swiss compatible UltraPlate. I have the Joby Ballhead X mounted on all of my travel tripods and monopods. When I need to secure the camera, I just slide it into place.

No fuss! I don't have to remove the hand strap to use any of my stabilizing devices. In fact, I never remove the hand strap... because I don't need to.

Joby UltraFit Sling

Even if I need to use a sling strap for an event shoot, I simply add the Joby UltraFit Sling Strap ($31.75 - XXL and women's size available too). The sling strap screws into the UltraFit plate.

The UltraFit system has finally allowed me to toss my uncomfortable neck straps and wrist-burning hand straps. Plus I like having the Arca-Swiss compatibility. Even if I didn't want to use Ballhead X, there's a wide variety of tripod heads that work wonderfully with this system.


Join me on my Instagram site as I explore the world of mobile photography. And now Instagram features 15-second movies too.

Want to Comment on this Post?

You can share your thoughts at the TDS Facebook page, where I'll post this story for discussion.

iPhone 5s Camera

We're beyond having to make excuses for our Samsung, Nokia, and Apple mobile devices. Yes, I know, the best camera is the one that's with you. That's because for many people, it is their best camera.

The goal of the iPhone 5s is to let you concentrate on the composition without worrying about the physics of photography. In low light, it stabilizes. If flash is required, it fires white and amber LEDs in proportion to balance the color. Burst mode is 10 frames per second. Then it analyzes the sequence and suggests the best shots. And the video isn't bad either, especially the 120 frames per second at 720p.

The iPhone 5s, Samsung Galaxy S4, and Nokia Lumia 1020 are the compact cameras of the modern age. They're smart, agile, and have serious computing power. These are the point 'n shoots I want to have in my pocket all the time. I even use them when I have my DSLR or mirrorless in action. How do you think those behind the seces images are captured?

Photography has always been the art form most influenced by technology. And the latest victim of change is the compact camera. I'm OK with that. Compacts had a good run. But to be honest, I'd rather just carry the iPhone 5s for my snapshots. Plus it makes phone calls too.


iPad for Digital Photographers

This is the kind of stuff I write about in iPad for Digital Photographers-- now available in print, Kindle, and iBooks format.

Want to Comment on this Post?

You can share your thoughts at the TDS Facebook page, where I'll post this story for discussion.

This week on The Digital Story photography podcast: The new Olympus OM-D E-M1 Four Thirds and Micro Four Thirds CSC body, my next camera purchase will be an iPhone, and Soft Filters for Portraits - All of this and more on today's show with Derrick Story.

Story #1 - Olympus OM-D E-M1. What happens when you have two distinct lines of lenses, and you only want one? You create a camera that accepts both. That's what Olympus has done with the new OM-D E-M1. They created a camera body that accepts both Micro Four Thirds lenses and Four Thirds. And it's the top story for today's show.

Olympus OM-D E-M1 Back

Story #2 - My next camera will be an iPhone. Ahhhh, the photographer's perspective on technology. Apple's new iPhone will be a mix of surprises and anticipated updates. And along with iOS 7, I'm going to enjoy exploring them all. But what's most important to me is the camera. Yes, I want an improvement over my already excellent iPhone 4S.

Story #3 - Soft filtering for portraits. Over the years, I've attached everything from expensive softening filters to pantyhose over the front of my lens. But now we have digital filters that do a better job. I discuss the Soft Focus Art Filter on the OM-D compared to the Beauty Face filter on Samsung Galaxy cameras (NX 300, etc.). And just for fun, I try the Soft Focus creative filter on the Canon 70D. How do they stack up?

Listen to the Podcast

In addition to subscribing in iTunes, you can also download the podcast file here (33 minutes). You can support this podcast by purchasing the TDS iPhone App for only $2.99 from the Apple App Store.

Monthly Photo Assignment

The September 2013 photo assignment is Grab Shot.

More Ways to Participate

Want to share photos and talk with other members in our virtual camera club? Check out our Flickr Public Group. And from those images, I choose the TDS Member Photo of the Day.


iPad for Digital Photographers

If you love mobile photography like I do, then you'll enjoy iPad for Digital Photographers-- now available in print, Kindle, and iBooks versions.

Podcast Sponsors

Red River Paper -- Keep up with the world of inkjet printing, and win free paper, by liking Red River Paper on Facebook.

Make Your Photos Sizzle with Color! -- SizzlPix is like High Definition TV for your photography.Special Summer Sale! Just add "TDS: in the comments space of your SizzlPix! order, and you will get 20 percent off the entire order. Sale ends Sept. 21. Take advantage now.

Need a New Photo Bag? Check out the Lowepro Specialty Store on The Digital Story and use discount code LP20 to save 20% at check out.

Want to Comment on this Post?

You can share your thoughts at the TDS Facebook page, where I'll post this story for discussion.

OM-D E-M1 Front View

The Olympus OM-D E-M1 is the successor to both the OM-D E-M5 and the E-5, providing excellent performance with both micro four thirds and four thirds lenses. How did they accomplish this feat? By developing "Dual Fast AF" that works for both types of mounts.

When a micro four thirds lens is mounted on the E-M1, it uses contrast detection AF for swift focusing. When Four Thirds glass is attached via an Olympus adapter, the camera switches to on-chip phase detection AF. I had a chance to shoot with both mounts, and indeed the technology works.

Evolved Look and Feel

As a result of this feature integration, the E-M1 looks different than either the E-M5 or E-1. In many ways, it's a whole new camera. The E-M1 does retain the distinctive electronic viewfinder housing of the E-M5. But Olympus has added a built-in grip and rearranged the top deck controls. The on/off switch has moved from the back of the camera to the top left (as you hold it in shooting position). And the exposure mode dial is now on the right side.

OM-D E-M1 Top View

Currently, there is only a black model available. Some of the finer details are also different, such as the textures for the control dials and the shapes of buttons and switches.

New Features

As you may have anticipated, there are plenty of feature improvements with the new model. Here are a few of the highlights.

  • 37-point On-Chip Phase Detection AF and 81-point Contrast Detection AF (auto switching)
  • New TruePic VII processor (the Live MOS sensor retains its 16MP resolution)
  • Built-in WiFi for both image transfer and remote camera control
  • Freeze proof body to -10 C (in addition to dust and splash proof)
  • Super large Electronic Viewfinder that is quite impressive (2.36M-dot LCD, 0.74x magnification)
  • Built-in HDR function
  • 10 fps burst mode
  • 1/8000th of a second top speed mechanical shutter
  • Diorama II Art Filter
  • Connectors for X-sync flash and microphone

OM-D E-M1 EVF View

Pricing and Availability

The new OM-D E-M1 will be available in Oct. 2013 for $1399.99 (body only). If you want to use Four Thirds lenses, you'll also need to purchase the MMF-3 Four Thirds Lens to Micro Four Thirds Lens Mount Adapter ($156).

I'm hoping to receive a camera to test soon. I'll report more after some hands-on work.

Want to Comment on this Post?

You can share your thoughts at the TDS Facebook page, where I'll post this story for discussion.


Join me on my Instagram site as I explore the world of mobile photography. And now Instagram features 15-second movies too.

Image Stabilization on Canon Lens

Larry asked an interesting question about how to test the image stabilization on his Canon camera. We answer with this handy technique that he can do at home.

Tom is planning a vacation to Europe and wants to know how to find information about photo tours so he can maximize his picture opportunities (and not get ripped off).

And John is interested in editing some of his Aperture shots in Photoshop and wants to know about "roundtripping." We show him how.

If you haven't stopped by the Photo Help Desk for a visit with Jeremy, Tom, and Derrick, then you're missing out on some great shop talk. We're here at Photo Help Desk 6 days a week to help keep you creative and productive. (On the seventh day we're out taking pictures...)


Join me on my Instagram site as I explore the world of mobile photography. And now Instagram features 15-second movies too.