Recently in Photography

  Page 164 of 382 in Photography  

How to Survive on Only 256 GBs a Year

The choice between speed and storage is a tough one for photographers. When I bought my stock MacBook Pro with Retina Display in mid-2012, I wanted speed. So I've had to learn to live with 256 GBs of built-in storage for my daily work.

backing-up-libraries.jpg 
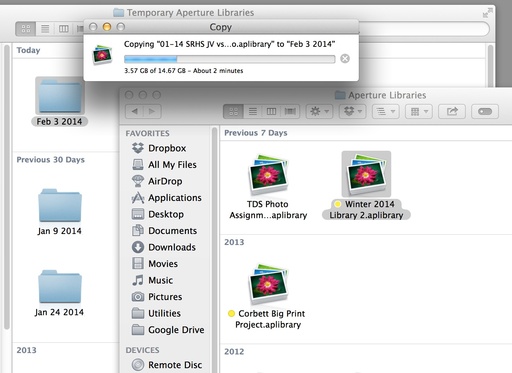
Copying libraries from my MacBook Pro to the Drobo 5D.

How do I do it?

I rely on Aperture's excellent Project/Library management structure. I only store my current projects on the MacBook Pro at any given time. That initial phase is when I'm image editing, which is when I need the best performance.

Once the project has reached a mature state, I move it off the laptop and integrate it into the master library on the Drobo 5D. If I need to work on those images at a later time, I simply connect the Thunderbolt cable from the Drobo, and open the library enabling me to touch-up a photo then export it for publishing.

I keep a separate portable hard drive in my laptop bag. It contains a library of images from the last year, just in case I need to grab something while on the go.

Using this system, I have survived with my internal 256 GB Flash drive for almost 2 years. I couldn't have done it without Aperture's versatile library management system and a Thunderbolt external drive.

The good news is that I should be able to afford a bigger internal drive with my next MacBook Pro. But I'll continue to use the same system... just with a bit more breathing room.

Aperture Tips and Techniques

To learn more about how to manage your projects and libraries in Aperture, check out my Aperture 3.3 Essential Training (2012) on lynda.com. Also, take a look at our Aperture 3 Learning Center. Tons of free content about how to get the most out of Aperture.


The Digital Story on Facebook -- discussion, outstanding images from the TDS community, and inside information. Join our celebration of great photography!


"High ISO" - TDS Photo Assignment 93

For the Dec. 2013 Photo Assignment, TDS shooters jacked up their ISO setting and explored fading light. See for yourself in our gallery, High ISO. And which one will be the SizzlPix Photo Assignment Pick of the Month?

fred-s-brundick-highiso.jpg

Fred S. Brundick writes, "I took this at the gallery event. I had my 50mm f/1.8 wide open and set the ISO to 3200 so I wouldn't need a flash." See all of the great images from this month's assignment by visiting the High ISO gallery page.


Participate in This Month's Assignment

The Feb. 2014 assignment is "Smartphone." Details can be found on the Member Participation page. Deadline is Feb 28, 2014. No limit on image size submitted.

Please follow the instructions carefully for labeling the subject line of the email for your submission. It's easy to lose these in the pile of mail if not labeled correctly. For example, the subject line for this month's assignment should be: "Photo Assignment: Feb. 2014." Also, if you can, please don't strip out the metadata. And feel free to add any IPTC data you wish (These fields in particular: Caption, Credit, Copyright, Byline), I use that for the caption info.

Gallery posting is one month behind the deadline. So I'm posting Dec. 2013 at the end of January, the Jan. gallery will be posted at the end of Feb., and on and on.

Good luck with your Feb. assignment, and congratulations to all of the fine contributors for Dec.


Want to Comment on this Post?

You can share your thoughts at the TDS Facebook page, where I'll post this story for discussion.


iPad for Digital Photographers

If you love mobile photography like I do, then you'll enjoy iPad for Digital Photographers-- now available in print, Kindle, and iBooks versions.

High magnification reveals new worlds hiding in everyday objects. I've been photographing old RAM chips with the olloclip Macro 3-IN-1 Photo Lens and the olloclip Quick-Flip Case + Pro-Photo Adapter.

Using the InstaFocus Hood that's included with the kit, both lighting and focusing are easy. Just attach the hood to the lens and set it on the object you want to photograph. Tap on the iPhone screen, and the image snaps into clarity.

I recommend using the olloclip app available in the iTunes App Store to capture the image. Not only is it designed to work with the lenses, it also features a Mesh Editor Tool that makes distortion correction easy before saving the picture to your Camera Roll.

Macro Set Up with iPhone 5S The iPhone 5S with olloclip lens and case and Joby Gorillapod for additional support. Photos by Derrick Story.

You can learn more about the olloclip Macro at their site. It's available for $69.99 directly from olloclip or from Amazon.


Nimble Photographer Logo

The olloclip has a high Nimbleosity Rating. What does that mean? You can learn about Nimbleosity and more by visiting TheNimblePhotographer.com.

Want to Comment on this Post?

You can share your thoughts at the TDS Facebook page, where I'll post this story for discussion.

My Favorite Mac of All Time

The iMac DV Special Edition was my first race car. When I bought this Macintosh in 1999, I felt like I had the sexist machine on the planet.

iMac DV Special Edition

Not only was it beautiful to look at, and still is, it packed a 400MHz processor, a full megabyte of L2 cache, and a Rage 128 graphics chip. I used this machine to design my first web sites and make the transition to the online world.

iMac DV 1999

The iMac DV still runs to this day. The internal hard drive died years ago. So now I boot it from a 6 GB FireWire external drive. As you see in the above photo, the iMac is logged on to my studio network and browsing the Web via Safari. It's running Mac OS X 10.4.

What's Your Favorite Mac of All Time?

You can share your thoughts at the TDS Facebook page, where I'll post this story for discussion.

The Olympus OM-D E-M10 wasn't the only good news from Olympus today. They also announced a handful of tantalizing accessories.

olympus-14-42-pancake-zoom.jpg

Starting with the M.Zuiko Digital ED 14-42mm f/3.5-5.6 EZ Lens in black or silver for $349. This pancake zoom lens measures just .9 inches thick. It has a smooth electric zoom that is suitable for shooting movies, and can also be zoomed in and out remotely using compatible smartphones through the updated Olympus Image Share app.

I'm also pleased that Olympus has improved the accessory grip for the E-M10 with the announcement of the ECG-1 for $59.95. They've designed a quick release lever that makes for simple removal of the accessory providing easy access to the battery.

9mm-body-cap-lens.jpg

The 9mm f/8.0 Fisheye Body Cap Lens for $99 adds a functional twist to the standard camera body cap. The super wide angle coverage (140 degree field of view) is perfect for adding a little creativity to your photography.

And finally, there's the new MCON-P02 Macro Converter ($64.95) that shortens the focusing distance for six lenses, including the 14-42mm f/3.5-5.6 EZ, 14-42 f/3.5-5.6 II R, 45mm f/1.8, 25mm f/1.8, 17mm f/1.8, and the 12mm f/2.0 lens.


Nimble Photographer Logo

These accessories has a high Nimbleosity Rating. What does that mean? You can learn about Nimbleosity and more by visiting TheNimblePhotographer.com.

Want to Comment on this Post?

You can share your thoughts at the TDS Facebook page, where I'll post this story for discussion.

"There are no secrets when it comes to light. Only physics," writes David Hobby in his free PDF titled, "Lighting 101." You can download this information-packed guide for free from his webiste, Strobist.

This 63-page tutorial is full of invaluable tips such as, "To avoid refections in glasses, simply light from one side and have the person face the other. There is no need to be shooting all of the way in profile, either. A flattering, 3/4 angle (subject to camera) will work just fine."

light-for-glasses.jpg

In my opinion, Lighting 101 should reside on every photographer's iPad for reference and practice. David Hobby had illuminated the path for working with flash for so many of us. Go visit his site today... and learn!

Want to Comment on this Post?

You can share your thoughts at the TDS Facebook page, where I'll post this story for discussion.

Thank Goodness for Camera WiFi

iphone-not-supported.png

It seems like it should work. But if you plug the Lightning to SD Card Camera Reader into your iPhone, all you get is a not supported message. Ack!

When I'm in super-nimble mode, I don't even want to bring my iPad (which of course does support the SD card reader). I just want a compact camera in one pocket and my iPhone in the other.

This is where camera WiFi saves the day. No adapters required. Today, I'm heading out with a Canon PowerShot S110 that connects to my iPhone 5S wireless via the Canon CW iOS app. And boom! I can quickly move images from one device to the other.

Personally, I would prefer it if Apple opened up the iPhone to use the SD Card Reader. It's always good to have a hardwire backup. Until then, thank goodness for camera WiFi.


Nimble Photographer Logo

This tandem has a high Nimbleosity Rating. What does that mean? You can learn about Nimbleosity and more by visiting TheNimblePhotographer.com.

Want to Comment on this Post?

You can share your thoughts at the TDS Facebook page, where I'll post this story for discussion.

pouches-for-modular.jpg

A primary goal with camera gear transport is to prevent metal objects from colliding with one another. There are a variety of ways to do this.

Many professional camera bags, such as those made by Lowepro, feature padded dividers to eliminate unwanted contact. This works great as long as your gear goes directly from the bag, to use, and back to the bag.

That's not always the way I work, however.

Often my camera bag is packed for traveling from one place to another, holding all of the equipment that I would need for that duration of the trip. Once I arrive at my destination, I most likely want to move about with fewer items, only selecting what I need for a particular shoot.

I'll have a flat shoulder bag packed in my suitcase, such as the Lowepro Photo Sport 18L Shoulder Bag or the Walking Man Shoulder Bag, then use pouches to protect individual items.

The Lowepro Photo Sport Shoulder Bag is a favorite of mine for travel.

The system can be quite efficient because I stow much of my gear in pouches in the large camera bag. Then I simply pull the items that I want and relocate them to the new bag. Essentially, it's a modular system for your camera gear on location.

Pouch features that I look for when designing this system include:

  • Squarish shape that is more efficient when packed in a bag.
  • Belt loop, and if possible, optional shoulder strap. This allows me to head out to dinner with just the pouch and no other bag at all.
  • A variety of colors. This helps to quickly identify one pouch from another.

The downside to this approach is that you can't get as much equipment in your "Point A to Point B" bag because of the pouches themselves. So I don't use this setup for every shoot. But for vacation travel and non-photography business, it works like a charm.


Nimble Photographer Logo

This pouch system has a high Nimbleosity Rating. What does that mean? You can learn about Nimbleosity and more by visiting TheNimblePhotographer.com.

Want to Comment on this Post?

You can share your thoughts at the TDS Facebook page, where I'll post this story for discussion.

I've been covering high school basketball this season with the Olympus OM-D E-M1 and the Olympus 75mm f/1.8 lens. As people see my shots online, the question has come up: Could I use this tandem instead of a DSLR to cover indoor sports?

The answer is a resounding, "depends."

Zach with Ball Photos by Derrick Story. OM-D E-M1, 75mm lens, ISO 3200, Aperture Priority f/1.8, 1/400th, +0.3 EV

For example, here's a note that I recently received from Joel, who is a photographer in the TDS community.

"I have had some issues with the 75mm Oly lens. I am shooting Dvision 1 college basketball in the best-lit arena in the Patriot League. I am able to use a combination of ISO settings starting at 1600 and going up thru 3200, simply dependent upon the aperture and shutter speed I desire. BUT, I am having some problems with focus slipping off my intended subject, or simply never locking in the first place. I don't have those issues with the 45mm lens."

Joel went on to ask if I were having the same issues with the Olympus 75mm lens.

The short answer is "yes."

My loss is higher with the 75mm than with the Canon 85mm f/1.8 on my 70D DSLR. So why do I keep shooting this season with the E-M1 and 75mm?

Congrats

The reason is because when I do get a shot I like, I love it. There's a certain feel that I get with the mirrorless kit that doesn't happen as often with other cameras and lenses. And as the season wears on, my percentage of good shots is rising. I'm having to learn how to shoot with this rig.

This is why my initial answer to the E-M1 vs DSLR is "depends." If I were shooting a single assignment that required the highest number of good images, I would choose my Canon DSLR and lenses. My percentages are better.

If, as the case for me this year, I have an entire season to build a collection of images for the high school yearbook, I'm sticking with the OM-D and 75mm.

Last night's shoot, for example totaled 723 frames for the JV game. I liked 219 images from that game. I loved a dozen of those shots.

For those of you who shoot basketball regularly, how do those numbers compare to yours? My guess is that they are a bit lower. And if you were shooting these types of assignments to pay your bills, you should go with a rig that gives you the best percentages possible. You don't want to miss the game winning shot.

As for me, I'm going to evaluate the body of work at the end of the season. Then I will decide. But for now, I'm going to stick with the E-M1 and 75mm and see how good I can get with them.


Nimble Photographer Logo

This kit has a high Nimbleosity Rating. What does that mean? You can learn about Nimbleosity and more by visiting TheNimblePhotographer.com.

Trade Show Shoes - The Movie

So, what do people wear on their feet when attending monster trade shows such as CES in Las Vegas? This floor level view provides some insights.

Recorded at CES 2014 at the Las Vegas Convention Center. I used a Canon S110 set at floor level. The movie was edited in Aperture 3.5 using the Slideshow tool.

Aperture Tips and Techniques

To learn more about Aperture, such as how to edit movies with this app, check out my Aperture 3.3 Essential Training (2012) on lynda.com. Also, take a look at our Aperture 3 Learning Center. Tons of free content about how to get the most out of Aperture.


The Digital Story on Facebook -- discussion, outstanding images from the TDS community, and inside information. Join our celebration of great photography!