Recently in Photography

  Page 247 of 381 in Photography  

There are a variety of cloud services available these days, including Apple's new iCloud. But what if you wanted to create your own cloud? I've been testing the Iomega Personal Cloud, the Segate BlackArmor network drive, and the Buffalo Cloudstor (which I didn't have working when I recorded the podcast, but I do now and like it a lot). In this week's episode, I explore the idea of creating your own storage cloud online, and share some of my initial experiences doing so.

I also have published a follow up article about the Buffalo Cloudstor. When I recorded the podcast, the Cloudstor wasn't online yet, in part because of a change I made to the drive configuration. Now that I have it working, I like it the best of the three drives I cover in this episode. So after you listen the the podcast, you may want to read Personal Cloud Storage for Photographers.

Listen to the Podcast

You can also download the podcast here (29 minutes). Or better yet, subscribe to the podcast in iTunes. You can support this podcast by purchasing the TDS iPhone App for only $2.99 from the Apple App Store.

Monthly Photo Assignment

Smoke is the July 2011 Photo Assignment. You can read more about how to submit on our Member Participation page. Deadline for entry is July 31, 2011.

TDS Oct. Photography Workshop and Nov. Aperture Workshop

I'm considering adding an Aperture Workshop in Nov. or Dec. If you want your name on the reserve list, or just more information, drop me a line.

More Ways to Participate

Want to share photos and talk with other members in our virtual camera club? Check out our Flickr Public Group. And from those images, I choose the TDS Member Photo of the Day.

Podcast Sponsors

Red River Paper -- The $7.99 Sample Kit is back! And with free shipping.

Make Your Photos Sizzle with Color! -- SizzlPix is like High Definition TV for your photography.

Need a New Photo Bag? Check out the Lowepro Specialty Store on The Digital Story and use discount code LP20 to saven 20% at check out.


Technorati Tags:
, , , , ,


Buffalo Cloudstor

I've been testing the Buffalo Cloudstor with an eye toward it helping me better manage my photography content, both in the studio and while on the road. I have good news and bad in this regard. We'll start with a brief overview of the Buffalo network drive and the good.

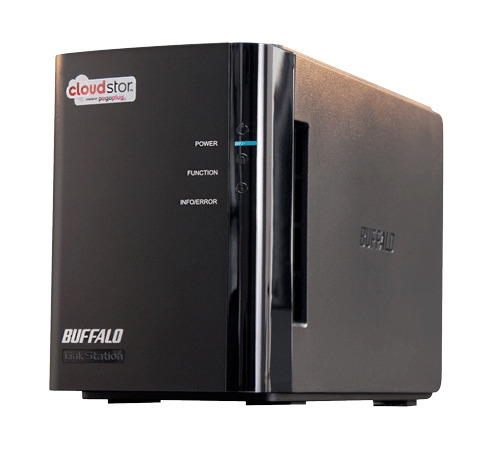
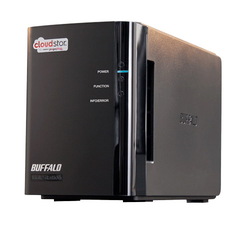
What Is the Buffalo Cloudstor?

For testing, I purchased a Buffalo Technology CloudStor 2-Bay (1 x 1 TB) Gigabit Ethernet Network Storage CS-WX1.0 for $129. I thought was a great price for a unit that provides Raid 1 mirroring between the drives, network connectivity, and software to make cloud access a snap. To get set up, all I had to do was connect the drive to my Airport base station via the supplied Ethernet cable and turn on the drive. I then registered with PogoPlug (Buffalo's online partner), downloaded the desktop app for my Mac, and spent about a half an hour configuring the set up.

The only problem I had during this process turned out to be my own fault. When I first got the Buffalo, I swapped out the 1 TB drives for a couple of 2 TB drives that I already had. The Cloudstor didn't like them for some reason. But I didn't know that at first. I thought I was having connectivity problems, but in reality, it was the swapped out drives. When I finally figured out to put the original 1 TB drives back in, every thing worked great. Go figure.

Access to My Master Raw Files While on the Road

Even though the Buffalo can perform a variety of cool tasks, such as serving up your iTunes library from afar, I was basically interested in two things. First, I wanted it to store my master Raw files so I would have access to them from anywhere in my studio, and while on the road.

My workflow is that I work with a referenced Aperture library on my MacBook Air while traveling. So I have a hefty library full of thousands of Jpeg previews with me. But every now and then I need the original Raw file, and having those available via the cloud would be handy. Since my Projects in the Aperture library are organized the same way as the referenced file folders on my external drives, finding a master image is a snap.

On average, it took the Buffalo Cloudstor about a minute and a half to download a 27 MB Raw file from a remote location. Not blazing fast, but workable for those times I need a couple masters while on the road. In the studio on the local area network, it was faster.

Using the Cloudstor as a Raw File Backup While on the Road

The second task I was interested in was using the Cloudstor as an image backup device while I'm working on location. Wouldn't it be nice to upload a day's shoot from the hotel and know that all of your Raw files are safe and sound back home? Unfortunately for Raw shooters, the technology just isn't there yet.

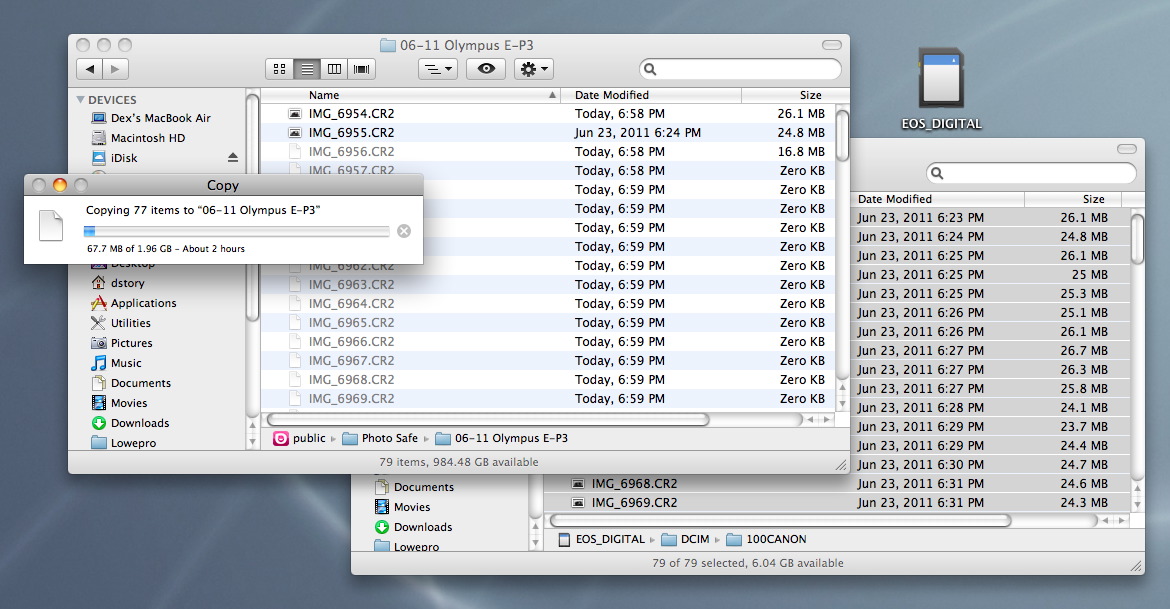
I tried a sample shoot of 79 Raw files that totaled about 2 GBs of storage, and uploaded them off the card via my MacBook Air to the Buffalo Couldstor about 6 miles away at my studio.

Copy Job to Cloudstor A 2 GB upload required 2 hours to complete via the cloud.

Even with really good cable Internet access on both ends, the upload took 2 hours. On a normal day's shoot, I rack up between 300 and 600 Raw files, and the Internet connection on the road often isn't nearly as good as what I tested at home. So it's conceivable that the upload would not be finished by the time I got up the next morning, or that the Internet connection would timeout before completion.

The Bottom Line

The Buffalo Cloudstor network drive is a terrific value considering that you get TBs of storage, easy to use software, and all of this capability at a great price. You can use it to share files on your local area network, and better yet, remotely via the Internet.

You can preload it with your master image files by connecting a separate hard drive via the Cloudstor's USB port on the back of the unit, then access those files from anywhere you have an Internet connection. It's not the fastest server on the planet, but it's fine for small batch downloads.

It can also serve as a back-up for traveling photographers, but it's not practical for large batches of big Raw files. If you shoot Jpegs, you'll most likely have a good experience as long as you have good bandwidth.


The Digital Story on Facebook -- discussion, outstanding images from the TDS community, and inside information. Join our celebration of great photography!


David Gary Henry

For the May '11 Photo Assignment, TDS shooters got their Eco on to create this gallery titled Shades of Green. Monotoned? No way. A visual tour through one of our favorite colors? Yes! And which one will be the SizzlPix Pick of the Month?

The July 2011 assignment is "Smoke." Start working on your contribution now. Details can be found on the Member Participation page. Submit your photo assignment picture 800 pixels in the widest direction. Deadline is July 31, 2011.

Please follow the instructions carefully for labeling the subject line of the email for your submission. It's easy to lose these in the pile of mail if not labeled correctly. For example, the subject line for this month's assignment should be: "Photo Assignment: July 2011." Also, if you can, please don't strip out the metadata. And feel free to add any IPTC data you wish (These fields in particular: Caption, Credit, Copyright, Byline), I use that for the caption info.


Photo by David Gary Henry. (Click on it to see enlarged version.) You can read more about how David captured this shot, plus see all of the other great images on the May 2011 Gallery page.


Good luck with your July assignment, and congratulations to all of the fine contributors for May.


twitter.jpg Follow me on Twitter

-


Now Available! The Digital Photography Companion. The official guide for The Digital Story Virtual Camera Club.

  • 25 handy and informative tables for quick reference.
  • Metadata listings for every photo in the book
  • Dedicated chapter on making printing easy.
  • Photo management software guide.
  • Many, many inside tips gleaned from years of experience.
  • Comprehensive (214 pages), yet fits easily in camera bag.

Technorati Tags: , ,

Here's the problem when you click the new Olympus 12mm f/2.0 prime lens into place on the redesigned E-P3 body: You never want to take it off. Seriously.

Olympus E-P3 with 12mm & Kit Lens

I've been testing this combination for a few weeks, and every time I considered switching to the new 14-42mm zoom (which is very nice, btw), I found a reason to keep the 12mm mounted. Actually, there are a number of reasons:

  • The 12mm f/2.0 looks amazing against the matte black body of the E-P3. The feel of the machined metal, design of the barrel, and that big objective glass in the front is addicting.
  • It focuses fast. Olympus has overhauled the focusing system in the E-P3, and combined with the 12mm lens, the speed is blazing. (Also great with new 14-42mm, once I actually tried it.)
  • Sharp. Edge to edge sharpness.
  • Wide field of view. The 12mm prime is a 24mm equivalent on a full frame camera. (You double the focal length on micro four-thirds bodies.)
  • Snap Focus. The focus ring can be pulled back toward the body allowing you to manually focus the camera with a dampened feel that harkens back to the day of great prime lenses. I'm also thinking of what I can do with this when recording full HD movies with the E-P3.

Olympus E-P3 with 12mm f/2.0

When I work with the E-P3 and 12mm prime, in all honesty, I feel like I have that top of the line German camera I always wanted, but could never afford. That doesn't mean this combination is cheap, but it's within my range.

The new Olympus PEN E-P3 with the redesigned 14-42mm zoom is $899 US. The 12mm f/2.0 prime lens is $799 US. For about $1,700, you get a solid, state-of-the-art digital body, a zoom, and a fast prime lens. (As shown in the top photograph.) That's nice.

I'll be writing more about the E-P3 itself. You can read the basic overview of the camera here. And here's more information on the 12mm f/2.0 prime lens. I've published a set of images on Flickr that show you different views of the camera and some photos captured with the 12mm lens.

More to come on all of this!


The Digital Story on Facebook -- discussion, outstanding images from the TDS community, and inside information. Join our celebration of great photography!


"This image was taken while strolling through Central Park in Manhattan," writes Kevin Miller. "The John Lennon memorial, 'Strawberry Fields,' was dedicated on what would have been his 45th birthday, October 9, 1985, by New York Mayor Ed Koch and Lennon's widow Yoko Ono."

John Lennon Memorial by Kevin Miller

"Mayor of Strawberry Fields" by Kevin Miller. Click on image for larger size.

"About 18 years ago, Gary dos Santos started hanging around the memorial and eventually became the self-assigned curator -- decorating the mosaic memorial and giving his Lennon spiel to fans. About 10 years ago, Gary was visited in a dream by the Brother (John Lennon), who told him to keep up his daily efforts at the memorial and that he should be the appointed Mayor of Strawberry Fields."

"This image captures Gary in the middle of his memorial decorating service. Note the title 'Mayor' on his jacket."

Taken with Canon S95, ISO 400, f4.5, 1/125th second, 13mm lens setting based on range of 6mm-22.5mm.

This is our 216th Grab Shot! Wow. If you want to review the collection that began back in 2006, go to our Grab Shots page.

If you have a candid you'd like to share, take a look at our Submissions page, then send us your Grab Shot. We'll try to get it published for you on The Digital Story.

And you can view more images from our virtual camera club in the Member Photo Gallery.


The Digital Story Podcast App is the best way to stream or download weekly TDS podcast episodes. No more syncing your iPhone, iPod Touch, iPad, or even your Android phone just to get a podcast. And the best part is, The Digital Story Podcast App is your way to help support this show. Download it today!


twitter.jpg Follow me on Twitter


I was standing among the giant balloons as propane burners brought them to life and crews steadied the crafts for hopeful liftoff. "Hot Air" was shot with a Canon 5D Mark II and edited in Final Cut Pro X.

You can read about this event, which was part of the June 2011 TDS Photography Workshop, by clicking on to the article, More Hot Air than Usual at the TDS Summer Workshop.


The Digital Story on Facebook -- discussion, outstanding images from the TDS community, and inside information. Join our celebration of great photography!


A gap in my photography software had been the ability to create professional videos from the content captured with my DSLR. Until recently, I depended on iMovie and the slideshow function in Aperture to meet my needs. Then Final Cut Pro X was announced. Totally rewritten from prevous version, FCPX gave me professional movie editing tools in a package I could understand. In today's podcast, I discuss my first movie edited in Final Cut Pro X, Hot Air, and share what I've learned along the way.

Also, I have lots of updates in the "Virtual Camera Club" segment, including news about the Fall 2011 Workshop, a new workshop sponsor (that I think you're going to love), and more.

Listen to the Podcast

You can also download the podcast here (32 minutes). Or better yet, subscribe to the podcast in iTunes. You can support this podcast by purchasing the TDS iPhone App for only $2.99 from the Apple App Store.

Monthly Photo Assignment

True Grit is the June 2011 Photo Assignment. You can read more about how to submit on our Member Participation page. Deadline for entry is June 30, 2011.

TDS Oct. Photography Workshop and Nov. Aperture Workshop

We're making plans now for the Fall 2011 TDS Photography Workshop, which will be on Oct. 15-16, 2011. I'm also considering adding an Aperture Workshop in Nov. or Dec. If you want your name on the reserve list, or just more information, drop me a line.

More Ways to Participate

Want to share photos and talk with other members in our virtual camera club? Check out our Flickr Public Group. And from those images, I choose the TDS Member Photo of the Day.

Podcast Sponsors

Red River Paper -- The $7.99 Sample Kit is back! And with free shipping.

Make Your Photos Sizzle with Color! -- SizzlPix is like High Definition TV for your photography.

Need a New Photo Bag? Check out the Lowepro Specialty Store on The Digital Story and use discount code LP20 to saven 20% at check out.


Technorati Tags:
, , , , ,


Many people don't explore all of the personal settings in their Flickr photo sharing account, and end up using the default controls. But with a little customization, I think you can improve your Flickr experience.

To see how this works, plus more tips, take a look at this movie from my Flickr Essential Training title, and see what you think.

More Training Available

We have many more informative movies available in the lynda.com title, Flickr Essential Training. Stop by and learn how to get the most from your favorite photo sharing application.

Previously on The Digital Story

Exploring Interesting Places Via Flickr

Become Your Own Museum Curator with "Galleries" on Flickr

Using Google to Search Within Flickr

Flickr Keyboard Shortcuts

Flickr Updates Share Tools for Facebook, Twitter

Introduction to Flickr Essential Training


The Digital Story on Facebook -- discussion, outstanding images from the TDS community, and inside information. Join our celebration of great photography!


Final Cut Pro X for Photographers

I mentioned to a friend of mine who doesn't work on a Mac that I was editing my first movie in Final Cut Pro X. He said, "Oh that's the one everybody is complaining about, isn't it?" I replied, "Yeah, that's the one."

It's interesting to read such emotional reactions to what I consider a great software release. I'm guessing that I love Final Cut X (pronounced "10") for the same reasons that many hate it. You see, I never could warm up to Final Cut in the past. I tried, but I despised it. Same goes for Final Cut Express. I kept thinking to myself, why did they make it so hard to use?"

Final Cut Pro X After about an hour in the new Final Cut Pro X, I was thinking more about my movie than operating the software. Click on image for larger size.

The situation grew worse as more of my clients wanted video as part of the deliverable. "I'm a photographer," I thought to myself. So I would work within the limitations of iMovie and sometimes use Aperture for those short postings on YouTube and Vimeo that everyone was requesting.

Then, along came Final Cut Pro X.

Within an hour I was becoming comfortable. My iMovie and Aperture experiences were actually helping me in this new version of Final Cut. But I could do so much more. And it ran beautifully on my 13" MacBook Air.

My first project is telling the story of the recent Sonoma County Hot Air Balloon Classic that was part of our June TDS Photography Workshop in Northern CA. I had a mixture of still images and HD video captured with my Canon 5D Mark II. I imported the video into Final Cut Pro X, then when I needed a still image, I would use the Photos Browser to look into my Aperture Library, and drag an image right in to the timeline. Once there, I used the Crop tool to fit to 16:9 or to add a Ken Burns effect.

I could then move over to a video clip, double-click on it in the timeline to break out the audio track, and drag the audio over the still images. So professional. So easy. Same goes for transitions, titles, and sound effects. Easy.

I can understand why long time users of Final Cut are thrown off-balance by this latest release. It's so different. But I think most of what they need is actually in there, and the rest will follow soon. As for the rest of us, photographers who need to produce video that looks as good as their stills. Final Cut Pro X is the blessing I've been waiting for.

I'll talk more about this during Tuesday's TDS podcast. The video, Hot Air, is now available on YouTube. I can't wait to start working on my next project.


The Digital Story on Facebook -- discussion, outstanding images from the TDS community, and inside information. Join our celebration of great photography!


New Olympus Pen

Olympus has launched a teaser website for the next generation PEN camera. I'll have coverage of the new gear once the embargo is lifted. Given these circumstances, a few thoughts come to mind.

  1. If you thinking of buying a new Olympus PEN or accessories, sit tight.
  2. If you're thinking of buying any micro four thirds or compact ILC, sit tight.
  3. Keep in mind that Olympus handles image stabilization in the body, not in the lens. So in addition to any tempting glass Olympus may or may not announce, other micro four thirds lenses work great on PEN cameras.

It's been a great few weeks of announcements in this category. Panasonic released the impressive DMC GF3 and the Leica DG Summilux 25mm F1.4 prime lens in the micro four thirds mount. Pentax announced the 'Q' mirrorless interchangeable lens camera and five Pentax lenses to go with it.

But there's more to come, and it's very good stuff. Stay tuned.


The Digital Story on Facebook -- discussion, outstanding images from the TDS community, and inside information. Join our celebration of great photography!