Recently in Photography

  Page 333 of 381 in Photography  

after_every_shoot_icon.jpg

In this week's podcast show notes for "After Every Shoot", there's a downloadable Jpeg graphic listing the 10 reminders I encourage you to follow after each camera session. The reference graphic prints nicely on a 4 x 6 sheet of photo paper, enabling you to stash it in your camera bag or use as a bookmark for The Digital Photography Companion.

Go get yours today. Print one for yourself, and a few to share with friends.

Technorati Tags: , , ,

toshiba_bu_drive.jpg

After I published the Drobo podcast, some readers commented that picture backup seems more complicated than it should be. That's a great point. The answer is yes... and no

Those of us who have been wrestling with this issue for a long time probably have more redundancy built into our approach than the average photographer wants to think about. I totally understand that. What happens is, as I develop one archive system, and use it for a while, I begin to observe places where it is vulnerable. I then think about how to plug those holes. But if such matters are not your cup of tea, you can keep things simple and be reasonably safe. Here are three methods for doing that.

Method 1: Optical Disc for your Best Shots

Start with a photo management application such as Aperture, Lightroom, or iPhoto. Rate your images to identify the best ones. Put those heros in a folder and burn copies to DVDs once a month. I recommend that you burn two copies and store in different locations.

Method 2: Dual FireWire Drives

Here's where I really like Aperture. Set up a managed library where Aperture stores all of your assets, including the masters. I use an external FireWire drive for this so I don't fill up my computer's internal hard drive with Raw files. Connect a second FireWire drive, and use the Vault system in Aperture for incremental backups to that drive.

In Lightroom, you have another very good option. Have both FireWire drives connected. When you upload your images from your memory card, Lightroom can automatically backup a second set to a separate drive during upload. Very nice.

Method 3: Image Catalog System

This is also a two FireWire drive approach. But instead of using a photo management application, you organize your images by folders (usually labeled by date and name), then use a cataloging program such as Expression Media to rate and keyword the pictures. You can then use an incremental backup program such as Chronosync or SuperDuper to back up your images to a second hard drive.

So, backup doesn't have to be hard. And if you don't have a system now, start one today, no matter how simple. I admit that I am overcautious and spend too much money on hard drives. So view my approach as the extreme end of the spectrum, find a place where you fit, and go from there.

As always, your comments and alternative approaches are welcome!


Now Available! The Digital Photography Companion. The official guide for The Digital Story Virtual Camera Club.

  • 25 handy and informative tables for quick reference.
  • Metadata listings for every photo in the book
  • Dedicated chapter on making printing easy.
  • Photo management software guide.
  • Many, many inside tips gleaned from years of experience.
  • Comprehensive (214 pages), yet fits easily in camera bag.

Technorati Tags: , , , , , ,

peter_krogh_tasmania.jpg

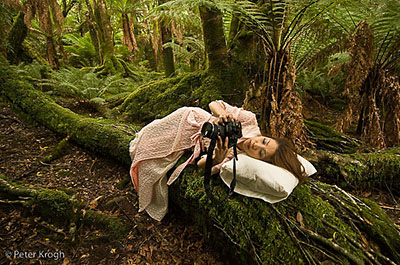
"We found this beautiful place in some old growth rain forrest, and Maki did an installment in her Makirama series," writes Peter Krogh. "I was running camera for her -- pushing the button when she was ready. After a series of images, I handed her the camera for review."

This is just a taste of the compelling imagery being posted from the Adobe Photoshop Lightroom Adventure 2008: Tasmania, where a team of more than 20 photographers "traveled to the end of the world, literally, to the remote island of Tasmania. Their mission is to road test specialized digital photography software designed by Adobe [Lightroom] while capturing images from one of the world's most mysterious and varied geographic locations."

In addition to the bounty of great photographs, there are blog posts discussing the event itself. It's truly a modern adventure, and I thought you might want to see what these artists have captured.

Photograph by Peter Krogh.

Technorati Tags: , , ,

epson_paper.jpg

TDS member Jason writes: "Over the last year, as I began looking at my photographs with a more critical eye, I realized that my prints were always noticeably darker than what I was seeing on my computer screen -– specifically, I was losing a lot of shadow detail in the prints."

"Shadow details that were easily visible on my screen disappeared into black on my prints. At the time, I was doing my editing using iPhoto and Photoshop Elements on a 20 inch iMac G5 running Panther. I didn't have my own photo printer, but I tried several different print services (Apple's, Snapfish, Shutterfly, Ritz), and always got similar results. Not only did I notice the problem with my prints, but I also noticed it when I viewed my pictures on PCs."

"I began to research the issue, and the first thing I came across was the difference between monitor gamma settings on Macs and PCs. So I ran a monitor calibration on my iMac for the first time and changed the gamma from 1.8 to 2.2. That helped, but it wasn't enough. I then lowered the brightness on my display, which got me closer, but still not perfect. What I got in the habit of doing was using Elements to boost the shadow detail of my images by a few percent (since I couldn't do that with iPhoto 6), knowing that I would lose a bit of it when it was printed. This worked okay, but it's a hassle, and it seems like it shouldn't be this way."

"I thought I'd write you to see if you had any thoughts or recommendations. Have you encountered anything like this? Am I the only one?"

Derrick responds: You are not the only one, Jason, who has run headfirst into this problem. The first issue is the inherent difference between glowing, backlit computer monitors and reflective sheets of printing paper. They are two different animals, and you will never get an exact match. So your expectation should be to get a good print, not an exact match to what you see on the monitor.

That being said, you can take steps to get the best results possible out of your printer. First, start with one of your best images. Sharp, well-exposed pictures print better that lesser shots. Then, make sure your monitor is calibrated. I've written about the ColorMunki, the Spyder3Elite, and the hueyPRO. You should be using a tool like one of these. They not only set the color, they calibrate the tones.

If I'm using a very bright monitor, such as my 23" Apple Cinema Display, I usually reduce its brightness about 3 notches. This helps bring it in line with the reflective surfaces that come out of the printer.

I then make sure that I'm using the proper ICC profile for the paper I'm printing on. You can usually download profiles from the paper manufacturer's site. They ensure that your computer and printer are talking the same language during the print job.

Finally, experiment with different paper stocks. If you're using only glossy, for example, it is more contrasty than say a nice matt paper. Paper choice is a huge variable in printing.

If you do these things, and take notes along the way, you'll soon develop a printing formula that results in consistent, attractive output. I've dedicated a chapter to printing in The Digital Photography Companion. Best of luck to you Jason!


santafeworkshops-int.gif

Events! See the TDS Event Calendar for photography workshops, speaking engagements, and trade show appearances, including my Beginning Workflow with Adobe Photoshop and Lightroom on June 22-28, 2008 in Sante Fe, New Mexico.


Technorati Tags: , , , , ,

drobo_web.jpg

The Drobo is labeled as "Fully Automated SATA Robotic Storage Array," which sounds a little intimidating, like something that will taunt the cat when you're not around. But actually, it's a fairly clever device about the size of a toaster that you can insert up to four SATA hard drives. After doing so, Drobo takes it from there. It stores any data that you write to it, automatically backs it up, and constantly monitors the situation making necessary adjustments and repairs while you're out doing what you should be doing, taking pictures.

As a passionate digital photographer, I had pledged to figure out my storage solution in 2008. Prior to the Drobo, I would purchase a standalone 500 GB hard drive, use it until it was full, catalog it, put it on the shelve next to the other drives, and start all over again. I was storing big Raw files, music, movies, and all my other data. I decided that I wanted to separate my photography data from the rest of my stuff. And if I could find a good photo storage solution, that it would take pressure off the rest of my backup needs. After asking around and reading some research online, I decided to try the Drobo to store my photos.

I purchased the Drobo for about $465 and two 750 GB SATA drives for $165 each, making for an investment of just under $800 -- fairly sizable for sure. In return I get over a Terabyte of automated, backed-up storage that I can expand with additional drives whenever I want.

Preparing the Drobo for Network Sharing

My thought was to put the Drobo on my AirPort Extreme network that also handles my Internet and printing. I had saved one open port on the USB hub for network storage, and that's where the Drobo was going. Setup, as advertised, was easy. I unpacked the Drobo, inserted the two hard drives and connected it directly to my MacBook Pro running Leopard. I did this so I could use the Drobo Dashboard to initialize the hard drives. Unfortunately, Dashboard doesn't recognize the Drobo on an 802.11 network, so you have to perform the initial set up with the Drobo directly connected to a computer. You only have to do this once. When you add SATA drives in the future, Drobo automatically prepares them for you.

After initial set up using Drobo's Mac formatting for the drives, I connected the robot to my network and accessed it via the "Shared" tab in the sidebar of any open Finder window in Leopard. You'll see the name of your network, and when you click on it, it will reveal the Drobo. At this point you can copy files just like you would with any connected hard drive. Drobo manages the information once it has it in its procession, and presumably you can go back to work with the peace of mind that your pictures are safe. And so far, this seems true.

Read/Write Speed on a Network

I work with three different laptops. What makes this configuration so nice is that I can back up files and print from any of my machines without ever connecting a wire. I can also grab files from the Drobo and copy to any machine. But there is a price for this convenience, and it is read/write speed. For my first test, I copied and Aperture archive that was 14 GBs. It took 90 minutes to complete the transfer over the wireless network. I did a little more research and found an article on AppleInsider titled, Exploring Time Capsule: theoretical speed vs practical throughput. There is a table near the bottom of the article that compares throughput speed with different connections: direct USB, Ethernet networking, and wireless networking. The chart shows a big difference between direct USB connection (30 MB/sec) and 802.11g connection (3 MB/sec). So, there's a major bump in speed when connecting the Drobo directly to a computer compared to putting it on a wireless network. My one hope was that a 802.11n network has a 9 MB/sec throughput, which isn't bad. So, I revisited my network setup to make sure I was taking full advantage of the AirPort Extreme's 802.11n capabilities.

I opened the AirPort Utility (Applications > Utilities > AirPort Utility), clicked on the Wireless tab, and selected "802.11n only (5 Ghz)" from the Radio Mode. (Previously, I had been using 802.11n (802.11b/g compatible.) I then ran my 14 GB test again. This time the Aperture archive transferred in, well, 90 minutes. So, apparently I was getting as much out of my network as it had to offer. Further messing around with settings didn't make any noticeable improvements. Well, at least now I know.

airport_setup.jpg
I tried making a few changes to my network, but performance remained the same.

The good news is that file copying can happen in the background. So I just start uploading when I first arrive, and everything is finished by the time I'm ready to pack up and hit the field. If I wanted to spend another $200, I could purchase a DroboShare that lets me use Gigabit Ethernet (40 MB/sec). That should speed things up considerably, and if the current 802.11 network begins to drive me crazy, I might start saving my pennies for the upgrade. (Or do I want another hard drive for that third slot!)

I have a couple of tips too. If you get a "Connection Failed" message when trying to access the Drobo, you probably just have to click the "Connect As" button and enter the network password. That did the trick for me. And if you want your Drobo icon to display on the Desktop, open Finder Preferences and check the "Connected servers" box under the General tab.

finder_prefs.jpg

Final Thoughts

Drobo is both Mac and Windows compatible. If you use it on a Mac, I recommend the latest version of Leopard, and make sure you have the current firmware update for AirPort Extreme (7.3.1 at the time of writing). This allows you to use the Drobo with Time Machine, which is fairly nifty. The Drobo web site contains a wealth of information, and is worth investigating if you have a particular strategy in mind.

As for me, time will tell. Right now, I'm still fine-tuning my backup gameplan that includes Drobo for much of the heavy lifting. I don't plan on using it for any realtime work, such as Aperture or Lightroom referenced files. The network performance would be too slow for me. But, so far, I do like this solution for archiving my work. Last night I sent a 42 GB job to the Drobo for safe keeping. This morning everything was there safe and sound. If I continue to like the way it performs over the long haul, I'll probably purchase another for offsite storage too. For the time being, I'll continue to use 500 GB drives offsite for redundancy, and count on the Drobo as my primary storage.

What really jumps out at me after this exercise is that there is still no single solution that handles all of my storage and backup needs the way that I want. The Drobo moves the ball forward, and I appreciate that. But I still have a ways to go.

If you've tested the Drobo yourself, please post a comment with your thoughts, and any tips you have for fine-tuning your backup strategy.

Technorati Tags: , , , , ,

chdk_logo.jpg

Canon compacts with DIGIC II or III processors have more capabilities than appear on their menus. Functions such as high-speed shutter and RAW mode can be unlocked using firmware available via the CHDK project (Canon Hacker's Development Kit). WIRED Magazine helped shine a light on this work with their recent article, Supercharge Your Camera with Open-Source CHDK Firmware. It's a terrific overview piece with lots of links, and I suggest you start there if interested in this project.

I have a Canon SD700 IS that I'm going hack. It's a wonderful little camera that I use primarily for underwater because I have a matching housing for it. I want to be able to capture in RAW while snorkeling, and CDDK seems like the way to go.

Of course, anyone trying this does so at their own risk. But if you've tested CHDK, please post a comment and let us know how it went. And if you're interested in trying it, here's a list of cameras.

Technorati Tags: , , , , ,

Repost of Stephen Johnson Interview

stephen_johnson_book.gif

Sometimes we can't just leave well enough alone... If you downloaded Podcast 123, Interview with Stephen Johnson on Tuesday or Wednesday (April 8 & 9), then you noticed that my segments covering virtual camera club business sounded terrible. What happened was that in an attempt to remove some of the background noise from the Johnson interview on the expo hall floor at Photoshop World, we totally butchered the in studio stuff. Yuck!

I've since reposted the audio and it sounds so much better. You can redownload the podcast here (28 minutes). You can also subscribe to the podcast in iTunes

Sorry about that!

It's a great interview, however, I hope you listen to what Stephen has to say.


Now Available! The Digital Photography Companion. The official guide for The Digital Story Virtual Camera Club.

  • 25 handy and informative tables for quick reference.
  • Metadata listings for every photo in the book
  • Dedicated chapter on making printing easy.
  • Photo management software guide.
  • Many, many inside tips gleaned from years of experience.
  • Comprehensive (214 pages), yet fits easily in camera bag.

Technorati Tags: , ,

adrees_latif.jpg

"“Tipped off by protests against soaring fuel prices, I landed in Yangon on 23 September, 2007, with some old clothes, a Canon 5D camera, two fixed lenses and a laptop," writes Adrees Latif in his blog post.

"...Knowing that hundreds of people were gunned down in similar circumstances in a 1988 uprising, I climbed an old crosswalk directly overhead, to get to one of the few spots offering a clear view... I had already locked on my 135mm lens and set my camera shutter speed to 1000, aperture to F/7.1 and ISO at 800. With the camera on manual, I wanted to stop any movement while offering as much depth-of-field as possible."

This is a fascinating account that is worth reading for anyone interested in great photojournalism.

Image by Adrees Latif.

Technorati Tags: , ,

colormunki.jpg

We heard about the ColorMunki Photo ($449 on Amazon.com) earlier this year at PMA. But now that the real product is shipping, the reviews are starting to surface.

Over at PhotographyBLOG, they write:

"ColorMunki Photo is a brand new colour management device that makers X-Rite are touting as a "breakthrough product". What's the reason for all the excitement? Namely price - ColorMunki Photo offers monitor, projector, and printer profiling at the previously unheard of price of $499 / £379 / 429 Euros, seemingly without cutting any corners. Our colour management expert Jon Canfield has been testing the ColorMunki for the last few months - find out if it meets all those high expectations in our latest review..."

I can tell you right now, Jon likes it. And so do others I've talked to. If you've been waiting for the next big thing in color management, this might be it. The name is funny, but the results seem quite serious.

Technorati Tags: , , ,

shoot_at_night_webinar.jpg

If you missed my first live webinar, "Five Ways to Impact," you can now download the entire presentation from the O'Reilly Media site. The 54-minute presentation shows five techniques for making your pictures look better than others, plus includes a Q&A session with queries submitted live from the audience. You'll need some bandwidth, however, because this puppy is really a big dog at 175 MBs. It does have quick start, so the movie begins playing before the download is complete.

To view, go to -- http://downloads.oreilly.com/oreilly/videos/oreilly-story-webcast.mov -- then put your feet up and enjoy.


Now Available! The Digital Photography Companion. The official guide for The Digital Story Virtual Camera Club.

  • 25 handy and informative tables for quick reference.
  • Metadata listings for every photo in the book
  • Dedicated chapter on making printing easy.
  • Photo management software guide.
  • Many, many inside tips gleaned from years of experience.
  • Comprehensive (214 pages), yet fits easily in camera bag.

Technorati Tags: , , , , ,