Recently in Photography

  Page 107 of 385 in Photography  

After publishing today's TDS podcast titled, Nimble HQ Video, I received some requests for the actual settings that I use on my Olympus OM-D E-M5 Mark II. I'll share those here, keeping in mind that these will work on most other cameras too.

The Fn1 Button and 1-2 Lever

The first thing I recommend it programming the lever that's next to the Fn1 button and positioned just to the right of the viewfinder. By setting up "1" for your still photography and "2" for video work, you can quickly go from one mode to the other knowing that you have the right settings for each.

To program this lever, go to Menu > Gear Submenu > Gear B > Button/Dial/Lever > Lever Function and choose mode 6. With Mode 6 selected, you've programmed the lever to use position 1 for still photography and position 2 for video.

short-cut-lever.jpg

The Movie Menu

Everyone is a bit different when it comes to specific camera settings, but I'll give you an overview of what I use, and you can take it from there. Start by going to Menu > Gear Submenu > Gear I, then follow along.

  • Mode: Manual ("M") - In my opinion, unless you're in run and gun mode, why would you use anything else. Set the shutter speed to 30 and the aperture for the look you want.
  • Movie Mic - "On"
  • Recording Volume - I use an external mic, and with my rig the gain is set to +2. Test for your particular mic.
  • Volume Limiter - I go back and forth on this. Currently I have it on to protect against clipping the highs.
  • Wind Noise Reduction - I keep it off unless I'm in breezy conditions. Even then, I'll use a dead cat over the mic, because it's more effective.
  • Plug-in Power - Off. My mic doesn't require it. Hopefully yours won't either.
  • PCM Recorder Link - I don't use it.
  • Headphone Volume - I'm usually around 7. My headphones are plugged into the Olympus HLD-8G External Grip.
  • Time Code Settings - Non-DF (Does not adjust for time difference vs. actual recording time.)
  • Movie Specification Settings - I use FHD-F and FHD-SF. For shorter pieces I'll switch to SuperFine. For longer recordings Fine is great.
  • Movie+Photo Mode - Mode 1 - Movie is given priority.
  • Shutter Function - Mode 1 - Shutter button is for photos, and movie button is for recording.
  • Noise Filter - Standard
  • Picture Mode - Off

My recording format is FHD Fine 30fps MOV 1920x1080. ISO can be anything I need, usually between 400 and 1600. I use S-AF for focusing mode because I don't want the camera hunting for focus while I'm recording.

Once you have these set to your liking, the camera will remember them. Now, when shooting still photos, have the lever in position 1. When it's time for movies, go to position 2, and make some magic!

The Nimbleosity Report

Do you want to keep up with the best content from The Digital Story and The Nimble Photographer? Sign up for The Nimbleosity Report, and receive highlights twice-a-month in a single page newsletter. Be a part of our community!

Want to Comment on this Post?

You can share your thoughts at the TDS Facebook page, where I'll post this story for discussion.
This is The Digital Story Podcast #540, July 12, 2016. Today's theme is "Nimble HQ Video." I'm Derrick Story.

Opening Monologue

Video isn't so bad. If you didn't have to worry about loads of equipment, frame rate, humongous files, crappy audio, a plethora of formats, or compression algorithms, it would be a piece of cake. I might not be able to help you with everything on this list, but I can share with you my nimble video kit that will lighten your load. It's what I use for commercial interviews.

Nimble HQ Video

Back when I was designing this recording kit, I wanted the same nimbleosity rating for my movie gear that I enjoy for still photography. Thanks to some careful selection, and advances in technology, I have a kit that produces professional results and won't break the bank, or your back.

Frederick-Video.jpg

In the News

Elevating X-Trans? Fuji film X-T2 First Impressions Review via DP Review.

The Fujifilm X-T2 is an updated version of the company's top-level DSLR-shaped APS-C camera. It's built around the same 24MP X-Trans sensor as the X-Pro2 but ends up being much more than an X-T1 with more pixels. Instead, the X-T2 is a camera that does much to address the X-System's remaining weaknesses, which can only broaden its already considerable appeal.

Key features include:

  • 24MP X-Trans CMOS III sensor
  • 325 AF points (169 of which offer phase detection)
  • AF point selection joystick
  • 2.36M-dot OLED EVF with 0.005 sec refresh time (60 fps or 100 fps in boost mode)
  • 3" 1.04M-dot articulating LCD
  • 4K UHD video at up to 30 fps for up to 10 min (30 min with booster grip)
  • F-Log flat profile and 4K out over HDMI
  • 8 fps continuous shooting with AF (11 fps with booster grip)
  • 5 fps continuous shooting with live view updates between capture
  • Dual SD card slots (UHS-II compatible)
  • USB 3.0 socket

The camera is expected in Sept. 2016 for $1,599.

The Nimble Photographer Podcast and Patreon

I've set up a Patreon account to support The Digital Story, The Nimble Photographer, and theAnalogstory. For patrons who pledge $5 a month or more (all handled seamlessly by Patreon), they will receive access to Season 1 of The Nimble Photographer Podcast.

The first episode is waiting for you right now. The second show goes live this coming Friday, July 15. It's title, "Baggage."

I hope you become a patron of The Digital Story, and I look forward to hearing what you think of The Nimble Photographer Podcast. The URL is: www.patreon.com/thedigitalstory

Do You Have an Analog Story to Share?

If so, please send the text and up to 6 pictures to theanalogstory@gmail.com.

Updates and Such

Just Released!: The Apple Photos Book for Photographers

You can get your eBook copy of The Apple Photos Book for Photographers for $15 by using the checkout coupon: APPLE15. That saves your 5$ off the price.

And finally, be sure to visit our friends at Red River Paper for all of your inkjet supply needs.

See you next week!

More Ways to Participate

Want to share photos and talk with other members in our virtual camera club? Check out our Flickr Public Group. And from those images, I choose the TDS Member Photo of the Day.

Podcast Sponsors

Red River Paper - Keep up with the world of inkjet printing, and win free paper, by liking Red River Paper on Facebook.

MacPaw Creators of CleanMyMac 3 and other great software for Apple computers. Visit www.macpaw.com today.

Hedge for Mac - The fast solution for moving photos and videos from memory cards to drives, or drives to drives for that matter. Learn more at Hedge for Mac.

inkdot Metal Prints Brilliant, affordable, and archival. Visit ink dot.com/metal-prints today.

The Nimbleosity Report

Do you want to keep up with the best content from The Digital Story and The Nimble Photographer? Sign up for The Nimbleosity Report, and receive highlights twice-a-month in a single page newsletter. Be a part of our community!

Want to Comment on this Post?

You can share your thoughts at the TDS Facebook page, where I'll post this story for discussion.
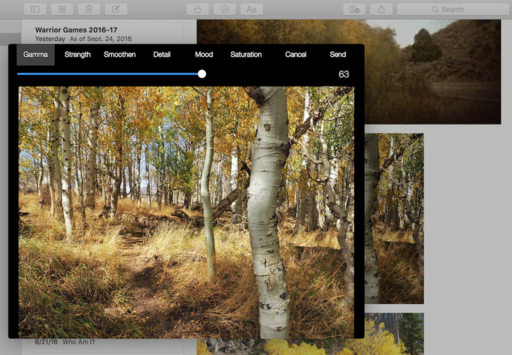
I've been working with the Priime Styles editing extension for Photos for macOS. I've applied its filters to my iPhone Jpegs and RAWs from my Micro Four Thirds cameras, and I've had some excellent results.

BTW: Priime Styles works for Lightroom users too. So if you're not into Photos, then still read on...

The iPhone workflow is straightforward. You open the image in Priime, choose from their vast array of professional filters, and save. But in order to get the most out of the RAW workflow, I have a few tips.

edit-raw-first.jpg Duplicate your RAW file in Photos, then edit it using native tools first. Images by Derrick Story.

Duplicate Your RAW and Edit First

Priime Styles can import your RAW file, but it returns a Jpeg to your Photos library. My recommendation is to duplicate the RAW in Photos, then apply your basic adjustments while it's still in the RAW state. This gives you much better control over recovering highlights and opening up shadows.

Send Edited RAW to Priime Styles

Once your RAW has received its basic adjustments, you can send it over to Priime Styles for finishing. There are lots of filters to choose from. And this part of the process is really fun. All you have to do is click on the thumbnail to apply a filter.

apply-filter-social-version.jpg Load the edited RAW file into Priime Styles and apply your favorite filter.

Now click the Save Changes button, and a Jpeg will be returned to your Photos library, right next to the original RAW. You have all of the standard options at this point, such as viewing the master (press the M key) or reverting to the original RAW file.

sidebyside-photos.jpg

When working in Priime Styles, I like to start with the Explore button to view thumbnails of all the possibilities for my image. Once I choose a filter, I generally use the strength slider to adjust the intensity. You have two different comparison buttons so you can really get a feel for the before and after. This editing extension is very easy to use, and it provides a wealth of options for your pictures.

Master Photos for OS X

(It's More Powerful than You Think)

For hands-on tutorials, be sure to take a look at Photos for OS X Essential Training on lynda.com. I cover everything you need to know to get the most from this surprisingly powerful image management application.

For photographers who are more than just casual snapshooters, or who are making the transition from Aperture or iPhoto, The Apple Photos Book for Photographers shines a light on the sophistication of this app and the ecosystem it taps into. Available as an eBook now, and coming to print later this year.

Get it for $15 using checkout code APPLE15!

More Help and Insights on Photos for OS X

Don't forget about the Photos for OS X Special Feature Section on The Digital Story. It's a roundup of tutorials, videos, and articles focused on helping you master Apple's latest photo management software. You can also find it under Photography in the top nav bar.

Want to Comment on this Post?

You can share your thoughts at the TDS Facebook page, where I'll post this story for discussion.

A big part of The Film Project has been learning about used photo gear and testing various cameras and films. In order to keep items moving through our shop, we've created two stores offering exceptional value to anyone interested in purchasing classic SLRs and lenses.

TheFilmCameraShop on Etsy

theFilmCameraShop.png

Our TheFilmCameraShop on Etsy offers cameras, lenses, and accessories that have been inspected and cleaned in our shop at theAnalogstory.com. Every camera has been film tested at least once, as well as the lenses that go with them.

We chose Etsy as the location for TheFilmCameraShop because of their high standards, excellent customer service, and interesting array of goods offered. At the moment we're featuring Pentax, Contax, and Yashica brands. We're in the process of adding a line of Minolta products too.

These are great cameras and optics. And the images produced by them will be featured in my book on analog photography.

The Outlet Store for Used Gear

outlet-store.png

Not every item we buy for testing passes muster for the Etsy store. And we've accumulated a number of accessories that came with camera packages that weren't necessarily something that we wanted to feature in TheFilmCameraShop.

So we did what any respectable retailer would do. We created the Outlet Store for Used Gear. Here you'll find an array of odds and ends at rock bottom prices with super cheap shipping.

Think of the Outlet Store for Used Gear as an online garage sale that only sells photo stuff. There are no returns or refunds on these items. But at these prices, who cares!

If you have a few moments, you may want to check out both stores. It's window shopping for photographers.

Do You Like Film?

Take a look at theAnalogstory - Film Photography in the Digital Age. We cover great 35mm cameras, personal stories from film photographers, quick tips, and even a camera shop. Stop by, won't you?

Want to Comment on this Post?

You can share your thoughts at the TDS Facebook page, where I'll post this story for discussion.
This is The Digital Story Podcast #539, July 5, 2016. Today's theme is "Other People's Photos." I'm Derrick Story.

Opening Monologue

I was writing a post the other day about Flickr and looking at photos in my Friends feed. I started thinking about all of the photography I consume, and the role those pictures play in my own work. I explore this idea in today's show.

Other People's Photos

When I was in college, I tutored others in English. Many of my students were engineering and science majors, hoping to pass the written skills tests required to complete their curriculum. I noticed that those who read novels and literature frequently had an easier time improving their writing skills. It seemed that reading good stuff added the meter and syntax of the language to their consciousness. I think this is true for photography also.

Photography can be a very inwardly focused endeavor. We obsess over the details of our equipment, pixel peeping post processing, and perfect alignment of composition. Yet many great artists eschew much of this and produce great images anyway. What is their secret? Maybe we can unravel it by looking more closely at their images.

Here are a few suggestions that I have to add the language of photography to our consciousness.

  • Study Books Published by Great Photographers - A trip to the used book store can provide a wealth of photographic inspiration. The thing images in books, compared to an Instagram feed, is that they are curated. People thought long and hard about which images to include, and which to leave out.
  • Take In a Daily Dose of Explore on Flickr - The interesting thing about Explore, compared to traditional photo books, is that it's contemporary. Here are the trends that are valued today, whether they be by computer algorithm, or hand picked by editors who are most likely young. It's worth knowing and studying these images.
  • Follow Your Friends - The advantage of friendship photography is that you have an open channel to that person. If he or she produces something that you find inspiring, you can ask them about it, pick their brain, and learn from them.
  • Make_2nd_Print_D_Story.jpg

  • Visit Galleries and Museums - The test thing about studying art in college was that we'd learn about the works in the classroom, then see them in real life in museums. I can't describe how shockingly different a painting affected me in real life compared to print.
  • Print Your Own Work - You can learn from your own photography if you print it. Much in the same way that art changes when you see it in a museum, your work is different on the wall then viewed on a smartphone. You'd be surprised at the things you can learn from your own pictures if you give them a chance to teach you.

In the News

Eye-Fi to cease support for Pro X2 and earlier generation cards via DP Review.

Eye-Fi will soon end support for its X2 and older wireless memory cards, services and apps, according to a notice sent to customers today. Citing security concerns, the company will complete the 'end of life' stage on September 16, 2016 by ending server support. The cards will still function at that point, and certain wireless transfer modes may still work, but their associated apps and services won't offer full functionality. Eye-Fi is offering to move customer data to its newer Cloud service, and will sell affected customers new cards at a discount. Mobi, Mobi Pro and EyeFi Cloud are all unaffected.

The Nimble Photographer Podcast and Patreon

This is something that I'm really excited about. You may recall that about this time last year, I mentioned that I was working on a project with Frederick Van Johnson. That project was The Nimble Photographer Podcast. As it turned out, we could never quite get the logistics worked out. But I had recorded 4 shows, and written a half dozen others. So I've been sitting on these episodes trying to figure out what to do. And now I have the answer.

Enter Patreon - I've set up a Patreon account to support The Digital Story, The Nimble Photographer, and theAnalogstory. For patrons who pledge $5 a month or more (all handled seamlessly by Patreon), they will receive access to Season 1 of The Nimble Photographer Podcast.

The first episode is waiting for you right now, with the balance of the shows to appear every two weeks following. When you commit your pledge on Patreon, you'll receive the URL and password for the season pass to The Nimble Photographer Podcast.

These shows are different than this one, much in the same way that the Nimble Photographer is different than The Digital Story. Here's the opening from show 1.

I hope you become a patron of The Digital Story, and I look forward to hearing what you think of The Nimble Photographer Podcast. The URL is: www.patreon.com/thedigitalstory.

New lynda Title

We've just released, Flickr Mobile: Sharing Photos Anywhere. I had so much fun recording these movies, working only with my iPhone, iPad and Android tablet. It was a true nimble-rush. And I think you'd enjoy watching this training.

Updates and Such

Just Released!: The Apple Photos Book for Photographers

You can get your eBook copy of The Apple Photos Book for Photographers for $15 by using the checkout coupon: APPLE15. That saves your 5$ off the price.

And finally, be sure to visit our friends at Red River Paper for all of your inkjet supply needs.

See you next week!

More Ways to Participate

Want to share photos and talk with other members in our virtual camera club? Check out our Flickr Public Group. And from those images, I choose the TDS Member Photo of the Day.

Podcast Sponsors

Red River Paper - Keep up with the world of inkjet printing, and win free paper, by liking Red River Paper on Facebook.

MacPaw Creators of CleanMyMac 3 and other great software for Apple computers. Visit www.macpaw.com today.

Hedge for Mac - The fast solution for moving photos and videos from memory cards to drives, or drives to drives for that matter. Learn more at Hedge for Mac.

inkdot Metal Prints Brilliant, affordable, and archival. Visit ink dot.com/metal-prints today.

The Nimbleosity Report

Do you want to keep up with the best content from The Digital Story and The Nimble Photographer? Sign up for The Nimbleosity Report, and receive highlights twice-a-month in a single page newsletter. Be a part of our community!

Want to Comment on this Post?

You can share your thoughts at the TDS Facebook page, where I'll post this story for discussion.
flickr-friends.jpg

The quality images that flow through my Friends feed is outstanding. But to be honest, I sometimes opt for scrolling through Instagram instead, primarily because it just seems easier. (I know, lazy me.)

I think the real issue was when my Flickr friends posted multiple shots in one session. One one hand, I like seeing the different aspects of a particular subject. Those images tell a more complete story.

But when viewing them on my iPhone 6s, as I do 90 percent of the time, groups of images are less immersive. That is, until Flickr updated their mobile app to be 3D Touch compatible. Now I can just press and hold on any shot in the group, and I get a full screen version, complete with title and name overlay. It's really cool. When I'm done viewing the larger size, I just lift my finger off the screen. Here's a short video about it.

camera-metadata.jpg

It's such a simple thing, but this approach keeps me in the flow of the photo stream. And that makes all the difference when casually browsing pictures.

You can favor the shot by double-tapping on it. If you want to see the metadata or comment, tap once on the image to make it full screen, then use the tool bar at the bottom. BTW: viewing camera metadata is one of the things that I really like about Flickr mobile compared to other apps. Seeing how the photographer got the shot, the settings that he or she used, is interesting to me.

Once I started taking advantage of the tools that were available to me in Flickr Mobile, I started using it more. And as a result, I am seeing more great photography than ever.

More Flickr Tips and Techniques

If you want to master Flickr on your mobile device, check out Flickr Mobile: Photo Sharing Anywhere. Desktop users might be interested in Sharing Photos with Flickr. Of course the platforms work well together too, and I discuss how you can integrate all of your devices to create a seamless photography workflow.

Want to Comment on this Post?

You can share your thoughts at the TDS Facebook page, where I'll post this story for discussion.
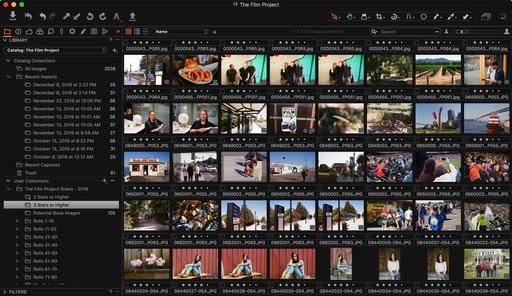
One of the new features in Capture One Pro 9.2 is called Create Albums From... It's something that former Aperture users will appreciate, because it allows you to choose a group of thumbnails, right-click on them, and put those shots in an album, on the fly.

For the most part, the tool works well, although I am going to suggest a tweak that I hope they incorporate in future updates. But first, let's see how it works now.

create-album.jpg

Using "Create Albums From"

second-dialog.jpg

Select a group of thumbnails and right-click on them to reveal the popup menu command, Create Albums From. Then choose Selection. You'll see a second dialog box that gives you two choices: "Add selected images after creation" (which seems unnecessary to me, since that's the point of the whole thing) and "Select collection after creation," which opens the album after you make it.

At this point, I expected Capture One to put the new album inside the project I was working in. But instead, it places it at root level. So there's one more step of dragging the new album into the project. Not a big deal, but I think we should have the option to put the new album in its parent project. Maybe in the next update...

Overall, however, this feature is a timesaver. And it's available right now if you update to Capture One Pro 9.2. Being able to create albums on the fly makes it much easier for us to work with sub-groups of images while we're organizing our catalog.

More Capture One Pro Tips and Techniques

Improve your skills by watching Capture One Pro Essential Training now available on lynda.com. More than 5 hours of tips, tricks, and techniques. Plus many free movies using advanced techniques.

I've also created a dedicated Capture One Pro Training page on The Digital Story. You can follow all of the tips and techniques that I publish in one convenient spot.

Thinking About Making the Transition from Aperture or Lightroom? - Download my free eBook titled, Rocky Nook's Guide to Moving to Capture One Pro. I show you the steps to create a test library, then build the foundation for a smooth transition to Capture One Pro.

Want to Comment on this Post?

You can share your thoughts at the TDS Facebook page, where I'll post this story for discussion.
This is The Digital Story Podcast #538, June 28, 2016. Today's theme is "Chicago Takeout." I'm Derrick Story.

Opening Monologue

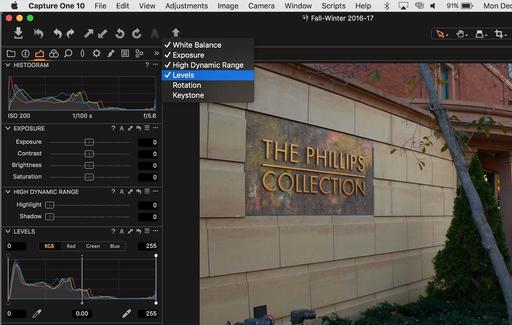
During my week in Chicago, I've learned a lot of things, talked with many people, and have taken many, many pictures. For those of you who joined me here, you know it was a rich, memorable experience. For those who couldn't make it, I have a takeout order for you. And that's the focus of today's show.

Chicago Takeout

I have an hour left before I have to check out of the Travel Lodge on Wabash in downtown Chicago. You'll hear the grinding wheels of the train in the background as it rolls by my window. And I'm sure housekeeping will tap tap tap on my door at least once.

Chicago-P6243380.jpg

But before they reclaim the room for the next visitor to this great city, I want to share a few of my favorite moments from my week teaching at Out of Chicago.

  • The State of Mirrorless - Olympus, Panasonic, Sony, and Fuji were all sponsors and here showing their wares. But what really impressed me is that nearly all of the speakers and a large percentage of the attendees were carrying mirrorless cameras. Mirrorless is alive and well, and it's thriving in urban photography.
  • Packed Sessions for "Beyond the Pixel, Your Photography as Art" - I thought that my talks on going from digital capture to inkjet print would go over well, but I had not ideal that I would pack a double classroom, not once, but twice during the conference. I began the story with a silver gelatin print that I had made in 1988, and described my journey with printing. I then walked through a demo for making fine art greeting cards with Lightroom or with Photos for OS X.
  • The Nimble Photographer Workshop - I debuted this workshop in Chicago because I wanted to see how a one-day event would go. Based on my experience, I will be repeating this workshop in the future. My favorite parts where "What's in my Bag" by participants, and the MacGyver session.
  • Film is not Dead - I totally enjoyed conversation after conversation where someone was telling me how they dug out their film camera from the closet and are planning shoots with it. Everyone one of them said that theAnalogstory was their inspiration.
  • Midwest Photographers - Of all the great things that happened this week, meeting dozens of members of our virtual camera club who work and shooting in Illinois, Minnesota, Wisconsin, Michigan, Iowa, Indiana, Kentucky, and throughout the heartland of our country, was the biggest thrill of all.

In the News

The 'Warm-to-Cold Fader' Puts Color Temperature Control Onto a Filter via PetaPixel.

If you like to physically control as many of the settings on your camera as possible, the ICELAVA Warm-to-Cold Fader is right up your alley. This neat little lens accessory puts color temperature control onto a variable filter you simply twist to adjust.

Color temperature isn't something we think about much these days, given how easily it's adjusted in post (you ARE shooting RAW right?). But having a physical filter that lets you warm up or cool down your image gradually could definitely come in handy.

Hedge Adds Log Files

We have some great news to share today. Next to releasing Hedge 1.3.2 with some small improvements and fixes, we also have a bigger thing coming: Transfer Logs.

Transfer Logs Beta - We've been working hard the last few weeks to add a new Feature to Hedge Beta: the much-requested log files. Now it's also possible to see which files were copied, when they were copied, and what the source and destination hashes are. Give Hedge 1.4ß a go. Let us know what you think, so we can make it even better!

Free Test Ride - Not sure how much Fast Lane and the other Premium features will help you? We now have a week-long license available for you. Yep, it's free.

Keep these three things in mind...

  • Hedge is the fastest app for importing and backing up media on macOS.
  • Import multiple sources to multiple destinations, at the same time.
  • Every file copied by Hedge is cross-verified with the original.

There's a free version and a premium version. Use this URL, hedgeformac.com/tds and save 20 percent off the price of the pro version that provides the full Hedge experience with Fast Lane copies, unlimited simultaneous transfers, plus NAS and RAID support.

New lynda Title

We've just released, Flickr Mobile: Sharing Photos Anywhere. I had so much fun recording these movies, working only with my iPhone, iPad and Android tablet. It was a true nimble-rush. And I think you'd enjoy watching this training.

Fujifilm Instax Printer SP-2

Fujifilm Instax Printer SP-2.

Updates and Such

Just Released!: The Apple Photos Book for Photographers

You can get your eBook copy of The Apple Photos Book for Photographers for $15 by using the checkout coupon: APPLE15. That saves your 5$ off the price.

And finally, be sure to visit our friends at Red River Paper for all of your inkjet supply needs.

See you next week!

More Ways to Participate

Want to share photos and talk with other members in our virtual camera club? Check out our Flickr Public Group. And from those images, I choose the TDS Member Photo of the Day.

Podcast Sponsors

Red River Paper - Keep up with the world of inkjet printing, and win free paper, by liking Red River Paper on Facebook.

MacPaw Creators of CleanMyMac 3 and other great software for Apple computers. Visit www.macpaw.com today.

Hedge for Mac - The fast solution for moving photos and videos from memory cards to drives, or drives to drives for that matter. Learn more at Hedge for Mac.

inkdot Metal Prints Brilliant, affordable, and archival. Visit ink dot.com/metal-prints today.

The Nimbleosity Report

Do you want to keep up with the best content from The Digital Story and The Nimble Photographer? Sign up for The Nimbleosity Report, and receive highlights twice-a-month in a single page newsletter. Be a part of our community!

Want to Comment on this Post?

You can share your thoughts at the TDS Facebook page, where I'll post this story for discussion.
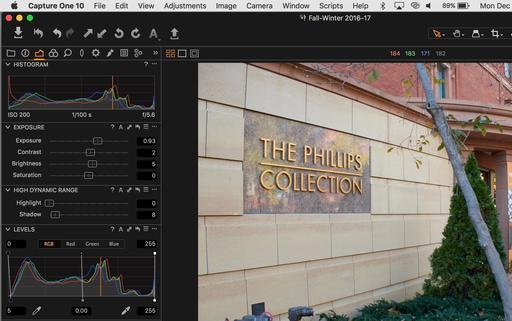
I've been printing fine art greeting cards for years. But the process has never been easier than lately using Apple's Photos app.

card-layout.jpg

In addition to integrating these projects with my overall Photos library, I have dozens of stylish templates to choose from. And since Photos saves each card that I make as a project, I can easily reopen it, reprint it, or change the photo all together.

I write about this process in my latest book, The Apple Photos Book for Photographers, which you can download right now. But I'll also share the basic steps right here so you can create your own works of art at home with an inkjet printer.

Creating a Fine Art Greeting Card with Apple Photos

I use Red River Paper because it offers a wide selection of card stock at very affordable prices. (Plus you can get envelopes and ink there too.)

For this project I'm using one of my favorites, 60 lb. Polar Matte double-sided 7" � 10" (catalog #1958). It's a bright paper with a nice tooth that feels good in the hands. Your cards will look and feel like works of art.

The reason why you want to go with 7" � 10" paper is because it folds down to a standard 5" � 7" card - the same dimensions that Apple uses for its folded pieces. In a pinch, you could cut down a larger sheet if necessary. But the Red River cards are also scored in the middle, which makes folding so much easier and professional looking.

As for printing instructions, I'll remind you that what appears in the dialog box is based on the print driver. So what you see on your computer might look different than what I'm showing here. Hopefully, you'll be able to take this information and adjust accordingly.

10-14-PrintDialog.jpg

Instead of clicking on the Buy Card button, go to File > Print. You should see something like in the figure above. If you're seeing far less information on your computer, click on the Show Details button at the bottom of the dialog. That should expand the dialog box.

Since I'm only printing the outside of the card (I like to leave the inside blank for a personal message), I choose "Print from 1 to 1." Then we get to paper size. Chances are very good that you're not going to have a 7" � 10" option in this popup menu. But what you will have there is a Manage Custom Sizes option at the bottom. Choose that, and make your own preset. I named mine Greeting Card. The computer will remember the 7" � 10" preset you just created. So you only have to do this the first time.

After you have the paper size right, the card should look pretty good in the preview window. Mine came up just a tad short on the edges. So I set scale for 102 percent. That fixed the problem perfectly.

Now all that's left are the printer settings. You can add those in the popup that's labeled Layout. Click on it, and choose Printer Settings from the list. The most important part is having Media Type set correctly. In my case, the printer needs to know that I'm using matte paper. Check your settings one more time, then print!

Watching the card slowly emerge from the printer is the closest thing we have in digital photography to seeing an image magically appear in a tray of developer. Both are exciting. Let the card cure for an hour or so at room temperature before folding - that is, unless it's one of those emergency jobs you're making as you head out the door to an anniversary party. Then fold and go!

As you're sitting there in the car with the card in your hand, you might feel a little something. Let it wash over you and enjoy it. That's the feeling of being an artist.

The Apple Photos Book for Photographers

For photographers who are more than just casual snapshooters, or who are making the transition from Aperture or iPhoto, The Apple Photos Book for Photographers shines a light on the sophistication of this app and the ecosystem it taps into. Available as an eBook now, and coming to print later this year.

Get it for $15 using checkout code APPLE15!

Want to Comment on this Post?

You can share your thoughts at the TDS Facebook page, where I'll post this story for discussion.
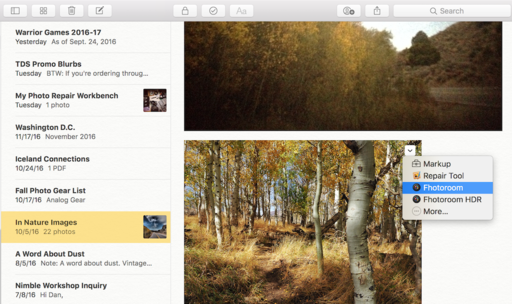
Apple RAW Update 6.20 adds compatibility for 9 new cameras for its Photos app and system wide on Mac OS X. The new cameras are (including the PEN-F):

  • Canon EOS-1D X Mark II
  • Canon EOS 80D
  • Canon EOS Rebel T6 / 1300D / Kiss X80
  • Canon PowerShot G7 X Mark II
  • Panasonic LUMIX DMC-GF8
  • Panasonic LUMIX DMC-GX7 Mark II / GX80 / GX85
  • Panasonic LUMIX DMC-ZS100 / TZ100 / TX1
  • Sony Cyber-shot DSC-RX10 III
  • Olympus PEN-F

olympus-pen-f.jpg

RAW files from these cameras can be processed natively on Mac OS X. For a complete list on cameras supported, see Apple Support Document

The Apple Photos Book for Photographers

For photographers who are more than just casual snapshooters, or who are making the transition from Aperture or iPhoto, The Apple Photos Book for Photographers shines a light on the sophistication of this app and the ecosystem it taps into. Available as an eBook now, and coming to print later this year.

Get it for $15 using checkout code APPLE15!

For hands-on tutorials, be sure to take a look at Photos for OS X Essential Training on lynda.com. I cover everything you need to know to get the most from this surprisingly powerful image management application.

Want to Comment on this Post?

You can share your thoughts at the TDS Facebook page, where I'll post this story for discussion.