This is The Digital Story Podcast #700, August 13, 2019. Today's theme is "Street Photography with the Canon G5X Mark II." I'm Derrick Story.
Opening Monologue
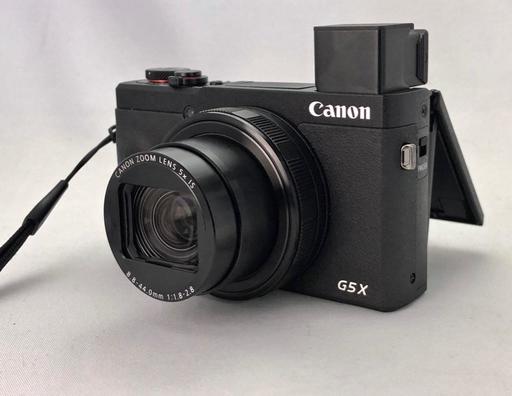
The Canon G5X Mark II is compact enough to fit in your pants pocket, but it pairs a 24-120mm zoom lens with a 20.2 MP 1" Stacked CMOS Sensor. That's a lot of imaging potential in a small package. And it seemed to me worthy of serious street photography. So I headed off to South San Francisco to see what it could do. I share my findings on today's TDS Photography Podcast.
Street Photography with the Canon G5X Mark II
You may be wondering why my first inclination for the Canon G5X was for street photography. Well, the answer came within minutes of my exploration of South San Francisco with the camera.
I was photographing a fabulous neon blue hotel sign downtown when a middle-aged man came storming out the front door calling to me, "What are you doing? What are you doing!"
I lowered the camera and turned to him, "I'm taking pictures of that sign."
"Why are you doing that?" he asked with way too much intensity.
"Because I like the way it looks," I responded. "I'm just having fun. Look," I said holding the diminutive Canon G5X up to his face. "Just having fun."
"Well, OK," he said begrudgingly and went back inside.
We have come to the point where we can't take a picture of a hotel sign on a public street without an inquiry as to our intentions. And one of the reasonable lines of defenses against this unreasonable behavior is a small camera that looks like something only a tourist would carry.
That's why I thought the G5X was a good choice for the day. And as it turns out, I was right.
After a week of steady shooting with the Canon, there are five features that I think are worth discussing for those interested in a compact camera for travel, street photography, and family outings. Let's dig deeper.

5 Noteworthy Features on the Canon G5X Mark II
- Electronic 2,360,000 dot Viewfinder and Tilting 3" 1,040,000 dot LCD - The popup viewfinder works well for both left and right eye photographers. Once popped up, the eyepiece pulls outward providing plenty of viewing distance. This adjustable diopter is a great touch, and the image is outstanding. The tilting LCD is wonderful for street photography when you want to get low or high angles. This tandem really makes this a versatile, easy to use camera.
- Front Control Ring for More Precise Zooming - The adjustable ring around the lens can be programmed as a step zoom with click stops for 24mm, 28mm, 35mm, 50mm, 85mm, 100mm, and 120mm. Since I'm already familiar with those focal lengths, I found this far more useful than just randomly pushing a rocker switch in one direction or the other to adjust the zoom.
- Easy to Use Exposure Compensation Ring - If you enable Exposure Simulation, you can take full advantage of the easy to adjust exposure compensation ring that provides real time visual feedback as your rotate it with your thumb.
- Relatively Fast f/1.8 - 2.8 Zoom lens - Not only is the zoom range good - 24mm to 120mm - so is the maximum aperture ranging from f/1.8 - 2.8. This makes it easier to capture images in a variety of lighting environments without having to jack up the ISO.
- Versatile Charging Options - In-camera battery charging, from a power bank, outlet, or computer, is possible via the USB port. And unlike many other cameras that allow for USB charging, Canon also includes the standalone charger in the box. So you have both options available.

I do have a few nits as well. The battery indicator is less than accurate. It may show half charge available one minute, then suddenly shut down the next. The back panel controls are too easy to accidentally change during the shooting process. And I would love to have a custom function button or two.
But overall, I really like the Canon G5X Mark II ($899). The imaging pipeline produces excellent shots, there's a bounty of useful features, and the body is truly compact. It's a winner!
The B&H Deal of the Week
Panasonic Lumix G 25mm f/1.7 ASPH. Lens with UV Filter for Micro Four Thirds
The Panasonic Lumix G 25mm f/1.7 lens is on sale for $147.99 - that's $100 off.
One UHR (Ultra-High Refractive Index) element pairs with two aspherical elements to reduce spherical aberrations and distortions for consistent edge-to-edge sharpness and illumination. A Nano Surface Coating has been applied, too, and helps to reduce flare and ghosting for increased contrast and color fidelity. The optical construction also helps to realize a compact overall form factor, measuring just 2"-long and weighing 4.4 oz. Benefitting both stills and video capture, this lens also incorporates a stepping motor for smooth, quiet autofocus performance that is compatible with Lumix cameras' high-speed contrast-detection focusing systems.
Great for both Panasonic and Olympus MFT cameras, especially at this price!
74
Samsung officially unveils 108MP ISOCELL Bright HMX mobile camera sensor
You can read the entire article here. Here's the scoop:
The ISOCELL Bright HMX is the first mobile sensor to feature a 1/1.33" size, according to Samsung, which says its Tetracell tech enables the HMX to 'imitate big-pixel sensors' for better quality 27MP images.
The 1/1.33" format equates to around 9.6 x 7.2mm, which is around 40% smaller than a 1"-type sensor, but nearly 3 times larger than the 1/2.5"-type chips in the many of smartphones. The Tetracell design, much like Sony's 'Quad Bayer' technology, places four pixels under each color of its color filter, making it easy to combine pixels to give better performance at 1/4 resolution, but also means additional processing needs to be done to attempt to replicate what a standard Bayer sensor would capture, if it had 108 megapixels.
New Course Offering: Podcast Skills
A course on podcasting has been the number one request for new workshop topics. And after some time thinking about the best way to make this happen, I've come up with a one day skills course that you can attend from home, or wherever you have an Internet connection.
This event will cover the following topics:
- Recording Hardware
- Editing Software
- Concept and Creation
- Essential Storytelling Techniques
- Show Notes
- Syndication and RSS Feeds
- Getting Your Show on Apple Podcasts, Google Play Music, Stitcher, and More
- Adding Music to Your Show (and Where to Get It)
- Editing Workflow
- Promoting Your Podcast
- The Ins and Outs of Advertising and Sponsorships
The topics will be divided into modules and presented live, and they will be recorded as movies as well. Each participant will receive the catalog of HD movies from the day as part of their tuition.
The course will include insider tips, best practice techniques, and multiple Q&A sessions. Each participant is also entitled to one follow up one-on-one session after the workshop to address questions unique to his or her goals.
The live course, set of recorded videos, and the follow up one-on-one session costs only $249. Inner Circle Members get a 10 percent discount on tuition.
The first two course dates are scheduled for October 12 and November 9, 2019. Participation is limited to 10 people per course, first come, first served. Registration is open now at www.thenimblephotographer.com. Click on the 2019 Workshops tab.
Updates and Such
Inner Circle Members: A big thanks to those who support our podcast and our efforts!
B&H and Amazon tiles on www.thedigitalstory. If you click on them first, you're helping to support this podcast. And speaking of supporting this show, and big thanks to our Patreon Inner Circle members:
And finally, be sure to visit our friends at Red River Paper for all of your inkjet supply needs.
See you next week!
More Ways to Participate
Want to share photos and talk with other members in our virtual camera club? Check out our Flickr Public Group. And from those images, I choose the TDS Member Photo of the Day.
Podcast Sponsors
Red River Paper - Keep up with the world of inkjet printing, and win free paper, by liking Red River Paper on Facebook.
Portfoliobox - Your PortfolioBox site is the best way to show off your best images.
The Nimbleosity Report
Do you want to keep up with the best content from The Digital Story and The Nimble Photographer? Sign up for The Nimbleosity Report, and receive highlights twice-a-month in a single page newsletter. Be a part of our community!
Want to Comment on this Post?
You can share your thoughts at the TDS Facebook page, where I'll post this story for discussion.
 "Las Vegas Reflection" - Canon G5X Mark II - Photo by Derrick Story.
 "Woman with Yellow Hair" - Canon G5X Mark II - Photo by Derrick Story.
 "Man in Red Shirt" - Canon G5X Mark II - Photo by Derrick Story.
 "Tourist Pointing" - Canon G5X Mark II - Photo by Derrick Story.