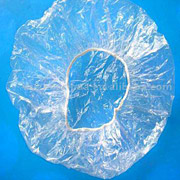
Recently in Photography

  Page 375 of 382 in Photography  

Aperture Preferences

I've been using Aperture on a 17" PowerBook, and my biggest challenge hasn't been performance, but disk space. Storing hundreds and hundreds of RAW files on a measly 80GB internal hard drive is insane. Even if I cleaned off my iTunes music, video clips, applications, documents, and the OS itself, I'd still run out of room. I had to find a solution, and fast. So, I did.

My approach was to carry with me a 80GB LaCie 80GB Portable External Hard Drive that was slim enough to fit unobtrusively in my laptop case. I then copied my Aperture Library on to the mobile drive and removed it from my PowerBook's internal disk (I recommend that you back up your Aperture Library to at least one other drive before deleting from your laptop). You can instruct Aperture to read the library on the mobile drive by going to its Preferences (Aperture > Preferences) and pointing the application to the new library location. You'll have to relaunch Aperture for the change to take effect.

OK, so now you've relieved the pressure off your internal drive, but you've also created an 80GB ball and chain that's necessary to run Aperture. Or is it? One of the lesser-know features of Aperture is the ability to drag and drop entire projects out of the master library. You can use this to your advantage while working on a big assignment. Drag a project out of your master library (from the mobile drive) to your laptop's internal drive. If it's a large project, this will take a minute or two to copy.

Drag Project

Now quit Aperture, disconnect the mobile drive, and relaunch Aperture. Since the designated Aperture library isn't available (it's on the disconnected mobile drive), Aperture will create a brand new library on your PowerBook internal drive. Simply drag your project into Projects column in Aperture, and you can continue working on it just as if it were in your master library. Once you've finished with the project, you can copy it back into your Master library on your mobile drive (replacing the older version of it).

There are variations of this technique, but this should get you headed in the right direction.

Technorati Tags: , ,

Airplane Window Sunset

A great way to pass the time while flying is to take pictures. That's why I always get a window seat if one is available. Here are a few tips to get the best shots possible.

Start by cleaning off the glass to remove smudges and hand prints left by the child that had your seat on the previous flight. Then turn off the flash; these are existing light shots only. I usually leave the white balance setting on "auto" and correct the color, if necessary, later on the computer. (BTW: one trick I've learned with daytime airplane window shots is that Photoshop's auto color correction works great on these types of images. Try it.) On digicams, I then set the focus on "infinity" or "landscape" so the sensor isn't fooled by the glass, and to prevent it from spending too much time trying to focus on clouds that don't have distinct edges.

Put the camera lens barrel right up against the glass (make sure, however, you don't have glass-to-glass contact with the front element of your lens). If you have a lens hood, use it. The idea is not to get reflections from the window in your shots. Now fire away.

I captured this image with a Contax SL 300R compact while flying from Florida to California. ISO was set to 200. Exposure was 1/4 of a second at f-2.8. I was able to get away with this long shutter speed by steadying the camera against the glass. I chose not to up the ISO to 400 because this camera gets a little noisy at that setting.

This shot is in celebration of Julianne Kost's new book, Window Seat. It's a beautiful work filled with lots of great Photoshop technique. I'll be attending a reception in Julianne's honor tonight at Adobe. Will let you know if I glean any further insights.

Technorati Tags: ,

First 2006 Wedding Posted

Wedding

I just posted the first wedding gallery of the season. I used Apple's Aperture to manage the RAW files that I shot with my Canon 5D. For most of the wedding, I used the Canon EF 24-105mm f-4 IS lens, with and without flash. My assistant, Paige Green used a Canon 20 D with 85mm f-1.8 or 28-70mm f-2.8 L lens. She shot mostly existing light.

The online gallery was generated right out of Aperture using its Web Gallery tool, then uploaded to a .Mac server from Aperture. Only minor photo edits, mostly cropping, were applied to the images.

I talk about wedding photography in this week's podcast if you'd like to learn more about the process.

Technorati Tags: ,

iPhoto 6

Building web pages to share photos isn't always convenient, and email attachments have varying effectiveness depending on the photo size, email client, and recipient. A new method for easily sharing your pictures is to syndicate them via RSS using the new Photocasting feature in iPhoto 6.0.2 or later.

This technique enables you to share images in one of four resolutions by simply dragging them into an iPhoto 6 album that has Photocasting enabled. You will need a .Mac account to syndicate the pictures, but anyone with an Internet connection and an RSS reader can receive your pictures automatically. And if a recipient has iPhoto 6, he or she will automatically see your images in iPhoto itself.

To enable Photocasting, all you have to do is select an album in iPhoto by clicking on it once, then choose Share > Photocasting. iPhoto will ask you what size of image you'd like to syndicate: small, medium, large, or original. You can learn more about the details of those options in my recent post, Photocasting: Serve the Right Picture Size on Mac DevCenter. For onscreen viewing, "small" seems adequate, serving up 640x480 versions of your pictures.

Once you publish, you have the option of iPhoto generating an email with subscribing instructions that you can send to everyone you want to share your pictures with. If a recipient doesn't have iPhoto 6, then you might want to recommend a free RSS reader, such as NetNewsWire Lite.

I recommend that you make this a more full-bodied experience by adding informative titles to your pictures and writing some caption material in iPhoto's comment field. Both title and comments are served with the picture. The entire package looks great in all of the RSS readers I tested.

David Pogue and I cover Photocasting in great detail in our new book, iPhoto 6: The Missing Manual. It's available on Amazon.com now as preorder.

Overall, I think Photocasting is a great way to share photos. All you have to do is drop a new image in your enabled album, and it is immediately sent out via RSS. Your fans will automatically receive the pictures when they open iPhoto 6 or their RSS reader. Very nifty!

If you'd like to see a sample Photocast, subscribe to this URL: http://photocast.mac.com/dstory/iPhoto/dex's-photocast/index.rss.

Technorati Tags: , ,

huey screen calibrator

Calibrating your computer monitor is a lot like carrying a tripod. You know you should do it, but it's often such a hassle, you don't. I've been using the Spyder 2 to keep my monitor in check. It's a nice device, and the software is decent, but the Spyder isn't portable or simple enough for me justify taking it on the road. While at the PMA show in Orlando, I was able to test the new huey by gretagmacbeth ($79 on Amazon). It's about the diameter of a thick writing pen and a bit shorter. So, there's really no excuse to leave this device at home.

The huey is both a screen calibrator (LCD and CRT) and a room light monitor. The first part we all know about. It calibrates your computer monitor so the colors you're viewing on screen (in theory) are the same as on other calibrated monitors. Plus you can sync your monitor to your output devices so you have accurate color all the way through your workflow -- or at least that's the hope. The huey makes this process easy. Its bundled software works with Mac OS X 10.2 (or later), Windows 2000 and XP. The Mac version, which I tested, installs an application, system preference pane, and menu bar shortcut. It's well designed and fun to use.

But the truly ambitious aspect of this device is that it endeavors to monitor the room lighting and adjust your monitor on the fly if the lighting changes. This is particularly helpful when you're working on long image editing sessions in rooms with natural light. And since the huey is so portable, laptop users can stash it in their travel bag and enjoy accurate color on the road.

This all sounds great, but the real test is will the huey help me make better prints? Since I'm on the road right now, I'm not able to verify yea or nay as to its effectiveness. So I looked up the huey on Amazon and read its reviews. Both reviewers (as of March 1, 2006) said that the device did not help them make better prints. You can also read a fairly in depth review on Northlight Images, although that review wasn't definitive on the huey's ability to help us make better prints.

So, is the huey worth 80 bucks? Well, for gaming calibration and for quickly adjusting the way your monitor looks, it's pretty slick. I really like using it. But I think there's some question concerning its ability to improve your color workflow. For that, I'm going to have to test it with my printers and post a comment below. If you've had a chance to test the huey, please share your comments for others.

Technorati Tags: , ,

Natasha the Fortune Teller

Natasha

Monday was my first full day at PMA, and it really had a little bit of everything. I began my assault on the Expo Hall floor. This is not something I can conquer in one day. There are so many exhibitors, many of whom are doing truly interesting things in their booths. At the Canon booth, for example, I had a couple of extended conversations about the new 30D and the just announced PIXMA Pro9500 printer. This is a very tempting entry into the high end consumer printing market. I then watched a shooting demo with ace photographer Robert Farber. Just like that, an hour had passed.

Once the floor closed at 5:30 pm, the social gathering began. Here's where you get to meet the people you've heard of, read about, or had worked with but never met in person. In these settings is where I also learn about what's coming down the pike... conversations that aren't appropriate for the booth during show hours.

I saw Natasha the fortune teller at one of these gatherings. She was circulating among the crowd, reading their palms and peeking into events yet to come. I asked Natasha if I could take her picture, and she agreed. As I said, you see a little bit of everything at this show.

Oh, and one more thing. My experiment with photoblogging from the show floor seems to be working out. I posted a half dozen pictures yesterday on my SplashBlog site. I'm using a Casio EX-P505 compact camera to capture the images. I then take out the SD memory card and put it in my Palm LifeDrive. I then launch SpalshBlog, choose the picture I want to upload right off the memory card, add the text, and upload the image via WiFi that's available in the conference building. After the image is uploaded, I remove the memory card and put it back in the Casio. I never have to copy images to the LifeDrive, I just upload to the site directly off the card. I'll make some more posts today.

And who knows what I'll find...

Technorati Tags: ,

PS Elements 4 Mac

Adobe released Photoshop Elements 4 for the Mac today at PMA. I had a chance to meet with an Adobe engineer last night in Orlando to talk about Elements 4 and some of its notable features. Adobe has packed quite a bit of power in this affordable package.

First, and a bit of a surprise, Elements 4 now has a streamlined version of Bridge. So there's a fully capable file browser built right into the app. The biggest "wow" feature however, is the new "Adjust Color for Skin Tones" control that lets you click on a spot of skin, then Photoshop analyzes it and corrects the color. I saw it tested on a variety of subjects, and it worked remarkably well. Speaking of our people shots, the new red eye correction tool is the model of simplicity. You just enable it and Photoshop finds all the instances of red eye in the image and fixes them for you. The Mac version isn't able to correct red eye on import as in the Windows release, but this approach works quite well.

Adobe has included some very helpful selection tools too. The Magic Select Brush and the Magic Extractor tools speed up the tedious task of selecting an element within your picture to adjust or copy and place elsewhere. They don't achieve perfection automatically, but they do get you close enough so that with a little clean-up you're in business.

The price for Elements 4 is still $89. This a great value for a powerful image editor. Considering that it includes Bridge and the latest version of Camera Raw, this application is all most hobbyist photographers would ever need.

Technorati Tags:

PMA Reporting Via Splashblog

PMA 2006

The Photo Marketing Association Show (PMA) is underway in Orlando, Florida. I'm landing in Orlando Sunday evening and will begin reporting on Monday. I'm going to try something new this year. I've set up a SplashBlog. Mine will be called Dex's Mobile Blog. It will have an RSS feed too.

I'll be taking photos with Casio and a Contax compact cameras. I'll then take the memory cards and put them in a Palm LifeDrive that has WiFi connectivity. The SplashBlog software will enable me to upload the photos and captions directly to Dex's Mobile Blog.

Sounds fun. Let's see how it works.

Technorati Tags:

Full Review of Nikon D200 on DP Review

Nikon D200

Digital Photography Review has just published their full review of the Nikon D200. As we expected, Phil Askey highly recommends this camera. If you're considering making the jump to this pro-level Nikon, I recommend that you read what Phil has to say. It will help you understand both its strengths and weaknesses, and help you decide if it's the right DSLR for you.

Technorati Tags: ,

Nikon Coolpix P4

More PMA Announcements -- Nikon jumped into the pre-PMA announcement frenzy with a raft of items, one of my favorites being the new Nikon Coolpix P4. It's more sophisticated than your average point and shoot with additional controls such as Aperture Priority and a speedy continuous shooting mode of 1.8 fps (for a compact). The 3.5X optical zoom comes with image stabilization, and there's a 2.5" LCD monitor on the back. This svelt package will run less than $400. For an extra $50, you can get the P3 with similar specs, but includes 802.11 WiFi connectivity.

Aperture Training Redux -- If you're serious about your digital photography, then you may be wondering if Apple's Aperture is software you should consider. That was on the minds of many people who attended the Aperture Power Tools workshop at the recent Macworld in San Francisco. If you missed that training, Scott Bourne and I are teaming up again for an Introduction to Aperture 2-Day Lecture/Demo Course at Pixel Corps in San Francisco on March 17 and 18. This two full days of immersion into Aperture is only $249. And the facilities at Pixel Corps are terrific.

Ultra Clamp Assembly -- I spoke last night at the North Coast Mac User Group meeting and was showing off some of my "dumb photography tricks." One of the favorite gadgets was the Ultra Clamp Assembly, and I promised to list the url where folks could buy one.

Technorati Tags: ,