Recently in Photography

  Page 170 of 382 in Photography  

I'm doing some preliminary testing with the Sigma DP2 Merrill Compact Digital Camera. Sigma claims "the DP2 can more accurately reproduce colors, and capture sharper resolution images, than any camera the same size." I wanted to put this claim to test.

Sigma DP2 Merrill at 100 Percent Jpeg from DP2 magnified to 100 percent on a Retina display MacBook Pro.

After just one afternoon of shooting, I can tell you that this compact camera with an APS-C, 46 MP Foveon X3 Direct Image sensor and Sigma fixed focal length 30mm f/2.8 lens, can capture outstanding images. The color is vibrant and accurate, sharpness is excellent, and shadow/highlight detail quite pleasing.

Examining this Jpeg from the Santa Monica pier at 100 percent on my MacBook Pro 15" with Retina display was a delight for my eyes. And I haven't even dug in to the Raw files yet. (You can download the Jpeg here.)

More to come from this intriguing compact camera. But we're off to an impressive start.

Want to Comment on this Post?

You can share your thoughts at the TDS Facebook page, where I'll post this story for discussion.


twitter.jpg Follow me on Twitter

Designing Your Holiday Greeting Cards

I don't send out many holiday greetings. But I do like to celebrate the season with the important people in my life. And when I do, I make my own fine art cards.

Christmas Cactus 2013

Since I have a Christmas Cactus in my studio that blooms in November, it makes an excellent subject to feature on the cover. I make sure I get a good series while it's in full bloom.

Then I check that I have enough printing supplies on hand. I use Red River Paper Card Stock in my Epson R2000 to create my mailable masterpieces.

If this project sounds appealing to you, now is the time to get your plan and supplies together. If you use Aperture, I have a few tips to help you design your cards. And certainly you can use other applications too for making cards.

Fine art greeting cards make a satisfying gift. You took the pictures, processed the images, designed the cards, then printed the final product with your own hands. Slip a store certificate inside, and you've got a great present.

Aperture Tips and Techniques

To learn more about Aperture, check out my Aperture 3.3 Essential Training (2012) on lynda.com. Also, take a look at our Aperture 3 Learning Center. Tons of free content about how to get the most out of Aperture.


The Digital Story on Facebook -- discussion, outstanding images from the TDS community, and inside information. Join our celebration of great photography!


Adding a vignette to landscape and portrait images can help direct the viewer's eye to important areas. There are times, however, when you need more control than a single vignette can provide. That's when the double-vignette technique can prove helpful.

Double Vignette in Aperture 3 By using two vignette controls instead of one, you have more control over the gradation. Photo by Derrick Story.

Setting this up is easy. First make sure Vignette is active in your Adjustments pane. If not, go to the Add Adjustment popup menu and choose it. My first vignette usually has a radius just for the edges of the image. Adjust intensity to taste.

Then click on the gear icon in the Vignette brick, and choose Add New Vignette Adjustment. The radius for the second brick often covers more ground. By balancing the two Vignette adjustments, I have more control over the tones than with a single adjustment.

More Aperture Tips and Techniques

To learn about portrait retouching in Aperture, take a look at Portrait Retouching with Aperture. You may want to check out my other Aperture titles, including Aperture 3.3 Essential Training (2012), Using iPhoto and Aperture Together, and the latest, Enhancing Product Photography with Aperture. Also, take a look at our Aperture 3 Learning Center. Tons of free content about how to get the most out of Aperture.

Want to Comment on this Post?

You can share your thoughts at the TDS Facebook page, where I'll post this story for discussion.

Are Digital Filters Real Photography?

We see them everywhere. Digital filters for Instagram, Flickr, the iPhone, and even your compact and micro four thirds cameras. When applied during capture, we're able to instantly add an effect to our images - even if we're not completely certain on how that image will render.

And that's the issue, isn't it?

Hegenberger Ave, Oakland, CA "Hegenberger Road, Oakland, CA" Captured with a Canon PowerShot N in Creative Mode.

If you leave part of the creative process up to the camera, is that real photography? Well, let's look at what you are doing when you take a photo:

  • Finding the location
  • Composing the image
  • Timing the capture
  • Deciding what's good
  • Sharing your choice

So in other words, you've baked the cake. The creative frosting is the icing that sweetens it further.

In my photography workshops, I encourage participants to try new things on their cameras. Last weekend we played with Art Filters on the Olympus OM-D. I have shooters capture in RAW+Jpeg so they'll get both the original "untainted" RAW file and the filtered Jpeg. In all honesty, we got some amazing results.

My feeling is to first learn photography basics so you know what you're doing. Practice those basics to improve your skills. And when you feel like shaking things up a bit, play with filters. It's fun, it often spurs a new approach, and it doesn't hurt anyone.

Want to Comment on this Post?

You can share your thoughts at the TDS Facebook page, where I'll post this story for discussion.


Join me on my Instagram site as I explore the world of mobile photography. And now Instagram features 15-second movies too.

The "Bag Within a Bag" Concept

You want to travel light. But at the same time, you probably don't want your gear bouncing around unprotected. The approach I use in these situations is called "bag within a bag." In fact, I'll be traveling with this setup tonight while attending an NBA game.

Bag Within a Bag

It works like this. You start with a lightweight shoulder bag that's comfortable, not too big, and looks good. In my case, I'm using the Walking Man Shoulder Bag. One of the reasons why I like this carrying solution is that it's so versatile. I can pack an iPad mini and a camera in it tonight, then switch to a water bottle and lunch tomorrow for an afternoon picnic.

The key to protecting my gear when I'm carrying photo equipment is to use protective pouches for the individual items. For example, my Olympus OM-D E-M5 with a 17mm f/1.8 lens will fit nicely in a Lowepro Dashpoint 30 pouch (shown on the right in gray).

Not only will the Dashpoint protect the OM-D in the shoulder bag, but it has its own strap and attachment system. So I can use it in a variety of configurations outside of this scenario. I'll also put an extra lens or two in a pouch, drop in my iPad mini, and I'm ready to have a great time.

By using "bag within a bag," I can travel light, look discreet, and have what I need for the moment. For instance, I'll have the Walking Man Shoulder Bag on my person all night tonight because it's so light. That means that it won't be stolen, spilled on, or crushed.

If I'm on assignment, then I have to take more serious gear and carrying solutions. But when my goal is to have a good time, yet be able to capture great images, I like to use this type of rig.


Nimble Photographer Logo

This approach has a high Nimbleosity Rating. What does that mean? You can learn about Nimbleosity and more by visiting TheNimblePhotographer.com.

Want to Comment on this Post?

You can share your thoughts at the TDS Facebook page, where I'll post this story for discussion.

olympus-stylus-1-front-square.jpg

If you're curious about how the new Olympus Stylus 1 performs with in-studio testing, then you might want to take a look at a recent post from Imaging-Resource.com, Olympus Stylus 1 First Shots posted: How do images taken with this high-end, long-zoom camera stack up?

Test images range from ISO 100 to ISO 12800, with both Jpegs and RAWs available. All of the metadata is intact, so you can get a very good idea of how this camera captures with a variety of settings.

Want to Comment on this Post?

You can share your thoughts at the TDS Facebook page, where I'll post this story for discussion.


Join me on my Instagram site as I explore the world of mobile photography. And now Instagram features 15-second movies too.

This week on The Digital Story photography podcast: Is the iPad mini Retina worthy for photographers? On the Nimbleosity Report - A week with the Lollipod ultralight accessory stand.; From the Photo Help Desk - Are soft backgrounds possible with micro four thirds cameras? All of this and more on today's show with Derrick Story.
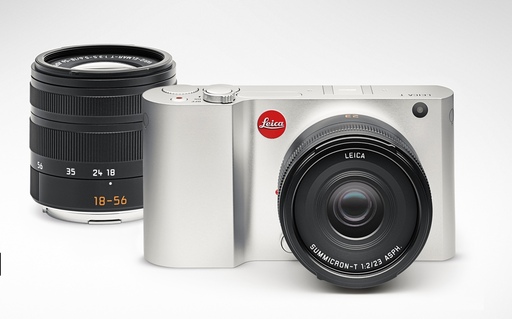
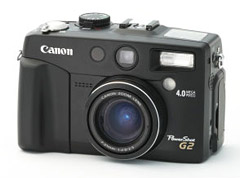
Story #1 - Is the new iPad mini worthy for photographers? The much anticipated Retina display mini is now available. It sports a brand new display weighing in at 2048x1536 resolution at 326ppi. But it seems to generating its share doubts from the photography community. Starting with reports of possible burn-in on some models, to criticism about its more narrow color gamut.

I've tested a brand new iPad mini with Retina display against the original iPad mini, an iPad 3, and iPhone 5S. Here's the way things stack up.

  • The new iPad mini screen is brighter, sharper, and has better contrast than the original iPad mini.
  • Compared to the iPad 3 and the iPhone 5S, the new mini has less saturated colors, especially the reds and purples.
  • The color temperature for the new iPad mini is more pleasing to my eye than the original iPad mini, and to a small degree, the iPad 3.

I haven't been able to test the new iPad mini against the iPad Air. Reports are that the color gamut displayed by the Air is better than the new iPad mini. I would tend to believe this because the iPad 3 has a broader gamut too.

iPad Color Gamut Comparison Upper Left: iPad mini with Retina Display; Upper Right: iPad mini; Lower Left: iPad 3 with Retina Display; Lower Right: iPhone 5S with Retina Display.

So, is the iPad mini with Retina Display a worthwhile investment for photographers? I delve into the details in the first segment of today's show.

Lollipop with flash

Story #2 - The Nimbleosity Report: A week with the Lollipod ultralight accessory stand. In short, I really like this little guy. I've used it for a variety of tasks including camera stabilization, wireless flash, and even as a microphone stand. And, it only weighs 320 grams total weight and is 320 mm long when folded (12.5")

Story #3 - Are soft backgrounds possible with micro four thirds cameras? In short, yes . And I explain how in the third segment of today's show.

Photo Assignment for November is Critters.

SizzlPix! Holiday Special!

For The Digital Story Virtual Camera Club members ... If you'd like additional copies of for gifts, or SizzlPix! of any other of your images to make spectacular, amazing holiday gifts, order any two SizzlPix! to be shipped together, and we'll give you 25 percent off on the second one! Order any size up to a mind-boggling 48 by 72" Imagine -- six feet! and no sacrifice in resolution, luminance, and impact. Just put "TDS" in the comments space on the sizzlpix.com order page. Of course, you may apply the discount to any number of pairs. And free shipping to any US mainland address.

BTW: If you're ordering through B&H or Amazon, please click on the respective ad tile under the Products header in the box half way down the 2nd column on thedigitalstory.com. That helps support the site.

Listen to the Podcast

In addition to subscribing in iTunes, you can also download the podcast file here (31 minutes). You can support this podcast by purchasing the TDS iPhone App for only $2.99 from the Apple App Store.

Monthly Photo Assignment

The November 2013 photo assignment is "Critters."

More Ways to Participate

Want to share photos and talk with other members in our virtual camera club? Check out our Flickr Public Group. And from those images, I choose the TDS Member Photo of the Day.


iPad for Digital Photographers

If you love mobile photography like I do, then you'll enjoy iPad for Digital Photographers-- now available in print, Kindle, and iBooks versions.

Podcast Sponsors

Red River Paper -- Keep up with the world of inkjet printing, and win free paper, by liking Red River Paper on Facebook.

Make Your Photos Sizzle with Color! -- SizzlPix is like High Definition TV for your photography.

Want to Comment on this Post?

You can share your thoughts at the TDS Facebook page, where I'll post this story for discussion.

screen-retention-test.jpg

Among the early adopters for the latest iPad mini (now with Retina display), there have been a few reports of "screen burn in."

Essentially, this means that the screen will temporarily retain faint outlines of strong graphical elements even after you move on. In all honesty, the effect is very subtle and probably would not be noticed unless you were on the lookout for it (or had read about it online).

That being said, if you want to test your new iPad mini, here's a link to Marco Arment's image retention test. Interestingly enough, my excellent MacBook Pro 15" with Retina Display retained the squares for a good 20 seconds after I ran the test on my computer. Just saying...

Want to Comment on this Post?

You can share your thoughts at the TDS Facebook page, where I'll post this story for discussion.


twitter.jpg Follow me on Twitter


The Super Light, Nimble Water Bottle

Nimble Water Bottle in Backpack

Crafted by Wenger, this handsome 26-ounce water Nimble Water Bottle is perfect for an afternoon hike, bike ride, or as a companion while running errands in the car.

It measures 11" tall by 2.75" in diameter. The rugged screw top cap features a soft gasket to prevent water leakage when tightened. Even though the bottle is very light, it's resistant to dings and dents. Kit includes D-Ring attachment.

The Walking Man logo is printed on the front in black, and Wenger is printed on the back. The matte finish for the bottle is charcoal gray.

The Nimble Water Bottle fits long ways inside the Walking Man Shoulder bag.


The Nimble Water Bottle

This Stainless Steel Water Bottle has a high Nimbleosity Rating. What does that mean? You can learn about Nimbleosity and more by visiting TheNimblePhotographer.com.

Want to Comment on this Post?

You can share your thoughts at the TDS Facebook page, where I'll post this story for discussion.


twitter.jpg Follow me on Twitter


Accurate color is particularly important in product photography. And it's easier to achieve spot-on hues than you may think. I show you how using Aperture 3.

This tutorial is from my Enhancing Product Photography with Aperture training on lynda.com. I provide tips on creating your own white balance target, then using that tool in post production.

More Aperture Tips and Techniques

To learn more about Aperture, take a look at Aperture 3.3 Essential Training (2012), Using iPhoto and Aperture Together, and the latest, Portrait Retouching with Aperture. Also, visit our Aperture 3 Learning Center. Tons of free content about how to get the most out of Aperture.

Want to Comment on this Post?

You can share your thoughts at the TDS Facebook page, where I'll post this story for discussion.