Recently in Photography

  Page 188 of 385 in Photography  

The Movie Making for Photographers Workshop focused on the Sonoma County Hot Air Balloon Classic for its filmmaking subject. We spent portions of both Saturday and Sunday at Keiser Park in Windsor, CA capturing content for our work in Final Cut Pro X.

Waiting for Lift Off Close access to the action provided great content for our filmmaking.

The workshop crew then learned the ins and outs of setting up a project in Final Cut Pro X, organizing the vast library of scenes we had recorded, building an effective storyline, massaging audio, and best practices for outputting our finished product. We also covered how to move Final Cut projects from one drive to another and upgrading existing iMovie work to Final Cut X.

Two professional filmmakers joined us as co-instructors, Louis Ekrem of Laughing Cat Films and Eric Michael Perez of Clicker Video, who shared practical ways to tap the movie making functionality of our DSLRs.

TDS Movie Making Workshop for Photographers Classroom session of TDS Movie Making Workshop. Photo by Eric Perez.

"I'm never going back to iMovie," remarked Ed Shields, one of the workshop photographers. "Once you get your bearings in Final Cut X, it's actually quite logical," added Craig Tooley, who also joined the group.

Inflating Balloon photos by Derrick Story.

Having such intimate access to the action at the Hot Air Balloon Festival was so important for our movie making. We were able to show the details of preparation as well as the sweeping big shots during liftoff. We're planning to do this workshop again next year. If you want to improve your movie making skills and witness firsthand the excitement of a hot air balloon festival, make June 2014 on your calendar.

Want to Comment on this Post?

You can share your thoughts at the TDS Facebook page, where I'll post this story for discussion.


Join me on my Instagram site as I explore the world of mobile photography.

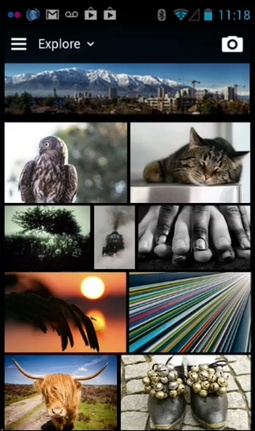
Flickr for Android

When Yahoo! released Flickr v2 for iOS, iPhone users had a more appealing experience than their Android counterparts. In late May, that discrepancy was diminished... for the most part.

Flickr for Android brings the visual beauty of the iOS version with much, but not all, of its functionality. Since I'm primarily an iOS user, I couldn't tell if the unevenness was my lack of understanding or Flickr's UI. According to others, such as PCMag.com, it's not me; it's the app.

But those few rough spots could be easily ironed out in future updates. And the app itself is beautiful. Like the iOS version, it has reenergized my enthusiasm for mobile Flickr when using Android.

If you haven't done so already, give the new Flickr for Android a try. And while you're at it, join the Digital Story Public Group. We have a talented community there. And selected images from that public group are featured on the TDS Facebook page as the TDS Member Photo of the Day.


iPad for Digital Photographers

If you love mobile photography like I do, then you'll enjoy iPad for Digital Photographers-- now available in print, Kindle, and iBooks versions.

Want to Comment on this Post?

You can share your thoughts at the TDS Facebook page, where I'll post this story for discussion.

Lowepro Transit Sling 250 AW on Derrick Story

When I'm working in an urban environment, I want to travel light, have fast access to my equipment, and carry a bag that doesn't scream "camera gear." Lately I've been packing my OM-D kit in the Lowepro Transit Sling 250 AW ($99) and feeling great, even during extended shoots.

The Transit sling has fast side-access allowing me to keep the Olympus OM-D tucked away when on the move, then able to grab it quickly when a shot presents itself. I have plenty of room for spare lenses, flash, an extra body, and snacks. There's a dedicated iPad pocket in the back that fits a 10" tablet or iPad mini. If I need a light tripod or monopod, I can use the tuck-away holder on the side of the bag. And just as importantly, I feel like I blend into the environment when working out of the Transit Sling.

Alyssa Parking Garage

Portrait of Alyssa

I used the Olympus OM-D E-M5 with the excellent Panasonic Lumix G X Vario 12-35mm/F2.8 lens to create this portrait of Alyssa in the downtown area of Santa Rosa, CA. With the ISO set to 400, I shot at f/2.8 at 1/800th in Aperture Priority mode, exposure compensation set to -1.3. The focal length was set to 35mm. I then processed the image in Aperture 3.4.

Packed Lowepro Transit Sling 250 AW

Inside the Transit Sling 250 AW

Inside the Transit Sling I pack the OM-D with grip, Panasonic 12-35mm f/2.8 zoom, Olympus 75mm f/1.8 prime, and the Leica 25mm f/1.4 lens. Also stowed is an Olympus flash, Fujifilm X20 compact camera, filters, cable release, iPad (in the dedicated back pocket) and a snack. In the field, I can upload images directly from the camera to the iPad using a Toshiba FlashAir or Eye-Fi Mobi wireless card.

Regardless if I'm working on location, or processing images on the iPad in a coffee shop, the Tranist Sling 250 protects my gear and doesn't get in the way. I give it a very high nimbleosity rating.


iPad for Digital Photographers

If you love mobile photography like I do, then you'll enjoy iPad for Digital Photographers-- now available in print, Kindle, and iBooks versions.

Want to Comment on this Post?

You can share your thoughts at the TDS Facebook page, where I'll post this story for discussion.

Great minds thinks alike. In this case it's Canon and DP Review. But I like the Canon EF 40mm f/2.8 STM lens too. And DP Review just honored it with Gold Award.

Canon 40mm Lens

In their review, they write: The EF 40mm f/2.8 STM is a fairly unprepossessing little lens, and its tiny size and relatively low price might make you wonder whether significant compromises have been made in its design and construction. But the moment you start shooting with it and looking at the images it produces, any such thoughts rapidly disappear - it's actually a very fine lens.

And I couldn't agree more. When I'm feeling creative and want to just have fun shooting, the 40mm is one of those lenses I reach for. And for $149, how can you go wrong?

Want to Comment on this Post?

You can share your thoughts at the TDS Facebook page, where I'll post this story for discussion.


Join me on my Instagram site as I explore the world of mobile photography.

Eye-Fi Mobi Review

Eye-Fi Mobi Wireless SD Memory Card

The new Eye-Fi Mobi 16GB SDHC Wireless Memory Card does what I've always wanted an Eye-Fi card to do: easily connect my iOS device to my camera regardless of my location.

Once the card and camera are connected, the images flow from the camera to the iOS device, such as an iPad, where you can edit and share the pictures. The process is relatively simple.

  • Insert the card in the camera and power up.
  • Download the mobile app at www.eye.fi/mobi and enter the activation code that comes with the card.
  • Take a picture with your camera to force the card to begin broadcasting.
  • Open the Settings app on the iPad, tap on WiFi, and choose the Eye-Fi card that's in the list of networks.
  • Return to the Eye-Fi app and watch the picture being transferred from your camera to the iPad.

In the Eye-Fi app, you can monitor the connection via the status button in the upper left corner. When it's green, the two devices are talking. When it's red, the Eye-Fi card has timed out and stopped broadcasting.

Eye-Fi App on an iPad mini The Eye-Fi app on an iPad mini

This is where the system could use a little refinement. There's no control over how quickly the Eye-Fi card powers down in the camera. As it works out, it's just a couple of minutes. I understand why it does this, to save battery power. But once the card powers down, you have to prod it again to transmit, then go back to Settings on the iPad and log back in to the network.

I would like to have some control over the time period before the card powers down. I found myself having to log in to the card repeatedly, even during a single session of shooting.

Once the images are on the iPad, Eye-Fi creates a Photos Album to manage them. This is very convenient. You can access the Album via the Photos app, iPhoto app, or any other app that can read Albums. I also liked that transfer was swift. My medium-sized Jpegs loaded quickly and were virtually ready for use immediately after capture.

You can set up sharing to Facebook, Twitter, or via email within the Eye-Fi app itself. But since the images are automatically saved to your Camera Roll, you have access to them for publishing using your normal workflow. You can add multiple Eye-Fi Mobi cards to the app, and switch among them as needed. This allows you to have cards in all of your cameras if you wish.

The Eye-Fi Mobi is available in 16 GB ($75) and 8 GB ($50) capacities. Both versions are rated at a speedy Class 10. I anticipate refinements in how we can control the card's power management. But even in this first release, the Mobi is one of the best wireless card options currently available. Both versions are available on Amazon.com


iPad for Digital Photographers

This is the kind of stuff I write about in iPad for Digital Photographers-- now available in print, Kindle, and iBooks format.

Want to Comment on this Post?

You can share your thoughts at the TDS Facebook page, where I'll post this story for discussion.

This week on The Digital Story: Samsung Galaxy Camera, Eye-Fi Mobi, and the Olympus 75mm f/1.8 lens. All of this and more on The Digital Story podcast.

Story #1 - Samsung GC110 Galaxy Digital Camera - I've been testing this Android-based (4.1 Jellybean) 16MP camera with 21X optical zoom with 23mm on the wide end.

The Samsung Galaxy also sports a 1.4 GHz quad core processor, giant 4.8" LCD, and WiFi (no cellular with the GC110 model). It's selling on Amazon for $449. That's an investment for a compact camera that's on the large size. So what do you get for your money? I'll go into some detail about that.

Story #2 - The Eye-Fi Mobi 16GB SDHC Class 10 Wireless Memory Card addresses one of my biggest complaints about Eye-Fi cards, lack of easy direct connect. With the Mobi, and the iOS app for my iPad mini, I can shoot with any SD card compatible camera and have the images stream to the iPad.

The Mobi has some nice features that help with energy management and picture organization. The 16 GB SDHC model (class 10) is currently selling on Amazon for $75. I think it's worth it. And I'll discuss why in the second story.

Story #3 - The Olympus 75mm f1.8 Lens is now available in black. Yaay! I've been shooting with this beauty for a week now, and I have first impressions to share.

Reminder! - If you're going to purchase gear through Amazon or B&H Photo, please stop by the TDS home page first. Look for the "Products" box about half way down the page in the second column. There you will see display tiles for Amazon, lynda.com, and B&H Photo, in that order. By entering those sites through those display tiles, you help support The Digital Story.

Listen to the Podcast

You can also download the podcast here (32 minutes). Or better yet, subscribe to the podcast in iTunes. You can support this podcast by purchasing the TDS iPhone App for only $2.99 from the Apple App Store.

Monthly Photo Assignment

The June 2013 photo assignment is Stylish.

More Ways to Participate

Want to share photos and talk with other members in our virtual camera club? Check out our Flickr Public Group. And from those images, I choose the TDS Member Photo of the Day.


iPad for Digital Photographers

If you love mobile photography like I do, then you'll enjoy iPad for Digital Photographers-- now available in print, Kindle, and iBooks versions.
Podcast Sponsors

Red River Paper -- Keep up with the world of inkjet printing, and win free paper, by liking Red River Paper on Facebook.

Make Your Photos Sizzle with Color! -- SizzlPix is like High Definition TV for your photography.Special Offer! Anyone buying Derrick's new book, iPad for Digital Photographers, even at Amazon's or Barnes And Noble's discount, and putting the password for the Book Owners lounge in the comments space of their SizzlPix! order, will get 10 percent off their entire order -- the equivalent of more than a full refund for the book!

Need a New Photo Bag? Check out the Lowepro Specialty Store on The Digital Story and use discount code LP20 to save 20% at check out.

Want to Comment on this Post?

You can share your thoughts at the TDS Facebook page, where I'll post this story for discussion.

3 Things I Like About Lightroom 5

Even though there are more than 50 new features in Lightroom 5, there are three in particular that I like. First, we finally have a true full screen preview mode. Now, when I press the "F" key, I get what I've always wanted.

Second, when using the Spot Removal tool, there's an option at the bottom of the screen called Visualize Spots. By checking the box, Lightroom creates a mask that makes it easy to see any flaws that I might want to remove.

Lightroom 5 Visualize Spots Using "Visualize Spots" I can easily see areas that I might want to remove.

And third, the Upright tool, found in the Lens Corrections box, is terrific. It straightens out those lines making the buildings look less distorted. I've tested it with a series of architecture shots, and it has improved the image 9 out of 10 times. More often than not, using Auto mode for Upright is all you need.

Lightroom 5 is available now for download ($79 for upgrade, $149 for new users) and is part of Adobe Creative Cloud.

Want to Comment on this Post?

You can share your thoughts at the TDS Facebook page, where I'll post this story for discussion.


Join me on my Instagram site as I explore the world of mobile photography.

Mac OS X Mountain Lion

With RAW Compatibility Update 4.06, your Mac (Aperture, iPhoto, and Preview) now supports the following new cameras:

  • Canon EOS-1D C
  • Canon EOS Rebel SL1 / 100D / Kiss X7
  • Canon EOS Rebel T5i / 700D / Kiss X7i
  • Hasselblad Lunar
  • Nikon COOLPIX A
  • Nikon D7100
  • Nikon 1 J3
  • Nikon 1 S1
  • Sony Alpha NEX-3N

The update is for Mountain Lion (Mac OS X 10.8) users.

Use Aperture and iPhoto Together!

To learn about using Aperture and iPhoto together, visit my Using iPhoto and Aperture Together on lynda.com. Also, take a look at our Aperture 3 Learning Center. Tons of free content about how to get the most out of Aperture.

Where's Your Cable Release?

They hardly take up any space in your camera bag, yet they're often left behind. The cable release allows you to trip the shutter without jarring the camera, enabling you to capture sharper images.

Nikon Cable Release on Fuji X20 Nikon "traditional" cable release on a Fujifilm X20

For my Fujifilm X20, I'm using the wonderful (and affordable) Nikon AR-3 Mechanical Release that's 12" long and runs $16.95. For all of my other cameras, I'm using the mandatory electronic releases.

I recommend always having one release for one camera in your bag. For night photography, low-light mood shots, and product work, they really come in handy.

Want to Comment on this Post?

You can share your thoughts at the TDS Facebook page, where I'll post this story for discussion.


iPad for Digital Photographers

If you love mobile photography like I do, then you'll enjoy iPad for Digital Photographers-- now available in print, Kindle, and iBooks versions.
75mm_olympus.jpg

The ability to create soft backgrounds is important for pros and serious enthusiasts. Some have shied away from micro four thirds cameras, such as the Olympus OM-D because its sensor is smaller than full frame or APS-C -- an important factor in creating soft backgrounds.

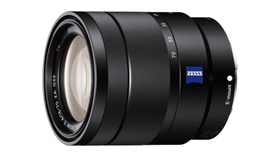
But the lens you put on the camera can help with this cause. And some lenses do an admirable job of providing us with creamy bokeh, while still lightening the load on our shoulders. An excellent example is the Olympus M.Zuiko Digital ED 75mm f/1.8 ($899 and now available in black as well as silver).

Cactus at 75mm wide open
Cactus with Olympus 75mm at f/1.8, ISO 200

The Olympus 75mm has a quality that provides for high sharpness where the lens is focused, but falls off quickly creating a very appealing background. You can see from the image above, that fall off begins with the cactus in the back. Notice how smooth the green area is in the lower left of the frame.

The all metal Olympus 75mm is compact (2.7 x 2.5") and weighs a very reasonable 10.7oz. Its silent focusing also makes it a good choice for video work. I'll show you how it works for portraits in a future post.


Take a look at the Olympus Micro Four Thirds Gear Guide for an overview of cameras, lenses, and accessories.

Want to Comment on this Post?

You can share your thoughts at the TDS Facebook page, where I'll post this story for discussion.