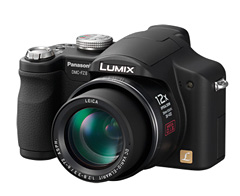
Recently in Photography

  Page 363 of 381 in Photography  

Mod Your Flash with a Cardboard Grid

Gut Mann's Cardboard Grid

One of the problems with location flash photography is that you often only want to light part of the scene (the subject) and downplay (but not eliminate) the area surrounding the person. There are lots of expensive accessories to achieve this effect. But I just read a post on the Strobist (scroll down the page until you get to the post titled "Free and So Easy: DIY Grid Spots for Your Flash"), where contributor Gut Mann designed a nifty grid for your flash head out of corrugated cardboard. Using this DIY attachment, you can create professional looking environmental portraits that emphasizes the subject, yet downplays the environment. Complete assembly instructions are detailed on the site.

You can get a rough feel for the effect by looking at an assignment shoot with a snoot by the Strobist. If you're a location portrait shooter, this is definitely a trick you want in your camera bag.

Photo from the Strobist website.

Technorati Tags: ,

iPhoto 6

I've been doing a lot of iPhoto talks lately, and I've noticed that a lot of people don't know how to preview the images on their memory card using iPhoto 6. I first read about this trick on MacOSXhints, and it's pretty handy.

When you have your camera or card reader connected to your Mac with iPhoto open, hit the Return key twice in succession. iPhoto 6 will allow you to preview the images on your memory card. You can even drag specific pictures to the Source pane.

Once you've finished previewing your pictures, all you have to do is click on the Library folder (or anywhere else really), then back to your Camera Icon in the Source pane, to upload your pictures the normal way.

It's really a handy way to see what's on your memory card before adding the whole enchilada to your iPhoto library.

Technorati Tags: ,

Canon Rebel XTi

Canon "played it safe" with the latest version of the Canon Digital Rebel 400D (XTi), according to a recent review in Digital Photography Review. But playing it safe isn't always a bad thing, because the latest Rebel earned a Highly Recommended rating.

So what do you get for your hard earned money? The new Rebel features a 10.1 megapixel CMOS sensor with improved microlens array, excellent dynamic range, nine point auto focus sensor, large, bright, 2.5" LCD monitor with 160° viewing angles, three settings for long exposure noise reduction, and a new dust reduction system.

Pretty good stuff for a camera that is $100 less than its predesessor -- $849 on Amazon with 18-55mm lens. If you want to shoot RAW, this is a camera to consider.

Technorati Tags: ,

Looking for Aperture Bloggers

Aperture 1.1

Are you a profession or serious amateur photographer using Aperture? Would you like to be part of a high profile weblog that focuses on Aperture and digital photography? If the answer is yes to both of these questions, send an email to derrick(at)thedigitalstory(dotcom). Put "Aperture Blogger - Your Name" in the subject line, and describe why you'd like to join this blogging community in the body of the email. If you have any links that I should see, include those too.

Deadline for this "Call for Aperture Bloggers" is Wed. Oct. 18. So if you're interested, don't procrastinate. Send that email today.

Technorati Tags: ,

Panasonic Lumix DMC-LX2

This is a camera that many serious photographers want to buy, but may be leery of because of the image processing shortcomings in the first model, the LX1.

The latest release, the Panasonic Lumix DMC-LX2, once again tempts our willpower. It has a 4X Leica zoom with image stabilizer (that is 28mm on the wide end), true 16:9 format option, 10 megapixels of resolution, 2.8 inch LCD monitor, beautiful metal body, RAW mode, ISO range up to 1600, and a brand new Venus III image processing engine.

The bottom line with this beautiful machine seems to be this... if you shoot at ISO 100, or even 200, you're going to be pretty happy with the results. But once you start pushing it to ISO 400 and higher, you're going to have some image noise to deal with. For more details about this, take a look at the review on photographyblog. If grappling with the noise at higher ISOs isn't a deal breaker for you, this is a gorgeous camera with a Leica lens that you can buy for around $500.

Technorati Tags: ,

iView Media Pro

iView Multimedia has released an update to its flagship digital asset management program, iView MediaPro. In today's press release, iView says that it's increased performance for both Mac and Windows versions. This is heartening, since this is the first update to the popular application since the Microsoft acquisition. Many had feared that Microsoft would eliminate Mac support for the product. This release is a good sign for Mac users of iView Media Pro.

Download iView MediaPro 3.1.2 at www.iview-multimedia.com/downloads/index.php. This update is free for registered users of MediaPro 3.x. This update works best with the latest version of QuickTime (7.1.3) from Apple, which is strongly recommended to both Windows and Macintosh users.

Technorati Tags: ,

Epson R2400

One of the biggest challenges in digital photography is producing clean, accurate prints using your desktop printer. How do you tackle color management, screen calibration, printing resolution, and all the other variables that befuddles most photographers between capture and output?

Fortunately for us, Ben Long has published a four part printing tutorial on creativepro.com. In this series, Ben covers:

  • Part 1: Selecting a photo printer.
  • Part 2: Color management, soft proofing, make your first print.
  • Part 3: Paper profiling.
  • Part 4: Paper profiles, RIPs.

This is a series I highly recommend.

Technorati Tags: , ,

Sea Turtle Rising for Air

maui_sea_turtle.jpg

I had been hoping all week to visit a sea turtle underwater, and I finally got my chance while snorkeling at Kahekili Beach Park in Maui. I spotted this guy resting beneath a rock ledge about 20 feet down. I knew that turtles generally come up for air a couple times an hour, so I just hung out to see what would happen. Sure enough, about 15 minutes later he headed for the surface. I gave him lots of space so he could go where he wanted, but photographed his ascent and decent.

I have all sorts of great shots in this series, but this is one of my favorites. He looks graceful, and the feeling of weightlessness is really communicated here. After he caught his breath, he went back to his spot under the reef.

One quick note about sea turtles. If you're lucky enough to visit one while snorkeling, please give them lots of space. And what ever you do, don't touch.

One final shot from Maui, then back to regular business. I'm including this wonderful congregation of fish from a Black Rock dive because it just felt so good to be swimming with them. Hope you enjoy it. See you back in Northern California for my next post.

school_fish.jpg

Technorati Tags: ,

Moray Eel in Maui

moray_eel.jpg

As I continue to work with the Canon SD700 and the WP-DC5 underwater housing in West Maui, I'm getting more comfortable with the rig each day. The only glitch I had today was some fogging on the inside of the housing after a short session of above-water shooting. So I had to swim back to shore, take the camera out of the housing, defog, then return for a second tour of snorkeling.

I'd also recommend the optional weights that you can get for the housing. I noticed that I wasn't staying submerged as long as I would have liked on my free dives. Part of what was working against me was the WP-DC5 housing that is buoyant by design. The optional weights help counter that. And when you're trying to stay under during a dive, every little bit helps.

The top image is a Moray Eel I caught relocating from one rocky area to another. I had to shoot fast to catch him, and the SD700 was very responsive. The bottom shot of the Rectangular Triggerfish is from above also. I really like the clown-like face, complete with blue lips, that is displayed on the top of this beautiful fish.

triggerfish.jpg

maui_diver.jpg

What better place to test the Canon SD700 IS with its $160 underwater housing than in Maui? I caught an early morning Catamaran to the reserve at Molokini and spent the next 3 hours snorkling in beautiful 74 degree water that had about 20 feet of visibility, if not more.

I was very impressed with how easily I could work the controls on the WP-DC5 housing. I used the "underwater" selection from the scene modes and fired away. I could use Canon's bright 2.5" LCD to frame the shots about half the time, depending on the angle of the light from above. Sometimes, the glare and reflection off the housing would wash out the LCD, and I'd just have to guess while lining up a shot. Some of those guesses, however, turned out great.

I also shot topside with the SD700 still in the housing. Those images also turned out well, with no detectable degradation from the camera being inside the housing. This makes the SD700/WP-DC5 combo useful for all sorts of inclement weather, not just underwater.

The housing is rated to 130 feet. I never dove beyond 20 feet, so I can't vouch for the housing's depth rating beyond that. My only complaint was that my right thumb once changed the scene mode from "underwater" to "movie" without me knowing until many minutes later. The dial is positioned where I normally rest my thumb while pressing the shutter button.

Other than that interesting movie digression, I was very satisfied with the results. The shot included here was captured near the reef in Turtle Town, not far from Molokini.

Technorati Tags: ,