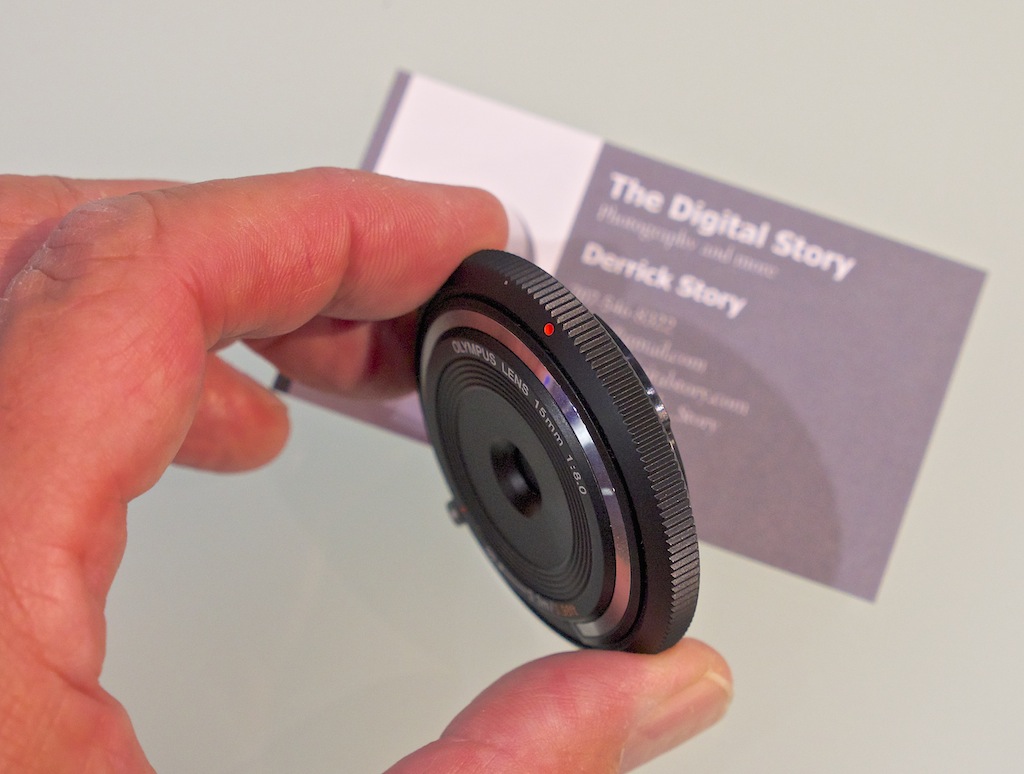
Recently in Photography

  Page 221 of 388 in Photography  

For the May 2012 Photo Assignment, TDS shooters fired up their motor drives and captured the world moving around them. See for yourself in our gallery, Action. And which one will be the SizzlPix Pick of the Month?

ron_boyd_action.png

Photo by Ron Boyd. "When I heard the assignment 'action,' the first thing I thought about was this photo captured at Bosque Del Apache. I really like the contrast of the two engaged in intense competition while the other birds are seemingly unaware." To see all of the other terrific shots from May, visit the Action gallery page.


Participate in This Month's Assignment

The July 2012 assignment is "Hot." Details can be found on the Member Participation page. Deadline is July 31, 2012.

Please follow the instructions carefully for labeling the subject line of the email for your submission. It's easy to lose these in the pile of mail if not labeled correctly. For example, the subject line for this month's assignment should be: "Photo Assignment: July 2012." Also, if you can, please don't strip out the metadata. And feel free to add any IPTC data you wish (These fields in particular: Caption, Credit, Copyright, Byline), I use that for the caption info.

Good luck with your July assignment, and congratulations to all of the fine contributors for May.

SizzlPix Pick of the Month for March and April Photo Assignments

Congratulations to Brian Reynolds for his "Eyes" photograph, and to Ruth Cooper for "Macro." Each will receive a SizzlPix for his winning image, selected by the good folks at SizzlPix.


twitter.jpg Follow me on Twitter

-


Now Available! The Digital Photography Companion. The official guide for The Digital Story Virtual Camera Club.

  • 25 handy and informative tables for quick reference.
  • Metadata listings for every photo in the book
  • Dedicated chapter on making printing easy.
  • Photo management software guide.
  • Many, many inside tips gleaned from years of experience.
  • Comprehensive (214 pages), yet fits easily in camera bag.

Technorati Tags: , ,

I Knew MobileMe Well

Like many other MobileMe users, I spent part of Saturday pulling content off my little corner of the Apple universe and saving it to the computer. As of today, it's goodbye MobileMe, hello iCloud.

mobile_me_discontinued.jpg I was greeted with this message when opening Aperture.

Just One More Thing...

This morning, however, when I opened my Aperture library to work on the TDS Photo Assignment (to be published soon), there was this parting message: "Click OK to move albums you have published to the MobileMe gallery to the Albums section of your library to preserve them." Aww shucks! Apple will relocate my MobileMe galleries to Aperture.

By the looks of the progress bar underway now, this will take a while. But, what a considerate eulogy for an old friend.

How versatile is the iPhone 4S? Nick Fancher, an Ohio based photographer, posted a "behind the scenes" video of a fashion shoot he did with just an iPhone 4S and a reflector as a fill light. He edited the images with Photoshop Express and Snapseed. Take a look!


Weekly Photography Podcast

You'll find The Digital Story in the new Apple Podcasts app. Subscribe (for free) today.

Podcasts are now out of iTunes and reside in their own app called Podcasts, which is available for free in the App Store. At first it may seem a little confusing to find and listen to your favorite episodes. So here's a quick walk through.

Step 1 - Search

To find a show, tap on the "Catalog" button and go to the "Search" field. In this case, I entered "Digital Photography." On the iPad, the results will be displayed as "Podcast Episodes" and "Podcasts." Browse both areas until you find something you want. (On the iPhone you'll only get the "Podcasts" listing.)

01_podcast_search.png Entering text in the Search field.

Step 2 - Select

One you find a podcast or episode you want to try, tap on it to reveal more information.

02_search_results.png Viewing search results.

Step 3 - Listen and Subscribe

You'll be presented with the most recent episodes for that podcast. You can listen to any of the selections by tapping on their title (streaming). If you want to download it for listening at another time, tap the "download arrow." You can also subscribe to the show by tapping the big "Subscribe" button.

03_subscribe.png Listen (tap on title), Download (tap on download arrow), or Subscribe.

Step 4 - Manage Your Podcast

Once you've subscribed to a show, it appears in your Library. You can see it by tapping on the "Library" button. At this point you can fine-tune some of the settings. On the iPad, click on the "gear" icon in the upper right corner to reveal the settings panel. On the iPhone, tap the arrow bracket > in the upper right.

04_settings.png Fine-tune the settings.

You can also share this podcast with a friend by tapping the "Share" button in the upper right and choosing one of three options: Email, Tweet, or Message.

Step 5 - Remove Episodes from Device

For individual episodes that you've downloaded and have already listened to, you can delete them if you wish to free up space on your device. Simply "swipe to the right" on the downloaded episode to reveal the "Delete" button.

05_deleting.png Delete to remove downloaded shows from device.

The Podcasts app seems well designed, and it's free. You might want to give it a try on your iPhone, iPod Touch, or iPad.


You can find more photo tips and "photography how tos" on my Pinterest page.


Giants pitcher Ryan Vogelsong had his stuff working, and hitters Melky Cabrera and Buster Posey did their jobs at the plate. The result: Giants defeat Clayton Kershaw and the Dodgers 2-0 to pull within one game of the lead in the National League West.

I was there in lower section 128, row 13 on the third base side with my Olympus OM-D E-M5 and Olympus 40-150mm zoom.

Buster Posey Hits Buster Posey connects against the Dodgers at AT&T Park. Photo by Derrick Story. You can see the entire set of images on the TDS Flickr page.

I parked the ISO at 1600 and used Aperture Priority to keep the zoom at the widest setting (f/4-f/5.6). When extended to 150mm on the OM-D, the effective power of the lens was 300mm because you double the focal length for micro four thirds. The high speed burst mode (9 fps) was a pleasure for capturing the action. And since the entire package was so compact, I was able to enjoy the game as a fan and grab a few photos when the action heated up.

Ball for Young Fan Ball for young fan. Photo by Derrick Story

Special Thanks to Hunt's Photo

As you may have read in earlier posts, I had two temporary review copies of the Olympus OM-D, but was having problems purchasing one for myself. I had orders placed with the typical big camera suppliers, and they kept getting delayed.

So I contacted the great people at Hunt's Photo & Video based in New England, US. I worked with Gary, who contacted Olympus US to see what he could do. Within a week my Olympus OM-D was on its way to me. The price was the same as what the other camera suppliers were charging, but the service was heads above. And yes, Hunt's offers free shipping too.

They have a wonderful newsletter that comes out every couple weeks with lots of specials. I use it to help keep up on the latest releases. You might want to try it yourself.

Thanks to Gary and the entire Hunt's crew for getting that Olympus OM-D in my hands so I could shoot this great baseball game at AT&T Park.


You can find more photo tips and "photography how tos" on my Pinterest page.


Whether you work with models regularly, or are contemplating your first shoot, this week's podcast includes "5 Don'ts" for these projects. These warnings were culled from many conversations with the models I work with for TDS workshops and other projects.

In the second story I talk about the winner from the recent World's Ugliest Dog competition. Why? Because an artistic handling of an "ugly" subject can lead to an impressive photograph.

And finally, SizzlPix is offering a 20 percent discount to TDS listeners... on any size or quantity. Listen in to learn how you can take advantage and get "sizzled" for less.

Listen to the Podcast

You can also download the podcast here (30 minutes). Or better yet, subscribe to the podcast in iTunes. You can support this podcast by purchasing the TDS iPhone App for only $2.99 from the Apple App Store.

Monthly Photo Assignment

Signs is the June 2012 Photo Assignment. You can read more about how to submit on our Member Participation page. Deadline for entry is June 30, 2012.

More Ways to Participate

Want to share photos and talk with other members in our virtual camera club? Check out our Flickr Public Group. And from those images, I choose the TDS Member Photo of the Day.

Podcast Sponsors

Red River Paper -- The $7.99 Sample Kit is back! And with free shipping.

Make Your Photos Sizzle with Color! -- SizzlPix is like High Definition TV for your photography.

Need a New Photo Bag? Check out the Lowepro Specialty Store on The Digital Story and use discount code LP20 to saven 20% at check out.


Technorati Tags:
, , , , ,


One of the many feature improvements in Aperture 3.3 is the White Balance tool. Among its enhancements is an "uber auto" button and three "filters" for different types of photos. Here's an overview to get you up and running right away.

renee_white_balance.jpg The new white balance tool in Aperture 3.3 includes a "skin tone" option for your portraits. Photo by Derrick Story. Click on image for larger size.

White Balance Popup Menu

Prior to Aperture 3.3 your white balance option was Temperature and Tint. Now there are two additional choices: Skin Tone and Natural Gray. Plus, there's an Auto button, but I'll get to that a bit later.

  • Skin Tone - a great choice for portraits. This new algorithm is designed for portraits. Simply place the eye dropper on a skin tone and click.
  • Natural Gray - designed to correct color cast, but to also leave some feel for the ambient color in your image. In other words, it won't over-correct your photo. An example could be an underwater scene where you want to temper the blue, but not eliminate it all together.
  • Temperature and Tint - this choice is best for color casts that are more extreme where you really need to get in there and move sliders around.

Auto Button

The White Balance brick also includes an Auto button. When you click on it, Aperture runs all three "filters" and you can choose your favorite version. Auto Skin Tone works best when Faces is enabled because Aperture will use face detection technology to fine tune the correction. I had good luck with it, however, even when Faces was not enabled.

What's fun about Auto is that once you run it, you can cycle through the 3 filters to see the different types of corrections, then choose the one you want to use. On this portrait, for example, the Skin Tone version is beautiful, but the Natural Gray and Temperature and Tint versions were a bit too cool.

Recommended Workflow

Apple has made white balance so easy. I recommend that you begin by clicking the Auto button. Then cycle through the 3 filters and choose the look you like best. You can then fine tune the color by using the slider for that filter.

Keep in mind that these corrections are brushable too. So you can further adjust the color in specific areas. I'll cover that in a future post.

Aperture Tips and Techniques

To learn more about Aperture 3, check out my Aperture 3 Essential Training on Lynda.com. Also, take a look at our Aperture 3 Learning Center. Tons of free content about how to get the most out of Aperture.

My next open Aperture Workshop is scheduled for Nov. 2012, in Santa Rosa, CA. You can get on the pre-registration list, plus learn about all the other photography workshops offered this season by visiting the TDS Workshops page.


The Digital Story on Facebook -- discussion, outstanding images from the TDS community, and inside information. Join our celebration of great photography!


Creating silhouette images is one of the easiest in photography, and often produces interesting pictures. The trick is to control the placement of the negative space in the composition, and to make sure your flash is turned off.

aquarium_silhouette.jpg "Aquarium Silhouette" Click on photo for larger size. Image by Derrick Story.

For example, in this aquarium shot, I had to wait a while until I had two people positioned on the left side. The process went something like this: 1) saw the potential for a good shot, 2) grabbed a position that had the right composition, 3) checked my camera settings, and 4) waited...

Once the elements come together, the actual picture taking is simple. The camera will read the large bright area and usually ignore the silhouetted subjects. So your photograph should be good to go without too much post production fooling around. Just make sure you're not in "auto everything" mode and that your flash is turned off. I think regular "program" mode works great for these types of compositions.

I like the graphical nature of silhouettes. And when these types of images are mixed in with your "regular" photos, they'll certainly grab the attention of the viewer's eye.


You can find more photo tips and "photography how tos" on my Pinterest page.


For the last few years, a chorus of us have been chanting that "the best camera is the one that you have with you." And I totally agree with that. But with high-end point & shoots improving in quality, and Compact System Cameras finding their stride, the "best camera with you" doesn't always have to be your mobile phone.

courting_butterflies.jpg "Courting Butterflies" captured with an Olympus E-PL2 with stock 14-42mm zoom during a family outing. Photo by Derrick Story. Click on image for larger version.

Don't get me wrong. I love shooting with my iPhone 4S. And there have been countless occasions where it has produced wonderful images I would not have otherwise captured. But whenever possible, I also tote a micro four thirds camera, such as an Olympus PEN, even on the most casual of family outings. Why?

  • Greater choice in lenses. I can use a compact zoom or a prime lens, depending on my mood.
  • Raw files. Don't need to say more here.
  • Better shutter speed and aperture control.
  • Bigger files, in case I want to make bigger prints.
  • More options, such as flash control, metering patterns, etc.

I enjoy those moments where I can wander off for a short bit and take a few pictures. In those instances, I love having a more advanced camera... while still knowing the iPhone is in my pocket if I need it.


You can find more photo tips and "photography how tos" on my Pinterest page.


I upgraded to the new MacBook Pro with Retina display for my everyday work. Chief among the reasons why was the 15" Retina display and the NIVIDA graphics card.

Just for fun, I loaded the same Raw file in Aperture 3.3 on both the new MacBook Pro and my 2010 MacBook Air (which I like a lot). The results were interesting.

retina_display_comparison.jpg MacBook Pro Retina Display on the left, 2010 MacBook Air on the right. Click on image for larger version. Photo by Derrick Story.

Specs aside, the first thing that jumped out at me is that the Retina display is more "photographic" than the image on the MacBook Air. I know many people are thinking detail with this display, but what I noticed is a more subtle gradation of tones. That's what I mean by more photographic. The image on the Retina display has some of the characteristics of a film based print. Look at the hair and the left side of the face.

The next attribute that impressed me was color. There is more of it in the Retina display. Keep in mind that it's just not the LCD we're talking about here. There is an entire set of technologies under the hood, that rolled up, contribute to the final image.

Both displays were set to the "Color LCD" profile with exactly the same file shown full screen mode in Aperture 3.3. The color was more accurate on the Retina display. No calibration on either machine. This is "out of the box" stuff.

As you might expect, there's a bump in detail too. But it's not an "earth shattering going to change the world" improvement. And I think part of the detail improvement is the better handling of tones so you can actually see the detail... if you know what I mean.

None of this is intended to be scientific. I'm a photographer walking by two computers with the same image on their screens. It's like the HD television wall at Best Buy. Even the comparison image here is a snapshot captured with an Olympus E-PL2 that was in my backpack at the time.

But, if you just go by what you see on the screen, then I have to say that what I like about the Retina display is that I feel like I'm looking at a photograph, not a computer screen.

Is that worth the $2,199 I paid for the 15" MacBook Pro? Well, considering how many pictures I look at on a weekly basis... the answer is yes.

Aperture Tips and Techniques

To learn more about Aperture 3, check out my Aperture 3 Essential Training on Lynda.com. Also, take a look at our Aperture 3 Learning Center. Tons of free content about how to get the most out of Aperture.

My next open Aperture Workshop is scheduled for Nov. 2012, in Santa Rosa, CA. You can get on the pre-registration list, plus learn about all the other photography workshops offered this season by visiting the TDS Workshops page.


The Digital Story on Facebook -- discussion, outstanding images from the TDS community, and inside information. Join our celebration of great photography!


1 2 3 4 5 6 7 8 9 10 11 12 13 14 15 16 17 18 19 20 21 22 23 24 25 26 27 28 29 30 31 32 33 34 35 36 37 38 39 40 41 42 43 44 45 46 47 48 49 50 51 52 53 54 55 56 57 58 59 60 61 62 63 64 65 66 67 68 69 70 71 72 73 74 75 76 77 78 79 80 81 82 83 84 85 86 87 88 89 90 91 92 93 94 95 96 97 98 99 100 101 102 103 104 105 106 107 108 109 110 111 112 113 114 115 116 117 118 119 120 121 122 123 124 125 126 127 128 129 130 131 132 133 134 135 136 137 138 139 140 141 142 143 144 145 146 147 148 149 150 151 152 153 154 155 156 157 158 159 160 161 162 163 164 165 166 167 168 169 170 171 172 173 174 175 176 177 178 179 180 181 182 183 184 185 186 187 188 189 190 191 192 193 194 195 196 197 198 199 200 201 202 203 204 205 206 207 208 209 210 211 212 213 214 215 216 217 218 219 220 221 222 223 224 225 226 227 228 229 230 231 232 233 234 235 236 237 238 239 240 241 242 243 244 245 246 247 248 249 250 251 252 253 254 255 256 257 258 259 260 261 262 263 264 265 266 267 268 269 270 271 272 273 274 275 276 277 278 279 280 281 282 283 284 285 286 287 288 289 290 291 292 293 294 295 296 297 298 299 300 301 302 303 304 305 306 307 308 309 310 311 312 313 314 315 316 317 318 319 320 321 322 323 324 325 326 327 328 329 330 331 332 333 334 335 336 337 338 339 340 341 342 343 344 345 346 347 348 349 350 351 352 353 354 355 356 357 358 359 360 361 362 363 364 365 366 367 368 369 370 371 372 373 374 375 376 377 378 379 380 381 382 383 384 385 386 387 388
Main Index | Monthly Archives | Category Archives