Recently in Photography

  Page 63 of 383 in Photography  

Shooting Monochrome at Mt. Lassen

As we approached Day 1 of the TDS Photography Workshop, I was looking for the best way to tell the story of Lassen Volcanic National Park with my images.

Lassen Volcanic National Park Remains of a Volcano - Olympus OM-D E-M1 with Olympus PRO 45mm f/1.2 lens. Photo by Derrick Story.

I was impressed with the harsh, but beautiful environment created by centuries of eruptions by the four different types of volcanos in the area. But as we spent time there, I was also struck by the fortitude of the plants and animals that inhabited the area.

Chipmunk with Full Pouches Chipmunk with Full Pouches - Olympus OM-D E-M1 Mark II with Olympus PRO 40-150mm zoom. Photo by Derrick Story.

I decided that black & white was the best way to convey what I felt while standing there: stark, rugged beauty with no excess. Nature had provided just enough resources for these trees, lakes, and creatures to survive. I wanted my images to feel the same way.

P9270076-Lassen-1024.jpg Lake Helen - Olympus OM-D E-M1 Mark II with Olympus PRO 45mm f/1.2 lens. Photo by Derrick Story.

I set my Olympus OM-D E-M1 to RAW+Jpeg (Superfine) and enabled the Dramatic Monochrome Art Filter. Even where reviewing the images on the LCD in bright sunlight, I could tell this was the look that I was hoping for: simple, clean, to the point. These pictures represent how I felt during the course of the day.

Lassen Volcanic National Park Wood Texture - Olympus OM-D E-M1 Mark II with Olympus PRO 45mm f/1.2 lens. Photo by Derrick Story.

Tomorrow we're off to another location. We'll be in a completely different environment. And once again we'll try to find a way to tell the story.

You can share your thoughts at the TDS Facebook page, where I'll post this story for discussion.

I'm heading north today for our workshop cabin at Lake Almanor, California. We're going to spend a day in Lassen National Park, then Burney Falls, with some pretty sweet side trips as well. I've packed my bag, and thought you might want a peek inside.

Derrick-Story-Bag.jpg

I'm going with the Olympus OM-D E-M1 Mark II paired with the Panasonic Lumix G X Vario 12-35mm f/2.8 zoom lens. I'm in a mix and match mood for this trip, combining Olympus with Panasonic, Think Tank with Lowepro, and tossing in a dash of Fujifilm for seasoning.

The long lens case contains the Olympus M.Zuiko Digital ED 40-150mm f/2.8 PRO lens. The two shorter Think Tank Lens Case Duo 5s are protecting my Olympus Digital ED 17mm f/1.2 PRO lens and the Olympus Digital ED 45mm f/1.2 PRO lens. I keep the 17mm in the green case and the 45mm in the black case so I know which one to grab without having to open it.

I'm also bringing the delightful Fujifilm XF10. It's great for quick shots, or when I have the telephoto on the E-M1 Mark II and don't want to change optics for a quick shot.

Lowepro-pro-tactic.jpg

All of this is housed in the Lowepro ProTactic 350 AW backpack, which is just the right size for these types of assignments. This is the same bag that I used successfully for my trip to Cuba. It's handsome, rugged, and holds just the right amount of gear.

It also provides access from the top, and from both sides. I can easily get to both cameras and all three lenses without having to open the main back panel.

I'll definitely want a tripod for Burney Falls, and I've packed a few filters as well. So this rig should provide me with all the tools I need, without slowing me down.

In the coming days, I'll post some images from the workshop. I can't wait to start working with these great folks from our photography community. (Wish you were joining us!)

You can share your thoughts at the TDS Facebook page, where I'll post this story for discussion.

Ricoh-GR-3.jpeg

It's been quite a day of pre-Photokina announcements. Lots of heavy artillery will be displayed in Cologne later this week. And there, standing among the trees, will be the svelt GR III.

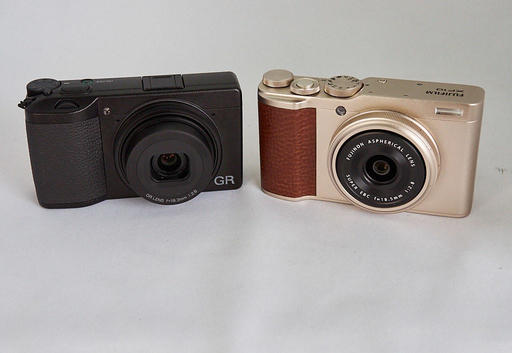
Many of us have been waiting to see the specs for this latest GR, especially those who are debating between it and the new Fujifilm XF10. Based on the Ricoh press release, there will be enough differences to make this an interesting decision.

The GR III will feature image stabilization, which the XF10 does not have (both cameras using a 28mm f/2.8 fixed focal length lens). The XF10 has an intelligent flash built-in, while Ricoh opted for a hot shoe capable of accepting an external strobe. The Fujifilm uses both Bluetooth and WiFi, while the Ricoh is WiFi only. This probably means that it won't be as adept as the XF10 at geotagging images in real time.

Fuji-XF10-front.jpg

What they both have in common are large APS-C 24MP sensors, 3" million dot LCDs, and no electronic viewfinder.

Price may be a difference, as well. The Fujifilm XF10 sells now for $499. That's competitive for a large sensor compact. Currently, the older Ricoh GR II costs more than that. So it will be interesting to see how the numbers add up when Ricoh releases their new model in the first quarter of 2019.

One other major distinction between the two cameras... they look very different. Like I said, if you want a large sensor compact and are debating between these two, you'll have plenty to choose from.

You can share your thoughts at the TDS Facebook page, where I'll post this story for discussion.

This is The Digital Story Podcast #654, Sept. 25, 2018. Today's theme is "Are You a Photography Dinosaur?." I'm Derrick Story.

Opening Monologue

Photography is changing faster than many of its seasoned photographers. And even though this doesn't mean extinction for the ways of the past, it does signal that a certain amount of evolution is in order. You may think that I'm talking about film. No way! That's pre-dinosaur. I'm referring to the tried and true digital photography workflow that was once the standard. I'll explain more in today's TDS podcast.

Are You a Photography Dinosaur?

jurassic-park-tree.jpg

Before I get too deep here, let's take a quiz together to determine if you're a dinosaur photographer. Answer yes or no to the following questions.

  • (1)Do you regard smartphones as real tools for meaningful photography?
  • (2)Do you manage all of your images on a computer using a hard drive based DAM such as Lightroom Classic or Capture One Pro?
  • (3)Do you post Instagram shots taken directly from your smartphone? (Opposed to a digital camera workflow)
  • (4)Do you even have an Instagram account?
  • (5)Do you know what Snapchat is?
  • (6)Is your primary method for sharing images via email attachments?
  • (7)Do you use a tripod more than twice a year?
  • (8)Are you a professional photographer or at least a regular freelancer?

Answers: 1) No=1 Dinosaur bone 2) Yes=1 Dinosaur bone 3) No=1 Dinosaur bone 4) No=1 Dinosaur bone 5) No=1 Dinosaur bone 6) Yes=1 Dinosaur bone 7) Yes=1 Dinosaur bone 8) Yes= -3 Dinosaur bones.

If you have four or more bones, you are a photography dinosaur. 2-3 bones means that you are in evolutionary phase. And 1 bone or zero means that you're either 17, or part of the new breed.

So at this point you're probably expecting me to say that the species is doomed. But I don't think that at all. Smartphone and wearable photography will never completely replace workflow based work. But the popularity of those tools depends on rate of change those companies can embrace.

For example, interchangeable lens cameras need to evolve substantially to provide a meaningful alternative to computational photography. The software workflow must get easier and more mobile.

We will always have workflow based digital photography, just like we still have film and the cameras that use it. But tools and techniques that don't evolve become niche products.

In the photography jungle, dinosaurs can survive. But they will no longer rule the planet the way they once did. And by not experimenting with newer tools and techniques, they are also missing out on some real fun.

The Portfoliobox Featured Image

Have you visited our TDS Facebook Page in the last few days? If you, what do you think of the beautiful image by Kenneth Cole as the featured banner? Maybe yours will be next.

Each week for the month of September, I'm going to feature a PortfolioBox Pro image as the banner for our TDS Facebook Page. I will select the image from my list of TDS PortfolioBox Pro users, and include the photographer's name and link.

If you've signed up for a Portfoliobox Pro account, and have published at least one page, then send me the link to that site. Use the Contact Form on the Nimble Photographer and provide your name, the link, and the subject of the page or site you've published. I will add it to our PortfolioBox Pro Directory.

I love using Portfoliobox for these reasons:

  • My images look great, both on my computer and on my mobile devices.
  • It's easy to use. Without any instruction, I'm adding a high quality page in just minutes.
  • It's affordable. There's a free plan and a Pro version. The Pro version is only $82.80 per year or $8.90 per month USD, and that's before the 20 percent TDS discount.

In addition to unlimited pages, you get a personalized domain name, web hosting, and up to 1,000 images.

Get Started Today

Just go to the TDS Landing Page to get started with your free account, or to receive the 20 percent discount on the Pro version. And if you want to see the page that I've begun, visit www.derrickstoryphotography.com.

Focos Brings iPhone XS Tricks to iPhone 8 and X

If you are envious of the computational photography goodies in the new iPhone XS, but want to stick with your existing iPhone 8 or iPhone X handset, take a look at Focos. It can provide much of the same functionality, for free.

  • Take photos with shallow depth of field, without manually painting or making selections
  • Simulate large apertures to create real bokeh effects normally only possible with DSLR cameras and expensive lenses
  • Import existing portrait photos and customize the bokeh effect
  • Re-focus portrait photos that have already been taken, with a simple tap
  • Choose from various simulated aperture diaphragms to generate different bokeh spot effects
  • Professional options to simulate lens characteristics, such as creamy, bilinear, swirly, and reflex effects, and more
  • An essential tool for iPhone 7 Plus, iPhone 8 Plus and iPhone X (dual lens devices).

There's much you can do with the free version. But if you want to unlock all of the cool features, you can do so for $10.99 one time fee or $6.99 a year for a subscription.

Inner Circle Members: New York Fine Art Greeting Cards

My latest printing project is creating a set of 6 fine art greeting cards from my trip to New York. Inner Circle members, not only can you help me choose the final images, but by doing so, you become eligible to win a free set of the cards.

Starting last week, I published two images on our Inner Circle site. Post a comment as to which one you prefer best, and you are automatically entered in the drawing. We'll do this once a week throughout September. At the end of each week, I'll randomly choose a name from the comments and send them a completed set of fine art cards once they are finished. This week's winner is: Bim Paras.

If you want to participate, you can become a member of our Inner Circle by clicking on this link or by clicking on the Patreon tile that's on every page of The Digital Story.

Updates and Such

Inner Circle Members: Starting in October - Photo Critique. Check out the post on Patreon. Send your images to me with the subject line, "Photo Critique." More details on our Patreon page.

B&H and Amazon tiles on www.thedigitalstory. If you click on them first, you're helping to support this podcast. And speaking of supporting this show, and big thanks to our Patreon Inner Circle members:

And finally, be sure to visit our friends at Red River Paper for all of your inkjet supply needs.

See you next week!

More Ways to Participate

Want to share photos and talk with other members in our virtual camera club? Check out our Flickr Public Group. And from those images, I choose the TDS Member Photo of the Day.

Podcast Sponsors

Red River Paper - Keep up with the world of inkjet printing, and win free paper, by liking Red River Paper on Facebook.

Portfoliobox - Create the site that your best images deserve by visiting Portfoliobox. And get a 20 percent discount by using our landing page!

The Nimbleosity Report

Do you want to keep up with the best content from The Digital Story and The Nimble Photographer? Sign up for The Nimbleosity Report, and receive highlights twice-a-month in a single page newsletter. Be a part of our community!

Want to Comment on this Post?

You can share your thoughts at the TDS Facebook page, where I'll post this story for discussion.
Better Image Importing in iOS 12

Apple fixed one of my most frustrating nits with importing images from a camera card to my iPhone: those tiny thumbnails.

IMG_3272.jpg Tiny thumbnails on an iPhone.

In previous versions, it was difficult to tell which shots I wanted, and those I did not, because I had to make decisions based on thumbnails too small to tell.

Now, I can pinch-zoom on any of the images to unlock a bigger view to make it easier to decide which ones I want, and those that I don't.

IMG_3273.jpg Relief! Bigger views of my images.

This improvement has made it far more fun to bring in images from my mirrorless cameras, then incorporate them into my Photos workflow.

I'm still learning iOS 12. But at the moment, this is my favorite photo improvement.

The Apple Photos Book for Photographers, 2nd Edition

Updated for macOS High Sierra, the The Apple Photos Book for Photographers, 2nd Ed. provides you with the latest tips, techniques, and workflows for Apple's photo management and editing application. Get your copy today!

You can share your thoughts at the TDS Facebook page, where I'll post this story for discussion.

Capturing great images of high school students is one of my favorite assignments. I've learned a lot over the years, and I've poured as much of that knowledge as possible into my newly revised, Learn How to Photograph High School Senior Portraits 2018 on LinkedIn Learning.

hs-senior-portraits-lr.jpg

For this new release, I've kept the interesting live action sequences with actual high school seniors, including shooting sessions and discussion about what they are looking for in a portrait session. Then, I added movies showing how to use Lightroom, Capture One Pro, and Photos for macOS to sort, edit, and share the best pictures from the session.

This title reflects the best of both worlds: understanding how to capture great images of teens combined with using the current software tools available to us. Here's a peek at the movie trailer.

Learn how to photograph high school seniors from Portrait Photography: High School Seniors by Derrick Story

If you've been tasked with photographing a high school student in your family, or if you're interested in adding this type of assignment to your freelance work, then I encourage you to watch Learn How to Photograph High School Senior Portraits on LinkedIn Learning.

You can share your thoughts at the TDS Facebook page, where I'll post this story for discussion.

I recently discovered the Think Tank Duo 5 ($20.75). And it's since become my preferred storage and travel companion for the Olympus 12-40mm f/2.8, 17mm, 25mm, and 45mm f/1.2 PRO lenses. They fit perfectly inside this case.

P9186653.jpg The Think Tank Lens Case Duo 5 with Olympus 17mm f/1.2 PRO lens.

The "Duo" refers to the dual access via either the top YKK zipper, or a second one down the front. The thinking is that we'd use the top for retrieving our lens when in a camera bag, and that the side zipper would be more handy when the pouch is on our belt. I still find myself using the top most of the time. (This is especially true with the lens cap reversed on the optic. It's just easier from above.)

P9186655.jpg Olympus 17mm f/1.2 with lens cap and hood inside the Lens Duo 5 case.

But there's more to this case than dueling zippers. The well-padded, softly-lined pouch material, handy belt loop, and two outer stretchy pockets are all nice touches. You can use one outer pocket for a microfiber cloth and the other to stash the lens cap when the optic is in use.

P9186657.jpg The Think Tank lens case Duo 5 with microfiber cloth.

The Lens Duo 5 is a reasonable $20.75 and comes in two colors, black and green. I think the green is really attractive. The Duo 5 holds a Canon/Nikon 18-55mm f/3.5-5.6, Canon 10-18mm f/4.5-5.6, Canon/Nikon 50mm f/1.4, Nikon 55-200mm f/4-5.6 AF-S, Olympus 12-40mm f/2.8, 40-150mm f/4-5.6, and the trio of f/1.2 PRO lenses. And there are five other Duo models as well, allowing you to stylishly transport practically any optic in your collection.

Most of us don't think as much about lens pouches as we do about the bags they go in. The Lens Case Duo 5 just might change that.

You can share your thoughts at the TDS Facebook page, where I'll post this story for discussion.

This is The Digital Story Podcast #653, Sept. 18, 2018. Today's theme is "iPhone XS: It's Nice, But I Don't Need It." I'm Derrick Story.

Opening Monologue

Last Wednesday during the Apple event, I pulled the iPhone X out of my front pocket, examined the screen and camera lens, and said to myself, "I'm good." The device is doing exactly what I need it to do: take good pictures, help manage my life, and provide a little entertainment. And other than a few minor tweaks, the iPhone XS does the same thing. Am I missing something by not upgrading? We'll explore further on today's show.

iPhone XS: It's Nice, But I Don't Need It

After 10 months of very enjoyable use, my iPhone X still has 216 GBs of free space. The battery life is excellent, lasting me a full day when needed. (I don't charge it all night anymore, only as needed during the day.) And other than its one weird quirk of taking screenshots when I don't intend to (opposite button syndrome), I truly enjoy using it.

But to be empirical as well, I looked up the specs and comparisons for the just-announced iPhone XS to evaluate my opinion. Here are the highlights.

Apple-Pres-1024.jpg

  • Size and Weight: They are virtually the same.
  • Screen type and resolution: same. But the XS has better dynamic range.
  • Processor: A12 vs A11: iPhone XS - Apple A12 'Bionic' chipset: Six-Core CPU, Six Core GPU, M12 motion coprocessor, 4GB RAM. iPhone X - Apple A11 'Bionic' chipset: Six-Core CPU, Six Core GPU, M11 motion coprocessor, 3GB RAM
  • Camera resolution: same (12MP/7MP) - But the XS has a new sensor with bigger photo sites.
  • New computational photography offerings on the XS, such as Smart HDR, enhanced bokeh effect, and depth control.
  • Speakers: XS has 25 increase in speaker volume and stereo support
  • SIM support: XS has eSIM to share work/home or home/roaming numbers in a single device. The X does not.
  • Slightly better battery life for XS
  • Gold case offering for XS.

So, since my iPhone X is in such good shape and performing well, I'm good. Plus, I kind of like having the 10 year anniversary handset. If I had an older iPhone, I would indeed be tempted by the iPhone XS.

The Portfoliobox Featured Image

Have you visited our TDS Facebook Page in the last few days? If so, what do you think of the beautiful image from Morocco by Jay Tuttle as the featured banner? Maybe yours will be next?

Each week for the month of September, I'm going to feature a PortfolioBox Pro image as the banner for our TDS Facebook Page. I will select the image from my list of TDS PortfolioBox Pro users, and include the photographer's name and link.

If you've signed up for a Portfoliobox Pro account, and have published at least one page, then send me the link to that site. Use the Contact Form on the Nimble Photographer and provide your name, the link, and the subject of the page or site you've published. I will add it to our PortfolioBox Pro Directory.

I love using Portfoliobox for these reasons:

  • My images look great, both on my computer and on my mobile devices.
  • It's easy to use. Without any instruction, I'm adding a high quality page in just minutes.
  • It's affordable. There's a free plan and a Pro version. The Pro version is only $82.80 per year or $8.90 per month USD, and that's before the 20 percent TDS discount.

In addition to unlimited pages, you get a personalized domain name, web hosting, and up to 1,000 images.

Get Started Today

Just go to the TDS Landing Page to get started with your free account, or to receive the 20 percent discount on the Pro version. And if you want to see the page that I've begun, visit www.derrickstoryphotography.com.

Cleaner Audio with SoundSoap

Here is a nifty application for vloggers who need to process and post their content quickly. SoundSoap can help you with:

  • Fix background noises
  • Fix low volume
  • Fix hum problems
  • Fix low/rumble sounds
  • Drag & Drop popular formats
  • No loss of video quality
  • Works automatically

I was up and running immediately with it. The learning curve is about 5 minutes. And for audio processing software, it's affordable. There are different versions of the app, but I'm using SoundSoap Solo 5 (Mac and Windows) that costs $79. You can purchase it from their website. I downloaded mine from the Mac App Store because it's a more convenient way to manage my software.

The bottom line is that for fast-moving video projects where you want the best sound possible, SoundSoap is an essential component of the workflow. It's fast, affordable, easy to use, and works great.

Inner Circle Members: New York Fine Art Greeting Cards

My latest printing project is creating a set of 6 fine art greeting cards from my trip to New York. Inner Circle members, not only can you help me choose the final images, but by doing so, you become eligible to win a free set of the cards.

Starting last week, I published two images on our Inner Circle site. Post a comment as to which one you prefer best, and you are automatically entered in the drawing. We'll do this once a week throughout September. At the end of each week, I'll randomly choose a name from the comments and send them a completed set of fine art cards once they are finished. This week's winner is: Bill Riski.

If you want to participate, you can become a member of our Inner Circle by clicking on this link or by clicking on the Patreon tile that's on every page of The Digital Story.

Updates and Such

B&H and Amazon tiles on www.thedigitalstory. If you click on them first, you're helping to support this podcast. And speaking of supporting this show, and big thanks to our Patreon Inner Circle members:

And finally, be sure to visit our friends at Red River Paper for all of your inkjet supply needs.

See you next week!

More Ways to Participate

Want to share photos and talk with other members in our virtual camera club? Check out our Flickr Public Group. And from those images, I choose the TDS Member Photo of the Day.

Podcast Sponsors

Red River Paper - Keep up with the world of inkjet printing, and win free paper, by liking Red River Paper on Facebook.

Portfoliobox - Create the site that your best images deserve by visiting Portfoliobox. And get a 20 percent discount by using our landing page!

The Nimbleosity Report

Do you want to keep up with the best content from The Digital Story and The Nimble Photographer? Sign up for The Nimbleosity Report, and receive highlights twice-a-month in a single page newsletter. Be a part of our community!

Want to Comment on this Post?

You can share your thoughts at the TDS Facebook page, where I'll post this story for discussion.
There are many quick-turnaround video projects that I don't want to run through Final Cut Pro X for the sake of speed. But I still want the best audio possible. In those instances, I've turned to SoundSoap 5 to reduce unwanted noise. Here's why.

soundsoap-interface.jpg The SoundSoap Solo 5 Interface.

I've been assembling a super nimble video blogging rig that I can carry around in my pocket. I plan on using this to cover PhotoPlus in October and beyond. At the moment, I'm testing the Fujifilm XF10 (9 ounces, 24MP, APS-C sensor, $499) with an Audio-Technica Consumer ATR3350iS Omnidirectional Condenser Lavalier Microphone ($29). I'll record short vlogs with this rig, run it through SoundSoap, then publish on Vimeo. Here's a sample.

Video Blogging with the Fujifilm XF10 from Derrick Ronald Story on Vimeo. (Note: you will need a 3.5mm to 2.5mm adapter for this setup. The XF10 had a 2.5mm audio port.)

SoundSoap is key to this workflow. The lavaliere mic plugged into the Fujifilm XF10 really improves the audio compared to its onboard mics. That being said, camera audio interfaces tend to be noisy, and the output still needs processing afterward.

On bigger projects, I use Final Cut Pro X to clean up the audio. But I want to move faster than that for vlogging. SoundSoap allows me to reduce noise and enhance my voice quickly, then upload the file to Vimeo for publishing. Here are some of its features.

  • Works automatically
  • Fix background noises
  • Fix low volume
  • Fix hum problems
  • Fix low/rumble sounds
  • Drag & Drop popular formats
  • No loss of video quality

I was up and running immediately with it. The learning curve is about 5 minutes. And for audio processing software, it's affordable. There are different versions of the app, but I'm using SoundSoap Solo 5 (Mac and Windows) that costs $79. You can purchase it from their website. I downloaded mine from the Mac App Store because it's a more convenient way to manage my software.

The bottom line is that for fast-moving video projects where you want the best sound possible, SoundSoap is an essential component of the workflow. It's fast, affordable, easy to use, and works great.

You can share your thoughts at the TDS Facebook page, where I'll post this story for discussion.
Starting today, you can preorder Aurora HDR 2019. I've had a chance to run this on my Mac, and it is clearly my favorite version of this intelligent HDR software.

UI_14_Aurora HDR'19.jpg

At the core of this update is the Quantum HDR Engine, an AI-powered tone mapping technology that's been three years in the making within Skylum's AI lab.

With Quantum HDR, when creating an HDR image using multiple bracketed shots, the engine analyzes the photos and intelligently merges them. Not only does it minimize the major issues that we often experience with HDR merging tools, but it produces images that are dynamic and natural-looking.

The Quantum HDR Engine reduces burned colors, loss of contrast, and noise, as well as mitigates unnatural lighting caused by halos and unstable deghosting. To do this, Skylum developers tested thousands of bracketed shots through a neural network, then took those findings to develop the technology needed to create top level HDR photographs.

The interface will also feel very natural to Luminar users. I like that I can load either piece of software, and feel at home working right away.

Aurora HDR 2019 is available for pre-order starting today (Mac and Windows). Pre-orders include bonus downloadable content and costs $89 for a new purchase and $49 for an upgrade.

When released on October 4th, the price will jump to $99 new and $59 for an upgrade. The bonus pack includes:

  • Video tutorial "Getting the Most from Aurora HDR 2019" by Trey Ratcliff
  • The Landscape Photography Handbook by David Johnston
  • Exclusive interior Aurora Looks by Richard Harrington
  • Burning Mood LUTs by Richard Harrington
  • 3-month 500px Pro membership
  • $300 OFF a multi-day Iceland Photo Tour

You can share your thoughts at the TDS Facebook page, where I'll post this story for discussion.