Recently in Photography

  Page 259 of 386 in Photography  

I've had photographers tell me that they would patiently wait -- sometimes for an hour -- for people to clear out of a scene so they could photograph it. This becomes a bigger challenge once school lets out and family vacation season begins.

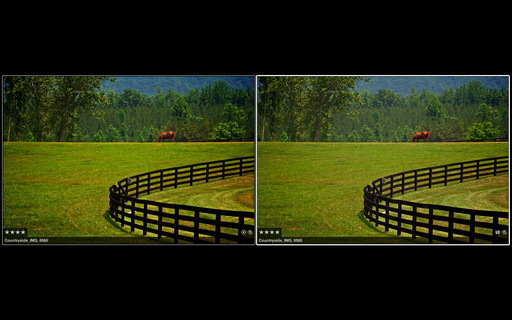
But, do people really ruin your scenic shots? Take a look at the comparison below, captured at Ledson Winery in Sonoma County. (Cast you vote for which image you like best in the comments section of this article.)

Ledson Winery, Sonoma County, CA Do people really ruin this scenic shot? Personally, I don't think so. Click on image for larger version. Photos by Derrick Story.

Sometimes people add visual interest to a composition. Plus they can help with sense of scale. Yet it's true, there are those situations where they are an annoying distractions no matter how you compose the scene.

So the answer for me is to try to capture the photo both ways, then decide later which version I like best. And if it's not possible to eliminate those pesky humans, then I wait for a decisive moment where they're doing something interesting.

As for the photo above, which way to you vote? People... or not?


twitter.jpg Follow me on Twitter


"Rocket Launch" - Grab Shot 213

"I've been trying to capture a rocket launch from Vandenberg for almost a year now," writes Thomas Emmerich. "I finally got my chance tonight, and it came out pretty good for my first try. I almost missed it by mis-judging the launch angle from Ventura (CA)."

"Rocket Launch" - Grab Shot 213 Thomas Emmerich "Rocket Launch" - Grab Shot 213 by Thomas Emmerich. Click on image for larger version.

"I had to move the camera at the last moment and missed the first few seconds of the launch. The hard part about taking these shots is you can't see anything in the viewfinder while setting up, and then once you open the shutter, you can't tell where the rocket is in the frame or if its even in the frame. There are no second chances."

"I used my Canon T2i with a borrowed Canon 17-40mm F4L lens. Settings were F/8 and bulb mode with a infrared remote trigger to start and stop the exposure of 95 seconds. ISO 400. I found tips on photographing rockets at night by doing a Google search for 'Photograph Vandenberg Rocket Launch'".

There was quite a bit of water vapor in the air, which was made visible by the long exposure and the parking lot lights behind me.

This is our 213th Grab Shot! Wow. If you want to review the collection that began back in 2006, go to our Grab Shots page.

If you have a candid you'd like to share, take a look at our Submissions page, then send us your Grab Shot. We'll try to get it published for you on The Digital Story.

And you can view more images from our virtual camera club in the Member Photo Gallery.


The Digital Story Podcast App is the best way to stream or download weekly TDS podcast episodes. No more syncing your iPhone, iPod Touch, iPad, or even your Android phone just to get a podcast. And the best part is, The Digital Story Podcast App is your way to help support this show. Download it today!


twitter.jpg Follow me on Twitter


One of my favorite features in Adobe Camera Raw 6.3 (part of Photoshop CS5) is the Lens Correction tool. It's handy for correcting images from your glass that records a tad too much distortion, chromatic aberration, or vignetting. But I also like to use it to evaluate zooms that I'm testing for reviews or considering for purchase.

For most common zooms, all you have to do is open the file in Adobe Camera Raw, click on the Lens Correction tab, then check the box next to Enable Lens Profile Corrections. By checking and unchecking the box, you have another way to gauge the performance of the optics on your camera.

Adobe Camera Raw Lens Correction Off Adobe Camera Raw Lens Correction Off. Click on image for full size version.

Adobe Camera Raw Lens Correction On Adobe Camera Raw Lens Correction On. Click on image for full size version.

I recently field tested the Canon EF-S 15-85mm f/3.5-5.6 IS USM, and loved the shots it produced in the field. So I thought I'd take a look at how it fared in ACR. As you can see, there was some distorition, but nothing that caused my affection to wane.

Lightroom 3 has this same technology available in the Develop module. Look for Lens Corrections in the right-side pane.

In either application, this is a useful tool for correcting images and evaluating your glass.


twitter.jpg Follow me on Twitter


It happens a thousand times a day: a group of people want to commerate a moment together, and you're the person standing there with a camera. Yes, it's time for the classic photo opp -- the group shot.

For those situations, I have some great tips to help you improve those images. I've just released Photo Assignment: Group Shots on lynda.com to help you with exactly that.

I start with an equipment overview, including some of the latest tools such as Rogue FlashBenders. We then go on location to a historic theater in downtown Ventura CA to put our theories to the test. I photograph couples and small groups inside and out the brick building. I wrap up the tutorial by returning to the computer to review our results and share more tips and techniques.

The entire training runs just a bit over 30 minutes, yet covers plenty of ground. I'm confident that the next time you've got group shots on the assignment list, you'll be better prepared after watching this training.

More Online Photography Training at Your Fingertips

The Group Shots title is part of an ongoing series I have on lynda.com. You may also want to take a look at the Off Camera Flash title. I show you all sorts of helpful lighting techniques that are especially good for portraits.


twitter.jpg Follow me on Twitter


As high-end compact cameras became, well, more compact, their optical viewfinders fell by the wayside. For me, this wasn't such a terrible thing since they were usually awful anyway, often only showing a fraction of the photo you were actually recording. That being said, wouldn't it be nice to have something other than the LCD screen for composing with these little photographic gems?

Olympus XZ-1 with VF-2 Electronic Viewfinder Olympus XZ-1 with VF-2 Electronic Viewfinder. Click on image for larger version. Photo by Derrick Story.

The engineers at Olympus seem to think so too. For their latest well-heeled compact, the XZ-1 with f/1.8 zoom, they included an accessory shoe that accommodates the VF-2 Electronic Viewfinder (that also works on most of the PEN cameras.)

The VF-2 slides into the accessory port and provides an accurate view of both image and camera controls. You can switch back and forth between the viewfinder and the LCD by pressing the control button on the back of the viewfinder. The VF-2 is hinged, so you can angle up to 90 degrees providing more flexibility in how you hold the camera when you take pictures. There's also a diopter ring so you can adjust its clarity to your eyesight.As you can image, this accessory is a blessing when working in bright sunlight, which can make composition on an LCD difficult at best. But I use the VF-2 for all types of shooting. I find it easier to concentrate on my composition with the device, similar to the experience of composing through a DSLR.

What's amazing, however, is how small and light the entire package is. For photographers on the go, or just anyone who loves to travel light, the Olympus XZ-1 plus VF-2 Electronic Viewfinder does make compact photography more pleasurable than ever. The only downside? The price for this combo will also lighten your wallet.

The Olympus XZ-1 is running around $499 plus another $249 for the VF-2 Electronic Viewfinder. So don't try it unless you have the budget to spend. Because if you do, you'll certainly be hooked.

More Articles about the Olympus XZ-1

Olympus XZ-1 Review, Part 1

Olympus XZ-1 ISO Test 100-3200

"Olympus XZ-1 ISO Smackdown" - Digital Photography Podcast 267


twitter.jpg Follow me on Twitter


The Canon EOS Rebel T3i(600D) is not your father's entry level Rebel. The latest consumer DSLR from Canon features a 3-inch articulated LCD, 18 MPs of resolution, full HD movie recording, and more. And now you can get the 18-135mm EF-S zoom as the kit lens. It's quite a package. And I've been shooting with one for weeks now, and have lots to report about the T3i, then how it stacks up against the 60D. Plus some discussion on should you consider the 5D Mark II now, or wait and see what happens later this year.

Listen to the Podcast

You can also download the podcast here (31 minutes). Or better yet, subscribe to the podcast in iTunes. You can support this podcast by purchasing the TDS iPhone App for only $2.99 from the Apple App Store.

Monthly Photo Assignment

Broken is the April 2011 Photo Assignment. You can read more about how to submit on our Member Participation page. Deadline for entry is April 30, 2011.

The SizzlPix Pick of the Month for the "Loved One" Photo Assignment is Kevin Miller for his shot, "Andrew, a special needs friend, loves his dogs."

TDS Fall 2011 Photography Workshop

We're making plans now for the Fall 2011 TDS Photography Workshop. If you want your name on the reserve list, just drop me a line.

More Ways to Participate

Want to share photos and talk with other members in our virtual camera club? Check out our Flickr Public Group. It's a blast!

Podcast Sponsors

Red River Paper -- Try the $7.99 Sample Kit.

Make Your Photos Sizzle with Color! -- SizzlPix is like High Definition TV for your photography.

Need a New Photo Bag? Check out the Lowepro Specialty Store on The Digital Story and use discount code LP20 to saven 20% at check out.


Technorati Tags:
, , , , ,


Both the Canon EOS 60Dand the Canon EOS Rebel T3i(600D) include the new "Soft Focus" Creative Filter that allows you to apply in-camera effects after you've captured the image. The adjusted shots are saved as separate files so you have both the original and the altered images.

Soften Creative Filter on Canon T3i Image on the left is original photo captured with Canon T3i and 18-135mm zoom. Next 3 images employ varying degrees of the "Soft Focus" Creative filter available in the T3i and 60D. Click on image for larger version.

I was curious to see if the Soft Focus effect could be used for portraits. You have some control over it because you can apply three different strengths of the filter (true for both the T3i and the 60D). In these shots, the original image is on the far left, then three different strengths of the Creative Filter follow from left to right. No editing was applied to these photos. This is how they were downloaded from the T3i.

As you can see, this isn't really an intelligent filter. I mean that in the sense that it does not have the ability to preserve detail in areas that are not continuous toned. The softening is applied to the entire image. The effect would be nice on the skin and the background, but it doesn't work on the eyes, or even the hair.

This filter could be useful for certain landscapes and other creative pursuits, but unfortunately it's not good for portraits. The defocused eyes in particular are annoying.

So, I'm going to stick with my normal portrait technique when shooting with these cameras.


twitter.jpg Follow me on Twitter


canon_15-85mm_zoom

When buying a new APS-C DSLR, it's a good idea to get a kit lens with it. They're great for resale value and are usually quite decent for the price. But when it's time to upgrade your "everyday zoom," what are your best options?

For Canon 60D and 7D owners, I recommend the Canon EF-S 15-85mm f/3.5-5.6 IS USM zoom. Here are the key reasons why I favor this zoom over the other models in the EF-S line up.

  • Wide 24mm equivalent, yet zooms out to 135mm equivalent
  • USM makes for quiet, fast focusing
  • 4 stops image stabilization
  • Very sharp at all focal lengths
  • Relatively compact for such a wide zoom range

You may have noticed that I didn't specify this lens for the Canon Rebel T2i or T3i. That's only because it feels a bit heavy on those camera bodies. I think the zoom has better balance on the 50D, 60D, and 7D models. It's not a particularly light lens, weighing in about 1.25 pounds (575 g). But is is relatively short at 3.4" (8.64 cm). It would certainly provide great images on a Rebel, just try it first to make sure it's comfortable to hold.

On the downside, it isn't a very fast zoom. Some of this is offset by the 4 stop image stabilizer. You do have f/3.5 at the widest setting, but as soon as you begin to zoom it works its way up to f/4, then f/5.6 at the tele end. I usually carry the Canon 85mm f/1.8 in my 60D kit, just in case I need a fast aperture at the short telephoto focal length.

I also noticed some vignetting at the wide and tele focal lengths. For those situations where you notice it, it's easily controlled by using lens corrections in Lightroom and Adobe Camera Raw, or devignette in Aperture.

Those nits aside, when it comes to performance, this lens outshines the non-USM models (such as the 18-135mm and 18-200mm) and has a broader zoom range than the 17-55mm or the 17-85mm alternatives. At $795, it is an investment in your DSLR system. But for my everyday lens that stays on the 60D, I feel the same way about the EF-S 15-85mm f/3.5-5.6 IS USM on that body, as I do about the 24-105mm L on the Canon 5D Mark II... confident.


twitter.jpg Follow me on Twitter


"I started out Sunday evening and took a drive until I found some water," writes Keith Burrows. At just the right moment, I stopped and shot this scene. It's a typical south Florida sunset, which is why I live here!"

Reflections of a Beautiful Evening - Grab Shot 212"Reflections of a Beautiful Evening" by Keith Burrows. Click on image for larger version.

Keith recorded this beautiful image with his Canon 60D and a 10-22mm lens set wide open. It's a 3-shot HDR, initially processed in Aperture 3 then finished with HDR PRO by Nik.

This is our 212th Grab Shot! Wow. If you want to review the collection that began back in 2006, go to our Grab Shots page.

If you have a candid you'd like to share, take a look at our Submissions page, then send us your Grab Shot. We'll try to get it published for you on The Digital Story.

And you can view more images from our virtual camera club in the Member Photo Gallery.


The Digital Story Podcast App is the best way to stream or download weekly TDS podcast episodes. No more syncing your iPhone, iPod Touch, iPad, or even your Android phone just to get a podcast. And the best part is, The Digital Story Podcast App is your way to help support this show. Download it today!


twitter.jpg Follow me on Twitter


Even though the Olympus PEN E-PL2has a pop-up flash, you're not stuck with it solely for advanced lighting techniques. You can slide an external flash in the hot shoe, or better yet, let the E-PL2 control RC-capable Olympus strobes that aren't even mounted on the camera. Yes, off-camera flash is possible with the E-PL2.

E-PL2 Flash Menu Off-camera flash controls via the menu system on the Olympus E-PL2.

I've been testing this functionality with the FL-50R full size flashand the FL-36R compact flashwith the E-PL2 and the XZ-1. The FL-36R is lighter, only uses 2 AA batteries, and sits on the smaller cameras better than the heavier FL-50R that uses 4 AA batteries. I've already done single flash portraits with the FL-36R, so I wanted to try a 2-flash set-up. I decided to tackle a most difficult subject: artwork behind glass. Talk about unforgiving flash work.

Off-Camera Flash Set Up A framed Alfred Eisenstaedt poster behind glass ready to be photographed with two flashes off camera.

I put the flashes in "RC mode" and positioned them equal distance and at similar angles from the framed print, then put the camera on the tripod. I enabled RC flash mode on the E-PL2 so the camera could communicate with both units. Since the FL-50R is more powerful than the FL-36R, I decided to go with manual exposure for the flashes, setting the FL-50R at 1/128 (Group B) and the FL-36R at 1/50 (Group A). This gave me relatively even flash output from both sides.

But to make this all work, I had to enable the pop-up flash on the E-PL2. This was really the only fly in the ointment. Even thought the pop-up unit isn't part of the exposure, the flash does have to fire to trigger the two external units. This caused a reflection in the glass. And there was no way to turn off the pop-up and still trigger the external strobes. When your subject isn't close to the camera, or reflective, this shouldn't be a problem. But it presented a challenge for me with this assignment.

I decided to hold my hand in front of the pop-up so it would not shine directly in to the glass, but could still trigger the external units. This worked relatively well. You can examine the image below. It isn't perfect, but it's not a bad photo of glass-covered art work.

Glass Covered Artwork Shot with Two Off-Camera Flashes Not a perfect reproduction, but much better than I could have done with just a single on-camera flash.

The Bottom Line

Even though it isn't as powerful, I like the Olympus FL-36R flash($219) as both a shoe mount and an off-camera flash for the Olympus E-PL2 and XZ-1. If you want to set up more sophisticated lighting schemes, you can add a second FL-36R or even the more powerful FL-50R and control both units from the camera. The only real downside is that the built-in flash does have to fire to trigger the off-camera units. So, there will be situations when you have to diffuse that light so it doesn't influence the main subject.

More Off Camera Flash Tutorials

If you want to learn more about getting pro results from a single flash, be sure to check out my Off Camera Flash title on Lynda.com. I show you all sorts of helpful lighting techniques that are especially good for portraits.

Off Camera Flash - Basic Techniques for Pro Results

Light Modifiers for Off Camera Flash

Off Camera Flash - The Single Light Portrait

"More Off Camera Flash" - Digital Photography Podcast 233

twitter.jpg Follow me on Twitter