In a recent article for Macworld Magazine titled How to move from iPhoto '09 to Aperture 3, I describe how to easily transition your images and work from an iPhoto library to Aperture 3. And because the two applications talk to each other so well, you even have the option of sharing the same library of images with both. If you use iPhoto now, I encourage you to read the tutorial.
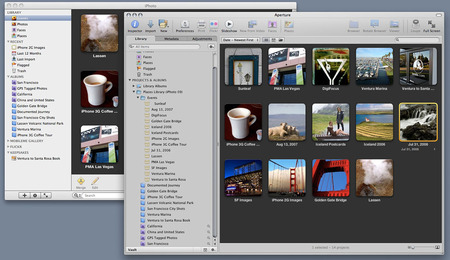
Comparison of iPhoto 09 and Aperture 3 libraries after import from iPhoto to Aperture. Click on image for larger view.
OK, But the Real Question Is...
As often the case, showing someone how to do something invariably brings up the question: "But why should I do this in the first place?" It's a good question.
The answer depends on what you need to do with your photographs after you click the shutter. If you're a casual shooter who captures less than a thousand images a year, and shares them primarily through email, Flickr, or the occasional slideshow, then iPhoto is a good application for you. It's easy to understand, has the basic tools your need, and it is included on your Mac when you buy it.
But if you consider yourself an amateur or pro photographer, iPhoto has some real shortcomings. One area that I find particularly frustrating is how it handles metadata. I can't add standard IPTC fields such as author, copyright, etc. And keywording is less than robust. I also think image editing in iPhoto is just too limited for most passionate photographers. Yes, you get the basic tools, but really, anything beyond simple luminance and color adjustments just isn't there. And finally, iPhoto lacks the "Project based system" of organization that's the heart of Aperture 3. Having these flexible containers to organize your work is important for people who take a lot of photos.
This is not a knock on iPhoto. It does what it does well. But if you're getting better at your photography and want to see how far you can take your work, Aperture 3 is a better tool. You have control over your metadata, your image editing, organization, and output. For many photographers, the tools inside of Aperture are all they need. And most shooters don't even leverage the totality of what's available.
Here's the thing though: you're going to need a current Mac with a good graphics card and 4 GBs or RAM, plus at least one external hard drive if you're going to have a good Aperture experience. I'm using a 17" 2.5 GHz Intel Core 2 Duo MacBook Pro with 4 GBs of RAM, and doing just fine with Aperture 3. Don't even try this with an early generation Intel MacBook with 2 GBs or RAM. You'll hate what happens.
The bottom line is, if you're feeling the limitations of iPhoto, and you like Apple's approach to software, then I would consider the upgrade to Aperture 3. It will give you the tools you need to take your photography to the next level.
PS: You may wonder why I didn't include Lightroom 3, Photoshop CS5, or other terrific software in this post. The main reason is, I'm talking about moving from iPhoto to the next level. In that case, Aperture is my recommendation. Other scenarios may lead to different applications.
More Aperture Tips and Techniques
To learn more about Aperture 3, check out my Aperture 3 Essential Training on Lynda.com. Also, take a look at our Aperture 3 Focus Section. Tons of free content about how to get the most out of Aperture.
 Follow me on Twitter