Recently in Photography

  Page 269 of 383 in Photography  

Photographers aren't the easiest people to buy gifts for. It's not that there isn't anything they want, but who can afford to get a loved one $1,400 DSLR body? I can help. Here are 10 great gifts for $50 or less that should thrill that favorite shooter in your life.

The Gift List

Listen to the Podcast

You can also download the podcast here (28 minutes). Or better yet, subscribe to the podcast in iTunes. You can support this podcast by purchasing the TDS iPhone App for only $2.99 from the Apple App Store.

Monthly Photo Assignment

High ISO is the November 2010 Photo Assignment. You can read more about how to submit on our Member Participation page. Deadline for entry is Nov. 30, 2010. Entries must be recorded at ISO 800 or above.

TDS Spring 2011 Photography Workshop

We're making plans now for the Spring 2011 TDS Photography Workshop. If you want your name on the reserve list, just drop me a line.

More Ways to Participate

Want to share photos and talk with other members in our virtual camera club? Check out our Flickr Public Group. It's a blast!

Podcast Sponsors

Red River Paper -- Try the $7.99 Sample Kit.

Make Your Photos Sizzle with Color! -- SizzlPix is like High Definition TV for your photography.

Blurb believes passionately in the joy of books - reading them, making them, sharing them, and selling them. Learn more by visiting Blurb on The Digital Story.


Technorati Tags:
, , , , ,


iPhoto '11 gets a lot of coverage for its online output services, but if you have an inkjet printer, you might be impressed with what it can do at home too. The trick is to first open the regular print dialog box (File > Print), then click on the "Customize" button. Go to Full Screen Mode, and you've got an entire print center at your fingertips.

iPhoto Custom Print Dialog Click the "Custom" button in the iPhoto '11 print dialog box to reveal a whole new world. Notice the Adjust panel controls just for that print job. Click on image for larger version.
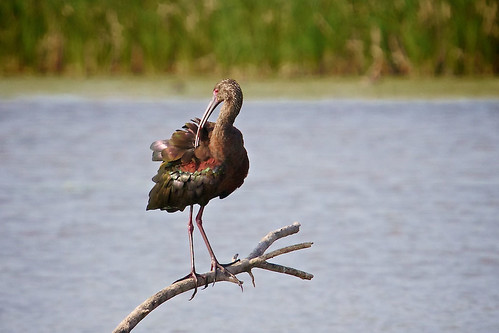
You have a variety of themes, backgrounds, and borders to choose from. If you want to print multiple photos at one, you can also select from a handful of layouts. But my favorite feature is the Adjust panel of controls that only affect the print job, not the photo in your library.

To enable this, click on the photo itself (in the custom print work area), then click on the Adjust button. You have an entire set of image adjustment sliders, plus 3 presets. This allows you to fine tune the photo for the print job without worrying about changing the image that resides in the iPhoto library.

If you want to make a more permanent adjustment, double-click on the image, and you get iPhoto's 3-tabbed adjustment panel. Now the edits you make will affect the library version too.

One last tip while working in the custom print dialog box. Click on the photo and you'll see a zoom slider appear. You can zoom in on parts of the photo, then drag it to reposition it in the frame. Very handy for last minute composition adjustments.

If you want to save a digital version of the image you've customized, click Print, then click the PDF button and choose the option you want. Using that control, you can even return a Jpeg version of your creation to the iPhoto library. Nifty!


twitter.jpg Follow me on Twitter


Camera Bags for the MacBook Air

Sure, a new MacBook Air with fit in practically any bag designed for laptops. But for nimble photographers on the go, can it squeeze into a regular DSLR camera bag? I tested two of my favorites, the Lowepro Classified Sling 180 AW ($115) and the Lowepro Versapack 200 AW ($99). How do they work? See for yourself in this short video report.


twitter.jpg Follow me on Twitter


Red River Greeting Card Give Away

It may be just in time for the holidays, but the gifts are for you. Red River Paper wants you to have the opportunity to print with your very own Canon ip4820 Photo Inkjet Printer. And it couldn't be easier to participate.

All you have to do is subscribe to their newsletter or become a Fan of their Facebook page. (If you do both, that's two entries!) In order to qualify for prizes, first visit The Digital Story landing page on the Red River site. The links for contest entry are there. It will take you less than one minute.

For your effort, you will have the opportunity to win:

  • Canon ip4820 Photo Inkjet Printer - A top pick for printing Red River note cards
  • Red River Greeting Card Sampler Kit
  • $100 Gift Certificate for use at Red River's website

This event is to celebrate Red River's fantastic selection of greeting card paper that you can use to create fine art gifts (at a very affordable price).

So, let's have a strong turnout for our longest running sponsor (who has so much to do with keeping the TDS podcast on the air). Enter to win today!

Congrats to Mike Kennamer for his landscape shot from the Great Smoky Mountains as part of the Saturated Photo Assignment.

Mike Kennamer SizzlPix Pick of the Month

For his efforts, Mike will receive a free SizzlPix of his image. If you've ever seen one of these high definition images printed on aluminum, you know that Mike is in for a treat.

The current Photo Assignment for Nov. 2010 is "High ISO." If you want to enter an image and be eligible for a free SizzlPix, then send in your photo (captured at ISO 800 or above) by the end of the month. Details for the Photo Assignment are available on the Member Information page.

Thanks to our wonderful sponsor, SizzlPix, and to Mike Kennamer for sharing his good work.

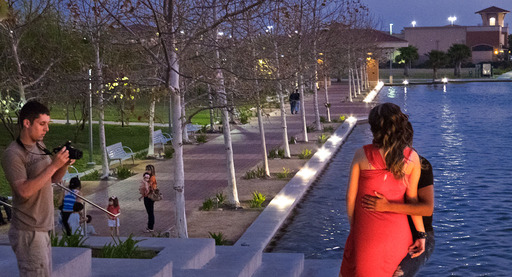
I've always been a fan of infrared photography. But never has it been as much fun to create as with this modified Olympus E-P1 digital camera. Even with the dense 89B filter over the lens, I can shoot at 1/200th at f/8 in late afternoon light. In this week's podcast, I talk about this new rig that I'm testing from Ventura, CA where I'm recording an iPhoto '11 Essential Training for Lynda.com. I'm using the built-in mic on the MacBook Air for this episode. Tune in and see what you think.

Rest Stop, I5 CA "Rest Stop, I5 CA" - Captured with an IR-modified Olympus E-P1 camera. Photo by Derrick Story. Click on image for larger version.
Listen to the Podcast

You can also download the podcast here (15 minutes). Or better yet, subscribe to the podcast in iTunes. You can support this podcast by purchasing the TDS iPhone App for only $2.99 from the Apple App Store.

Monthly Photo Assignment

High ISO is the November 2010 Photo Assignment. You can read more about how to submit on our Member Participation page. Deadline for entry is Nov. 30, 2010. Entries must be recorded at ISO 800 or above.

TDS Spring 2011 Photography Workshop

We're making plans now for the Spring 2011 TDS Photography Workshop. If you want your name on the reserve list, just drop me a line.

More Ways to Participate

Want to share photos and talk with other members in our virtual camera club? Check out our Flickr Public Group. It's a blast!

Podcast Sponsors

Red River Paper -- Try the $7.99 Sample Kit.

Make Your Photos Sizzle with Color! -- SizzlPix is like High Definition TV for your photography.

Blurb believes passionately in the joy of books - reading them, making them, sharing them, and selling them. Learn more by visiting Blurb on The Digital Story.


Technorati Tags:
, , , , ,


A feature on the new Canon 60D DSLRthat intrigued me was the in-camera Raw processing. The thinking is that you can shoot Raw, then if you need a Jpeg version of any of those images, you can process the Raw file in the camera. No computer required. You'll get a new Jpeg according to your settings. I decided to put this feature to the test.

Canon 60D Raw Processing Menu In-camera Raw processing menu for the Canon 60D. Click on image for larger version.

I selected this flower image from a Christmas Cactus. I captured it originally in Raw with the Canon 60D. In playback mode, I pressed the Menu button and navigated to Raw Image Processing. The next menu, shown above, provided me with 10 settings to customize the processing of the file. Included were: Brightness, White Balance, Picture Style, Auto Lighting Optimizer, Noise Reduction, Quality and Resolution, Color Space, Peripheral Illumination Correction, Distortion Correction, and Chromatic Aberration Correction. That's a fairly nice toolbox to work with.

I played with the settings, including sampling the file down to S1 (2592x1728, 4.5 MBs), then processed the photo. Once it was finished, the 60D informed me of the file number of the processed image and the folder in the camera where it resided. The un-retouched processed picture is below.

Raw File Processed In-Camera on a Canon 60D Un-retouched Jpeg processed in-camera from a Raw file with a Canon 60D. Click on image for full sized version.

I'll let you judge for yourself, but I find this feature very convenient. The only thing that would make it better is a cropping tool. For many shooters, in-camera processing could eliminate the need to record in Raw+Jpeg. Just shoot Raw, and double the number of frames you can record in burst mode, then process the images you need to share immediately in camera.You can sample down as far as 720x480. That means with an Eye-Fi SD Card you could upload a properly resized image directly from the 60D to Flickr, even if it began as a Raw file.

Seems like a handy feature to me.


twitter.jpg Follow me on Twitter


Using Shift-Drag in Photoshop CS5 to stack two photos in a layered document...

Fortunately I had a camera with me when I came upon this colorful vineyard during the late afternoon on Saturday. I didn't have much time to "work the shot," so I made two exposures: one for the sky and the other for the foreground.

Autumn Barn, Sonoma County Photo by Derrick Story. Click on image for larger version.

layers_photoshop.jpg

Then in Photoshop, I stacked the two images to create a layered document (hold down the Shift key and drag one photo on to the other.) I then clicked on the top layer, held down the Option key, clicked on the Vector Mask icon at the bottom of the Layers panel and created a mask. Now, with the brush tool set to white, I can reveal the areas from the top layer that I like (the sky) and combine it with the vineyard from the bottom layer.

This two-shot technique allows me to work fast in the field, then quickly composite the image in Photoshop. It's not HDR, but it works nicely.


twitter.jpg Follow me on Twitter


aperture_icon_desktop.jpg

After just a day of testing, there seems to be many benefits to the Mac OS X 10.6.5 update, including Raw file support for 10 new cameras:

  • Canon EOS 60D
  • Canon PowerShot S95
  • Hasselblad H4D-40
  • Nikon D3100
  • Panasonic Lumix DMC-LX5
  • Sony DSLR-A290
  • Sony DSLR-A560
  • Sony DSLR-A580
  • Sony SLT-A33
  • Sony SLT-A55

You can see the complete list of supported cameras here.

Improved Export Speed in Aperture 3.1

But there's another bonus performance update that you might not have found yet. Thanks to Core Image enhancement under the hood, exporting images in Aperture 3.1 has improved also. This is welcome relief, indeed.

I tested this by editing sample "referenced" Raw files from a Canon S90 and 5D Mark II on a MacBook Pro 17" 2.5 GHz with 4 GBs Ram. I worked on one set of images with Mac OS X 10.6.4, then performed the same test on similar images (captured in burst mode) in Mac OS X 10.6.5. I applied these adjustments to all images before exporting them as full size Jpegs: Color, Levels, Crop, Vibrancy, Shadows, Recovery, Definition, and Edge Sharpen. I was very careful to make sure that all processing had completed before I initiated export. There were no other apps running during this test.

Mac OS X 10.6.4 with Aperture 3.1

Canon S90 .CR2 export to Jpeg --> 13.6 seconds
Canon 5D Mark II .CR2 export to Jpeg --> 30.2 seconds

Mac OS X 10.6.5 with Aperture 3.1

Canon S90 .CR2 export to Jpeg --> 7.3 seconds
Canon 5D Mark II .CR2 export to Jpeg --> 11.4 seconds

Since I had a number of burst mode shots in each series, I performed the test on four different images with each version of the operating system, then averaged the numbers.

So, if you run Aperture, make sure you've updated the app to 3.1 and OS X to 10.5.6. You'll get new Raw profiles plus a nice little performance boost too.

More Aperture Tips and Techniques

To learn more about Aperture 3, check out my Aperture 3 Essential Training on Lynda.com. Also, take a look at our Aperture 3 Focus Section. Tons of free content about how to get the most out of Aperture.


twitter.jpg Follow me on Twitter


Built to Order MacBook Air Speed Tests

macbook_air_thumb.jpg

In this week's podcast I talk about using a "built to order" MacBook Air for running Aperture, Lightroom, iPhoto, and Photoshop. And given the dramatic savings in size and weight with the new Air, I didn't feel that I was compromising too much on performance.

Now we have the numbers to go along with my field experiences. Macworld Magazine has released their 2010 MacBook Air: ultimate-edition lab tests. And as I suspected, there is a performance boost in the areas that we care about between the stock models and the built to order (BTO) Airs:

"The 13-inch MacBook Air BTO configuration was 10 percent faster than its stock configuration. Individual application highlights include Aperture and our multitasking tests that were both 15 percent faster, and iPhoto was 14 percent faster."

You also get to see how the new Air compares to the 15" MacBook Pro 2.4GHz Core i5 (Mid 2010) model -- a laptop that many consider the gold standard for photographers on the go.


twitter.jpg Follow me on Twitter