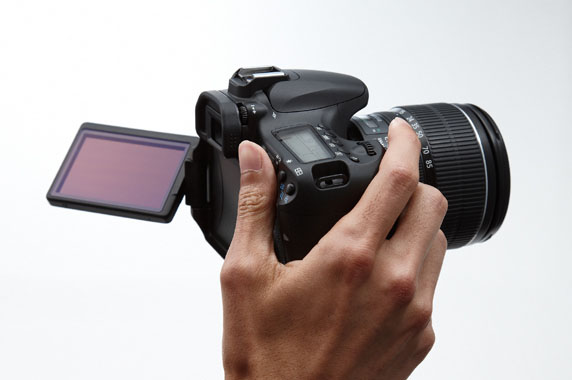
Recently in Photography

  Page 280 of 383 in Photography  

When I travel, my motto is: make space, don't erase. At first this may sound insane to you. But as you plan your trips, try to calculate how much camera memory you'll need, then get your hands on enough of it to cover your estimated shooting. Why?

Because you always want to have your pictures live in two places. Many photographers upload their images to a laptop in the evening, then erase their cards in preparation for the next day. In that scenario, your images only live in one place, and that's on a computer hard drive. If you were to keep your photos on the memory card too, then you would be much better protected against mishap.

I also recommend printing your contact information on each memory card in case it is misplaced. Plus, if you leave your camera behind, the card that's in it will tell people how to find you.

Currently, I'm packing a variety of 16GB memory, including the Kingston Elite Pro 16 GB 133x CF Cards ($40), and the Sandisk 16GB Extreme CF card ($95).


twitter.jpg Follow me on Twitter

-

We've caught wind of the new Panasonic LX5, and one of its most important changes is the upgraded zoom lens (24-90mm f2-3.3 vs 24-60mm f2-2.8). Here's a quick comparison between LX3 and LX5.
aperture_icon.png

At the start of 2010, I switched from the Managed File approach in Aperture to Referenced Files. I think both systems are good. It depends on your particular situation as to which is best for you.

But, regardless of your choice, be sure to use the wonderful incremental backup system built into Aperture called the Vault. It's a simple one-click tool that saves all of your work to a separate hard drive. If you're using the Managed File approach, the Vault backs up your masters too. Referenced File users must back up masters separately. Either way, one thing I've discovered is: the work that I do to organize, edit, and add metadata to my images is as valuable to me as the pictures themselves.

During my week of coping with my Drobo problems, the bright spot was how I had previously organized my files and having the Vault to put everything back together on a separate drive.

In short, I moved my 2010 Referenced File structure to a hard drive that had an up-to-date 2010 Vault on it. I enabled a Vault Recovery on the drive, and in just a few minutes, Aperture put everything back together for me. All of my work was there, all of the Referenced Files were reconnected, and I was back in business.

Moral of the story for me is: the Aperture Vault is invaluable, regardless of which library system I'm using.

More Aperture Tips and Techniques

To learn more about Aperture 3, check out my Aperture 3 Essential Training on Lynda.com. Also, take a look at our Aperture 3 Learning Center. Tons of free content about how to get the most out of Aperture.


twitter.jpg Follow me on Twitter


"The Big Yawn" - Grab Shot 199

"My dog Daisy is a frequent model for me," writes Gabrielle Rhodes, "but sometimes our sessions go a little long and she gets bored. This week I caught her in the middle of a full yawn."

Gabrielle Rhodes Grab Shot 199

Photo by Gabrielle Rhodes. Click on image for larger version.

Gabrielle captured The Big Yawn with a Nikon D3000 and a 18-55mm zoom lens. ISO was set to 100, and fill flash was on.

If you have a candid you'd like to share, take a look at our Submissions page, then send us your Grab Shot. We'll try to get it published for you on The Digital Story.

And you can view more images from our virtual camera club in the Member Photo Gallery.


The Digital Story Podcast App is the best way to stream or download weekly TDS podcast episodes. No more syncing your iPhone or iPod Touch just to get a podcast. And there's more! Tap the Extras button for free passes and discounts and the current Grab Shot by our virtual camera club members. Each podcast episode has its own Extras button, too, that contains more goodies such as pro photo tips. And the best part is, The Digital Story Podcast App is your way to help support this show.Download it today!


twitter.jpg Follow me on Twitter


What's the best way to protect your Olympus, Panasonic, Sony, or Samsung compact DSLR and still look stylish? You bought one of these nimble cameras to travel light, yet have all the functionality that you need. I have three Lowepro camera bags that work great for the Olympus PENs, Panasonic G series, Sony NEX, and Samsung NX10 camera systems.

Lowepro Bags for Micro 4/3 Cameras From left to right: Lowepro Apex 110 AW, Impulse 110, and Edit 110 bags for compact DSLRs. Click on image to enlarge.

Lowepro Apex 110 AW ($40) -- For outdoor work where the elements come into play. Included All Weather cover, belt loop, shoulder strap, sliplock loops, memory card pouches, padded handle, rugged rubber trim, and micro fiber cloth. Heavily padded design.

Fits Olympus PEN with 14-150mm zoom lens, and Panasonic, Sony, and Samsung bodies with any zoom. Additional room for pancake lens (such as Panasonic 20mm, Olympus 17mm, or Sony 16mm). But no room for additional zoom lens other than what is mounted on the camera. Most rugged of three cases.

Lowepro Impulse 110 ($19) -- For urban work. Largest of the three bags with shoulder strap, top loop but no padded handle, side pockets and front document pocket.

Fits Olympus PEN with 14-150mm zoom lens, and Panasonic, Sony, and Samsung bodies with any zoom. Additional room for pancake lens (such as Panasonic 20mm, Olympus 17mm, or Sony 16mm) and kit zoom lens separately. Accessories can be stored in side pockets.

Lowepro Edit 110 ($17) -- Suitable for urban or outdoor work. Shoulder strap, padded top handle, 2 side pockets, zippered front pocket, zippered mesh pocket inside, and belt loop.

Fits Olympus PEN with 14-42mm zoom lens, and Panasonic, Sony, and Samsung bodies with kit zooms. Additional room for pancake lens (such as Panasonic 20mm, Olympus 17mm, or Sony 16mm). Accessories can be stored in side pockets, zippered front pocket, or zippered mesh pocket inside. Heavily padded, all purpose bag for those who don't use the long zoom lenses (such as the Olympus 14-150mm).

Bottom Line

Rugged outdoor types who like the longer zooms should consider the Apex 110 AW. It can withstand just about any environment and protect your gear. For those who need a bit more room and tend to work in urban environments, the Impulse 110 is an affordable choice. And shooters who sometimes venture into the great outdoors, but need a good all purpose bag at an affordable price should look at the Edit 110.


twitter.jpg Follow me on Twitter


nanocam on bike

There are all sorts of ways to record video while riding your bike... and here's another. I'm using an iPod nano placed inside of a badge holder (that we all have from trade shows and conferences). I set the nano to video record, and off I go.

nanocam rig using badge holder to house iPod nano while riding. Click on image for larger version.

The Details

I cut a square hole in the clear part of the badge holder for the iPod nano camera lens and microphone. I hang the badge holder around my neck, and add a little stability using a cord that is looped around the bike frame. This allows me to record when both hands are on the bike.

However, the best recording happens when I can take one hand and steady the badge holder while peddling. It's much easier to grip than the nano itself, plus you don't have to worry about dropping it. The holder also allows me to direct the camera at other angles. If I need to put both hands on the bike, I can while still recording, thanks to the security of the rig. I also found that if I loop my thumb around the stabilizing cord while both hands are on the bike, I can still record decent video. It's definitely a trial and error procedure, though.

Bottom Line

This is yet another silly contraption for video recording while biking. Since nearly everyone has a conference badge holder laying around, however, this is a method you can rig up in just a few minutes.


twitter.jpg Follow me on Twitter


Over Under Lighting

Off camera flash opens up a whole new world of possibilities for your portrait photography. You're able to position the light exactly where you want it, you can make it more flattering for the subject by using modifiers, and you can add additional lights if necessary.

Now that I've finished the video training on the subject of Off Camera Flash, I want to revisit this subject in today's podcast for more details.

I'll talk about some of the different approaches to this type of lighting, the added control you have during portrait shoots, how you can use two lights to photograph reflective surfaces without getting any reflection, and more. This is really good stuff.

Listen to the Podcast

You can also download the podcast here (29 minutes). Or better yet, subscribe to the podcast in iTunes. You can support this podcast by purchasing the TDS iPhone App for only $2.99 from the Apple App Store.

Monthly Photo Assignment

Torn is the July 2010 Photo Assignment. You can read more about how to submit on our Member Participation page. Deadline for entry is July 31, 2010.

The SizzlPix Pick of the Month for Photo Assignment 51 (Fire) is awarded to Dan Newsom for his non-literal interpretation of fire.

TDS Autumn 2010 Photography Workshop

The next TDS Photography Workshop will be Oct. 16-18, 2010. You can place your name on the reserve list now. Just drop me a line.

More Ways to Participate

Want to share photos and talk with other members in our virtual camera club? Check out our Flickr Public Group. It's a blast!


twitter.jpg Follow me on Twitter

-


Podcast Sponsors

Red River Paper -- Try the $7.99 Sample Kit.

Make Your Photos Sizzle with Color! -- SizzlPix is like High Definition TV for your photography.


Technorati Tags: , , , , ,

Less in Love with Drobo

drobo_web.jpg

Back in September 2009, I published Drobo Field Test - 18 Months Later. At that point, things were going along pretty good for me and my robotic backup device.

Then, a couple weeks ago, I wanted to take advantage of one of Drobo's most touted features: increase its capacity by replacing a 500 GB hard drive with a 1 TB hard drive. I watched the video on the Drobo site about how easy this procedure was, then added a Hitachi 1 TB, 7200 rpm, SATA 3.0 drive in the bottom bay. For three days Drobo churned away incorporating the new drive into my array.

At the end of the third day, it showed increased capacity on the Drobo Dashboard, but I continued to get a "data is at risk" message with orange and green blinking lights. I restarted everything, and still, the same situation. Then a new twist, Drobo would dismount itself thereby prompting a new error by my Snow Leopard Mac.

Because Drobo can sometimes work things out for itself, I let it be for a couple days. But nothing improved. So I thought I would shut everything down, then put the original 500 GB drive back in the bottom bay, and at least get back to where I was before.

Three more days passed. More grinding. And in the end, Drobo decided it didn't like that hard drive anymore either. So I swapped drives again, thinking that maybe this time it would accept the new 1 TB drive.

Three more days passed. Nope.

So, I shut down Drobo, removed the drive from the bottom bay, and restarted. Now that the bottom bay is empty, it seems much happier, except it tells me that it's full. And therefore my data is still at risk. So I'm going to offload 100 GBs or so to another hard drive, give Drobo a little breathing room, then figure out what to do.

Bottom line: I haven't lost any data, so Drobo delivered on that promise. But, it seems like I no longer have an expandable drive either. This means that I'm less in love with Drobo than before. And it looks like I'm going to look for another backup solution.

If you have comments or tips about this, please post here. I'd like to hear your thoughts.


twitter.jpg Follow me on Twitter


When you take the flash off the camera and put it on a light stand, a whole new world of possibilities open up for you. You're able to position the light exactly where you want it, you can make it more flattering by using modifiers, and you can add additional lights if necessary.

In my just-released Lynda.com video training, Off Camera Flash, I demonstrate a variety of simple techniques that produce absolutely professional results. Check out this short movie for an overview:

By spending just an hour with this course, you can dramatically improve your indoor portrait photography, whether you're on location or in your own environment.


twitter.jpg Follow me on Twitter

-

Product Reviews on TDS

A fun section to peruse on The Digital Story is our Product Reviews page. There you can learn about interesting cameras, useful accessories, and the latest software to help you get more out of your photography. The easiest way to get there is to mouse over the Photography tab in the top navigation bar on The Digital Story. Product Reviews are the third item down.

And don't forget, we have full search capabilities too. Just type in what you're looking for in the search box in the upper right corner, and the results will be delivered right away.


twitter.jpg Follow me on Twitter

-