This is The Digital Story Podcast #632, April 24, 2018. Today's theme is "Postcard Gravity." I'm Derrick Story.
Opening Monologue
In my previous life as a cubical worker, we used to have this term for high-flying good ideas that were eventually pulled back to earth to meet their inevitable demise. We called this phenomenon, "corporate gravity." And believe it or not, it has an artistic sibling for photographers that I call that "postcard gravity." And the battle against it is the subject of today's show.
Postcard Gravity
Engaging in personal projects is one of the ways we can save our artistic souls as photographers. There are no bosses, committees, focus groups, or editors to shoot down our ideas. We come up with a concept, photograph it, then determine how we feel about its merits.
 "Fishing, Lahaina" - Kodak ColorPlus 200 film - From the Maui Series by Derrick Story.
But sooner or later, even our personal projects find themselves in front of others for their opinions. And how many times have you heard them thinking, "Why can't you just take a pretty picture and leave it at that?"
To help you battle Postcard Gravity, I have five techniques that I'm going to share with you right now.
- Be clear on the concept of the project. Art for art's sake can lead you down some very weird alleys. But if you've thought through your project from start to finish, you have a better opportunity of creating something truly unique, and possible even appealing to the masses.
- Leverage all of your technical expertise. By combining craftsmanship and artistry, you can impress viewers who might not initially grasp the concept, but appreciate your skill.
- It's OK to explain what you're doing. You're asking a lot of your audience to perceive in seconds an idea that took you days, or even weeks to perfect. By letting your viewers know something like, "I wanted to create a very graphical look," helps them understand what you're doing.
- Don't argue with critical feedback. It doesn't do any good.
- But don't discount positive feedback either. This is especially helpful for a gallery of images. If people express a favorite, then consider showcasing it to promote the entire collection.
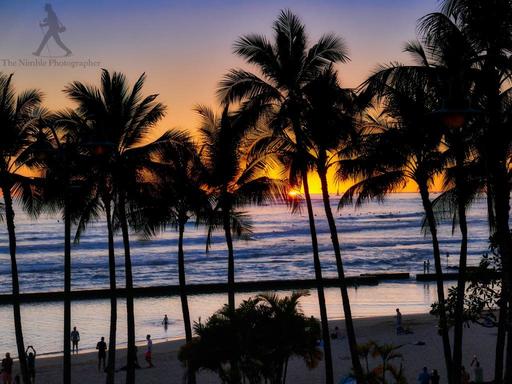
The main thing is to avoid becoming addicted to sugary likes. Everyone loves a sunset, but generally speaking, that is the artistic work of God, not the photographer.
Thomas Hawk Publishes, "My Thoughts on the SmugMug Flickr Acquisition"
In his Petapixel article, Thomas Hawk writes:
"First off, I have to say that I think that the acquisition news is very good for Flickr users and the Flickr community. While time will tell how this acquisition goes, I have much more faith in SmugMug running Flickr than I do Verizon."
"In buying Flickr, SmugMug more than anything is buying a community. I think that they are going to be very careful not to disrupt this community and look for ways to grow it thoughtfully. Having known the MacAskills (the family that owns SmugMug) for many years, one thing I can say for certain is that they LOVE photography and photographers. If you ever get a chance to visit their offices in Mountain View, do it. What you will find is wall after wall covered with the biggest prints you have ever seen in your life. These are people who are passionate about photography, not advertising."
"For SmugMug, I think what is probably most exciting is that they are getting a very large community of photographers by purchasing Flickr. I think that this will allow them to do even more with community, photowalks, meetups, etc. They will need to make sure Flickr is profitable (and it will be) but they will have a much larger group to build a bigger and stronger community with. While Google+ sort of became a place for the photographic community for a bit, before Google largely abandoned it, there really is not a good place for a larger community of photographers today and I think with the acquisition of Flickr, SmugMug hopes that it can build this and I think they have a pretty good chance at doing it."
I think both Thomas and I are excited about this announcement.
The Apple Photos Book for Photographers, 2nd Edition
The Apple Photos Book for Photographers, 2nd Ed is now available on Amazon. If you purchase the book, send me proof, and I'll send you an official book plate that you can print out on a standard 4"x6" sheet of photo paper. This offer is good until April 30, 2018. Use the Contact Form on The Nimble Photographer site. Also, feel free to post a review on Amazon once you've read the book. They're helpful to potential buyers.
Do You Have a Film Camera that Needs a Good Home?
Over the last year, I've received donations from TDS members who have film cameras that need a good home. What I do is inspect the items, repair and clean as I can, then list them in TheFilmCameraShop where I can find a good home for them. If you're interested in donating, please use the Contact Form on TheNimblePhotographer site. And thanks for you consideration!
Aerial Photography Workshop
Public registration is now open for the Sonoma Country Hot Air Balloon and Drone Photography Workshop, June 8-10, 2018. We're combining two very fun aerial activities into one workshop. Be sure to get on the Reserve List for this one!
Reservation Forms have been sent for the Burney Falls and Lassen Volcanic National Park Workshop
We have our cabin reservations secured for Sept. 27-29, 2018 for the Burney Falls and Lassen Volcanic National Park Workshop. I sent out reservation forms this last weekend. So if you are on the reserve list, you should have received an invite.
Updates and Such
You can become a member of our Inner Circle by clicking on this link or by clicking on the Patreon tile that's on every page of The Digital Story.
B&H and Amazon tiles on www.thedigitalstory. If you click on them first, you're helping to support this podcast. And speaking of supporting this show, and big thanks to our Patreon Inner Circle members:
And finally, be sure to visit our friends at Red River Paper for all of your inkjet supply needs.
See you next week!
More Ways to Participate
Want to share photos and talk with other members in our virtual camera club? Check out our Flickr Public Group. And from those images, I choose the TDS Member Photo of the Day.
Podcast Sponsors
Red River Paper - Keep up with the world of inkjet printing, and win free paper, by liking Red River Paper on Facebook.
The Nimbleosity Report
Do you want to keep up with the best content from The Digital Story and The Nimble Photographer? Sign up for The Nimbleosity Report, and receive highlights twice-a-month in a single page newsletter. Be a part of our community!
Want to Comment on this Post?
You can share your thoughts at the TDS Facebook page, where I'll post this story for discussion.