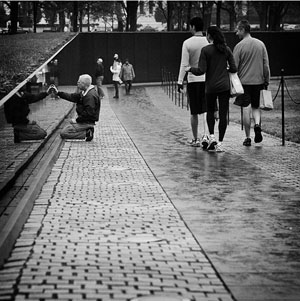
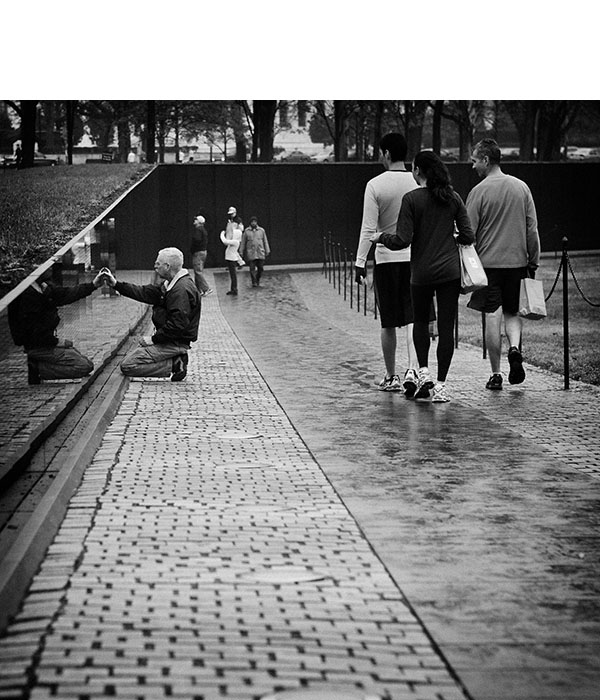
Recently in Photography

  Page 307 of 383 in Photography  

"Butterfly Rest Stop" - Grab Shot 184

"I captured this guy at Pilot Mountain State Park North Carolina, while on a business trip," writes Randy Martin. "He was stopping there for some R&R too. However, his trip is a lot longer than mine as he's headed for Mexico."

Randy captured this great image with a Nikon D90, Nikon DX AF-S Nikkor 55-200mm 1:4-5.6 ED lens. ISO 200, f8, 1/200.

Photo by Randy Martin. Click on image to zoom to larger size.

If you have a candid you'd like to share, take a look at our Submissions page, then send us your Grab Shot. We'll try to get it published for you on The Digital Story.

And you can view more images from our virtual camera club in the Member Photo Gallery.


twitter.jpg Follow me on Twitter

-


Technorati Tags: , , ,

If you had just a stock Mac, what would you buy to create a home photo studio? Now let's make it really interesting. If your purchases were limited to a budget of $300, then what would you do?

photo_receipt_original.jpg

That was the challenge given to me by Macworld Magazine. In the article, The $300 photographer challenge, where I try to outfit a home photo setup without going over budget.

For the challenge, I leaned heavily on the tools that are already included on a Mac: iPhoto '09, Preview, Time Machine, then focused my spending on an HP C6380 printer and an additional hard drive. It's an article worth reading, not only for what I have to say, but for the abundant reader comments who have lots of ideas of their own.


twitter.jpg Follow me on Twitter

-


When Canon unveiled the Canon 7D and three new lenses, understandably the DSLR got most of the attention. But for those of us who have existing Canon APS-sensor bodies, the new lenses, and especially the 15-85mm zoom, is a notable announcement. I think this is potentially the perfect high end all purpose glass for current Rebel owners.

At the top of the spec list is Canon's new hybrid image stabilization that compensates for both angle camera shake and shift camera shake. Canon states that its IS is effective up to four stops. By having such effective stabilization, Canon was able to keep the lens compact, sacrificing a bit on maximum aperture (3.5 to 5.6).

Next is the wonderful zooming range, 24-136mm, that allows shooters to cover most assignments without ever changing the lens. It's the perfect travel zoom for sure, and for many photographers it could be their main glass.

When the EF-S 15-85mm is released later this month, it will probably sell for around $800 US. That's the downside for Rebel owners. Many will feel it's hard to justify a standard zoom that costs as much, or more, than the camera itself. The justification is that if you can afford it, it's a lens you will have for a long time and most likely use on many cameras. I use the Canon 24-105mm f/4 as the standard lens on my 5D Mark II, and I can see me using the 15-85mm in a similar role on my Rebel T1i and other APS sensor bodies.

Oh, and did I mention... the Canon 7D looks great!

PS: In case you missed it, I recently reviewed another terrific accessory for Canon Rebel owners, the Canon Speedlite 270 EX.


twitter.jpg Follow me on Twitter

-


Editor's Note -- Recently I was corresponding with TDS member Brian F Wilkie about a project he was working on. Brian had figured out how to create a unique type of photo album where he output pages with snapshots printed on them, then bound these pages together in a binder. I loved this idea and asked Brian to write a short article for us, which he kindly did. So, in his own words, here's how Brian Wilkie creates his unique output, complete with Lightroom templates so you can do the same. Thanks Brian!

Using Lightroom 2.4, a Canon Pixma Pro 9000 printer, and Red River Paper's excellent Premium Gloss DUO 8.5" by 11" letter-sized stock, I'm able to  create a handsome looseleaf bound album quickly, and fairly easily.

In Lightroom, I start with a  grid filter which gathers all images taken in a  particular year with a rating of 1 star or above. The choice of rating will vary with how hard you are on yourself and whether you want to include family snapshots as well as fine art images.  Select all of the pictures (command A), then create a collection called Album 20XX (filling in the appropriate year). Now, you can use delete to remove any images which are repetitive, virtual copies you made for different print sizes, or black and white versions. By the end of the process you will have a good idea of how big a printing task you have undertaken.

Printing

You can download a pair of print templates that make good use of the real estate on a US letter page, as long as you have a printer that can handle borderless printing. These templates provide 4 prints up at 5.5" inches by 3.67" inches on a page. I use the "rotate to fit" option so that portrait mode images are printed as large as possible, although this means that on some pages viewers will need to turn the binder on its side to see the pictures oriented correctly. I also enable Page Number under Page Options to help keep track during printing, and the Identity Plate option for my Logo. Finally, the Photo Info option is enabled using Capture Exposure Date as a template. Be careful not to be too wordy in captions or the text will wrap around and the photo size may be restricted.

Printing is done using the appropriate ICC profile downloaded from Red River Paper with Print Sharpening set to "High" and Media type to "Glossy".

The printing itself is completed in two passes. First, the User Template "4up letter+data Odd" is selected, then Print is clicked. At this point, settings options become printer and computer operating system specific. As I mentioned before, I use a Canon Pro9000 on a Mac running OS 10.5. In the print dialog box under Paper Handling, I select Pages to Print - Odd Only. I also select Page Order - Normal. Under Quality and Media I select Media Type - Glossy Photo Paper and Print Quality - High. Under Borderless Printing, I select Amount of Extension - Min. This allows the page number to be visible on the final print since Lightroom puts this in the extreme lower right corner of the page.

After the first pass, carefully flip over the set of odd pages and put them into the paper feed. The top sheet should now be the back side of page one, but careful experimentation is called for here. Select the user template "4up letter+data Even" and click Print. Now under Paper Handling change  to Pages to Print - Even Only.

All you need now is a good quality 3-hole punch. Remember, this is heavy paper stock. Then put the pages in to a quality 3-hole binder.  I use a nice leather one from the local office supply store. The end result is a good looking, well printed, and durable album. By my calculation the cost is around 28¢ per image, less if you shop around for discounted Canon ink.

"Soft Background" really brought out the artists in this month's contributing photographers. We have 21 outstanding images featured in the July 09 Photo Assignment. You have to see this gallery.

The September 2009 assignment is "Simple." Start working on your contribution now. Details can be found on the Member Participation page. You can submit photo assignment pictures up to 600 pixels in the widest direction.

Please follow the instructions carefully for labeling the subject line of the email for your submission. It's easy to lose these in the pile of mail if not labeled correctly. For example, the subject line for next month's assignment should be: "Photo Assignment: September 2009." Also, if you can, please don't strip out the metadata. And feel free to add any IPTC data you wish (These fields in particular: Caption, Credit, Copyright, Byline), I use that for the caption info.

Photo by Landon Michaelson. You can read more about how Landon set up this shot, plus see all of the other great images on the July 09 Gallery page.

Good luck with your September assignment, and congratulations to all of the fine contributors for July. It's a great collection of images.


twitter.jpg Follow me on Twitter

-


Now Available! The Digital Photography Companion. The official guide for The Digital Story Virtual Camera Club.

  • 25 handy and informative tables for quick reference.
  • Metadata listings for every photo in the book
  • Dedicated chapter on making printing easy.
  • Photo management software guide.
  • Many, many inside tips gleaned from years of experience.
  • Comprehensive (214 pages), yet fits easily in camera bag.

Technorati Tags: , ,

Using Old Lenses on New Cameras

Of all the cameras I had in the past, my favorites were made by Contax. The first model I bought (when I had absolutely no money) was the Contax 139 with the Zeiss 50mm f/1.7. I later added the Zeiss 35mm f/2.8 and 135mm f/2.8 lenses. It was thrilling every time I picked up the camera. Over the years, I had other favorite bodies too, including the 167MT and RX.

After I made the transition to digital photography, I sold much of my film equipment. I did keep, however, my absolute favorites. I wasn't quite sure why at the time; I just didn't want to part with everything from the past. So I still have the Contax RX body, 5 prime lenses, and the pocketable Contax T. I also kept the Hasselblad 500C with both the 80mm and 150mm lenses.


The Transamerica building in San Francisco. Shot with an Olympus E-P1 with a Zeiss Distagon 35mm lens mounted. Photo by Derrick Story. Click to enlarge image. See more images with this rig on the TDS Flickr page.


I didn't use any of this equipment for a long time. Then, when I started shooting with the retro-looking Olympus PEN E-P1 camera, I got a hankering to try the collection of Zeiss lenses on that body using the Rayqual Micro Four Thirds adapter for Contax M lenses. I wrote about the experiment in the article Zeiss Lens on Olympus E-P1? Oh Yeah!. There are some good reader comments there too.

When I wrote the article, I promised to publish shots using a Zeiss lens on the E-P1. My opportunity appeared this week when I had meetings in San Francisco. I packed the Olympus with the 35mm Zeiss Distagon lens, and clicked photos as I walked from one appointment to the next. You can look at the set of images on the TDS Flickr page. These are Raw files processed in Adobe Camera Raw.

I had a great time shooting these images. I was manually focusing with the well-damped focusing ring in the Zeiss Distagon. I set the E-P1 in Aperture Priority mode and used the click-stop aperture ring on the Zeiss lens to set the f/stop. In all honesty, I felt more like an artist than a snapper using this rig.

Now that I have the bug, I'm going to see about mounting these lenses on my Canon 5D Mark II. Since it's a full frame sensor, everything should look as it did when they were mounted on my Contax bodies. I'll keep you posted. In the meantime, I'm going to continue to shoot with the Olympus E-P1 and my collection of Zeiss glass.


twitter.jpg Follow me on Twitter

-


Snow Leopard Notes for Photographers

snow_leopard.png

Snow Leopard is available for distribution tomorrow. After reading initial reviews of the latest Apple OS, I would say it's a recommended upgrade for Mac users using Intel machines, especially photographers who demand a little more from their computers. I have a few notes for those of you thinking about making the move.

First, read Jason Snell's excellent Review: Snow Leopard. He's been working with the software for some time now, and he does a great job of showing us the ins and outs of the new OS.

If you're a Photoshop users (CS3 or CS4), then you should be hanging out at John Nack's blog. John is addressing Photoshop compatibility running on Snow Leopard. There's lots of good information there. As far as I can tell, Lightroom should also run fine on Snow Leopard.

Aperture and iPhoto users should have a smooth transition to Mac OS X 10.6. Apple is very good about taking care of their own, and users should have a great experience with both applications.

If you want to save a few bucks, you can buy Snow Leopard on Amazon for $25 instead of the regular $29 price tag. Family packs are available too.

BTW: Amazon notes on the Snow Leopard product page that Tiger users must buy the more expensive Mac Box Set that lists for $149 on Amazon and includes the OS plus iLife and iWork. But in Jason Snell's review, he remarked that Tiger computers will boot from the upgrade disk. I'll report more as soon as I test myself.


twitter.jpg Follow me on Twitter

-


"This shot was taken at a local balloon festival," writes Jim Garrett, "an Air Force band was playing and this toddler just came up to the edge of the stage."

Jim captured this flag waving shot with a Pentax K100D with the kit 18-55mm lens -- F5.6, 1/90 sec., ISO 200. He then edited in Picasa using "Focal B&W" tool.

Photo by Jim Garrett. Click on image to zoom to larger size.

If you have a candid you'd like to share, take a look at our Submissions page, then send us your Grab Shot. We'll try to get it published for you on The Digital Story.

And you can view more images from our virtual camera club in the Member Photo Gallery.


twitter.jpg Follow me on Twitter

-


Technorati Tags: , , ,

snow_leopard.png

Apple has announced that Snow Leopard (Mac OS X 10.6) will be available on August 28, 2009 as a $29 upgrade. Many of us Mac users are excited about this because of the improved performance and stability that comes with this release.

Along those lines, our photographer brains might be wondering about compatibility with existing Adobe apps, specifically Photoshop CS4. John Nack has posted about this issue on his blog and points to an official Adobe FAQ.

Photoshop CS4 users on a Mac might want to take a peek.


twitter.jpg Follow me on Twitter

-


canon_280ex.jpg

The Canon Speedlite 270EX is a compact hot shoe flash that is an excellent accessory for modern Canon DSLRs and G series compacts. For this review I've tested the 270EX on a Rebel T1i and G9. Owners of older DSLRs, such as the Canon XT have reported that the flash works, but you can't change some settings, such as switching from 1st curtain to 2nd curtain.

Menu Controls on T1i and G9

The story is much more interesting with the Canon Digital Rebel T1i. Mount the 270EX in the hot shoe then go to the Flash Control menu, and you have a variety options including E-TTL II or Manual exposure (1/64 to 1/1), Shutter Sync (1st Curtain, 2nd Curtain, or Hi-speed), Flash Exposure Compensation (-2 to +2), and E-TTL II Metering Pattern (Evaluative or Average). You also have access to two Custom Function settings: Auto Power (on or off) and Quickflash with continuous shot (on or off).


Both photos unedited. Top image captured with 270EX flash in bounce position on a Canon Rebel T1i. Bottom image captured with flash in same position on a Canon G9. The T1i renders a cleaner image with the flash. Click to enlarge. Photos by Derrick Story.


You have many options on the G9 too, even though it's an older camera. There's quick access to Flash Exposure Compensation (-3 to +3) via the Function button. If you open External Flash Settings on the Menu, you have Flash Mode (Auto or Manual 1/64 to 1/1), Shutter Sync (1st Curtain, 2nd Curtain, or Hi-speed), Slow Synchro option, and Safety FE option. The flash responds well to these settings.

Physical Characteristics

The bottom foot of the flash (that slides into the hot shoe) is well-constructed using a metal plate instead of a plastic fitting that we normally see. The flash head pulls forward to "Tele" position for focal lengths 50mm and longer. It also swivels upward at 60, 75, and 90 degrees. I love this feature and consider it a real bonus on such a compact flash. Another improvement that Canon had made over the 220EX is requiring fewer AA batteries from four to only two for the 270EX. And it still has plenty of pop with a guide number of 72 ft. at ISO 100 (28mm focal length). Since most of the settings are controlled via the camera menu, there are only two buttons on the flash itself: the on/off switch and the hot shoe lock lever.

Operation

The 270EX uses an intermittent flash firing system for autofocusing assist and exposure evaluation, regardless of the head position. This system worked fine on the T1i, but it isn't supported on the G9. As for the exposures themselves, I rate the 270EX as excellent on newer cameras. I'm especially impressed with the bounce flash exposures on the T1i. The E-TTL II system in Evaluative mode does a great job of rendering flattering exposures. The results weren't quite as good on the G9, which I attribute to older flash metering technology in the camera. The pictures were still quite good, but not the same amazing quality I saw on the Rebel T1i. (See photo examples for comparison.)

Bottom Line

The Canon 270EX is selling on the street for about $150 US. That's not cheap by any means, but reasonable compared to other Canon flashes such at the 430EX II at $264 or the 580EX II at $400. The 270EX fits in your pocket (or the palm of your hand) and is an excellent match for newer Canon DSLRs (40D on up) and is serviceable on many older Canon cameras such as the G9. The swivel head is the killer feature that really sold me on this accessory.

Technorati Tags: , , , , ,


twitter.jpg Follow me on Twitter

-