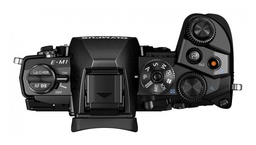
The Olympus OM-D E-M1 mirrorless camera includes Keystone Compensation that allows photographers to correct for converging lines in-camera.
There are two ways to apply this correction: 1) while shooting using the control dials on the top deck of the camera, or 2) using the RAW/Jpeg Edit function while viewing images. Here are the steps for both methods.
Keystone Compensation While Shooting
- Make sure you have Firmware 2.0. You can check this by going to the Menu and navigating to the wrench icon on the left side. The Firmware option will appear on the right. Once you navigate to it, it should read "Body:2.0" or later.
- Enable Keystone Comp. In the Menu, go to Camera Icon 1 on the left side and navigate to Keystone Comp. at the bottom of the screen. Turn it "on."
- Activate the LCD for live view by pressing the "monitor" button directly to the left of the viewfinder on the back of the camera.
- On the LCD screen, you should see the Keystone icon at the top and two scales with a green bar, one on the bottom and the other on the right. If you don't see these, press the INFO button repeatedly until they appear.
- Rotate one of the top control dials, and you'll see the image adjust. On my E-M1, the control dial around the shutter button adjusts the image horizontally, and the back control dial adjusts the image vertically.
- Once you begin an adjustment, a green arrow appears to show you which direction you're moving. Also, the scale for the adjustment you're not using will disappear. You can bring it back by "centering" the adjustment you're currently working on.
- Once the image looks good, take the picture.
- Move the green indicator bar back to center, then turn off Keystone Compensation.
- To save time, you can assign one of the Function buttons, such as Fn2, to quickly enable Keystone Compensation. If you do that, it will be grayed out in the Menu screen.
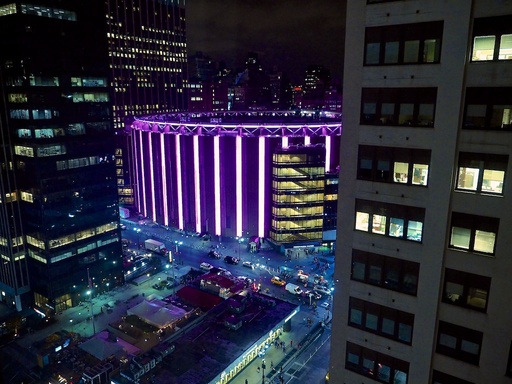
Penn Station, NY, No Keystone Compensation - Photos by Derrick Story.
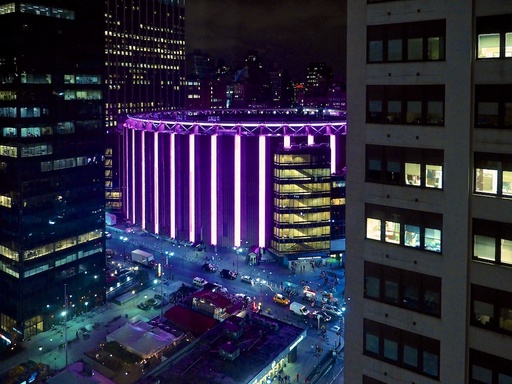
Penn Station with Keystone Compensation Applied In-Camera with the E-M1
Apply KeyStone Compensation in RAW/Jpeg Edit Mode
- Make sure you have Firmware 2.0. You can check this by going to the Menu and navigating to the wrench icon on the left side. The Firmware option will appear on the right. Once you navigate to it, it should read "Body:2.0" or later.
- Press the Play button and navigate to the image you want to correct on the camera's LCD screen.
- Press the OK button and choose either "RAW Data Edit" or JPEG Edit." Press OK.
- Navigate to "Custom2." Find the Keystone Compensation on the right side of the screen and enable it.
- Press the INFO button to make the adjustment to the image. As you move the Control Dials, a white box will indicate the adjustment you're making. Once the image looks the way you want, press the OK button.
- Press the OK button again, and choose "Yes." The correction will be applied.
- Press the Menu button to exit the screen and view your corrected photo.
The Keystone Compensation produces a Jpeg based on your size and compression settings. The final image looks amazingly good, and all done within the camera and ready to use.
More Features with Firmware 2.0
Tethering is also available with this firmware update. To learn more about that, see my article, Tethered Shooting for Product Photography.
Want to Comment on this Post?
You can share your thoughts at the TDS Facebook page, where I'll post this story for discussion.