Recently in Photography

  Page 194 of 384 in Photography  

Photographers Guide to Copyright Law

I've just finished looking over the Photographer's Guide to Copyright Law, and there is a ton of useful information in this free download. The guide, created by PhotoShelter and the American Society of Media Photographers (ASMP), covers these topics:

  • Discover your 6 exclusive rights under copyright law.
  • Learn how to secure your photos and avoid infringement.
  • Get tips to register your work through the U.S. Copyright Office.
  • Understand steps to take if you are infringed.

Definitely something you want to add to your reference library.

Want to Comment on this Post?

You can share your thoughts at the TDS Facebook page, where I'll post this story for discussion.

Join me on my Instagram site as I explore the world of mobile photography.

Photographer Gavin Seim did many things right when creating his ColorFlow presets for Aperture 3. I like them, not only because they help you produce better images, but also because they help you improve your editing skills in Aperture.

ColorFlow, Aperture 3, Image Editing, Model, Sexy, Portrait Applying the "Too Warm Fixer" preset to this portrait of Ewelina.

You can purchase the entire set, more than 60 presets in 5 categories, from Gavin's site for $39. It's a download, so within minutes you're using them in the app. (In the Adjustment tab, click on the Effects popup, choose Edit Effects, click on the gear menu and choose Import. Navigate to ColorFlow that you just downloaded. Aperture adds the presets to the app.)

The aspect of ColorFlow that I really like is that you stay in the Aperture environment the entire time you're working. There's no roundtripping to a separate window that adds big TIFF files to your library. You're working with your RAWs just like you would any other image.

The difference is, Gavin is giving you a head start on the editing. When I chose the "Too Warm Fixer" preset for the portrait of Ewelina, ColorFlow left my crop alone, but made changes to the White Balance and Enhance bricks. I can see exactly what it did. And if I want, tweak further using the sliders that I'm already familiar with.

Then, if I want, I might add a Hollywood Cinema effect, such as American Western, and ColorFlow makes adjustments to both Curves, and the Highlights & Shadows bricks. if the effect isn't exactly what I want, I can play from there.

There's nothing over the top here. Many of the effects are subtle, helping you craft your image rather than be hit over the head with it. And if you want more intensity, you can add it yourself.

I think ColorFlow is an excellent investment for your Aperture workflow. Because they are presets, they have low impact on the application itself. It's more like a guided tour for image editing. And I think using ColorFlow will inspire you to fine tune your pictures.

Watch the video that Gavin has embedded on the ColorFlow page, you'll learn a lot about these presets, and gain insights on his approach to photography.

Aperture Tips and Techniques

To learn more about Aperture, check out my Aperture 3.3 Essential Training (2012) on lynda.com. Also, take a look at our Aperture 3 Learning Center. Tons of free content about how to get the most out of Aperture.

Want to Comment on this Post?

You can share your thoughts at the TDS Facebook page, where I'll post this story for discussion.

iPhone as Your Third Camera Option

You have a DSLR around your neck, and another body in your camera bag. You should be able to cover just about anything, right?

Yes, indeed. Especially since you have a formidable third option in your pocket. An iPhone.

Artisan Cheese Festival Marketplace, iPhone, Derrick Story Wide angle shot captured with an iPhone 4S in panorama mode.

I love standing in the thick of things and pulling out my iPhone to record panoramas. Those images look much different than anything I shoot with my other cameras. I often hold the iPhone overhead and sweep across the scene to capture an entirely new perspective.

Panorama mode is built into the Camera app. Tap the Options button to reveal the Panorama control. Once enabled, you can sweep from left to right, or right to left. Just tap on the side that you want to begin recording.

If you have Photo Stream enabled, the images can go directly into your Aperture or iPhoto library. Since I'm an Aperture user, I've set up iPhoto to house my Photo Stream images. Then I use what I need and archive the rest.

When on location, you never know which perspective you're going to like the best. But you can't choose among them if you don't record 'em in the first place. So don't forget about that third option in your pocket.

Want to Comment on this Post?

You can share your thoughts at the TDS Facebook page, where I'll post this story for discussion.

Using Aperture and iPhoto Together

To learn more about using Aperture and iPhoto together, visit my Using iPhoto and Aperture Together on lynda.com. Also, take a look at our Aperture 3 Learning Center. Tons of free content about how to get the most out of Aperture.

This week on The Digital Story: Is the new Canon EOS SL1 a mirrorless killer? Supercharge your photo management workflow by using Aperture and iPhoto together. And I share some insights from the recent 3-Day Artisan Cheese Festival event coverage and advanced TDS workshop.

Story #1 - Canon EOS SL1: Instead of Mirrorless? Canon wants you to have your optical viewfinder and compact size too. With the announcement of the EOS SL1 (100D), you can tote a mere 407 grams with a body that measures only 117 x 91 x 69 mm. Compare that to the Olympus OM-D that weighs in at 425 grams and 122 x 89 x 43 mm. What are the pros and cons for buying compact SLR vs a mirror less body? (You can see the Canon EOS Rebel SL1 DSLR with 18-55mm EF-S IS STM lenshere.)

  • Bigger image sensor on the SL1 - APS-C (18MP) vs Micro Four Thirds (16MP)
  • Can use existing EF-S and EF lenses on SL-1
  • Lens are lighter and smaller, however, with OM-D
  • More professional features with OM-D such as 9 fps vs 4 fps, tilting LCD, built-in image stabilization, etc.
  • Price is interesting: Canon is $799 with 18-55 STM vs 1049 for OM-D with 12-42mm.

Story #2 - Using iPhoto and Aperture Together - I love using Aperture and iPhoto together, and now I have a training on lynda.com that shows you how to get the most out of this tandem. This was really made possible by the Unified Library that lets you use either application interchangeable with your image library. From there, you can decide which app is best for any given task, then use the right tool for the job. My goal is to help fully understand your options so you can create a killer workflow for all of your photography work (and play).

Story #3 - Clarification on the Canon CPS story. You need to be a working photographer to qualify. This is not a program for hobbyists.

Story #4 - Artisan Cheese Festival Event Coverage and Advanced Workshop. Three TDS members joined me for the 3-day festival: Scott McDaniel, Jeremy White, and Jeff Dickerson. And they shot lights out all weekend.

Listen to the Podcast

You can also download the podcast here (32 minutes). Or better yet, subscribe to the podcast in iTunes. You can support this podcast by purchasing the TDS iPhone App for only $2.99 from the Apple App Store.

Monthly Photo Assignment

The March 2013 photo assignment is Black & White.

More Ways to Participate

Want to share photos and talk with other members in our virtual camera club? Check out our Flickr Public Group. And from those images, I choose the TDS Member Photo of the Day.

Podcast Sponsors

Red River Paper -- Keep up with the world of inkjet printing, and win free paper, by liking Red River Paper on Facebook.

Make Your Photos Sizzle with Color! -- SizzlPix is like High Definition TV for your photography. Take the SizzlPix Challenge - See how your photo will Sizzl by getting a free 5x7 section of an uploaded image. Just put TDS or The Digital Story in the comments to get your free SizzlPix section.

Need a New Photo Bag? Check out the Lowepro Specialty Store on The Digital Story and use discount code LP20 to save 20% at check out.

Want to Comment on this Post?

You can share your thoughts at the TDS Facebook page, where I'll post this story for discussion.

Successful event photography requires quick reflexes and a few tricks. And like the magician's wand, the 70-200mm pro zoom can cast the perfect spell.

cheese_on_boos_block.jpg Canon 70-200mm IS at f/4.5 on a Canon 60D at ISO 1600, 1/400th of a second.

When fully extended and wide open, I can isolate subjects that are only a few inches apart. I have enough reach to achieve a good shooting angle, even in a crowded room. And with image stabilization combined with wide aperture, nearly any lighting condition can be tamed.

Ask just about any event photographer this question: "If you could take only one lens to this assignment, which one would you choose?" The answer more often than not would be: "My 70-200mm."

Want to Comment on this Post?

You can share your thoughts at the TDS Facebook page, where I'll post this story for discussion.


Join me on my Instagram site as I explore the world of mobile photography.

Regardless if you're primarily an Aperture or iPhoto user, you can sweeten your workflow by using the two applications together. And in my latest lynda.com title, I show you how. Here's a quick overview.

Welcome Movie to Using Aperture and iPhoto Together

View this entire Using iPhoto and Aperture Together training and more in the lynda.com library.

In the coming weeks I'll be sharing some of my favorite techniques for using these two excellent apps together. In the meantime, you might want to check out the free movies on lynda.com.

Want to Comment on this Post?

You can share your thoughts at the TDS Facebook page, where I'll post this story for discussion.
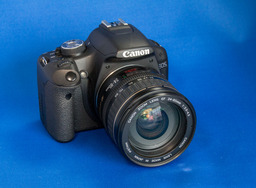
Canon wants you to have the option to keep the optical DSLR experience, even when the camera body itself is compact. They've introduced the Canon EOS Rebel SL1 with new EF-S 18-55mm f/3.5-5.6 IS STM lens ($799 for kit). It's the world's smallest DSLR.

canon_sl1_front.jpg

Good news is that the SL1 is truly a feat of miniaturization. The camera body measures 4.6" (w) x 3.57" (h) x 2.74" (d), and weighs only 14.36 oz. In comparison, the EOS Rebel SL1 is approximately 25 percent smaller and 28 percent lighter than the EOS Rebel T4i digital camera. Canon has also managed to keep the familiar Rebel control layout on the compact body. So the SL1 should be comfortable and easy to use.

The tradeoffs under the hood seem more to do with marketing decisions than miniaturization. Frame rate is 4 fps, which is a little slow by today's standards. And flash users don't get wireless control with the SL1.

I'm looking forward to the first test results. This could be a good option for those who want to use their existing lenses, but have a smaller form factor option for travel and business. More to come.

Want to Comment on this Post?

You can share your thoughts at the TDS Facebook page, where I'll post this story for discussion.

Join me on my Instagram site as I explore the world of mobile photography.

Want to spice up your photography life? How about a new lens?

When considering optics, you have many things to think about: sharpness, distortion, durability, focusing speed, and cost, just to name a few. All of those factors are important. But before you get to the technical aspects, I offer five considerations that might help you narrow down the list of candidates.

lens_ options.jpg Your kit lens (on the right) is great for general photography. But what if you want to do something different? Maybe explore low light compositions? Consider adding a fast lens (left) to your kit.

In my latest TechHive article, Five tips to help you choose a new camera lens, I cover perspective, maximum aperture, size and weight, stabilization, and emotional appeal.

Once you've covered those bases, then you should have a short list of lens candidates to choose from.

Want to Comment on this Post?

You can share your thoughts at the TDS Facebook page, where I'll post this story for discussion.

Join me on my Instagram site as I explore the world of mobile photography.

lomography_scanner_iphone_4s.jpg

I just received my Lomography Smartphone Film Scanner (Lomo) and have had fun testing it. I have my unit now because I participated in the Kickstarter funding. Retail units will be available very soon online.

The Lomo enables you to connect a smartphone, in my case an iPhone 4S, and scan 35mm film strips. The internal light is powered by 2 AA batteries. Operation is simple. Feed the film into the unit using a knurled knob, turn on the light, mount your phone, and take a picture of the illuminated image.

wild_bill_ellison.jpg Retired Dr. "Wild Bill" Ellison photographed in his study in 1991 using a Contax SLR and Ilford XP2 film.

You can use any photo app to take the picture. I prefer using ProCamera because of the controls it provides. Once I captured the image, I used Photoshop Express to invert the picture to make it a positive (Effects > Invert). After a bit of image adjustment, I'm ready to share my photo with the world.

1935_chevy_truck_front.jpg Front grill of a 1935 Chevy truck photographed in 1993 with an Yashica FX2000 and a Zeiss 35mm f/2.8 lens using Ilford HP5 Plus film.

The good points for the Lomo include:

  • Low cost (around $65) and very compact. Fits easily in your daypack.
  • Easy to use with quick results.
  • Free iOS and Android scanning apps soon to be released.
  • Great way to share your film archives or current projects on Facebook, Twitter, Flickr, and other sites accessible from your mobile phone.

Not so good points include:

  • Device only uses a portion of the resolution available on your iPhone. After cropping out the abundant black area, the final size of the scans were around 1200 x 1800 pixels.
  • Doesn't accommodate mounted 35mm slides.
  • Design isn't that robust, so handle with relative care.
  • Bottom line, however, is that the Lomography Smartphone Film Scanner is fun, and is about the easiest way to digitize 35mm film strips. I'm looking forward to publishing more of my film work from past decades.

    Want to Comment on this Post?

    You can share your thoughts at the TDS Facebook page, where I'll post this story for discussion.

    Join me on my Instagram site as I explore the world of mobile photography.

    Inside my Pro Messenger Camera Bag

    derrick_shooting_03-12.jpg

    In last week's podcast, I talked about how I was going to prepare for the St. Patrick's Parade assignment in San Francisco. My basic equipment list was:

    Originally I was thinking of using the 60D instead of the 5D Mark II. As it turned out, I had to send my 60D to CPS to have the grip reglued. So I went with the 5D Mark II with the 70-200mm, which I used most of the time. But when I did need a short lens, I grabbed the OM-D. I prefer this to changing lenses while on the run.

    Here's a 1-minute peek inside my Pro Messenger 200 AW to show you how I set up the bag.

    I carried this rig all day, logging miles up and down Market St., across the water on the Larkspur Ferry, and with me in restaurants for some after-assignment celebration. (I don't like to leave camera gear in the car!) I'll be working with this same set-up later this week for my 3-day assignment covering the Artisan Cheese Festival.

    Want to Comment on this Post?

    You can share your thoughts at the TDS Facebook page, where I'll post this story for discussion.


    Join me on my Instagram site as I explore the world of mobile photography.