Successful air travel requires preparation. One of the most important details is your carry-on luggage. All of your camera gear must go onboard with you. A little preflight research will ensure that you and your lenses stay together.
Start by looking up the carry-one requirements for your airline. Take these numbers seriously because they represent the maximum size allowed onboard. If you have a big assignment, such as my upcoming trip to photokina in Germany, you'll need more gear than for a casual vacation in the Hawaiian islands.
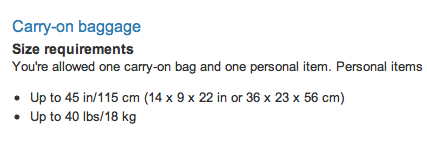 I checked the US Airways site for carry-on requirements, then compared them to my camera bag dimensions. Don't forget about the weight limit either!
Next, physically measure the bag you want to bring onboard. You can use the online specifications as a starting point, but not as the final word. I'll give you an example.
I'm taking a Lowepro Pro Trekker 300 AW to Germany because it's going to be a long, rugged trip, and I have to be prepared for a variety of assignments. On the product page, the dimensions are listed as 15.4 W x 14.2 D x 18.5 T inches. But, I removed the padded belly band and my physical measurements are 16 W x 9 D x 19 T. The big difference is the depth. Carry-on rules say 9", which I meet according to my measurements. So get our that ruler and confirm the dimensions.
Even with all of this preparation, you'll want to have a backup plan. Mine is to wear an empty photo vest onboard the plane. If nothing goes wrong, I simply fold it up and put it in the overhead compartment. But, if somehow I'm told I have to "check" my camera bag, I can pull out my most valuable gear and put it in my vest before I hand over the Pro Trekker 300. I also outfit my bag with TSA approved combination locks. They might prove just enough deterrent to the casual thief that my contents will still be there when I retrieve the bag off the luggage carousel.
My second carry-on is a slim laptop bag with a trolly sleeve that slides over the handle on my roller suitcase. My computer, hard drives, and cables go in here. I don't worry about this bag since I can slide it under the seat in front of me if necessary.
You can never prevent things going wrong while traveling by air. But with preparation, you can give yourself the best odds possible.