Recently in Photography

  Page 56 of 384 in Photography  

One of the features that I was most excited about with the new Olympus OM-D E-M1X mirrorless camera was the built-in field sensor system that has an integrated GPS module (GLONASS and QZSS) along with an electronic compass, manometer, temperature sensor, and acceleration sensor.

This is something that I absolutely love with my Olympus Tough TG-5, but having it in a sophisticated, interchangeable lens body elevates the game considerably. So I decided to take the E-M1X for a spin to see how the GPS worked.

P3257589-gear-upward-e1mx.jpg Olympus OM-D E-M1X with 75mm f/1.8 lens.

You have to turn on the GPS via the menu. My recommendation is to program one of the function buttons to toggle this feature on and off. That way you won't unnecessarily drain the batteries (even though there are two in the camera) when you don't need geotagging.

Once the system is active, you will see a satellite icon at the top of the back LCD panel. When it has determined your location, that information will be included with the file data for your images.

gps-preview.jpg Location data displayed for a file captured with the Olympus OM-D E-M1X.

I checked the files in Lightroom, Photos for macOS, and Preview, and each displayed the location where I captured the image. Once I went back inside, I turned off the GPS module to conserve power.

This feature lived up to my expectations. The joy of being able to geotag images with your "real camera" and not being limited to a smartphone or compact is wonderful. And with two batteries in the E-M1X, there's enough power to run it.

The Olympus OM-D E-M1X is shipping now for $2,999.

You can share your thoughts at the TDS Facebook page, where I'll post this story for discussion.

This is The Digital Story Podcast #680, March 26, 2019. Today's theme is "Who Would Want the Olympus OM-D E-M1X?" I'm Derrick Story.

Opening Monologue

For a Micro Four Thirds camera, it's big. For a non-full frame body, it's expensive. When I tried to squeeze the OM-D E-M1X into my camera bag, it didn't fit. It is the least nimble Olympus camera I have ever held. It's like I requested a Jetta and they handed me the keys to a Caravan. So, reluctantly, I packed it up anyway, and hit the road. Here's what I discovered along the way.

Who Would Want the Olympus OM-D E-M1X?

P3257585-gear-1024.jpg

Being a taller than average guy, I have pretty good sized hands. But when I warp my fingers around the grip of the Olympus E-M1X ($2,999), I suddenly feel a bit shorter. Putting it bluntly, this thing is a handful.

I put the camera to my eye and look through the viewfinder. It is clear and crisp with excellent readouts. I press the shutter button halfway, and the image snaps into focus. Yes indeed, it is fast.

P3257588-gear-1024.jpg

The drive is in High Speed mode. I full press the shutter button and the camera records 15 frames in one second. RAW+Jpeg, it doesn't care. It sounds like a machine gun from a war movie. It's actually kind of exciting.

I decide to take it with me on a walk. Hundreds of frames later, I think to myself, "My word, this thing is a beast."

You're probably familiar with the specs already, so let's just recap the highlights of the OM-D E1MX.

  • 20.4MP Live MOS Micro Four Thirds Sensor
  • Dual TruePic VIII Image Processors
  • Integrated Vertical Grip, Dual Batteries
  • 2.36m-Dot 0.83x Electronic Viewfinder
  • 3.0" 1.037m-Dot Vari-Angle Touchscreen
  • DCI 4K/24p & UHD 4K/30p Video Recording
  • 5-Axis Sensor-Shift Image Stabilization
  • 15 fps Shooting and Expanded ISO 25600
  • 121-Point All Cross-Type Phase-Detect AF
  • Weather-Sealed Construction

So this leads us to the question, who is this camera for? I have five scenarios where I think the E-M1X is a good choice.

P3257592-gear-1024.jpg

  • The Need for Speed - If you're a sports photographer who wants to shoot mirrorless, this camera is perfect.
  • Former DSLR Photographers Who Like a Good Handle - For those who have moved over from bulky DSLRs and feel that many mirrorless cameras just feel and look too small, this is your camera.
  • Outdoor Photographers Who Need Strong and Long - Combine dual batteries with robust weather sealing, and you have a camera that can last all day in the nastiest of conditions.
  • Photo Nerds Who Want to Geek Out - There is a ton of technology in the E-M1X. Handheld HiRez shot, Live ND Filter shooting, built-in GPS recording, configurable dual SD card slots, and more.
  • Those Who Want the Best Micro Four Thirds Camera - Even if you don't care about the previous four reasons, but are someone who insists on owning the best in its class, that indeed would be the OM-D E-M1X.

Truly, it is not a camera for everyone. But for certain types of photographers, I think it's a worthy investment.

Olympus 12-200mm f/3.5-6.3 First Impressions: The all-in-one vacation zoom for MFT stretches its legs

This is an excerpt discussing the $899 Olympus 12-200mm f/3.5-6.3 from an article on Imaging-Resource.com.

In terms of initial handling, the lens feels terrific in the hands. It's very light for such a long-zooming lens, weighing in at just 16oz (455g). The 12-100mm Pro tips the scales at almost 20oz (561g) and that's with less zoom range, but of course that lens has on-board IS and a beefier build, not to mention the constant f/4 aperture, so we're talking about different animals here. And yet, for the 12-200mm to come in at 16.6x zoom and weigh only 1lb is, well, a neat feat for the Olympus engineers!

The zoom and focus rings are amply textured and certainly straightforward to operate. They don't rotate with the buttery smoothness of the Zuiko Pro lenses, but again that's not their intended market first and foremost, nor price point. It does feel quite well-built though, even if not a Pro lens. The zoom functionality, while not internal like some high-end zooms (meaning the lens doesn't change size as you zoom) is still smooth enough to be reassuring.

Autofocus operation with the E-M1 II proved quick and capable. No surprises to report here on this first impressions pass, and this combination locked focus quickly on my intended subjects. The only time this didn't happen was shooting the setting moon, as the combo struggled in twilight and I ended up using manual focus. But I've had that issue on many a camera and lens combo, including with some high-end full frame cameras, and virtually always manually focus the moon regardless of camera body, so this isn't a big deal at all.

Do You Have a Film Camera that Needs a Good Home?

Over the last year, I've received donations from TDS members who have film cameras that need a good home. What I do is inspect the items, repair and clean as I can, then list them in TheFilmCameraShop where I can find a good home for them. If you're interested in donating, please use the Contact Form on TheNimblePhotographer site. And thanks for you consideration!

TDS Workshops Update

Sonoma Coast Workshop Update

I've secured a beautiful home for us just south of Bodega Bay. This will serve as our headquarters during the event. There's plenty of room for our classroom and presentation work, plus beautiful areas for relaxing, and even sleeping accommodations for those who wish to stay there.

We've started registrations for Sonoma Coast Exploration, and it looks like we have two seats open. So I've updated the inventory on the reserve list page. And you can place your deposit if you want to join us. If you do, you'll have an incredible photography experience.

Updates and Such

Inner Circle Members: A big thanks to those who support our podcast and our efforts!

B&H and Amazon tiles on www.thedigitalstory. If you click on them first, you're helping to support this podcast. And speaking of supporting this show, and big thanks to our Patreon Inner Circle members:

And finally, be sure to visit our friends at Red River Paper for all of your inkjet supply needs.

See you next week!

More Ways to Participate

Want to share photos and talk with other members in our virtual camera club? Check out our Flickr Public Group. And from those images, I choose the TDS Member Photo of the Day.

Podcast Sponsors

Red River Paper - Keep up with the world of inkjet printing, and win free paper, by liking Red River Paper on Facebook.

Portfoliobox - Your PortfolioBox site is the best way to show off your best images.

The Nimbleosity Report

Do you want to keep up with the best content from The Digital Story and The Nimble Photographer? Sign up for The Nimbleosity Report, and receive highlights twice-a-month in a single page newsletter. Be a part of our community!

Want to Comment on this Post?

You can share your thoughts at the TDS Facebook page, where I'll post this story for discussion.
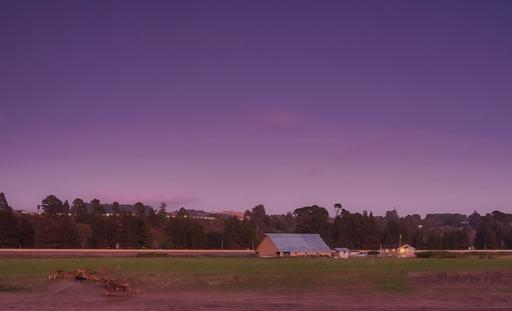
The Rokinon 12mm f/2.0 NCS CS lens ($299) for Micro Four Thirds is an affordable, effective optic for night sky photography, as I talked about in the last TDS podcast. But this lens is no one-trick pony. It's also quite capable for landscape and urban work.

P3237573-PEN-F-1024.jpg

I particularly like it on the Olympus PEN-F for a nimble wandering kit that's capable of capturing the big picture, even though it's relatively compact in size.

The Rokinon is a manual focus lens, but that's not really a drawback for an optic that has an effective focal length of 24 mm, especially on a Micro Four Thirds sensor. Even wide open at F/2, I wasn't really sweating to focus.

Geese at Spring Lake "Geese at Spring Lake" - Olympus PEN-F with Rokinon 12mm f/2 at f/2, 1/4000th, ISO 200. RAW file processed in Capture One Pro 12. Photo by Derrick Story.
If you do want precise focusing, however, there's a nifty magnifier button on the back of the PEN-F. Press it once to choose the area you want to magnify, then press it again to see that area in detail. Doing this makes it easy to precisely focus on any part of the composition. Then back out of magnify mode and take the picture. Since the Rokinon is a manual focus lens, you don't have to worry about it refocusing once you have it set.

P3237579-PEN-F-1024.jpg The Magnifying Glass button is handy for precisely focusing the Rokinon. Also, you can use the Lens Info Setting to register the optic so it appears in your EXIF data.

The PEN-F also allows you to register to lens with the camera so its data appears in the EXIF readouts. Go to Gear K > Lens Info Settings and click on Create Lens Information. You can register up to 9 optics with this feature. I highly recommend doing so.

The Rokinon 12mm does ship with a lens hood. If you don't want flare, be sure to bring it along. That's a fairly big chunk of glass on the front, and it does seem to find direct sunlight easily. In my case, I wanted some artistic flare in my images, so I took off the lens and experimented.

Jogger at Howarth Park "Running in to the Sun" - Rokinon 12mm without lens hood. Photo by Derrick Story.
The RAW files I processed in Capture One Pro 12 were crisp and colorful. The image quality is definitely on par with other optics in this class. And the fact that you can get a fast, wide prime for less than $300, makes this an easy purchase if you're looking to fill a gap in your lens lineup.

Walking at Spring Lake "A Spring Day at Spring Lake" - Olympus PEN-F with Rokinon 12mm f/2 at f/2, 1/8000th, ISO 200. RAW file processed in Capture One Pro 12. Photo by Derrick Story.
So if you're considering the Rokinon 12mm f/2.0 NCS CS lens for night photography, it's a good choice. But if you need additional reasons to justify its purchase, keep in mind that it's pretty good during the day as well.

Capture One Pro 12 Essential Training

You can learn all the ins and outs of this amazing software in the comfort of your home, or even on your smartphone by watching this fast-paced training: Capture One Pro 12 Essential Training on LinkedIn Learning. If you're a lynda.com fan, it's available there as well. You will learn everything from image organization, to expert editing, to output and more. It will feel good to finally take control of your photo library with Capture One Pro 12.

You can share your thoughts at the TDS Facebook page, where I'll post this story for discussion.

The latest version of Capture One Pro 12 is my favorite to date. Among the many new features, I love the way it handles luminosity masking. I can finally get my head around this useful image adjustment. And there's so much more in this update. And I cover all the cool stuff.

captureOnepro12-intro.png

In this course, I cover the following topics, peppered with inside tips and techniques:

  • Tapping all the new features in this version
  • Auto adjustments and basic image editing
  • Advanced editing techniques (and goodbye to Photoshop)
  • Organizing your catalog
  • Using star ratings and color labels to cull images
  • Building an electronic contact sheet
  • Creating a slideshow to review and present images
  • Strategies for protecting master images

For those of you new to this application, I have a Quick Start chapter that gets you up and running in less than 20 minutes. Yes, that's the entire workflow, start to finish, in less than half an hour.

You can learn all the ins and outs of this amazing software in the comfort of your home, or even on your smartphone by watching this fast-paced training: Capture One Pro 12 Essential Training on LinkedIn Learning. If you're a lynda.com fan, it's available there as well. You will learn everything from image organization, to expert editing, to output and more. It will feel good to finally take control of your photo library with Capture One Pro 12.

You can share your thoughts at the TDS Facebook page, where I'll post this story for discussion.

The new Think Tank Photo Vision 13 Shoulder Bag ($129) builds upon some of the best features from previous Think Tank models and even makes some improvements.

P3197513-Vision-13-web.jpg

The basic features for this mid-sized shoulder bag include:

  • Accommodates DSLR or mirrorless kit
  • Holds 13" Laptop and 10" Tablet
  • Zippered Lid for Main Compartment
  • Organizer Pockets, Large Phone Pocket
  • Top Carry Handle, Padded Shoulder Strap
  • Bottle Pocket, Tuck-Away Tripod Straps
  • Pass-Through for Luggage Trolley Handle
  • Weather-Resistant Exterior, Rain Cover

If you've used previous Think Tank bags, you'll recognize the basic design. Where the bag makes improvements, however, are in overall stability, side water bottle pocket, and conservative use of velcro.

P3197504-Vision-13-web.jpg

The side water bottle pocket is my favorite to date. Instead of an "all or nothing" approach (either closed or opened), there's now a middle position that's perfect for sunglasses and other quick-reach accessories. When you do want a water bottle in the pocket, it opens up nice and big to accommodate just about anything you'd bring along. If you don't need anything there, you can fold up the pocket for a slim look.

P3197502-Vision-13-web.jpg

The overall stability of the Vision 13 is also welcomed. The bag sits firmly upright without leaning forward or backwards. The base is solid (and waterproof) and the sides are straight. It looks good on a table, desk, or next to you in the car.

P3197500-Vision-13-web.jpg

The zippered lid on top is a good security feature that you can use with or without the buckling top flap. Most of the connectors are zippers or the main buckle, with spots of velcro only as needed. So this bag is more quiet that my Retrospective. No ripping velcro sounds!

P3197505-Vision-13-web.jpg

P3197507-Vision-13-web.jpg

As you may imagine, there are plenty of pockets for a 13" laptop, 10" tablet, camera bodies, lenses, phones, SSD drives, pens, and whatever else you need to bring along. I appreciate the document pockets on front and back. They are easy to access and truly handy.

I also really like the fabric used for the graphite version. It looks great and feels good, yet it's weather resistant. The zippers are top notch, as always with Think Tank gear, and there are plenty of internal dividers to customize the main compartment to your particular needs.

P3197511-Vision-13-web.jpg

We get both a document pocket and a trolley strap on the back. Plus you can attach a tripod or a rolled up jacket on the bottom of the bag using the included (removable) buckles. Nice touch indeed. The top handle is convenient and comfortable to hold. And the shoulder strap is plenty long with an excellent sliding pad.

P3197512-Vision-13-web.jpg

Overall, the Think Tank Photo Vision 13 Shoulder Bag is my favorite urban model from them to date. I truly like it. And at $129, it's a good value as well.

You can share your thoughts at the TDS Facebook page, where I'll post this story for discussion.

This is The Digital Story Podcast #679, March 19, 2019. Today's theme is "The Chill and the Thrill of Night Photography." I'm Derrick Story.

Opening Monologue

Having just spent nearly a week in the high desert, I can tell you that the nights are just as exciting as the days. As soon as the sky darkens and the stars come out, so do photographers with tripods and cameras in hand. After working with these late night shooters, I have some tips that might encourage you to bundle up and step into the starry night. All of that and more on today's TDS Photography podcast.

The Chill and the Thrill of Night Photography

Dennis-Lewis-Night-1024.jpg "Desert Sky" by Dennis Lewis (@lewisontheorad on Instagram) captured during the TDS Joshua Tree Photography Workshop - Olympus OM-D E-M1 II with Rokinon 12mm f/2 lens, 30 seconds, f/2, ISO 400, light painting on the Yucca Tree.

Some of my favorite images from the Joshua Tree Photography Workshop were captured well into the evening. We had a number of things going for us.

The Adobe Rockhouse, our HQ, was about 3500' in altitude above the city lights of Yucca Valley below. Plus we had wonderful rock piles and Joshua Trees to use for our foreground subjects, with the starry nights in the background.

Most us learned tips from the others for compelling night shots, and I'm sharing five of my favorites with you right now.

  • Get the Right Lens - You'll need a wide prime for effective star photography. A favorite among our group was the Rokinon 12mm f/2.0 NCS CS lens for Micro Four Thirds ($249-$399 depending if it's on sale). It's fast and wide (24mm on MFT) and has enough light gathering power for stars. Also check the Samyang 12mm f/2.0 NCS CS Lens for Micro Four Thirds
  • , which is essentially the same lens. You should be able to get one of them for under $300.

  • Test Your Infinity Setting - First you need a lens that allows you to manually focus and includes an infinity marker. But beyond that, you need to test where infinity actually is. On the Rokinon, for example, the sharpest infinity was just past the infinity marker. We fine tuned this through testing.
  • Get the Formula for Star Exposures - I recommend the article, Learn How to Shoot Stunning Milky Way Photos in Five Minutes. That's what many of us used as a starting point. The basic exposure was 20-30 seconds wide open with the 12mm. ISO was between 400 and 1600 depending on the conditions.
  • Use Your Flashlight for Light Painting - A few brush strokes with the flashlight on foreground subjects can add pop to them and help you create an overall compelling composition. Don't overdo it - just a second or two will suffice.
  • Consider a Clear-Night Filter to Offset Sodium Vapor Lights - If you don't care to the overly yellow-orange tint that comes from sodium vapor lights in the surrounding city, consider a Haida 67mm NanoPro MC Clear-Night Filter ($67) or equivalent to help you better control the color. These aren't helpful if you have LED streetlights in the surrounding area.

A Recap of the Joshua Tree Photography Workshop

Here's an overview of the highlights from our trip.

Nikon Now Includes the $250 FTZ Lens Adapter for Free with the Z6 and Z7

Via PetaPixel.

If you shoot with a Nikon full-frame DSLR and have been considering a jump to the new Z Series of full-frame mirrorless cameras, it's now easier on your wallet to bring your existing lens collection over with you. Nikon is now bundling the $250 FTZ (F-mount to Z-mount) lens adapter for free with the Nikon Z6 and the Nikon Z7.

The FTZ adapter allows over 360 F-mount NIKKOR lenses to be used on Z Series mirrorless cameras with no change in image quality, and it guarantees full compatibility with over 90 NIKKOR lenses. F-mount lenses mounted via the adapter can make use of Z camera features such as Hybrid-AF and 3-axis in-camera Vibration Reduction (VR).

TDS Workshops Update

Sonoma Coast Workshop Update

I've secured a beautiful home for us just south of Bodega Bay. This will serve as our headquarters during the event. There's plenty of room for our classroom and presentation work, plus beautiful areas for relaxing, and even sleeping accommodations for those who wish to stay there.

We've started registrations for Sonoma Coast Exploration, and it looks like we have two seats open. So I've updated the inventory on the reserve list page. And you can place your deposit if you want to join us. If you do, you'll have an incredible photography experience.

Updates and Such

Inner Circle Members: A big thanks to those who support our podcast and our efforts!

B&H and Amazon tiles on www.thedigitalstory. If you click on them first, you're helping to support this podcast. And speaking of supporting this show, and big thanks to our Patreon Inner Circle members:

And finally, be sure to visit our friends at Red River Paper for all of your inkjet supply needs.

See you next week!

More Ways to Participate

Want to share photos and talk with other members in our virtual camera club? Check out our Flickr Public Group. And from those images, I choose the TDS Member Photo of the Day.

Podcast Sponsors

Red River Paper - Keep up with the world of inkjet printing, and win free paper, by liking Red River Paper on Facebook.

Portfoliobox - Your PortfolioBox site is the best way to show off your best images.

The Nimbleosity Report

Do you want to keep up with the best content from The Digital Story and The Nimble Photographer? Sign up for The Nimbleosity Report, and receive highlights twice-a-month in a single page newsletter. Be a part of our community!

Want to Comment on this Post?

You can share your thoughts at the TDS Facebook page, where I'll post this story for discussion.

We often think of diffusers and reflectors as excellent tools to help us improve our natural light portraits. But they also work wonders for close-up flower work. Here's an example from today's TDS Photography Workshop in Joshua Tree National Park.

P3134989-Indian-Cove-web.jpg
Joshua Tree bloom with diffuser to soften the sun.

P3134991-Indian-Cove-web.jpg Joshua Tree bloom with direct sunlight, no diffuser.

It does help to have a second set of hands to hold the disc between the sun and your subject. Just about any diffuser will work, such as the collapsable kits that most of us have for portrait work. An easy to carry kit is the Impact 5-in-1 Collapsible Circular Reflector Disc - 32" ($38.95). It fits in most backpacks and has a variety of reflector surfaces as well.

P3134994-Indian-Cove-web.jpg Another bloom recorded in bright sun with a diffuser to soften the contrast. Photos by Derrick Story.

The great thing about this technique is that you can keep shooting, even when the sun is less favorable for general landscape work. There's no need to call it a day just because you no longer have magic light... just break out the diffuser.

You can share your thoughts at the TDS Facebook page, where I'll post this story for discussion.

This is The Digital Story Podcast #678, March 12, 2019. Today's theme is "Accidental Time Capsules." I'm Derrick Story.

Opening Monologue

Most of us have been shooting digital cameras longer than we realize. And even if we've been good about archiving, we probably haven't browsed those decade-old drives in a while. And then, there are those memory cards that we have stashed in a desk drawer somewhere. They are flattened time capsules. And it's time to pull them out and see what they contain.

Accidental Time Capsules

CF-Cards.jpg

Here's a story that began with a search for a few CF cards to use with a Nikon D700 that I just bought, and what I discovered as a result.

U.S. Supreme Court Holds That Copyrights Must Be Registered before Plaintifs Can File Infringement Suits

This story is from the National Law Review. You can read it in its entirety there.

The U.S. Supreme Court held today that bringing a suit for copyright infringement requires that the infringed work actually be registered with the U.S. Copyright Office, and that a mere application for registration will not suffice.

The ruling makes it even more imperative that copyright holders register their works promptly if they wish to enforce their rights--on top of the already considerable financial incentives that the U.S. copyright regime provides for registered works.

Justice Ginsburg, writing for a unanimous Supreme Court, held that only after the application has been "registered" and issued by the Copyright Office--a process that can take months--may a plaintiff bring a lawsuit to enforce its copyrights.

Interesting Stories on the Red River Blog

Among everything else that it does, Red River Paper also publishes a terrific blog. Recent articles include road trip photography, wildlife refuges, and smartphone accessories. You might want to swing by for a read, then bookmark it once you do.

Do You Have a Film Camera that Needs a Good Home?

Over the last year, I've received donations from TDS members who have film cameras that need a good home. What I do is inspect the items, repair and clean as I can, then list them in TheFilmCameraShop where I can find a good home for them. If you're interested in donating, please use the Contact Form on TheNimblePhotographer site. And thanks for you consideration!

TDS Workshops Update

Joshua Tree Workshop Update

We will have the Olympus OM-D E-M1X to work with at the event. Participants will be able to experience this latest technology wonder in the beautiful high desert.

Sonoma Coast Workshop Update

I've secured a beautiful home for us just south of Bodega Bay. This will serve as our headquarters during the event. There's plenty of room for our classroom and presentation work, plus beautiful areas for relaxing, and even sleeping accommodations for those who wish to stay there.

We've started registrations for Sonoma Coast Exploration, and it looks like we have two seats open. So I've updated the inventory on the reserve list page. And you can place your deposit if you want to join us.

Updates and Such

Inner Circle Members: I have a new goodie for you this week. Go over to the Patreon site now to watch an introduction to how the new library manager works in Luminar 3. Now that version 3.0.2 is out, I think Luminar 3 is worth a look. If you're curious, take a look at this benefit for Inner Circle Members. And if you want to join the Inner Circle, visit our Patreon site, or click on the tile that's on every page of The Digital Story.

B&H and Amazon tiles on www.thedigitalstory. If you click on them first, you're helping to support this podcast. And speaking of supporting this show, and big thanks to our Patreon Inner Circle members:

And finally, be sure to visit our friends at Red River Paper for all of your inkjet supply needs.

See you next week!

More Ways to Participate

Want to share photos and talk with other members in our virtual camera club? Check out our Flickr Public Group. And from those images, I choose the TDS Member Photo of the Day.

Podcast Sponsors

Red River Paper - Keep up with the world of inkjet printing, and win free paper, by liking Red River Paper on Facebook.

Portfoliobox - Your PortfolioBox site is the best way to show off your best images.

The Nimbleosity Report

Do you want to keep up with the best content from The Digital Story and The Nimble Photographer? Sign up for The Nimbleosity Report, and receive highlights twice-a-month in a single page newsletter. Be a part of our community!

Want to Comment on this Post?

You can share your thoughts at the TDS Facebook page, where I'll post this story for discussion.

Most drone shots need a little love to reach their potential. And AirMagic from Skylum Software makes it easy and fun to do so.

AirMagic-Before.jpg Image captured with DJI Spark before AirMagic. Photo by Derrick Story.
Airmagic After.jpg Image after AirMagic has been applied.

Powered by AI and advanced algorithms, AirMagic improves your aerial photos automatically. All you need to do is drag and drop your photos to the app (or use the Open command). AirMagic will take care of the rest by carefully enhancing each picture.

There are three basic ways you can use AirMagic: as a standalone app, as a plugin for Lightroom or Photoshop, or as an editing extension for Photos. Regardless of which approach you take, the process is the same. Point the software to an aerial shot and let it do its thing.

The AirMagic engine detects the camera type on your drone and makes lens corrections and other optimizations specific to that hardware (in my case, a DJI Spark). It then analyzes the image and applies the adjustments required to make it look great. AirMagic works for both Jpeg and RAW files.

In the lower right corner of the interface there's brush icon that reveals a slider that allows you to intensify or soften the adjustment. In the lower left corner there's a styles menu that provides different interpretations of the image. More styles will be available in the future.

Airmagic-Styles.jpg A selection of styles that ship with AirMagic

AirMagic is available for preorder for $39. And the special preorder offer includes a cargo bin of goodies.

  • The Drone Photography Guide eBook ($19)
  • "Shoot Professional Photos with Any Drone" video course ($74.99)
  • One AirMagic Premium Style ($12)
  • $40 discount on a Lume Cube lighting kit for drones.

Mixed computer households can share the same product key for Mac and PC, and each license can be activated on two devices. AirMagic also comes with a 30-day money back guarantee.

I've been using AirMagic with Photos for macOS. The enhanced images are automatically saved in my library, and shared across my devices. It also works wonderfully with the Lightroom workflow as well.

Now that I have an easy, effective way to process the pictures from my DJI aircraft, I can't wait for the weather to clear so I can go fly. Hopefully, it will re-energize your passion for drone photography as well.

You can share your thoughts at the TDS Facebook page, where I'll post this story for discussion.

Farewell to Oracle Arena

I've been watching the Golden State Warriors play basketball in Oracle Arena ever since I moved to Northern California. My boys and I grew up there together. I was a season ticket holder for 5 years and 3 championships.

Oracle-Farewell-D-Story.jpg

With the move to Chase Arena next year and the escalating ticket prices, I gave up my seats at Oracle this year. To be honest, I couldn't afford them anymore. But I did want to say farewell to the place that we once referred to as "Roaracle." In its heyday, when everyday basketball fans could afford to attend, it was a magical place.

Farewell to Oracle 2

So I donned a Stephen Curry jersey, packed my Fujifilm XF10, and headed to the arena on a rainy bay area night.

Farewell to Oracle 5

In addition to saying goodbye, I wanted to capture one last album of shots from my basketball home. I set the camera to B&W mode, and took pictures every step of the way. These images are not cropped. I wanted to share the scenes exactly as I saw them while I was moving through the evening.

Farewell to Oracle 3

The XF10 is a great camera for this assignment. I can jack up the ISO to 3200, open the aperture to f/2.8, and just shoot away at 28mm. The black and whites are very pleasing. And no one seems to care that I'm taking their picture with this svelt little camera.

Farewell to Oracle 6

The game itself, well, it was a dud. The Boston Celtics came to town and took our lunch money. It may have been the worst game I've ever watched there.

But that wasn't the point of the evening. I was there to get the last of my memories, and to say goodbye. On that front, the evening was a success.

Farewell to Oracle 7

Who knows what will happen in the future with me and this basketball team. It's been a good run. My boys are graduating from college this spring. The Warriors are moving across the Bay Bridge. There are lots of changes ahead.

I will say this, however. I loved that the Warriors played in Oakland. I think Oracle is a great place to watch basketball. And if a new arena was truly necessary, I wish they would have built it in the East Bay.

You can share your thoughts at the TDS Facebook page, where I'll post this story for discussion.