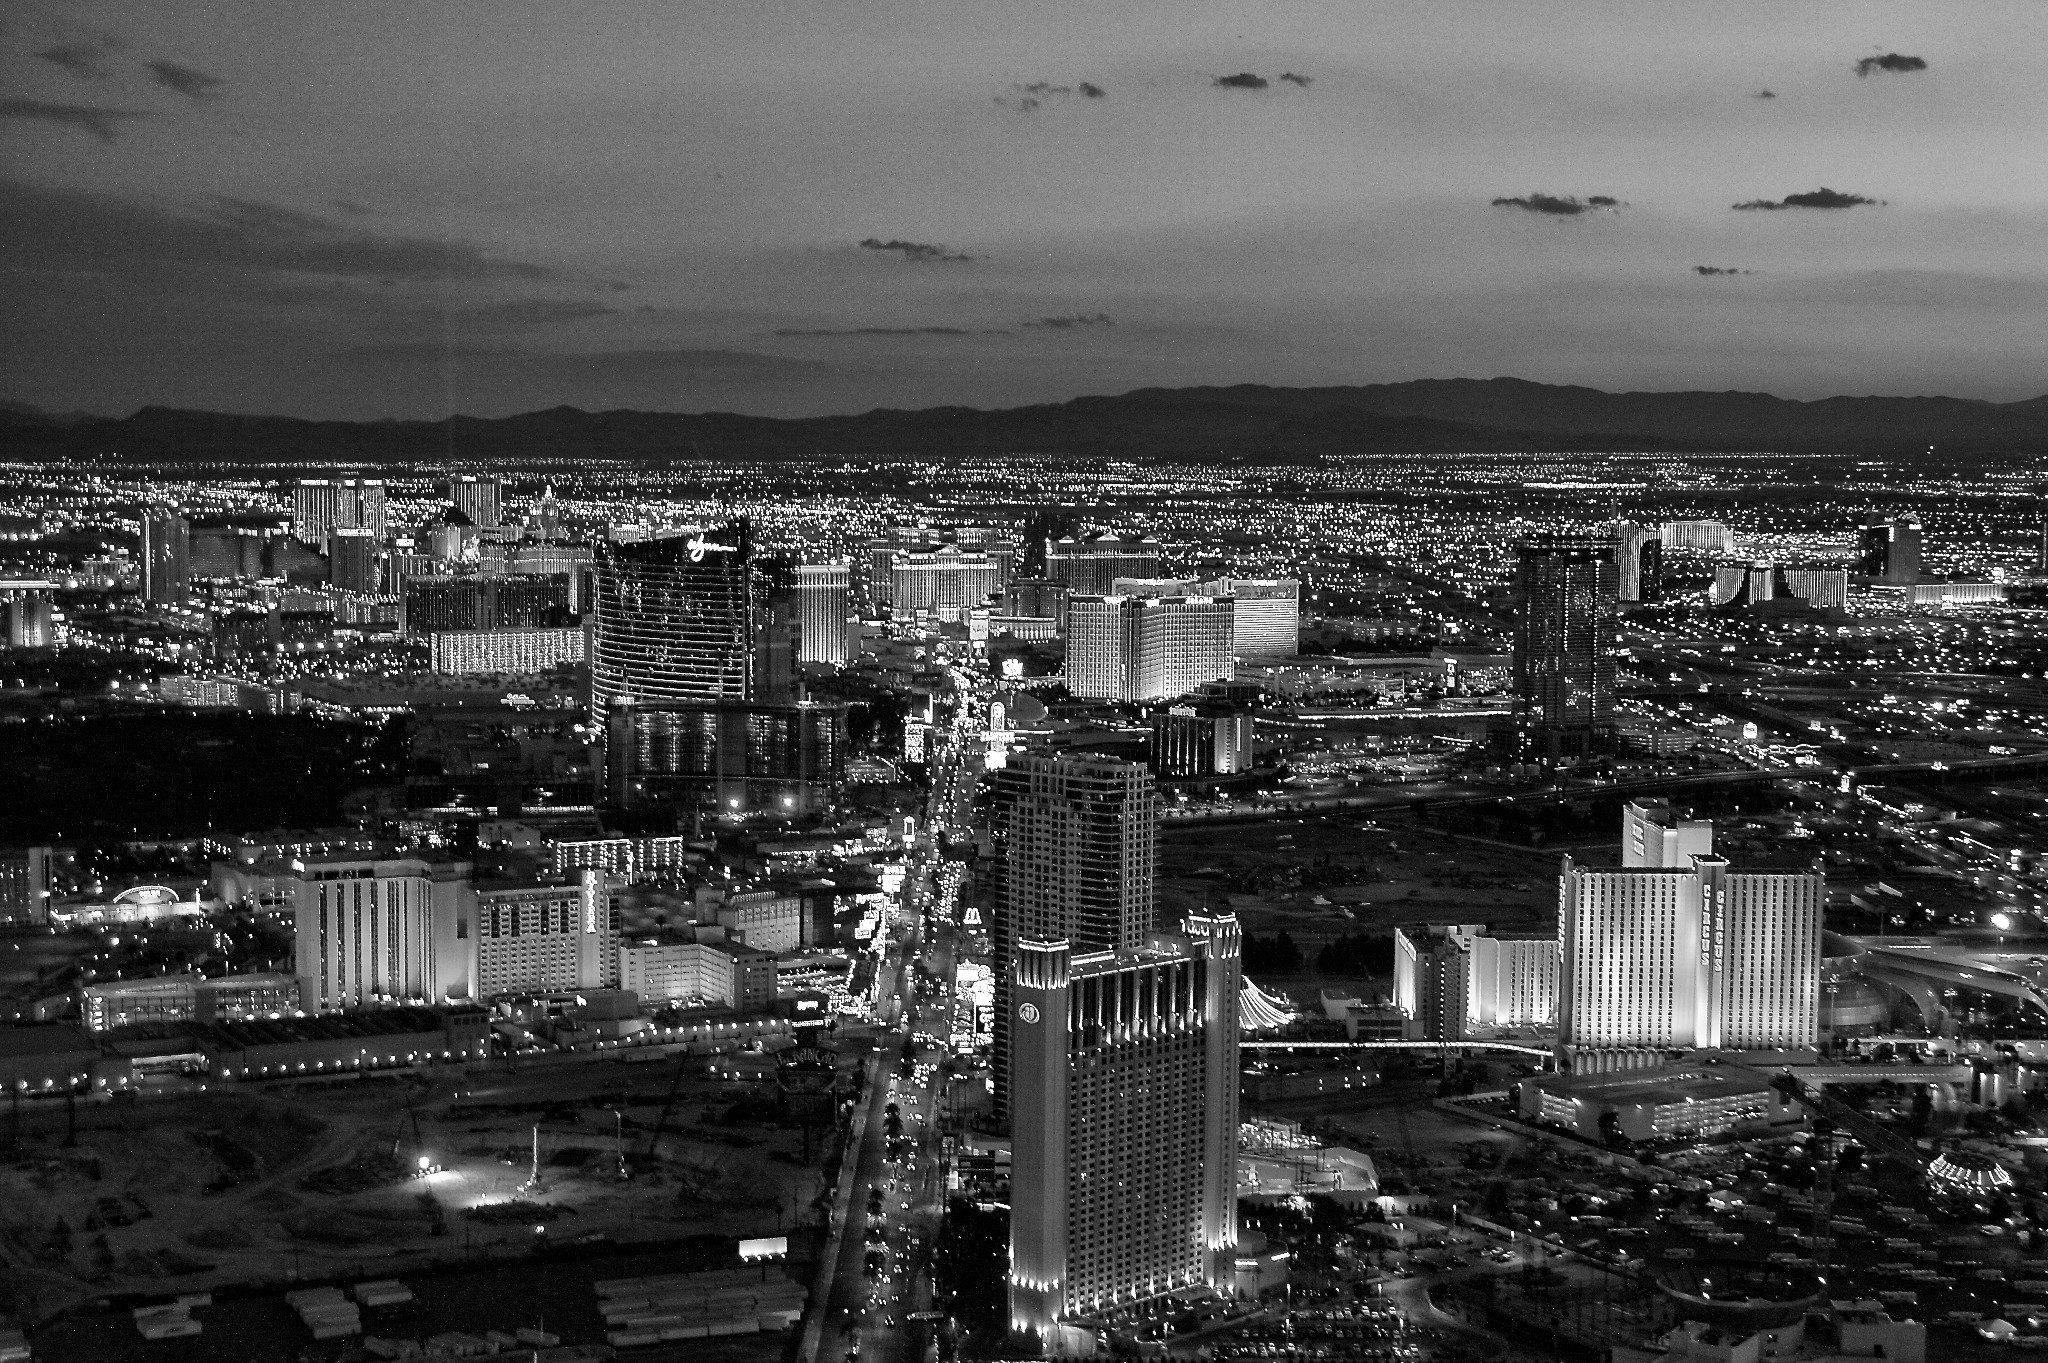
Recently in Photography

  Page 232 of 381 in Photography  

As the New Year approaches, I like to get organized. One of the best ways to store and transport camera gear is with a professional roller bag. I've been testing the new Lowepro Pro Roller Lite 150 AW, and it has become my new "go-to" hold-everything bag. It stores a ton of gear, yet it is ever so nimble: exterior is only 14.0 x 7.3 x 18.8" (35.6 x 18.4 x 47.6 cm). That means it will fit in the overhead compartment of virtually any commercial airplane.

Open - Lowepro Pro Roller Lite 150 AW
Nimble, yes. But this roller stores a ton of gear too.

What's Inside My Bag

  • Canon 5D Mark II with 70-200mm f/2.8 L zoom attached
  • Canon 60D with 15-85mm zoom attached
  • Canon 580EX and 320EX SpeedLites with Off-Camera Shoe Cord
  • Canon 24-105 f/4 L zoom
  • Canon 17-40 f/4 L zoom
  • Canon 100mm f/2.8 Macro
  • Sigma 50mm f/1.4 prime
  • Lapel mic
  • Expo Disc (under the 17-40mm zoom)
  • Canon S90 compact camera
  • Rogue FlashBenders
  • iPad 2 (inside pocket)
  • MacBook Air (outside pocket in Acme Made Skinny Sleeve)
  • Batteries, memory cards, etc.
    • Lowepro Pro Roller Lite 150 AW

      Cool Features

      The 150 AW has durable YKK Zippers that accept your TSA lock. On top there's a padded handle, but there are also handles on the other three sides. No matter which way you reach for this bag, you'll have a handle to pull. The in-line skate wheels are user-replaceable with wheels that you can get at any skate supply shop. If the weather turns bad, pull out the attached All Weather cover to protect your gear. (Have you seen the cute stop motion video of the Pro Roller with the AW cover?). The dual-bar extendable handle hides in the back of the bag keeping the overall depth to less that 8". Stretchy front pocket great for disc reflectors, documents, or a MacBook Air.

      Front - Lowepro Pro Roller Lite 150 AW

      The Bottom Line

      If you need a stylish organizer for stowing your gear at home, yet has the versatility to roll out the front door for a road trip, take a look at the $259 Lowepro Pro Roller Lite 150 AW. Great looking, nice capacity, and oh so nimble.


      The Digital Story on Facebook -- discussion, outstanding images from the TDS community, and inside information. Join our celebration of great photography!


Canon 85mm f-1.8 Prime Lens

I bought my Canon 85mm f/1.8 EF USM lens for wedding work well over a decade ago. At the time, I was shooting film with an EOS Elan. The 85mm was only my second Canon prime lens, after the 50mm f/1.8.

Cameras have changed a lot since my wedding days. Most of my DSLR work is with the 5D Mark II or 60D. And yet that $350 investment I made so many years ago is still helping me produce some of my favorite images.

The 85mm f/1.8 is affordable. Right now, it's available for $358 at B&H. The focusing is so quiet and fast that you would think it uses the latest in micro motor technology. It's sharp. Very sharp. And when wide open, the bokeh is very pleasing.

Girl on Scooter - Washington DC

"Girl on Scooter" by Derrick Story. Click on image for larger size.

One of the SizzlPix I have hanging in the studio gallery was taken in Washington DC with the 85mm at f/2 on the 5D Mark II. The image has the characteristics of this lens all over it. It's sharp, yet the background is pleasingly soft. And it has a feeling to it that I don't seem to get with other lenses.

When you're thinking about investing in glass, keep in mind, that your favorite lenses will serve you for years. As for me, yes, I'm still crazy about the Canon 85mm f/1.8 prime.


The Digital Story on Facebook -- discussion, outstanding images from the TDS community, and inside information. Join our celebration of great photography!


airport_extreme_5th_gen.jpg

When you're a photographer, spending time and money on your WiFi network is like having to buy tires for the car. You need them, but there are so many other things you'd rather do with the resources. But when my 4-year-old AirPort network pooped out, I had no choice but to upgrade. Of course now that the project is finished, I'm loving it.

The Basic Setup

I began by adding a new Airport Extreme 802.11N5th generation router. I have 3 networked drives connected to the 3 network ports on the back of the router. I discuss this setup in the article, Personal Cloud Storage for Photographers, and in the podcast, Create Your Own Cloud. I also have 3 WiFi printers on the network, plus the iHome iW1 Wireless AirPlay Speaker System and various computers and iOS devices.

The AirPort Extreme has dual band support, so the devices that use the 2.4GHz band (iPhone for example) and the computers that can use the 5GHz band (MacBook Air) can tap their respective bands at the same time. I usually have a number of devices on WiFi at any given moment, and after a month of testing, I have not experienced a bottleneck.

Some of the particulars that I enjoy with the AirPort Extreme 5th Gen include:

  • Guest Network - I love this feature! In addition to my working network that supports my various hard drives and computers, I can enable a second network for visitors just by checking a box in the setup menu. They have full access to the Internet, but not to my machines. This will be perfect for the 2012 TDS Workshop season.
  • Speed - You can read the technical articles about how the AirPort Extreme stacks up against other routers, but based on my heavy use, I can tell you that it does quite well. I'm enjoying the improved performance.
  • Port Forwarding, etc. - I had problems with the old router setting up outside access to some of my NAT drives, such as the Iomega StorCenter 4 TB ix2 that requires port forwarding. I went through the steps again with the new 5th gen AirPort Extreme, and everything works great.
  • Apple Integration - One reason that I stay within the AirPort family is that I can check and change settings from any Mac, iPhone, or iPad. This makes it very easy to monitor my network.

Bumps in the Road

airport_security_setting.jpg

After I set up the new AirPort Extreme, my WiFi network seemed solid. That is, until I tried to log on with my PowerBook G4 1 GHz running Mac OS X Tiger. Yes, I still have a 2003 laptop on my studio network. And as a side note, I think this is one of the best PowerBooks Apple ever produced. To this day, it runs like a champ.

But, for some reason, it couldn't log on to my new network. I discovered that the problem was that I had set the AirPort Extreme to "WPA2 Personal" for security, instead of "WPA/WPA2 Personal." My old Tiger PowerBook doesn't support WPA2. So all I had to do, once I figured out the problem, was switch to "WPA/WPA2 Personal" and reboot the router. Everything worked great after that.

The Bottom Line

Even though I didn't want to spend the $179 for the new Airport Extreme 5th Gen,I'm loving the features and performance. The Guest Network is a big plus, and having all of my network drives happy and accessible improves my workflow. Based on one month of testing, I can easily recommend this router for home or studio use.


Find great deals at the TDS Photography Store on Amazon.


stone_wall_portrait.jpg

Lowepro is sponsoring a 1-Day Photo Workshop with SF Giants Staff Photographer Andy Kuno and yours truly on Dec. 28, 2011 in San Francisco, CA.

This event was designed to be offered only to Lowepro Preferred Photographers, but since I'm the Evangelist, I can share the news with a few of my friends (which happens to be our virtual camera club). All you have to do is sign up as a Lowepro Preferred Photographer, which is free and has great benefits anyway. Once you do that, you can reserve a spot for the workshop. Here's the official scoop from Lowepro:

We start the day with two morning sessions that will be one-hour classroom style.

Derrick will teach Environmental Portraiture. There are backdrops and settings in the city that you could never emulate in the studio. The trick is knowing how to work efficiently with your lighting and your subject. In this class we'll review techniques for environmental portraiture and then hit the streets with a professional model to test those ideas.

Andy will speak about the 2010 World Series experience, some of his favorite sports images over the years, as well as action photography shooting techniques.

After lunch, which is included, you'll head out into the field with each photographer doing hands on photography of what was just covered in the classroom.

So you get one shoot with me, then we switch groups, and you get the second shoot with Andy. We have some great spots scouted out in SF. The class itself will be at Joby headquarters. And, if all that wasn't good enough, lunch is included.

To register, go to the sign up page, pay your $27.37, and make plans to hang out with me, Andy Kuno, and the Lowepro staff on Dec. 28. Limited to 25 seats. It's going to rock. Seriously.

Once you begin to take notice of time lapse photography, you see it everywhere. And for good reason. This style of video adds spice to existing movie productions, or can stand on its own two feet. This week I explain how to record and polish time lapse with just an iPhone or iPad 2. It's easy, fun, and will add impact to your photography.

To learn more about the specific tools I discuss in the podcast, check out these articles:

Nimble Time Lapse Photography with iStopMotion for iPad

How to Mount an iPad 2 to a Tripod

"Nimble Movie Making" - Digital Photography Podcast 304

Listen to the Podcast

tds_podcast_app_150_tile.jpg

You can also download the podcast here (37 minutes). Or better yet, subscribe to the podcast in iTunes. You can support this podcast by purchasing the TDS iPhone App for only $2.99 from the Apple App Store.

Monthly Photo Assignment

Family is the Dec. 2011 Photo Assignment. You can read more about how to submit on our Member Participation page. Deadline for entry is Dec. 31, 2011.

More Ways to Participate

Want to share photos and talk with other members in our virtual camera club? Check out our Flickr Public Group. And from those images, I choose the TDS Member Photo of the Day.

Podcast Sponsors

Red River Paper -- The $7.99 Sample Kit is back! And with free shipping.

You might also want to check out my article, Artistic Gifts You Can Make in an Hour.

Make Your Photos Sizzle with Color! -- SizzlPix is like High Definition TV for your photography.

Need a New Photo Bag? Check out the Lowepro Specialty Store on The Digital Story and use discount code LP20 to saven 20% at check out.


Technorati Tags:
, , , , ,


How to Mount an iPad 2 to a Tripod

Tripod Mounted iPad 2

You can securely mount an iPad 2 to your favorite tripod for movie recording and time lapse photography. All you need are a few standard studio hardware items that may already exist in your lighting kit. If not, this article lists what to get and where to find it.

If you haven't considered actually taking pictures with an iPad 2, you might want to read Nimble Time Lapse Photography with iStopMotion for iPad, where I share examples of time lapse movies that were recorded, edited, and published using only the iPad 2 with iStopMotion for the iPad and iMovie for iOS. (This is fun stuff!)

Hardware List

OK, back to the hardware you'll need to make this happen.

Flashpoint Clamp with 1/4-20 Stud ($9.95) - This clamp securely holds the iPad 2. Make sure the rubber grips are in place so you don't scratch the screen.

flashpoint_clamp.jpg

Chimera Single Axis Stand Adapter ($38.90) -- You put the Flashpoint Clamp in the top of the Chimera, then mount the entire rig to your tripod using the included threaded adapters. You can use other brands too, but make sure they include, or you already have, the adapters to connect to your tripod.

chimera_adapter

This rig will work with any tripod. And the best part is, you can also use these pieces for off-camera flash and studio lighting.

studio_clamp_mount_for_ipad My personal rig that I used for shooting The Overlook time lapse movie.


The Digital Story on Facebook -- discussion, outstanding images from the TDS community, and inside information. Join our celebration of great photography!


Earlier in my career, I used to shoot a lot of physician portraits. And it seemed that I was constantly dealing with reflections in eyeglasses. In this helpful video produced by Adorama TV, there are some excellent tips for coping with the situation during portrait sessions.

But like most things in photography, you usually have to give up one thing to get another. For subjects with very curved eyeglasses lenses, I often find that raising the off-camera flash does get rid of the reflection, but then creates a lighting effect that I'm not thrilled about for portraiture. The next step usually requires additional fill cards and reflectors.

In other words, there are no pat answers when battling unwanted reflections. But this video does provide a good starting point.


The Digital Story on Facebook -- discussion, outstanding images from the TDS community, and inside information. Join our celebration of great photography!


Kindle Fire

If you've purchased a Kindle Fireas a gift, and want to set it up before the official unwrapping, I have a few tips for you. These are just for consideration, not necessarily recommendations. Peruse and see if anything seems interesting to you.

Preloading Content

Wouldn't it be terrific for the recipient to already have a few well-chosen books and maybe a dozen songs when they first power up? You can do this, but there are a couple of considerations. First, the Kindle Fire is tied to the account you establish when you set it up. It's easy enough to change accounts, but by doing so, you also lose any content you've purchased. (You don't really lose it; it's just not on that particular Kindle anymore.) So it's best to set up the Kindle with an Amazon account that belongs to its eventual owner.

You could get the eventual owner's information, but then when you purchase stuff, they will be charged. Ho Ho Ho! Another route to consider is setting up a new Amazon account in the eventual owner's name. I did this with a shared email address we have with our cable company. She never checks that email, so it was perfect for this use. I wrote her log-in information on the instruction card that came with the device.

More Content Via a Gift Card

If you don't think that preloading content is a practical idea, you can get an Amazon downloadable gift cardand include it with the Kindle Fire. You choose the amount, pick the style of card, then Amazon sends you a PDF that you can print out and fold. It's personalized, looks great, and is a nice touch to the already thoughtful Fire.

A Home for the Kindle

Since the device doesn't come with a case, you may want to purchase one. This makes a great add-on gift that others can give. You provide the Fire, they add the steak sauce.

Get to Know the Device

If you spend an hour or so getting familiar with the Kindle Fire, then you can help the recipient get up to speed quickly after the unwrapping. Plus, there might be software updates that need to be installed. Why not take care of that beforehand?

Fully Charged and Ready for Action

The Kindle Fire ships with a decently charged battery. But you can top it off and have the device ready for a full day of action.

Hands Off; It's for Her

Once you give the gift, let her enjoy it. It's not your toy. Hands off unless she offers to let you play with it.


The Digital Story on Facebook -- discussion, outstanding images from the TDS community, and inside information. Join our celebration of great photography!


Artistic Gifts You Can Make in an Hour

You want to give something special to your close friends and family, but you don't have a lot of time. Sound familiar? Here's an idea that just might save the day. Print your own fine art greeting card, then put a holiday gift certificate inside.

holiday_greeting_cards Fine art greeting cards that I printed myself, with Amazon downloadable gift cards that can be output with any inkjet printer.

There are a variety of ways to accomplish this. I'll explain what I use, then you can tailor to your own tastes. This year I started with Red River Linin 60lb card stock. It's beautiful high quality paper, scored, and folds to a 5"x7" fine art card. I choose a favorite image, then make a print run of about 30 cards. I like to have a few extras.

Red River has a Card Help Center that provides you with tips, templates, and more. I use Aperture for my fine art cards because I can create a template then drop in the photo. But you can use Photoshop, Lightroom, or Photoshop Elements too.

I then add a holiday gift certificate. This year I chose Downloadable Amazon Gift Cardsthat let me set the amount and choose the design. They then send me a PDF of the gift that I can print out and include in my fine art greeting card.

Put everything in a 5"x7" envelope, add a holiday sticker or two, and you're set. You may have heard me mention before that people love these fine art cards. I've had many recipients tell me that they've framed them so they can enjoy year round.


Find great deals at the TDS Photography Store on Amazon.


Accessible time lapse photography is a gift of the digital age. And now, thanks to Boinx Software, it's easier than ever to create stop motion and time lapse video with just an iPad 2. I've been testing the beta version of iStopMotion for iPad ($4.99 in the App Store), and I can tell you right now... it's a blast.

"The Overlook" - recorded with the camera on an iPad 2 with iStopMotion, then finishing touches added in iMovie for iOS. No additional cameras or computers used. By Derrick Story.

To test the nimbleosity of this app, I set out to record, edit, and publish a time lapse movie using just the iPad 2. I put the iPad in a studio clamp with rubber protectors, then mounted it on a Joby Gorillapod Focuswith Ball Head X and launched iStopMotion.

iStopMotion Recording at the Golden Gate Bridge iPad 2 rig for recording "The Overlook."

The excellent battery life for the iPad, and iStopMotion's judicial use of it, allowed me to record over the course of an entire afternoon, into twilight, without having to recharge.

You have three shooting options with the software: front iPad camera, back camera, or via WiFi with the iPhone 4S (using the free companion app, iStopCamera.) I used the back camera for recording "The Overlook," but also tested the iPhone 4S camera via WiFi for making this stop motion movie. I typically shot one frame every 3 seconds when using just the iPad 2, or switched to one frame every 6 seconds when using the iPhone 4S on WiFi. You have control with the duration using this software.

Once you've recorded your images, you can play them back at a variety of frame rates. I typically watched the movies at 12, 15, 24, or 30 fps. If you notice a few images you don't want in there, they can be deleted individually by tapping on the wrench icon.

istopmotion_interface The iStopMotion interface

Other helpful features include onion skinning, exposure setting, and grid lines. Once you have the movie to your liking, you can add a soundtrack from your music library and upload it to your Camera Roll, YouTube account, or share via email. There are three resolution options for export, including HD.

For "The Overlook," I saved scenes to my Camera Roll, then opened them in iMovie for iOS to stitch them together and add the finishing touches. I'm going to discuss this process more in next week's TDS Podcast.

The Bottom Line

iStopMotion for iPad earns a Nimbleosity Rating of 4. That's impressive considering this is the first release of this ambitious app, and we should see further enhancements up the road. Used by itself, you can create simple, but impressive stop motion or time-lapse movies, enhanced by the ability to delete frames and control frame rate. When used in combination with iMovie for iOS, iStopMotion becomes even more powerful. You have an entire recording, editing, and publishing environment, right there on your iPad.


The Digital Story on Facebook -- discussion, outstanding images from the TDS community, and inside information. Join our celebration of great photography!