This is The Digital Story Podcast #737, May 5, 2020. Today's theme is "Has ON1 Figured Out the Connected Experience?" I'm Derrick Story.
Opening Monologue
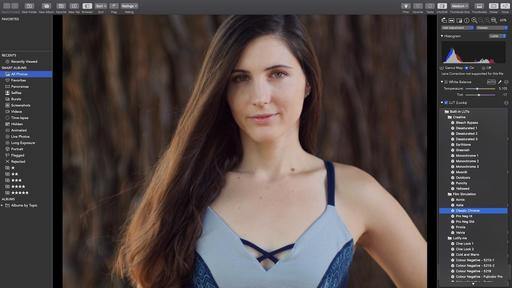
ON1 360 joins the ranks of Adobe and Apple for offering a connected desktop to mobile experience with tons of features and editing tools. On the surface, ON1 makes a very good argument. We'll dig a bit deeper on today's TDS podcast to determine if this is a service that you should seriously consider. I hope you enjoy the show.
Has On1 Figured Out the Connected Experience?
Starting this June, you can subscribe to a complete photo capture, management, editing, sharing system that works on macOS, Windows, iOS, and Android devices. It's called ON1 360, and there's much to unpack.
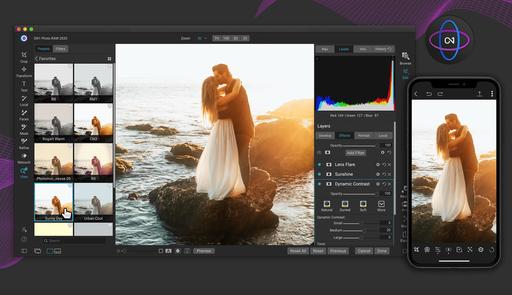
ON1 360 automatically keeps track of the photos you choose to access from any of your devices, including their metadata and where you want to store them. The desktop and mobile apps share the same processing engine, which enables non-destructive editing settings to remain in sync as well.
An Overview of the Features
- All the Powerful Editing Features of Photo RAW - built-in effects, portrait retouching, and layers.
- Choose Which Photos to Sync Between Devices - Somewhat similar to Lightroom Desktop where you can manage your Cloud storage needs by choosing which images are shared across devices. Regardless, your original files stay in their original locations.
- Impressive Compression Option - store smaller files (4x smaller, high-quality) OR the full raw files and sync in multiple directions
- One License for 5 Desktop and 5 Mobile Devices - This provides more flexibility than Adobe's plan that only allows for 2 desktop devices.
- Flexible Pricing Plan You can buy a perpetual license for Photo RAW or rent it as a subscription option. The first offering lays out two plans, one for 20 GBs of Cloud storage, and the other for 1 TB of space. Pricing depends if you include renting the software or not.
ON1 pulls off this magic by creating a temporary version of the photo under-the-hood (similar to a compressed raw file) and storing in the Cloud. The photo maintains the tone and color of the original photo while using only about 25 percent of the Cloud storage space a typical raw photo uses. For those who demand the full raw file at all times and don't care about storage space, uploading and editing the raw photo is also an available option.
Your original photo files stay put, right where you keep them. Your original photos can live on any of your devices, including external hard drives and file servers. You can choose to upload copies of your original photos to ON1 360? as well, if you need to access the full, original file remotely.
How Much Does it Cost?
If you buy your own copy of Photo RAW for $50, then you can get the 200 GB plan for $60 a year, or 1 TB for $110 a year. Those plans include the mobile app. Preorder now, and you won't be billed again until July 2021. If you decide to rent Photo RAW, the 200 GB plan for $90 a year, or 1 TB for $180 a year.
If you decide to rent Photo RAW, the 200 GB plan for $90 a year, or 1 TB for $180 a year.
Who Is It For?
This could be appealing to photographers who don't have a Cloud-connected workflow and want one. Capture One Pro, Luminar, and DxO are great on the desktop, but they're not available on mobile devices. Also, artists who are not satisfied with their current situation, whether it be Creative Cloud or iCloud, may see ON1 as a better end-to-end solution.
The Bottom Line
If you're happy with your current workflow, I don't recommend the switch to ON1 360. But if you've wanted a connected photo experience and don't have one currently, I think it stacks up well against Creative Cloud and Photos for macOS.
The New Donation Kit for Carefree Shipping of Found Film Cameras
We have more time around the house than ever. And you finally dove into that bedroom closet that's been begging for some organization.
If you found a film camera that you're no longer using, our new Donation Kit makes it easy to pack and ship. Just visit the Contact Form on thenimblephotographer.com, click the box next to Donating a Film Camera, and let me know what you have. In your note, be sure to include your shipping address.
If it's a camera we can use for the shop, I'll send you a Donation Kit that includes a USPS Priority Mail shipping box and prepaid label. All you have to do is tape it up, insert the camera, and add the label. USPS will pick up your shipment from the front door of your house during their regular mail delivery. It's that simple!
Your donation help get analog gear in the hands of aspiring fine art photographers, and the proceeds help support this podcast.
New MacBook Pro 13" Looks Great for Photographers
Apple announced today their new 13" MacBook Pro, and it looks pretty darn good.
Highlights include: the Magic Keyboard with a redesigned scissor mechanism, a 13.3" Retina Display, immersive stereo speakers, and all-day battery life. The Touch Bar adapts to different apps to provide useful functions without having to navigate menus. It features a Retina-quality display and supports multi-touch input. The power button contains the Touch ID sensor, so you can quickly log into your MacBook Pro using your fingerprint. You can also use Touch ID to make purchases over the web, thanks to Apple Pay.
The model I like for $1,499 is powered by a 1.4 GHz 8th Gen Intel Core i5 Quad-Core processor that features a burst speed of up to 3.9 GHz, while 8GB of 2133 MHz LPDDR3 onboard RAM helps to ensure smooth multitasking and also allows the computer to quickly access frequently used files and programs. The system memory cannot be upgraded.
For long-term storage of your files, this MacBook Pro is equipped with a 512GB SSD. If you want to add external peripherals, 2 Thunderbolt 3 ports support bi-directional transfer speeds of up to 40 Gb/s, while also supporting 10 Gb/s USB 3.1 and device charging. Wi-Fi 5 (802.11ac) is built-in for wireless networking, and Bluetooth 5.0 technology will allow you to connect additional compatible peripherals. There is a FaceTime HD webcam.
You can preorder the 13" MacBook Pro today for $1,499.
Digitizing Family Memories Course Now Available Online
Each of the four classes in the course will outline a specific set of steps that you have one week to accomplish. Then, the next week, we build on that progress with new techniques and assignments. By the end of the four weeks, you will have an organized digital archive of your most valuable family images.
Patreon members can sign up for free on the Patreon site. I have a post there for you. All you have to do is comment that you want to join us. If you're not a Patreon member, you can sign up at the Inner Circle level for $5 a month and become instantly eligible for the course.
Non-Patreon members can also sign up for the course by visiting the Workshops page on The Nimble Photographer. The course fee is a reasonable $45.
Updates and Such
Inner Circle Members: A big thanks to those who support our podcast and our efforts!
How to Watch Photos for macOS Catalina and iPadOS - Learn everything you need to know about Photos for the Mac and iPad by checking out my latest course on LinkedIn Learning and on lynda.com. This course is perfect for Mac and iPad based photographers who shoot with iPhone, Mirrorless, and DSLR cameras. It covers both photography and movies. And if I say so myself, it's a lot of fun.
B&H and Amazon tiles on www.thedigitalstory. If you click on them first, you're helping to support this podcast. (The Digital Story is supported by its audience. When you purchase through links on our site, we may earn an affiliate commission.) And speaking of supporting this show, and big thanks to our Patreon Inner Circle members:
Affiliate Links - The links to some products in this podcast contain an affiliate code that credits The Digital Story for any purchases made from B&H Photo and Amazon via that click-through. Depending on the purchase, we may receive some financial compensation.
And finally, be sure to visit our friends at Red River Paper for all of your inkjet supply needs.
See you next week!
More Ways to Participate
Want to share photos and talk with other members in our virtual camera club? Check out our Flickr Public Group. And from those images, I choose the TDS Member Photo of the Day.
Podcast Sponsors
Red River Paper - Keep up with the world of inkjet printing, and win free paper, by liking Red River Paper on Facebook.
The Nimbleosity Report
Do you want to keep up with the best content from The Digital Story and The Nimble Photographer? Sign up for The Nimbleosity Report, and receive highlights twice-a-month in a single page newsletter. Be a part of our community!
Want to Comment on this Post?
You can share your thoughts at the TDS Facebook page, where I'll post this story for discussion.
 Alanah was managing curbside pickup for CIBO in Santa Rosa, CA. They are serving their full menu daily. #open4pickup