Recently in Photography

  Page 62 of 385 in Photography  

Former Aperture users... don't delete the app quite yet. I have a helpful, practical purpose for keeping it on your hard drive: to add IPTC metadata (semi-automatically) to your pictures.

I'm using the Automator/Aperture tandem to include my copyright and author info with images that may fall outside my normal workflow, and don't have camera functions to include them. I've been adding data to iPhone images and those from the Fujifilm XF10. Here's how it works.

step-1-quick-action.jpg Start with an Automator Quick Action.

First you have to create an Automator Quick Action. I outlined the steps on how to do this in the article, Create Your Own Quick Action Shortcuts for Photo Tasks. This time, however, you're going to build a Quick Action using a series of short AppleScripts written for Aperture. Here's the recipe.

add-iptc-workflow-web.jpg

The actions are in this order: Import Photos, Set IPTC Tags, Export Versions. When I add the actual fields to the Automator Action, I keep it simple. Study the screenshots carefully to customize your own workflow. Here are the actual IPTC tags that I include.

set-iptc-tags-web.jpg

Once you have everything completed, Save the Quick Action. Automator will place it in the proper Services folder so it's available when working at the Finder level in macOS Mojave. Now it's time to play.

Make sure Aperture is open and running in the background. I would also create a new folder on your Desktop to receive the copyrighted images.

Copy a small batch of images to a folder on your Desktop. Open them in Mojave's Finder using Gallery View. You can peruse the current EXIF data for the shots. Now let's add the IPTC info. Select them all (CMD-A), then choose your new Quick Action from the gear menu. Automator will go to work.

add-info.png

In the background, Automator will run all the pictures through Aperture, add the data you want, then place them in the folder you selected on the Desktop. It will take a few seconds per image to process. One it's finished, all of your copyrighted images should be in their new folder. You can check one by opening it in Preview and reading the Info panel.

info-panel.png

I imported these IPTC pictures into Photos for macOS Mojave, worked with them, then exported them out of the app. All of my metadata stuck with the pictures.

There are lots of individual uses for this workflow. It just depends on the data you add to the Automator Action. Give it a try and see what you come up with.

The Apple Photos Book for Photographers, 2nd Edition

Updated for macOS High Sierra, the The Apple Photos Book for Photographers, 2nd Ed. provides you with the latest tips, techniques, and workflows for Apple's photo management and editing application. Get your copy today!

You can share your thoughts at the TDS Facebook page, where I'll post this story for discussion.

Luminar 2018 users have a new filter in their toolbox. It's called AI Sky Enhancer, and it's impressive.

sky-enhancer-oak-1024.jpg Before/After with Luminar 2018 AI Sky Enhancer applied.

Unlike when you use a graduated filter to enhance a sky, AI Sky Enhancer doesn't affect the foreground subjects and only applies its magic to the sky itself. That's a huge timesaving by eliminating retouching. Skylum describes it like this:

"With the help of our deep neural network, Luminar analyzes the image and detects the sky. This neural network had been trained using hundreds of thousands of images with different amounts and different types of sky, whether it's a tiny patch of blue peeking through a skylight, a cloudy sky flaunting sunset colors, or a dark, ominous sky signaling a storm."

"Once image analysis is complete, Luminar performs what we call semantic segmentation, separating the image into different layers, based on the semantic and contextual meaning of the objects it detects."

"This analysis allows the most precise and intelligent sky enhancement with minimal noise, halos, and negative impact on other areas of the image. The AI detects objects in the foreground, defines edges, and analyzes the textures and tones of the sky itself."

This simplifies landscape editing, freeing the photographer from tedious brushing of foreground subjects that need to be excluded from the enhancement of the sky. Take a look at this finished image. AI Sky Enhancer was used without any brushing to exclude the vegetation from the edit.

Luminar AI Sky Enhancer Final edit of landscape using AI Sky Enhancer. Photo by Derrick Story.

Luminar 2018 ($59) can be used as a standalone application, as a plugin for Lightroom, and as an editing extension for Photos for macOS. The next big step for this application with be Luminar Library coming in December.

Rock Luminar with my Essential Training

You learn all the ins and outs of Luminar 2018 via my Essential Training on lynda.com and on LinkedIn Learning. It's fun, and I promise, you will learn a lot.

You can share your thoughts at the TDS Facebook page, where I'll post this story for discussion.

This is The Digital Story Podcast #660, Nov. 6, 2018. Today's theme is "How to Manage Holiday Sales Temptation." I'm Derrick Story.

Opening Monologue

We're entering that time of year when retailers dangle tempting deals before our eyes in the hopes that we'll make a big ticket purchase. More often than not, these items are a bit past their prime, but still quite serviceable. So, what's the best strategy for evaluating what is a great deal and a perfect fit, as opposed to a mere impulse buy? I'll share my sure-fire approach on today's TDS Photography Podcast.

How to Manage Holiday Sales Temptation

I've already fought off my first impulse buy of the season. And it required some discipline to do so.

sony-a7-2.jpg

B&H Photo is offering the Sony Alpha a7 II Mirrorless Digital Camera with 28-70mm Lens Deluxe Kit for $998. The kit included the full frame Sony, a Sony 28-70mm zoom, spare battery, charger, and 64GB memory card for less than a grand. If you buy the camera alone with no lens or accessories, it's $1,400. You can see why my pulse started racing.

But I have a system for evaluating such mind-bending deals. Five steps to sane purchasing. So let's see where we end up after walking through the process.

  • Learn more about the camera - I pulled up a few reviews about the Alpha a7 II. First of all, it's not one of Sony's best low-light performers. It was release in 2015 and has had a couple firmware updates. But if I were to go full frame, I would want to shoot at high ISOs. And 24MP isn't more than I already have.
  • Is the 28-70mm a lens that I would buy normally? - Again, after some research, many users feel that it's soft at the corners. It's a tad bulky, but not exceptionally well made. And its maximum aperture is f/3.5-5.6. I would rather have a compact, sharp, fast, prime.
  • How would I use it, exactly? - It wouldn't be for commercial shoots because I don't have any glass besides the mediocre zoom. It's too big for travel photography. The shutter is too loud for street photography. So it doesn't fill a gap in my equipment arsenal.
  • Do I have a $1,000 to burn? - Well, now that you mentioned it, I don't. If I were purchasing an item that could generate more work or better art, yes, I could afford the grand as a business investment. But I don't have that kind of money to spend on a whim.
  • Would I regret my purchase after the thrill is gone? - Most likely yes. I just went through this process with the Fujifilm XF10. After a month of answering the above questions and shooting with the camera, I opted to buy it. Two weeks later, I'm more thrilled than ever to have it. I don't think that would be the case with the Sony.

Don't get caught off guard. Build your vetting process now, so when that super-tempting offer appears before your eyes, you have a system to determine if it's the right bargain for you.

The Portfoliobox Inspirational Photographer

I got to thinking about some of the great PortfolioBox photographers out there, and how they could inspire us both artistically, but also in terms of our presentation online. So I started digging.

Each week for the month of November, I'm going to feature an inspirational photographer who uses Portfoliobox as his/her platform for presenting their work. This week I want to point you to Raphaƫl Heymann. His still lives are incredible, true works of art. And his use of Portfoliobox complements his work. You've got to check out his site.

If you've signed up for a Portfoliobox Pro account, and have published at least one page, then send me the link to that site. Use the Contact Form on the Nimble Photographer and provide your name, the link, and the subject of the page or site you've published. I will add it to our PortfolioBox Pro Directory.

To create your own Portfoliobox site, click on the tile or use this link to get started. If you upgrade to a Pro site, you'll save 20 percent off the $83 annual price.

Capture One Pro 11.3 and Fujifilm RAW Processing

I was among the many pleased photographers who exclaimed, "Finally!" when Phase One announced their improved Fujifilm RAW support with version 11.3.

This highlight, of course, is bringing the Fujifilm GFX 50S into the mix. But a dozen Fujifilm cameras and another half dozen lenses were included as well. Among them was my humble, but loved, Fujifilm XF10 compact with APS-C sensor. I was dying to seeing how its RAW files were decoded with Capture One Pro. I was not disappointed.

The XF10 Jpegs are beautiful. And I shoot in that mode most of the time. But I've programmed the back Function button to switch to RAW+Jpeg when I want to extract as much image information as possible. And now, thanks to Capture One Pro 11.3, I can do so with confidence.

Coming Next Week - The 2019 TDS Workshop Season

Is 2019 the year that you will join me and your peers for a photo adventure? I hope so. Next week I will lay out the entire 2019 season for you, and open the reserve list so you can secure your spot. Be a part of the action!

Updates and Such

Inner Circle Members: Continuing this month - Photo Critique. Check out the post on Patreon. Send your images to me with the subject line, "Photo Critique." More details on our Patreon page.

B&H and Amazon tiles on www.thedigitalstory. If you click on them first, you're helping to support this podcast. And speaking of supporting this show, and big thanks to our Patreon Inner Circle members:

And finally, be sure to visit our friends at Red River Paper for all of your inkjet supply needs.

See you next week!

More Ways to Participate

Want to share photos and talk with other members in our virtual camera club? Check out our Flickr Public Group. And from those images, I choose the TDS Member Photo of the Day.

Podcast Sponsors

Red River Paper - Keep up with the world of inkjet printing, and win free paper, by liking Red River Paper on Facebook.

Portfoliobox - Your PortfolioBox site is the best way to show off your best images.

The Nimbleosity Report

Do you want to keep up with the best content from The Digital Story and The Nimble Photographer? Sign up for The Nimbleosity Report, and receive highlights twice-a-month in a single page newsletter. Be a part of our community!

Want to Comment on this Post?

You can share your thoughts at the TDS Facebook page, where I'll post this story for discussion.

I haven't updated my iPhone X to iOS 12.1 yet because it includes the controversial battery performance feature for 2017 handsets. At some point I will update, but not until I've thought about this a bit more.

tim-cook-phone-event.jpg

My understanding from Tim Cook and Apple was that the advanced hardware in the iPhone X would not require iOS battery performance management. Based on what we see in iOS 12.1, that isn't the case.

samsung-charger.jpg

All of this may be moot for me anyway. A year ago, I decided to learn more about taking care of my iPhone battery, using the new handset as a fresh start for a different approach. In the article, A New Way to Charge My Smartphone, I outlined the basic changes I was making. Essentially, I no longer leave the phone plugged-in at night, opting instead to top it off during the day when it's around 50 percent.

In part, this became easier thanks to the Samsung Qi Certified Wireless Charger Pad I keep on my desk at the studio. I just plop the iPhone X on it, and refreshing the battery is easier than ever.

IMG_3432.jpg

So now, a year later, how did my grand experiment work? It appears quite well. I checked my Battery Health (Settings > Battery > Battery Health) to see that my Maximum Capacity is at 97 percent. It also reads that the battery can support normal peak performance. Great news!

My "new way" to recharge my phone has become second nature. How big of an impact on my battery health does this approach have? There's no way for me to know without running a side-by-side test. But after a year of rigorous use, I'm happy with 97 percent.

It will be interesting to see what battery health is in November of 2019.

As for the update to iOS 12.1. I'm going to sit tight for just a little while to see if Apple responds to the criticism about adding performance management for its 2017 handsets. Through future updates, they may add further enhancements to the tool that might make it a bit more appealing. My understanding is that I can turn it off if I wish. But something a bit more refined other than a binary "on or off" approach would be even better.

One final note on the iPhone X - Over the last year, it has performed very well. Battery life is excellent, and I seldom find myself below 25 percent. The camera is wonderful, as is its overall responsiveness. I really like it.

If I can continue to maintain good battery health with this handset, I can see me using it for quite a long time. And in this era of disposable devices, that would make me very happy.

You can share your thoughts at the TDS Facebook page, where I'll post this story for discussion.

I was among the many pleased photographers who exclaimed, "Finally!" when Phase One announced their improved Fujifilm RAW support with version 11.3.

Last of the Garden Tomatoes "Last of the Garden Tomatoes" - Photographed with a Fujifilm XF10 with the RAW file processed in Capture One Pro 11.3. Photo by Derrick Story.

This highlight, of course, is bringing the Fujifilm GFX 50S into the mix. But a dozen Fujifilm cameras and another half dozen lenses were included as well. Among them was my humble, but loved, Fujifilm XF10 compact with APS-C sensor. I was dying to seeing how its RAW files were decoded with Capture One Pro. I was not disappointed. (Take a look at the Garden Tomatoes shot above.)

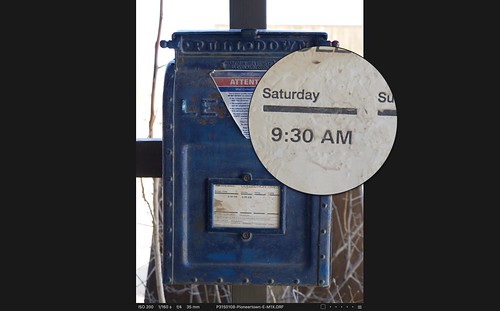
Capture-1-loupe.png The combination of the Fujifilm camera and Capture One Pro retains all that beautiful detail. Processed RAW file on the left, original RAW on the right.

The XF10 Jpegs are beautiful. And I shoot in that mode most of the time. But I've programmed the back Function button to switch to RAW+Jpeg when I want to extract as much image information as possible. And now, thanks to Capture One Pro 11.3, I can do so with confidence.

Edit Like a Pro with Capture One

Improve your skills with my new course titled, Capture One Pro 11 Essential Training on LinkedIn Learning. You can also tune in on lynda.com if you prefer your training there. Either way, I have four hours of entertaining education that will help you master this excellent photo management and editing application.

You can share your thoughts at the TDS Facebook page, where I'll post this story for discussion.

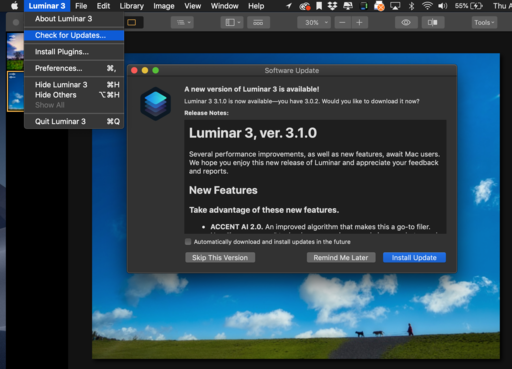
Luminar 1.3.2 is a free update for existing users and rolls out a number of tantalizing features. At the top of the list is the new AI Sky Enhancer.

AI-Sky-Enhancer-1024.jpg

The AI Sky Enhancer allows you to get beautiful skies almost instantly with artificial intelligence and a single slider. Luminar analyzes and detects the sky in an image to improve the texture, tone, and colors of the sky itself. The filter can recognize sky in most photos as well as distinguish between water and other elements in a photograph. It also detects the objects in the foreground and their edges for perfect masking.

If the controls are grayed out after applying the filter, the artificial intelligence couldn't recognize the sky in the photo. Skies that are very out of focus or blurred may not be detected automatically. It may also be grayed out if the filter determines that the sky does not need enhancement. If you want to stylize the sky, explore filters such as Golden Hour, Polarizer, Vibrancy, and HSL.

Also included in the update are:

  • IMPROVED Luminosity Masks. Improved performance when opening up existing documents with Luminosity masks.
  • IMPROVED TIFF Files. Increased stability exporting TIFF files with 8 bits per channel bit depth.
  • IMPROVED Filters B&W Conversion, Bi-Color Toning, Photo Filter. The controls Luminance and Saturation are available when these filters are added a second time.
  • IMPROVED Grain effect. All filters and Looks which include Grain effect work properly. IMPROVED Speed of sliders.
  • IMPROVED Crop tool in Photos Extension.
  • IMPROVED Crop Tool. Properly see a gridview while changing the angle of the image in Crop tool.

One thing that has been removed is the sharing to Facebook and Twitter. Due to the recent changes in personal security with Facebook and Twitter, the ability to post directly to a social network from Luminar has been temporarily removed for users on MacOS Mojave.

Overall, this is a terrific update. I've been playing with the tools on both macOS High Sierra and Mojave, and everything has run smoothly.

If you're not a Luminar user yet, you can get it now for $59. It includes all of the new features, plus you will also receive the new digital asset manager, Luminar Library, for free when it's released in December.

Rock Luminar with my Essential Training

You learn all the ins and outs of Luminar 2018 via my Essential Training on lynda.com and on LinkedIn Learning. It's fun, and I promise, you will learn a lot.

You can share your thoughts at the TDS Facebook page, where I'll post this story for discussion.

It's like a flash drive on steroids. The SanDisk Extreme 500GB Portable SSD (on sale for $109) is fast, sleek, and super nimble.

sandisk-scale.jpg The SanDisk 500 GB SSD next to my Apple AirPods.

When you look at a picture of the device online, you might not realize that it weighs just 39 grams and is less than 2" wide. It's small. Yet, the SanDisk SSD has very impressive specs.

  • 500GB Solid State Drive.
  • High-speed transfers with up to 550MB/s read speeds.
  • Water Resistance Rating: IP55 for water and dust resistance.
  • Dimensions: 0.348 x 1.951 x 3.787 in. (8.850 x 49.550 x 96.200 mm). Weight: 0.086 lbs (38.9g).
  • USB Type-C to Type-C cable; Type-C to Type-A adapter included.

I loaded a 65 GB Capture One Pro library on to the portable SSD and took it for a spin with my RAW files. Once it was connected to my MacBook Pro via the USB-A adapter, I applied a variety of edits, performed searches, filtered by star rating, and exported sampled-down jpegs. The SanDisk did not even blink.

sandisk-kit.jpg Kit includes USB-C cable and a USB-A adapter if you need it.

The SanDisk Extreme 500GB Portable SSD is currently on sale for $109 (normally $169) with free 2-day shipping for Amazon Prime members. I think it's worth every penny.

You can share your thoughts at the TDS Facebook page, where I'll post this story for discussion.

This is The Digital Story Podcast #659, Oct. 30, 2018. Today's theme is "How to Avoid Clogged Nozzles and Other Printing Woes" I'm Derrick Story.

Opening Monologue

If it wasn't for printers, making prints would be a lot of fun. Yes, there's nothing worse than finally getting in the mood to print a beautiful 13" x 19" print, only to discover that you have a clogged nozzle or some other malady. The good news is, that almost every woe that plagues us is preventable. And I have some excellent tips from printing experts to ensure output happiness in your future.

How to Avoid Clogged Nozzles and Other Printing Woes

Among the many visits that I enjoyed at PhotoPlus Expo last week, one of the best was with the printing gurus at the Epson booth. I had a laundry list of questions from listeners that I wanted advice about. And they were more than ready to respond to my every query.

Epson-1024.jpg

What I came away with were five tips that will help ensure a productive, non-frustrating printing experience, even if you only print every couple months. So without further ado, here they are.

  • Use Your Inkjet as an Occasional Document Printer - Printers like to print. But if we save our fancy 13" photo printer for photography only, it might not get enough use to stay in top shape. They work great for documents as well. Fire it up once a week and print a few sheets.
  • Cover Your Printer When Not in Use - Dust is your greatest enemy. Not only can it affect your prints, but it is the main culprit for clogged nozzles. It's the dust that commingles with residue ink that actually causes the problem.
  • Turn Off Your Printer When Not in Use - Many folks leave their printer on when not in use because they think it dumps a bunch of ink each time it starts up. Actually, that's not true with modern Epson printers. All that chugging and churning is really just a comprehensive system check. You can verify this by weighting your cartridges before and after start up.
  • Don't Change Cartridges When Their Warning Light Comes On - There's usually 10 percent or more of ink remaining when the warning lights illuminates. Don't change then. Use the light as a reminder to order a replacement cartridge when the previous one actually runs out of ink.
  • Check Out Informative Video Available Online - Great videos can be found at the Epson Print Academy that will help you stay on top of your printing game.

HoneyBook Makes Your Business as Good as Your Art

I was sitting in a client meeting today, and one of the dominate topics was how we could get ahead of these projects, and stay more organized along the way.

As we were talking about this, I was thinking about HoneyBook and how this service is designed to do exactly that. From scheduling with its integrated calendar (that also syncs with Google Calendar), to staying on track with its task list and project management tools. And when it's time to invoice, all the bookkeeping is integrated as well.

If you're grappling with these same sort of challenges in your freelance or startup business, I encourage you to explore Honeybook. It won't cost you a thing to learn what it can do for you. But it can save you hundreds, if not thousands of dollars up the road.

"Honeybook is a purpose-built business management platform for creative small businesses. They help photographers, designers, event professionals, and other solopreneurs save hundreds, if not thousands of hours a year by adding time-saving automation into their business. HoneyBook makes it easy to streamline the client process, so you never miss a thing!"

And that's why, for a limited time, TDS listeners can get 50 percent off the first year of Honeybook with promo code THEDIGITALSTORY. Honeybook membership includes unlimited access to ALL features, at one low monthly price. So go to HONEYBOOK.COM today, and use promo code THEDIGITALSTORY to get started. Again, that's HoneyBook.com, promo code THEDIGITALSTORY.

Tonality Mega B&W Pack Free to Luminar Users

One of the reasons why I like Tonality so much for B&W work is that it has these fantastic presets that make it easy to view and convert my images to a variety of styles. Luminar 2018 ($59) users can now enjoy those same benefits by downloading the Tonality Mega B&W Pack... for free.

When they say "mega," they mean it. There are collections of Tonality presets in different categories, film textures, workspaces, and more. They come in zipped files that you unzip, then use the File > Add Custom Presets Pack command in Luminar to add them to your work environment. They will be available to you under Categories when you have Presets enabled.

If you love B&W photography, and are using Luminar 2018 as a plug-in for Lightroom, Photoshop, or Photos for macOS (not to mention as a powerful standalone app), then you will definitely want to download this free mega presets pack.

Updates and Such

Inner Circle Members: Starting this month - Photo Critique. Check out the post on Patreon. Send your images to me with the subject line, "Photo Critique." More details on our Patreon page.

B&H and Amazon tiles on www.thedigitalstory. If you click on them first, you're helping to support this podcast. And speaking of supporting this show, and big thanks to our Patreon Inner Circle members:

And finally, be sure to visit our friends at Red River Paper for all of your inkjet supply needs.

See you next week!

More Ways to Participate

Want to share photos and talk with other members in our virtual camera club? Check out our Flickr Public Group. And from those images, I choose the TDS Member Photo of the Day.

Podcast Sponsors

Red River Paper - Keep up with the world of inkjet printing, and win free paper, by liking Red River Paper on Facebook.

HoneyBook - What small biz owner wants to spend their time on paperwork, endless emails, and dealing with payment collection? That's why there's HoneyBook. Learn more at HoneyBook.com. And save 50 percent your first year by using coupon code: THEDIGITALSTORY

The Nimbleosity Report

Do you want to keep up with the best content from The Digital Story and The Nimble Photographer? Sign up for The Nimbleosity Report, and receive highlights twice-a-month in a single page newsletter. Be a part of our community!

Want to Comment on this Post?

You can share your thoughts at the TDS Facebook page, where I'll post this story for discussion.

One of the reasons why I like Tonality so much for B&W work is that it has these fantastic presets that make it easy to view and convert my images to a variety of styles. Luminar 2018 ($59) users can now enjoy those same benefits by downloading the Tonality Mega B&W Pack... for free.

Tonality-Street-Pack.jpg

When they say "mega," they mean it. There are collections of Tonality presets in different categories, film textures, workspaces, and more. They come in zipped files that you unzip, then use the File > Add Custom Presets Pack command in Luminar to add them to your work environment. They will be available to you under Categories when you have Presets enabled.

If you love B&W photography, and are using Luminar 2018 as a plug-in for Lightroom, Photoshop, or Photos for macOS (not to mention as a powerful standalone app), then you will definitely want to download this free mega presets pack.

Have a blast with it!

You can share your thoughts at the TDS Facebook page, where I'll post this story for discussion.

Making an Impression in New York

Izzy Derrick and Yossi BW.jpeg

Many of the Skylum team members arrived in New York the day before PhotoPlus Expo opened its doors to the public. This gave us a chance to prepare for the event, and to meet with business contacts who are often friends as well.

One of those conversations, at Mr. Broadway in Midtown, led to some interesting thoughts that I want to share with you. Here's how it began.

Our server had just covered the table with plates of short rib tacos, chicken wings, and a pastrami reuben pizzette when my friend Izzy turned to me and asked, "So what do you think Skylum hopes to accomplish at the show?"

I had been watching the restaurant fill up, noticing that there were still a few open tables. But not for long. The lunch crowd was pouring in. I turned back to Izzy.

"I think we want people to know that Luminar and Aurora HDR are for real. These apps are innovative, powerful, and really fun," I said. "To tell you the truth, I love this software."

I reached for a short rib taco. Izzy was working on a bowl of chicken soup with a huge matzah ball floating in the middle of it.

"So you use it for your stuff?"

"I do. I test a lot of apps for my reviews, but at the end of the day when I'm editing just for me, I use Luminar."

Izzy's questions during lunch got me thinking about how others on our team might answer that question. How would Alex or Scott respond if they were there with us at Mr. Broadway? So after lunch, I decided to ask them and find out.

I started with Scott Bourne, President of Skylum Software. Scott is the one who brought me into the company, is a professional photographer, and he shares my passion for Luminar. Scott said:

"I hope that PPE attendees get a good sense of just how powerful our software is, and that they see that software doesn't have to be expensive or hard to use to be useful. I also want attendees to see that there are always alternative ways to accomplish their goals, and that Skylum is one such alternative."

One of the key points that Scott made is that software doesn't have to be hard to be powerful. I think that's so true for both Luminar and Aurora. Let the program do the heavy lifting; you focus on the creativity.

Alex Tsepko, Skylum CEO, made a great observation when I asked him this question. He pointed to Skylum's original approach to software design, which is in the company's DNA. They way he put was:

"PhotoPlus allows photographers to personally interact with Skylum team. As a result, we all have the opportunity to get to know one other even better."

"They will also experience the latest and the best releases of Aurora HDR, Luminar, and Photolemur. I hope they see that there's actually a software company that doesn't copy existing features from other tools, but rather, brings innovation and new approaches to photo editing."

Mr-Broadway-web.jpg Mr. Broadway is a fantastic Kosher bar and grill located on Broadway at 38th St. (Above) Yossi and Izzy with me in the middle. They both work for B&H Photo and are good business partners to me and to Skylum Software. Photos by Derrick Story.

After talking to Alex and Scott, I wish I were back at Mr. Broadway with Izzy and Yossi. There's so much more to say about innovation and ease of use.

But the plates have been cleared and we're all back to work. Fortunately, I'll be in the Skylum booth on Friday and Saturday at the show, and I can talk more about this with you.

Hope to see you there.

You can share your thoughts at the TDS Facebook page, where I'll post this story for discussion.