Recently in Photography

  Page 4 of 386 in Photography  

This is The Digital Story Podcast #957, July 23, 2024. Today's theme is "Behind the Scenes at the Olympics." I'm Derrick Story.

Opening Monologue

Opening ceremonies for the Paris Summer Olympics are this Friday. Certainly this is a thrilling moment for athletes from all over the world who will compete for their countries. But it's also an exciting time for the media specialists who are preparing to capture those moments. I've been lucky enough to witness firsthand the Olympic experience. And to celebrate the Paris event, I will take you behind the scenes to the Beijing Summer Olympics. I hope you enjoy the show.

Digital Photography Podcast 957

Tune-In Via Your Favorite Podcast App!


podcast-icon.jpeg

Apple Podcasts -- Spotify Podcasts -- Stitcher

Podbean Podcasts -- Podbay FM -- Tune In


Behind the Scenes at the Olympics

Derrick-in-Beijing.jpeg

Derrick tells the story of his Beijing Olympic experience.

"The Summer Olympics in Beijing were held from August 8 to 24, 2008. A total of 10,942 athletes from 204 National Olympic Committees (NOCs) competed in 28 sports and 302 events, one event more than those scheduled for the 2004 Summer Olympics.[2] This was the first time China had hosted the Olympic Games, and the third time the Summer Olympic Games had been held in East Asia, following the 1964 Olympics in Tokyo, Japan, and the 1988 Olympics in Seoul, South Korea. These were also the second Summer Olympic Games to be held in a communist state, the first being the 1980 Summer Olympics in the Soviet Union (with venues in Russia, Ukraine, Byelorussia, and Estonia)."

"During the 2008 summer games, an unprecedented 87 countries won at least one medal. Host nation China won the most gold medals (48), and became the seventh different team to top an overall Summer Olympics medal tally, winning a total of 100 medals overall. The United States placed second in the gold medal tally but won the highest number of medals overall (112). The third place in the gold medal tally was achieved by Russia." Source: Wikipedia.

Camera sales hit highest level for three years driven by mirrorless and a compact rebound

You can read the entire story on DPReview.com.

This $479 Smart Telescope Lets Anyone Shoot Beautiful Astro Photos

You can read the entire story on Petapixel.com.

Virtual Camera Club News

The Nimble Photographer Newsletter is now publishing every Thursday. Readers will enjoy a variety of content spanning from short photo essays, to commentary on weekly events, to reviews of the latest and coolest photo gear.

Inner Circle Members: A big thanks to those who support our podcast and our efforts! We are having a blast at our new Inner Circle hangout, the private group I've set up at DerrickStoryOnline. We'd love it if you join us. You can become an Inner Circle Member by signing up at our Patreon site. You will automatically be added to the new hangout.

Great Photography Articles on Live View - If you check out our publication and appreciate what you see, be sure to follow us and clap for those authors. You can find us at medium.com/live-view.

If you're interested in writing for Live View, drop me a line at dstory@gmail.com.

The New Donation Kit for Carefree Shipping of Found Film Cameras - If you've discovered a film camera that's no longer being used, our new Donation Kit makes it easy to pack and ship. Just visit the Contact Form on thenimblephotographer.com, click the box next to Donating a Film Camera, and let me know what you have. In your note, be sure to include your shipping address.

Affiliate Links - The links to some products in this podcast contain an affiliate code that credits The Digital Story for any purchases made from B&H Photo and Amazon via that click-through. Depending on the purchase, we may receive some financial compensation.

Red River Paper - And finally, be sure to visit our friends at Red River Paper for all of your inkjet supply needs.

See you next week!

You can share your thoughts at the TDS Facebook page, where I'll post this story for discussion.
This is The Digital Story Podcast #956, July 16, 2024. Today's theme is "How Still Photography, Once Again, Tells the Story" I'm Derrick Story.

Opening Monologue

New York Times photographer, Doug Mills was on stage just a few feet from Donald Trump when an assassin's bullet grazed the former president's ear. Mills, who has been covering the presidency since the days of Ronald Regan, recorded a series of images that help tell the story of that terrible day. This week, I'm thinking about the value of photojournalism as we try to understand these events.

Digital Photography Podcast 956

Tune-In Via Your Favorite Podcast App!


podcast-icon.jpeg

Apple Podcasts -- Spotify Podcasts -- Stitcher

Podbean Podcasts -- Podbay FM -- Tune In


How Still Photography, Once Again, Tells the Story

IMG_2971.jpeg

Essay read by Derrick Story.

Source credits from the essay.

From The Daily: The Attempted Assassination of Donald Trump, Jul 15, 2024.

Associated Press: In a world of moving pictures, photographs capture indelible moments in Trump assassination attempt.

The Art of Stills Photography on Movie Sets

You can read the entire story on FStoppers.com.

Canon teases 'Something Big' on July 17th

You can read the entire story on DPREview.com.

Virtual Camera Club News

The Nimble Photographer Newsletter is now publishing every Thursday. Readers will enjoy a variety of content spanning from short photo essays, to commentary on weekly events, to reviews of the latest and coolest photo gear.

Inner Circle Members: A big thanks to those who support our podcast and our efforts! We are having a blast at our new Inner Circle hangout, the private group I've set up at DerrickStoryOnline. We'd love it if you join us. You can become an Inner Circle Member by signing up at our Patreon site. You will automatically be added to the new hangout.

Great Photography Articles on Live View - If you check out our publication and appreciate what you see, be sure to follow us and clap for those authors. You can find us at medium.com/live-view.

If you're interested in writing for Live View, drop me a line at dstory@gmail.com.

The New Donation Kit for Carefree Shipping of Found Film Cameras - If you've discovered a film camera that's no longer being used, our new Donation Kit makes it easy to pack and ship. Just visit the Contact Form on thenimblephotographer.com, click the box next to Donating a Film Camera, and let me know what you have. In your note, be sure to include your shipping address.

Affiliate Links - The links to some products in this podcast contain an affiliate code that credits The Digital Story for any purchases made from B&H Photo and Amazon via that click-through. Depending on the purchase, we may receive some financial compensation.

Red River Paper - And finally, be sure to visit our friends at Red River Paper for all of your inkjet supply needs.

See you next week!

You can share your thoughts at the TDS Facebook page, where I'll post this story for discussion.
This is The Digital Story Podcast #955, July 9, 2024. Today's theme is "Are You an Off-the-Grid Ready Photographer?" I'm Derrick Story.

Opening Monologue

Some of the most important images in my personal library were captured during the Tubbs Fire of 2017. I documented the events the best I could during our 10-day evacuation flee. But I could have done better, much better, had I been prepared. And I wasn't. Whether it's in time of emergency, or fulfilling a desire to just get away, off-the-grid readiness is sure to pay dividends at some point in the near future. In this week's podcast, I share what I've learned over the last seven years. I hope you enjoy the show.

Digital Photography Podcast 955

Tune-In Via Your Favorite Podcast App!


podcast-icon.jpeg

Apple Podcasts -- Spotify Podcasts -- Stitcher

Podbean Podcasts -- Podbay FM -- Tune In


Are You an Off-the-Grid Ready Photographer?

Camping-1024.jpeg

On Monday, July 8, 2024, the Texas Tribune reports: "Hurricane Beryl has knocked out power for more than 2.7 million Texas customers, as of 12:59 p.m. Monday, based on estimates from PowerOutage.us and CenterPoint Energy.

At 3:08 p.m., PowerOutage.us reported that more than 2.1 million of CenterPoint's 2.6 million Texas customers lacked electricity. CenterPoint has not yet provided an estimate of when millions of its customers will regain electricity.

"As soon as safe to do so, you'll see our crews headed out to start assessing damage and developing restoration plans," CenterPoint said on social media platform X.

Outages are most extensive in the Houston area and coastal counties including Matagorda, where Beryl landed as a Category 1 hurricane at approximately 4 a.m., Monday. Significant outages are also in Galveston County, Calhoun County and Jackson County. As the morning progressed, outages extended further inland and into Deep East Texas to areas including Polk, San Jacinto, Montgomery, Grimes and Washington Counties.

As we all know, reports like this are commonplace. Now, this show isn't about doom and gloom. But, what if we could combine emergency preparedness with outdoor adventure and photography? In other words, doing what we like helps prepare us for an event that we don't want, but need to be ready for?

I have a camping trip coming up in a few weeks that I'm so looking forward to. These outings have evolved a lot over the last few years, becoming more enjoyable than ever.

In part, that's because camping gear has improved - many of those new items I will talk about today. Additionally, getting away from early morning leaf blowers, cranky commuters, and the steady stream of discouraging news has its advantages as well.

I also view my solo camping trips as dry runs for disaster preparedness. In a most enjoyable way, I test my evacuation system for our family, including cooking options, sleeping accommodations, power supply, and more.

One new example that I'll be writing about later next month is an item called TentBox. It's a tent that mounts to the top of the car and can sleep 2 people. It collapses to only 18" tall while driving, but is a full-fledged living space when erected. One of the many advantages is that it can be set up in just a minute or two, and I don't have to unload anything out of the car to get some shuteye. Stay tuned for that review in mid-August.

In addition to these dry runs helping me improve my preparedness, this type of exercise will allow me to be a better storyteller. I will spend less time dealing with the elements, and will have more time for documenting with my photography and writing.

Sounds efficient, doesn't it? Let's dig into some of the specifics.

The Shortlist of Considerations

So I'm going to start with the basics for car camping and emergency preparedness, then get into our photography and computer gear after that.

  • Food - Food is important, obviously, but my experience has been there isn't a lot of time, or the facility, for cooking meals. That's why I like having dehydrated backpacking meals in the mix. If you haven't had one for a while, I think you'll be surprised at how good they taste, and they are satisfying. My camping trips allow me to rotate stock, using up the older ones and replacing with new meals.
  • Water is more difficult because it's bulky. We can only store and transport so much. I prefer 1-gallon containers that are easier to stash in odd places than bigger containers that are heavy and bulky.
  • Sleeping - Unless you have a Rec Van, you're most likely looking at some sort of tent for shelter. Personally, I like tents. Sometimes I even feel like a kid in a fort with them. But I don't like pitching them. And they take up room in the back of the SUV where I'd rather be storing other supplies. So, I'm hoping that my top-of-car mounted tentbox is the answer that I've been looking for. Be sure to have an inflatable mattress and a good sleeping bag for each person in your party.
  • Power - This is where things have really changed for me over the last couple years. I once looked at power as a luxury. It's nice to have camp lighting, laptops, and air compressors. I now look at these items as necessities. If I'm going to be able to do my thing in any location, I need power.

    USB-C Power Delivery (PD) has improved charging my electronic devices substantially by sending up to 100 watts through the USB-C cable. Because the Power Station monitors the charging, devices such as my laptop are refueled quickly and efficiently. All you need is the cable.

    So now I'm more interested in higher-capacity Power Stations, such as the Bluetti AC70 1,000 Watt Power Station (768Wh Capacity for $429) and the Jackery Explorer 600 Plus (632Wh capacity for $399). Not only can the keep my cameras and computers running, but they can also power portable refrigerators, lighting, compressors, hot water kettles, and more. And they are compatible with portable solar panels.

  • Clothing - I know this category isn't as sexy as electronics, but it makes a world of difference when it comes to comfort. Hats, gloves, boots, jackets, and both short and long pants are worth testing on your camping trips. Keep the good stuff. Move along the rest.

Once you've tested (and enjoyed) your outdoor equipment on a camping trip, pack it in an organized way back home. I like stackable plastic containers that are efficient in both the garage and in the car. If you need to make a quick get-away, everything is already organized and ready to go.


The Bluetti AC70 Power Station Review

One thing I've learned while testing portable power stations is the importance of finding the right balance between ample energy storage in a unit that's still light enough to carry around. That's why I've come to appreciate 1,000-watt models, which walk that line between capacity and mobility, and most recently in that category, the Bluetti AC70.

This 22.5-pound unit measures 12.4" x 8.2" x 10.1". I can pick it up with one hand, carry it to the car, and it doesn't take up much room in the boot. Its LFP (Lithium Iron Phosphate) batteries have a total capacity of 768Wh with two AC outlets (1,000W Rated Power/ 2,000W Lifting Power), two USB-C ports (100 watts), a pair of USB-A ports (12 watts), and a 12V DC car accessory outlet. If needed, surge power can go up to 2,000 watts.

During testing, the AC70 powered a mini fridge, hot water kettle, room fan, laptop, stereo system, LCD television, and living room lamps. It's beefy enough to serve as a backup power source at home and mobile enough to run an entire campsite on the road. This type of versatility means that the AC70 will provide a return on its modest investment regardless if you're a road-tripping photographer or someone who wants to trim energy costs at home with portable solar.

Things I Like (and what also could be improved)

What I liked

  • Bright, informative LCD screen
  • Dedicated standard DC input for solar panels
  • Excellent mobile app for monitoring the unit and adjusting its settings
  • Fast recharging via AC outlet, solar, car accessory port, or gas generator
  • Simultaneous input/output capability
  • Customizable configuration
  • Robust design
  • Excellent value for 1,000-watt unit (currently available for $429)

What could be improved

  • Lacks built-in emergency light
  • Bluetooth only, no WiFi to extend range of mobile app

You can read the entire, comprehensive review here.

Amazon Prime Day Sale

The Bluetti AC70 Portable Power Station is on sale for $399 as part of Amazon Prime Day, until July 15, 2024.


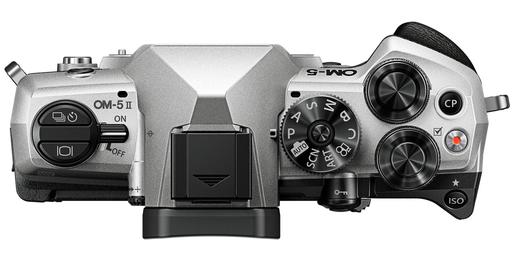
The OM-5 Advantage | 4 Computational Features You Need to Know

You can read the entire story on GetOlympus.com.


Enhance Your Photos With NASA's Sharpening Technique

You can read the entire story on FStoppers.com.


Virtual Camera Club News

The Nimble Photographer Newsletter is now publishing every Thursday. Readers will enjoy a variety of content spanning from short photo essays, to commentary on weekly events, to reviews of the latest and coolest photo gear.

Inner Circle Members: A big thanks to those who support our podcast and our efforts! We are having a blast at our new Inner Circle hangout, the private group I've set up at DerrickStoryOnline. We'd love it if you join us. You can become an Inner Circle Member by signing up at our Patreon site. You will automatically be added to the new hangout.

Great Photography Articles on Live View - If you check out our publication and appreciate what you see, be sure to follow us and clap for those authors. You can find us at medium.com/live-view.

If you're interested in writing for Live View, drop me a line at dstory@gmail.com.

The New Donation Kit for Carefree Shipping of Found Film Cameras - If you've discovered a film camera that's no longer being used, our new Donation Kit makes it easy to pack and ship. Just visit the Contact Form on thenimblephotographer.com, click the box next to Donating a Film Camera, and let me know what you have. In your note, be sure to include your shipping address.

Affiliate Links - The links to some products in this podcast contain an affiliate code that credits The Digital Story for any purchases made from B&H Photo and Amazon via that click-through. Depending on the purchase, we may receive some financial compensation.

Red River Paper - And finally, be sure to visit our friends at Red River Paper for all of your inkjet supply needs.

See you next week!

You can share your thoughts at the TDS Facebook page, where I'll post this story for discussion.
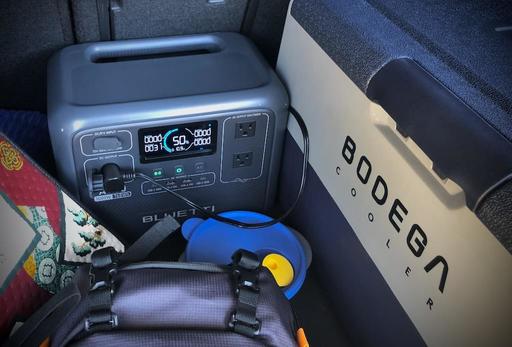
Bluetti-in-Boot-1024.jpeg Bluetti AC70 Power Station connected to a Bodega Mini Fridge in the boot of a VW ID.4

One thing I've learned while testing portable power stations is the importance of finding the right balance between ample energy storage in a unit that's still light enough to carry around. That's why I've come to appreciate 1,000-watt models, which walk that line between capacity and mobility, and most recently in that category, the Bluetti AC70.

This 22.5-pound unit measures 12.4" x 8.2" x 10.1". I can pick it up with one hand, carry it to the car, and it doesn't take up much room in the boot. Its LFP (Lithium Iron Phosphate) batteries have a total capacity of 768Wh with two AC outlets (1,000W Rated Power/ 2,000W Lifting Power), two USB-C ports (100 watts), a pair of USB-A ports (12 watts), and a 12V DC car accessory outlet. If needed, surge power can go up to 2,000 watts.

During testing, the AC70 powered a mini fridge, hot water kettle, room fan, laptop, stereo system, LCD television, and living room lamps. It's beefy enough to serve as a backup power source at home and mobile enough to run an entire campsite on the road. This type of versatility means that the AC70 will provide a return on its modest investment regardless if you're a road-tripping photographer or someone who wants to trim energy costs at home with portable solar.


Things I Like (and what also could be improved)

What I liked

  • Bright, informative LCD screen
  • Dedicated standard DC input for solar panels
  • Excellent mobile app for monitoring the unit and adjusting its settings
  • Fast recharging via AC outlet, solar, car accessory port, or gas generator
  • Simultaneous input/output capability
  • Customizable configuration
  • Robust design
  • Excellent value for 1,000-watt unit (currently available for $429)

What could be improved

  • Lacks built-in emergency light
  • Bluetooth only, no WiFi to extend range of mobile app

There's a great deal of competition among portable power stations. Each brand has its personality and features. Let's take a look at what Bluetti has packed into the AC70.


Input - Adding Power to the AC70

input-output-1024.jpeg Input from a 100-watt solar panel and simultaneous DC and AC output.

SOLAR: I have a 100W solar panel permanently set up on my south-facing patio at the studio. I use it to keep all my power stations topped off. Most of my small appliances at work run off the solar-fueled power stations. That includes lighting, all of my electronics, cooling fans, and the television.

The AC70 fits right into this scenario. During the day it receives a flow of 65-75 watts from the panel, which is enough to power my appliances downstairs. If I need more juice, I can set up a 200W panel knowing the AC70 can accept up to 500Ws (12V-58VDC, 10A) from solar. At that level, I could refuel the unit in about 3 hours. And yes, it does have pass-through charging, so I can input and output simultaneously.

PLUG-IN AC: When I'm on the road, I can also top off the Bluetti via 120V AC in the hotel. (I like to camp for two nights, then hotel one night.) This form of charging, plugging the AC70 into the wall, was one of my first peeks into its unique feature set.

There are three modes for plugin charging - Silent, Standard, and Turbo. Silent, which is easiest on the batteries and doesn't prompt the fans to kick on, limited charging to 265 watts. Standard, which is the middle option, logged in at 437 watts. And Turbo kicked it up to 928 watts.

It's good to know that you can refuel the AC70 in less than an hour, but I would reserve the Turbo setting for those times when speed is most important, because it does add more stress to the batteries than the other modes.

Plus, using Silent mode, I went from 14 percent full to 100 percent in just a little over 3 hours with no noise or stress. This will be my default setting.

12V CAR ACCESSORY PORT: There's an adapter to tap the 12V car accessory port for recharging. I tend not to use that option since I have an electric VW ID.4, and I'd rather use its juice to reach my next destination, but it's great to have that adapter if needed.


A Word About the Bluetti Mobile App

IMG_1769.jpeg

The easiest way to monitor activity and adjust settings is with the mobile app. Using my iPhone, I was able to control nearly every aspect of the AC70, including changing the charging modes I just discussed.

The app also contains a ton of information to help you learn how to better use the device, contact tech support, and more. The Bluetooth connectivity was stable, and if I wandered far away from the Bluetti, it easily reconnected when I was back in range. That said, I do wish it had WiFi as well. This would be particularly handy at home where I could monitor the AC70 from any room.


Powering Appliances with the Bluetti AC70

Hot-Water-Kettle-1024.jpeg A hot water tea kettle drawing 1000 watts plus is a good test for any power station.

This is a reason why we have a power station in the first place... to power and charge things. And in this capacity, the AC70 performs its job admirably.

I'll start with a pair of USB-C ports with a maximum power output of 100 watts. These are output-only ports, which I prefer, so there's no confusion when you're trying to transfer power to another USB-C device.

One such example is using the AC70 to top off smaller units that have two-way ports. The energy always flows the way that I want, from the larger unit to the smaller one.

USB-C is also handy for my MacBook Pro laptop, Nikon Zf camera, Olympus OM-1 camera, Apple Watch, and just about every other portable device that I depend on. When I plug in the Mac, the output reading zooms up to 74 watts providing a quick charge of the laptop. And I can charge both camera and MacBook at the same time.

For photographers and videographers on the go, the AC70 provides freedom from AC outlets. It can power cameras, computers, and accessories for an entire day, regardless of your location.

I don't use them as much, but there are also two USB-A outlets that are rated at 12 watts in total. They are handy for smaller peripherals such as keyboards and mice.

For heavy-duty appliances, such as hot water kettles, microwaves, and televisions, there are a pair of AC outlets. This is where robust really comes into play. Smaller 300-watt units are fine for light duty, but if you plug a 750-watt microwave or 1,000-watt tea kettle into them, they shut down.

The AC70 can handle both of these scenarios. My litmus test is a 1,000-watt tea kettle that I have on the kitchen counter at work. I plugged it into the Bluetti, filled halfway with water, and turned it on.

The LCD readout soared to over 1,000 watts, but that wasn't a problem for the AC70 because of Power Lifting, which allows the Bluetti to handle high-power resistive loads up to 2,000 watts. (If it's disabled, you can turn it on in the Setting Mode by pressing and holding the AC power button.)

Of course, battery drainage is going to be faster in these situations. But generally speaking, we're usually only talking about a few minutes to boil water or heat up a dinner.

Finally, we can't overlook the venerable 12V car accessory port that can power 12V DC appliances up to 120 watts. I like it because its direct current is the perfect source for my Bodega Portable Refrigerator that only draws 35 watts in Eco mode. That's a lot of cold drinks from the AC70.


ECO Mode on the Bluetti

IMG_1758-Standard-AC-Charge-Mode-1024px.jpeg ECO Mode indicated on the LCD display. Also, showing AC charging in Standard Mode.

This setting is important for conserving energy in the AC70. That's because the power station is much more than a bunch of Lithium batteries packed in a case.

There's an operating system (complete with OTA firmware updates), Bluetooth radio, and lots of internal electronics. If you were to leave the system on, even without output load, the AC70 would slowly drain power.

In my tests, it lost 3 percent in a 6-hour period, with no load (going from 100 percent to 97 percent.) I wasn't surprised by this, but it was a good reminder to shut down the AC70 when its services were not needed. ECO mode can help with that.

When operating in this mode, the AC or DC output will automatically turn off if the AC70 is bearing below the threshold you set, or with no load at all for the amount of time you've selected in the settings. This helps the Bluetti retain more of its energy.

Eco mode settings can be set independently for AC and DC. With either, there are increments of 1-4 hours and minimum wattage draw as well.

If neither the AC nor the DC outlets are enabled, the AC70 will shut down automatically after a short period of time. So if you want it to stay on, enable either AC or DC, even if nothing is plugged in.

All of the Eco mode settings are available in the Bluetti mobile app.


Final Thoughts

If you've never experienced the robust joy of a 1,000-watt portable power station, I doubt you will be able to go back to smaller units except for specialized situations.

Everything gets easier with more storage. A cloudy day is no longer a deal-breaker, and your camping trip can stretch to an extra day or two.

At 22 pounds, the AC70 is right on the edge of portability. Most people can grab it single-handedly and carry it to its working destination. It will fit on top of a roller bag for transport to a hotel room.

(When your mates ask you why you're bringing a roller bag on a camping trip, you can show them why as you transport the AC70 up to the room for refueling on an off day.)

What separates the Bluetti AC70 from other units I've tested is its high value, being priced less than similarly featured 1,000-watt power stations - plus its bright, informative LCD screen; truly useful mobile app; and excellent design.

And for photographers, campers, and road trippers, the Bluetti AC70 provides that much-needed muscle in a unit compact enough to take anywhere.

Other Articles in This Series

Jackery 40W Mini Solar Panel for Your Cameras and Devices.

The Jackery Explorer 300 Plus Review - Power Your Roadtrips.

Roadtripping with the BODEGAcooler Mini 12V Portable Fridge/Freezer - A Review.

Hot Coffee, Soup, on the Road with this Portable Electric Kettle.

Note: The affiliate links in this article help support my research and writing. There is no additional charge to you the customer. Thank you for using those links.

This is The Digital Story Podcast #954, July 2, 2024. Today's theme is "How Megatank Printers Change Everything - Canon G620 Review." I'm Derrick Story.

Opening Monologue

When my aging All-In-One Canon printer rattled out its final 5x7, I began shopping for a replacement. There are many options in this category, but I wanted to take advantage of the latest innovations. That's when I discovered that mega-tank printers were becoming viable for cost-consciousness photographers. I opted for a 6-ink Canon Pixma G620. And Oh My how things have changed. Find out how on today's TDS Photography Podcast. I hope you enjoy the show.

Digital Photography Podcast 954

Tune-In Via Your Favorite Podcast App!


podcast-icon.jpeg

Apple Podcasts -- Spotify Podcasts -- Stitcher

Podbean Podcasts -- Podbay FM -- Tune In

How Megatank Printers Change Everything - Canon G620 Review

Canon-Ink-1024.jpeg

My dedicated photo printer is the venerable Canon Pro-100. It has 8 ink cartridges, each with 13 ML of fluid. A full replacement set costs $120. Based on the reporting of other photographers, ink costs per 4"x6" print is about 50 cents per. The Pro-100 produces lovely prints and has served my well for years.

My new Canon PIXMA G620 Printer ($249) is a 6-ink printer with user-replaceable print heads and is refueled with 57 ML ink bottles that cost $15 each - $90 for a complete set which can output approximately 3,800 4"x6" prints at about 2.5 cents each.

One Canon GI-23 bottle of ink contains more fluid than 4 Canon CLI-42 cartridges for the Canon Pro-100 that sell for $17 each.

This is quite a difference! Are we giving up print quality or longevity? Not at all. Both printers are dye-based. The Chromalife 100 System 3 ink in the G620 protects your photos from fading up to 100 Years in a photo album, 30 Years behind glass (Light Fastness), or 20 Years without the glass (Gas Fastness), approximately the same as prints from the Canon Pro-100.

The Canon G620 is developing an interesting reputation among reviewers. Across the board they agree that the photo output is amazing, worthy of serious enthusiast photographers.

But as a multi-functional device is has shortcomings compared to the competition - slower page output, no duplex printing, no automatic document feeder, and a very basic LCD panel. I agree with all of these nits.

But I'm a photographer who sometimes prints documents. And the photo output is more important to me than document speed. The Canon PRINT app allows me to set up jobs directly from my iPhone. And the scanner and copier work great.

Maximum print size is 8.5"x14". So, for the bulk of my daily work, the G620 works fine. And if I need bigger, my Pro-100 is still firing on all cylinders.

But there is one important drawback for Mac users. Canon leans on the AirPrint driver for the Mac, so you can't use ICC profiles. Red River paper has published a set of ICC profiles for the G620, but they can only be used via Windows machines.

I was more worried about this until I actually started printing. Setting up the jobs with the proper parameters such as paper surface and quality, the output was fantastic. I know I should be missing the ICC profiles. But to be honest, I can't say that I would get anything better out of the printer using them.

Bottom Line

The Canon PIXMA G620 Printer has changed my everyday printing. It's affordable to run, had great image quality, and I feel much better about tossing less stuff in the landfill.

Japan's Olympic athletes will wear outfits designed to block infrared cameras

You can read the entire story on TheVerge.com.

Nikon announces $600 Z 35mm F1.4 - its first F1.4 for Z mount

You can read the entire story on DPReview.com.

Virtual Camera Club News

The Nimble Photographer Newsletter is now publishing every Thursday. Readers will enjoy a variety of content spanning from short photo essays, to commentary on weekly events, to reviews of the latest and coolest photo gear.

Inner Circle Members: A big thanks to those who support our podcast and our efforts! We are having a blast at our new Inner Circle hangout, the private group I've set up at DerrickStoryOnline. We'd love it if you join us. You can become an Inner Circle Member by signing up at our Patreon site. You will automatically be added to the new hangout.

Great Photography Articles on Live View - If you check out our publication and appreciate what you see, be sure to follow us and clap for those authors. You can find us at medium.com/live-view.

If you're interested in writing for Live View, drop me a line at dstory@gmail.com.

The New Donation Kit for Carefree Shipping of Found Film Cameras - If you've discovered a film camera that's no longer being used, our new Donation Kit makes it easy to pack and ship. Just visit the Contact Form on thenimblephotographer.com, click the box next to Donating a Film Camera, and let me know what you have. In your note, be sure to include your shipping address.

Affiliate Links - The links to some products in this podcast contain an affiliate code that credits The Digital Story for any purchases made from B&H Photo and Amazon via that click-through. Depending on the purchase, we may receive some financial compensation.

Red River Paper - And finally, be sure to visit our friends at Red River Paper for all of your inkjet supply needs.

See you next week!

You can share your thoughts at the TDS Facebook page, where I'll post this story for discussion.

This is The Digital Story Podcast #953, June 25, 2024. Today's theme is "How to Buy an Infrared Camera." I'm Derrick Story.

Opening Monologue

Infrared photography is exciting and is an excellent way to get the creative juices flowing. But finding the right camera for you might appear daunting at first. There are so many options! Fear not. After today's TDS Photography Podcast, you will know exactly what to look for. I hope you enjoy the show.

Digital Photography Podcast 953

Tune-In Via Your Favorite Podcast App!


podcast-icon.jpeg

Apple Podcasts -- Spotify Podcasts -- Stitcher

Podbean Podcasts -- Podbay FM -- Tune In

How to Buy an Infrared Camera

P1184894.jpeg

This week we have class presentations for our Infrared Photography Workshop. More than 20 participants will share their favorite IR images. We will see everything from some of the most stunning B&W that you can imagine, to other-worldly colors and compositions. And the cameras used to create this art are as varied as the photographers themselves.

Choosing the right camera for infrared photography can seem overwhelming at first. Can you use your existing camera? Should you get one converted? And if you do get a converted camera, which options should you select?

Basic Understanding of Infrared Photography

Let's start with a basic understanding of what infrared photography is. Here's what our friends at Kolari Vision say.

"Infrared photography is a look into the invisible world. The human eye can see wavelengths from about 400nm-700nm (from purple to red). Infrared light exists in the wavelengths beyond 700nm.

An infrared photography camera is specially designed to capture images in the infrared spectrum, revealing unique and often ethereal details that are invisible to the naked eye.

IR photography can be done with either infrared film or a digital camera and typically involves near-infrared light, typically in the 590nm-850nm range. This is different than thermal infrared, which images far into the infrared spectrum.

Infrared photography produces some very distinct effects, which make it aesthetically pleasing. The most striking difference is the "Wood Effect," where leaves reflect infrared light, giving them a bright white hue in IR photos. This effect is named after photographer Robert W. Wood, who is considered the father of infrared photography.

This effect is utilized in landscape photography to produce surreal color landscapes or high-contrast black and white photographs."

Which Cameras Work Best?

Photographers can begin experimenting with infrared photography with their existing cameras and a 720nm filter. Some cameras perform better than others, but all visible light cameras will struggle with very long exposures and high ISO settings because the 720 filter is very dense. An unconverted digital camera can only shoot IR in 720nm or 850nm.

But, you can get a taste of IR, and that often leads to wanted to get a converted camera that is far easier to use. What is a converted camera and where can you get one?

We recommend Kolari Vision for converted IR cameras. They can work on one you already have, or you can buy a camera that's already been converted. But what does that mean?

"With an infrared conversion, the camera's internal hot mirror is removed and replaced with a filter that only lets infrared light through. This allows for handheld infrared shots with normal exposure times and low ISO. A converted digital camera is the only way to take good digital infrared portraits, as the subject no longer has to stay perfectly still for a long exposure."

With a full-spectrum conversion, the camera's internal hot mirror is removed and replaced with a clear glass filter. This makes the camera sensitive to UV, visible, and IR light. This is an excellent option for someone who doesn't want a camera devoted to only IR. Using various external filters, the camera can take pictures in regular, infrared, or UV light.

I highly recommend a full-spectrum conversion of a mirrorless camera. This gives you access to a wide variety of infrared wavelengths via filters, allow you to see the effect in real-time in the electronic viewfinder, and provides for regular visible light photography via an external hot mirror filter.

If you opt for a full-spectrum conversion, the next thing to consider is whether you will shoot color or not.

If you plan to shoot only B&W, then the 720nm and 850nm filters are the best choices. If you plan to shoot color even occasionally, consider a 590nm or 665nm filter.

When choosing between 590nm, 665nm, and even 720nm, the first consideration is your aesthetic preference. If you like the yellow leaf effect, you should choose the 590nm or 665nm option. If you want to shoot regular color shots with white leaves and blue skies, then the 720nm ir filter is probably right for you.

The Right Lens Makes a Big Difference

Another thing to consider is the lens that you will use with the filter. Some lenses perform better than others for infrared. Some lenses are prone to hotspots that require touchup in post production. Kolari maintains a lens hotspot database to help you decide with optic will work best for you.

The other thing to consider is filter diameter. The cost of IR filters can really add up, and a smaller diameter filter, such as 37mm, is far more affordable than a larger diameter option such as 72mm. Choosing a lens with a smaller filter diameter will save you lots of money.

Additional Filters to Consider

Most photographers fall in love with a specific wavelength such as 590nm or 720nm. But if you have a full-spectrum conversions, there are other options to explore as well.

The IR Chrome filter achieves the look of Kodak Aerochrome IR film, straight out of camera without the need to channel swap. There are no special settings nor post production requirements.

The IR Cut Hot Mirror II filter provides for visible light photography with a full-spectrum conversion. The beauty of this is that you only need to carry one camera body for both your IR and visible light work.

Wrapping Up

For the best experience with the most options available to you, I recommend a full-spectrum converted mirrorless camera with one or two small diameter filter lenses. The number one filter I recommend is the 720nm because it's great for both B&W and soft color photography. My second favorite filter is the IR Chrome. And I suggest a Hot Mirror II as well.

All of this information, plus cameras and filters for sale, can be found at the Kolari Vision website.

Alice Camera, the AI-enhanced Micro Four Thirds camera, ready to ship

You can read the entire story on DPReview.com.

SOLD OUT! The Pentax 17 is already out of stock in Japan

You can read the entire story on DigitalCameraWorld.com.

Virtual Camera Club News

The Nimble Photographer Newsletter is now publishing every Thursday. Readers will enjoy a variety of content spanning from short photo essays, to commentary on weekly events, to reviews of the latest and coolest photo gear.

Inner Circle Members: A big thanks to those who support our podcast and our efforts! We are having a blast at our new Inner Circle hangout, the private group I've set up at DerrickStoryOnline. We'd love it if you join us. You can become an Inner Circle Member by signing up at our Patreon site. You will automatically be added to the new hangout.

Great Photography Articles on Live View - If you check out our publication and appreciate what you see, be sure to follow us and clap for those authors. You can find us at medium.com/live-view.

If you're interested in writing for Live View, drop me a line at dstory@gmail.com.

The New Donation Kit for Carefree Shipping of Found Film Cameras - If you've discovered a film camera that's no longer being used, our new Donation Kit makes it easy to pack and ship. Just visit the Contact Form on thenimblephotographer.com, click the box next to Donating a Film Camera, and let me know what you have. In your note, be sure to include your shipping address.

Affiliate Links - The links to some products in this podcast contain an affiliate code that credits The Digital Story for any purchases made from B&H Photo and Amazon via that click-through. Depending on the purchase, we may receive some financial compensation.

Red River Paper - And finally, be sure to visit our friends at Red River Paper for all of your inkjet supply needs.

See you next week!

You can share your thoughts at the TDS Facebook page, where I'll post this story for discussion.
This is The Digital Story Podcast #952, June 18, 2024. Today's theme is "Pentax Actually Did It - The Pentax 17 Film Camera." I'm Derrick Story.

Opening Monologue

Talk about having some serious moxie... Not only did Pentax debut the their first film camera in decades, they did it on the same day Nikon announced the highly anticipated Z6 Mark III. And guess which camera we're going to talk about first? All of this and more, much more, on today's TDS Photography Podcast. I hope you enjoy the show.

Digital Photography Podcast 952

Tune-In Via Your Favorite Podcast App!


podcast-icon.jpeg

Apple Podcasts -- Spotify Podcasts -- Stitcher

Podbean Podcasts -- Podbay FM -- Tune In

Pentax Actually Did It - The Pentax 17 Film Camera

Pentax-17-front.jpg

The Pentax 17 is a half-frame 35mm film camera with auto exposure, manual film advance, manual rewind, ISO selection dial, exposure compensation, built-in flash, and a whole lot of style.

Along with its magnesium top and bottom plates, the 17 borrows many legacy details from past cameras to inform its distinct design: the film rewind knob is taken from the Pentax LX, the ISO dial from the SP, the flash and shutter release from the KP, the lens housing from the Espio Mini, the front logo text from the 67, the knurled battery cover from the DA WR series of lenses, the film advance lever from the Auto 110, and the top plate from a special edition LX.

The viewfinder includes Pentax's own classic logo along with the Asahi AOCo logo and a film plane indicator taken from their line of DSLRs.

And it looks great. The protruding grip houses the CR2 lithium battery, the viewfinder housing is absolutely beautiful, the textured wrap and back memo holder contrast the silver top plate, and the lug straps are arranged so you can wear the camera horizontally or vertically.

Distinct from 35mm "full-frame" cameras with a 36 x 24mm format, the Pentax 17 is a half-frame format camera with a recording area of 17 x 24mm. This smaller, more unique format has a few added benefits.

Let's review the key specs and features.

  • 35mm Half-Frame Film Camera (72 exposures on roll of 36)
  • HD PENTAX HF 25mm f/3.5 Traditional Lens (37mm equivalent) f/3.5-f/16
  • Manual Zone Focus with Macro Setting
  • Window-style optical viewfinder (non TTL) with brightline frame lines for composition accuracy; these lines also include two notches to help compensate for parallax when using the close-up focus setting.
  • Autoexposure, Program, and Bokeh Modes - 1/350th to 4 seconds
  • Built-In Flash, Flash AE Modes - sync at 1/125th
  • Exposure Compensation (-2.0/+2.0) and ISO Dials (50, 100, 200, 400, 800, 1600, 3200)
  • Manual Film Advance Lever & Film Rewind
  • Takes 1x CR2 Battery
  • 2.5mm Remote Cable Switch Terminal
  • 40.5mm filter ring with light meter sensor in the lens housing behind the filter.

Focusing is accomplished with what I call intelligent zones. You choose a basic zone, but the camera will fine-tune the focusing by adding more or less depth of field depending on your exposure setting. The zones are:

  • Macro/Flower: 0.82' / 0.25 m
  • Close-Up/Knife & Fork: 1.7' / 0.5 m
  • Single Person: 4' / 1.2 m
  • Two People: 5.6' / 1.7 m
  • Group of People: 10' / 3 m
  • Mountain/Infinity

The fixed prime lens is an HD PENTAX HF 25mm f/3.5 Traditional; it's a slightly wide-angle lens offering excellent sharpness and color rendering. It features Pentax's contemporary HD anti-reflective coating, helping to boost contrast and clarity.

The exposure dial is also unique. Your basic choices are programmed exposure or full auto, but with a twist.

The mode dial is divided into two sections: flash off or flash on. Within the flash on section, there is a choice between a Program auto with flash and a slow-sync with flash settings. With the flash off, Program auto, bulb, and slow shutter speed settings can be used, as well as a unique Bokeh mode that prioritizes use of the f/3.5 maximum aperture for the shallowest depth of field. Also, there is an in-between Auto mode that choose whether or not to use flash depending on the lighting conditions.

There is also a built-in flash on the front of the body. This flash has a guide number of 20' at ISO 100 and a recycle time of about 9 seconds. LEDs near the viewfinder display when the flash is recharging and when it is ready for use.

The pictures I've seen from independent reviewers are quite good and would stand up to the images that I currently get with many of my legacy film cameras. Yes, it's half frame, so you won't be making 16x20 prints from the Pentax 17, but that's not its goal.

What it aims to do is provide a modern analog experience that is fun and rewarding. And on both of those counts, it appears to succeed.

You can order the Pentax 17 right now for $499. It should begin shipping later this week.

Apple's iOS 18 Lets You Open Third-Party Camera Apps From Lock Screen

You can read the entire story on Petapixel.com.

U.S. Sues Adobe for Hidden Fees and A Confusing Cancellation Process

You can read the entire story on FStoppers.com.

Virtual Camera Club News

The Nimble Photographer Newsletter is now publishing every Thursday. Readers will enjoy a variety of content spanning from short photo essays, to commentary on weekly events, to reviews of the latest and coolest photo gear.

Inner Circle Members: A big thanks to those who support our podcast and our efforts! We are having a blast at our new Inner Circle hangout, the private group I've set up at DerrickStoryOnline. We'd love it if you join us. You can become an Inner Circle Member by signing up at our Patreon site. You will automatically be added to the new hangout.

Great Photography Articles on Live View - If you check out our publication and appreciate what you see, be sure to follow us and clap for those authors. You can find us at medium.com/live-view.

If you're interested in writing for Live View, drop me a line at dstory@gmail.com.

The New Donation Kit for Carefree Shipping of Found Film Cameras - If you've discovered a film camera that's no longer being used, our new Donation Kit makes it easy to pack and ship. Just visit the Contact Form on thenimblephotographer.com, click the box next to Donating a Film Camera, and let me know what you have. In your note, be sure to include your shipping address.

Affiliate Links - The links to some products in this podcast contain an affiliate code that credits The Digital Story for any purchases made from B&H Photo and Amazon via that click-through. Depending on the purchase, we may receive some financial compensation.

Red River Paper - And finally, be sure to visit our friends at Red River Paper for all of your inkjet supply needs.

See you next week!

You can share your thoughts at the TDS Facebook page, where I'll post this story for discussion.
This is The Digital Story Podcast #951, June 11, 2024. Today's theme is "Apple Intelligence - Nonthreatening to Photographers, for Now." I'm Derrick Story.

Opening Monologue

Unlike our friends at Adobe, Apple isn't targeting the photo shoot with their AI integration into the upcoming versions of its OS and photo apps. There are lots of new goodies in the toy box, and many of them will be useful for photo enthusiasts. In today's show, I'll provide an overview from a photographer's perspective and also discuss Adobe's latest controversy. I hope you enjoy the show.

Digital Photography Podcast 951

Tune-In Via Your Favorite Podcast App!


podcast-icon.jpeg

Apple Podcasts -- Spotify Podcasts -- Stitcher

Podbean Podcasts -- Podbay FM -- Tune In

Apple Intelligence - Nonthreatening to Photographers, for Now

apple-intelligence-1024.jpg

Apple Intelligence is Apple's branding of Artificial intelligence into its operating system and apps. They are aiming to apply this technology in ways that make your life easier and more creative while at the same time keeping your privacy intact. They're calling it AI for the rest of us.

To some degree, based on the keynote presentation at WWDC, I think the marketing is lining up with real-world application. Apple Intelligence powers new writing tools to put your written communications in the best light, you can create new Pixar-like images with Genmoji, you can generate illustrations from scratch with Image Playground, and you can create professional-looking movies easily that are based on the pictures you have captured and stored in your Photos library.

Most of the generated images in the keynote were illustrative rather than photographic. I didn't see anything that resembled the output from my digital camera. But, according to the documentation, Image Playground does have the ability to transform sketches into polished photographs. And I can't see this happening on-device, so the user would have to venture out into the Cloud for this capability.

But generally speaking, if you want to create a custom emoji for a text message or an illustration for a school paper, Apple Intelligence will do a nice job.

When applied to the Photos app, this technology will further improve search capabilities, provide better organizing options, and even give us a nifty Clean Up tool for removing unwanted items from a composition.

To tap this tech you will need an iPhone 15 Pro or Pro Max, a Mac with Apple Silicon, or a M-powered iPad. The hardware requirements are steep because Apple's approach is to do as much AI processing on the device as possible, with options for venturing out into the Cloud as needed. Users will have control over where the processing occurs, which is a good option for most of us.

The unknown is, however, what will developers want to do with this technology, and what will Apple allow them to put on its platform? Apple is providing an SDK with App Intents, APIs, and frameworks to make it easy for developers to integrate system-level features like Writing Tools and Image Playground into their apps.

Of particular interest to our community is the SDK for Image Playground. Here's what Apple is saying to developers:

"Image Playground delivers an easy-to-use experience to create fun, playful images in apps like Messages, Notes, Keynote, Pages and more. Using the Image Playground API, you can add the same experience to your app and enable your users to quickly create delightful images using context from within your app. And because images are created entirely on device, you don't have to develop or host your own models for your users to enjoy creating new images in your app."

Again, sounds fun and lighthearted. And it very well may stay that way. And it's going to be very interesting to see what savvy software companies like Pixelmator do with all of this new capability.

macOS Sequoia and iOS 18 will be released this Fall. Betas will be available to the general Mac community soon. I'm really looking forward to see how this all plays out.

Adobe Revising Terms of Use to Clarify Content Licensing, AI, and Privacy

You can read the entire story on Petapixel.com.

Finally, the Nikon Z6 III is coming soon!

You can read the entire story on AmateurPhotographer.com.

NextGen Styles - Adjust the White Balance automatically and apply AI color gradings in Capture One.

You can read the entire story on AlexOnRAW.com.

Note: The code THEDIGITALSTORY gives 10 percent OFF all products, and for products on sale it will give an additional 10 percent OFF on top of the existing discount.

Virtual Camera Club News

The Nimble Photographer Newsletter is now publishing every Thursday. Readers will enjoy a variety of content spanning from short photo essays, to commentary on weekly events, to reviews of the latest and coolest photo gear.

Inner Circle Members: A big thanks to those who support our podcast and our efforts! We are having a blast at our new Inner Circle hangout, the private group I've set up at DerrickStoryOnline. We'd love it if you join us. You can become an Inner Circle Member by signing up at our Patreon site. You will automatically be added to the new hangout.

Great Photography Articles on Live View - If you check out our publication and appreciate what you see, be sure to follow us and clap for those authors. You can find us at medium.com/live-view.

If you're interested in writing for Live View, drop me a line at dstory@gmail.com.

The New Donation Kit for Carefree Shipping of Found Film Cameras - If you've discovered a film camera that's no longer being used, our new Donation Kit makes it easy to pack and ship. Just visit the Contact Form on thenimblephotographer.com, click the box next to Donating a Film Camera, and let me know what you have. In your note, be sure to include your shipping address.

Affiliate Links - The links to some products in this podcast contain an affiliate code that credits The Digital Story for any purchases made from B&H Photo and Amazon via that click-through. Depending on the purchase, we may receive some financial compensation.

Red River Paper - And finally, be sure to visit our friends at Red River Paper for all of your inkjet supply needs.

See you next week!

You can share your thoughts at the TDS Facebook page, where I'll post this story for discussion.
This is The Digital Story Podcast #950, June 4, 2024. Today's theme is "A Yay Lens, a Nay Lens, and an It Depends Lens." I'm Derrick Story.

Opening Monologue

There's been lots to talk about regarding photography gear lately. Sigma has been on an impressive roll, Panasonic released the full-frame S9 with a companion pancake lens, and Viltrox continues its steady march to fame and fortune. And as you can imagine, all lenses are not created the same, and there are definitely yays and nays with these latest announcements. In today's TDS Photography Podcast, we will separate the cheers from the jeers. I hope you enjoy the show.

Digital Photography Podcast 950

Tune-In Via Your Favorite Podcast App!


podcast-icon.jpeg

Apple Podcasts -- Spotify Podcasts -- Stitcher

Podbean Podcasts -- Podbay FM -- Tune In

A Yay Lens, a Nay Lens, and an It Depends Lens

viltrox-16mm.jpg The It Depends Lens

The Yay: The Sigma 28-45mm f/1.8 DG DN Art Lens (Sony E)

The 28-45mm f/1.8 DG DN Art Lens, the world's first zoom lens for full-frame mirrorless cameras with an f/1.8 aperture throughout the entire zoom range. Featuring prime-like optical performance and video-friendly design and functionality, its wide-to-normal focal range means a lighter kit bag without surrendering image quality.

Things to like about the Sigma 28-45mm

  • Two AFL buttons
  • Focus mode switch
  • Super multilayer and nanoporous coatings
  • Water- and oil-repellent coating on the front element
  • Dust- and splash-resistant design
  • Durable brass bayonet mount

The lens features a total of 18 elements in 15 groups, with three aspherical and five Special Low Dispersion elements to minimize flare and ghosting and suppress various aberrations. This results in an optical performance that meets or exceeds that of other Sigma Art lenses, including the primes. Along with its 11-blade, rounded diaphragm, the design promotes sharpness and a large, smooth bokeh when used wide open.

In addition to the f/1.8 maximum aperture, the lens also maintains an 11.9" minimum focusing distance across the entire zoom range. It achieves a maximum magnification ratio of 1:4 at its longest focal length, increasing depth of field and versatility in tight spaces.

On the downside, there is size and weight. Dimensions are 3.5 x 6", weight is 2.1 lb, and the front filter size is 82mm.

You can preorder the Sigma 28-45mm f/1.8 DG DN Art Lens (Sony E) for $1,349. It will also be available in the Leica L mount.

The Nay: The Panasonic 26mm f/8

This little pancake lens was designed to go with the new full frame Panasonic S9 camera. In terms of aesthetics, it accomplishes that goal. In order to convey the compactness of the S9 body, you want a small optic. That makes sense.

But, in terms of usefulness, this little guy really falls short. Here are a few examples why.

  • Manual focus with no AF
  • No focusing scale to help you estimate
  • Locked f/8 aperture
  • No filter ring
  • Plastic lens mount
  • $198 price tag

Yes, we've seen lenses like this in the past, but they weren't intended to be the primary shooters, and they cost half the amount. Up the road, this would be a fun addition. But as the introductory optic with a debut camera, not a great choice.

All that being said, if you want one of these, you can preorder the Panasonic Lumix S 26mm f/8 Lens (Leica L) for $198.

The It Depends Lens: The Viltrox AF 16mm f/1.8 FE Lens (Nikon Z)

Featuring an ultra-wide angle of view for Nikon Z-mount full-frame cameras, the Viltrox AF 16mm f/1.8 FE Lens is an ideal choice for a wide variety of photographic pursuits, including landscape and architecture photography, astrophotography, and creative videography requiring close-up capabilities with expansive backgrounds.

Things to like about the Viltrox 16mm

  • Easy-to-access aperture switch enabling clicked and de-clicked operation. When switched to OFF, the stepless aperture mode quietly facilitates smooth depth-of-field transitions during video shooting.
  • Built-in AF/MF switch for quickly alternating between autofocus and manual focus modes.
  • Fn1 and Fn2 custom buttons allow for rapid access to key functions with select Sony cameras.
  • Sophisticated LCD screen displays important shooting information including object distance, Fn icons, and aperture identification.
  • An all-metal body and brass bayonet mount for a professional and reliable connection.
  • Dust-proof and water-resistant design for use in adverse weather conditions.
  • USB-C interface for firmware upgrades.
  • Compatible with 77mm filters for optional widely available landscape filters.
  • That's a lot of lens for $549. But the "It Depends," at least for me, is can I justify buying a fixed focal length ultrawide optic? I'm not a night sky photographer, I don't shoot architecture professionally, and I already have the Viltrox 20mm that I really like.

    You can preorder the Viltrox AF 16mm f/1.8 FE Lens (Nikon Z) for $549. It will also be available in the Sony E mount.

    Panasonic Explains Stock Photos on S9 Website: A Mindset From 'Over 20 Years Ago'

    You can read the entire story on Petapixel.com.

    Movie Director Christopher Nolan Has Some Great Advice for Photographers

    You can read the entire story on Fstoppers.com.

    Virtual Camera Club News

    The Nimble Photographer Newsletter is now publishing every Thursday. Readers will enjoy a variety of content spanning from short photo essays, to commentary on weekly events, to reviews of the latest and coolest photo gear.

    Inner Circle Members: A big thanks to those who support our podcast and our efforts! We are having a blast at our new Inner Circle hangout, the private group I've set up at DerrickStoryOnline. We'd love it if you join us. You can become an Inner Circle Member by signing up at our Patreon site. You will automatically be added to the new hangout.

    Great Photography Articles on Live View - If you check out our publication and appreciate what you see, be sure to follow us and clap for those authors. You can find us at medium.com/live-view.

    If you're interested in writing for Live View, drop me a line at dstory@gmail.com.

    The New Donation Kit for Carefree Shipping of Found Film Cameras - If you've discovered a film camera that's no longer being used, our new Donation Kit makes it easy to pack and ship. Just visit the Contact Form on thenimblephotographer.com, click the box next to Donating a Film Camera, and let me know what you have. In your note, be sure to include your shipping address.

    Affiliate Links - The links to some products in this podcast contain an affiliate code that credits The Digital Story for any purchases made from B&H Photo and Amazon via that click-through. Depending on the purchase, we may receive some financial compensation.

    Red River Paper - And finally, be sure to visit our friends at Red River Paper for all of your inkjet supply needs.

    See you next week!

    You can share your thoughts at the TDS Facebook page, where I'll post this story for discussion.
NikonZF-iPhone.jpg

Nikon Zf, iPhone 15 Pro Max, Kingston Card Reader with USB-C adapter.

For years I have tried to bend smartphone software to my will. They do some things OK, like geotagging pictures. But they're painful at best when it comes to getting real work done. And by real work, I mean copying images from my camera to an image editor on the phone where I can edit and share them.

I've tested software created by Nikon, Fujifilm, OM System, Pentax, and others. Most of the time, I can get them to work, but in the end, I feel like it's easier to lug around my laptop and use a card reader. But I shouldn't have to.

The processing power in today's iPhone is ample for managing and editing pictures from mirrorless cameras. The screens are absolutely beautiful and large enough for basic tasks. They are cloud-connected devices, so our work is immediately backed up and shared to all of our computers. But where they really shine compared to full-sized laptops, is that they fit in our pockets.

So, with a mirrorless camera around my neck and an iPhone in my jacket, I should be conquering the world. Instead, I find myself wasting time trying to get the two devices to talk to each other with fiddly WiFi software.

Making a Better Connection

One thing that the European Union had right and Apple had wrong was using USB-C for all smartphones. As of iPhone 15, the Lightning connector was replaced by a standard USB-C port. Not only did this ensure that we always have a charging cable available, but many of the accessories that we use with laptops now work with our smartphones... including portable SD card readers.

Card-Reader-Connection.jpg

Kingston USB-C card reader connected to an iPhone 15 Pro Max.

Combine this reliable hardware connection with universal software that's included in iOS, and you can say goodbye to frustrating WiFi transfers between cameras and mobile devices. Within iOS we have the Files app, which is rock solid. Additionally, Lightroom Mobile is very adept at managing and editing mirrorless camera pictures, as is Photos for iOS.

On the hardware side, a card reader is faster and more stable than fighting with wireless transfer. Plus, it's small. I stash mine in the little coin pocket in my Levi's jeans. Ditching wireless transfer and using a USB-C card reader allows me to leave the laptop behind and travel lightly with just my camera and the iPhone. And when I do get home, all of my pictures are waiting for me on the computer thanks to cloud connectivity.

Step-by-Step Guide to Transferring Pictures from a Mirrorless Camera to an iPhone

For my latest shoot, I used a Nikon Zf camera, iPhone 15 Pro Max smartphone, a Kingston 1 TB SD card, and a Kingston portable card reader.

I like to shoot RAW+Jpeg because I enjoy experimenting with film simulations that I've loaded into the Nikon. With this workflow, I can decide if I want to copy the Jpegs, RAWs, or both to my iPhone. Let's start with the most basic approach using the Files app.

The Files app is included in iOS. Unlike software designed by camera manufacturers who seem to have a limited understanding of the iPhone, Files is perfectly integrated into the device. Look for the icon with the blue file folder. Now, let's move some pictures.

  • Remove the SD card from the camera, put it in the card reader, and connect the reader to the iPhone.
  • Open the Files app on the iPhone and look for your SD card under Locations. In my case, it will read NIKON Z F.
  • Files-Nikon.jpg

    The SD card in the Apple Files app.

  • Tap on the SD card name to take you to the next screen. You will see one or more file folders there. Tap on the one that reads DCIM. Depending on how your camera sets up the file system, an additional folder may exist inside DCIM. Tap on it and your photos will be revealed.
  • Files-Pictures.jpg

    Both RAWs and Jpegs are displayed here. The Jpegs show the image thumbnails.

  • If you shoot RAW+Jpeg, you will see both versions of your pictures there. To choose the ones you want to copy to the iPhone, tap on the 3 dots in the upper right corner of the screen. Then tap on Select.
  • Now, tap on the thumbnails of the pictures you want to copy to the device. They will be marked with a blue check.
  • Tap on the Share button in the lower-left corner of the screen. Choose Save Images.
  • The pictures are now copied to your camera roll on your iPhone and are accessible via Photos and other apps.
  • Swipe up to close the Files app, disconnect the reader from your phone, and return the SD card to your camera.

This process is fast. And the best part is, it works every time.

Kingston-Card.jpg

You'll notice that I have a large 1 TB card for the Nikon Zf. I like to keep all the pictures from an adventure on the card as an additional backup.

With WiFi transfer, this becomes untenable because it takes so long to read all of the files on the card. But with USB-C connectivity, it's nearly instantaneous. In terms of speed, there is no comparison between WiFi and USB-C.

Adding Lightroom Mobile to the Mix

Lightroom on the iPhone and iPad provides a powerful set of editing tools, and it plays nice with the other software. For example, from the Files app, as described above, you can send selected images directly to Lightroom on your mobile device via the Share button.

Lightroom-Mobile.jpg

Direct import using Lightroom Mobile.

Or you can copy directly into Lightroom, bypassing the Files app altogether, by connecting the SD card and tapping on the blue import icon in the lower right corner of the Lightroom interface.

Lightroom will ask you if you want to add photos from the Device (iPhone), Files (app), or Connected camera/card. Choose Connected camera/card, select the pictures you want, then tap the blue Import button at the bottom of the screen. Bingo!

Once the pictures are in Lightroom, you have a powerful set of imaging tools to adjust them. If you haven't used the mobile version of Lightroom for a while, I think you'll be surprised at how elegantly it has evolved.

After editing, you can share the finished files with other apps on your mobile device, save them to the camera roll, or publish them on social media. They'll also be available when you get home on your computer via the Cloud Tab in the upper lefthand corner of the Lightroom interface. You can pick up right where you left off.

Additional Apps and Hacks

If you're not a Lightroom fan, an excellent alternative is RAW Power from Gentleman Coders. No subscription is required, it's a very affordable one-time purchase, has a powerful set of editing tools, and the developer does a great job of keeping it up to date with the latest camera releases.

Photomator for iOS is also very popular, and for good reason. Easy to use combined with powerful editing tools make this Lightroom alternative a winner.

And here's a fun little hack... Lightroom has a handy export function that enables you to copy files from your mobile device to a USB-C flash drive.

Tap on the Share button at the top of the Lightroom interface, tap Export As... from the popup menu, choose Save to Files, then navigate to the connected flash drive icon in Files, and tap on Save. Yes, you can use USB-C to copy pictures to a flash drive as well.

Wrapping Up

I've waited far too long for camera software that provides a reliable workflow for my iPhone. Now, I don't need it. With my pocket-sized card reader, I can work as fast with mobile devices as I do with a computer. And that means more time to focus on my pictures.