One of the joys of looking through the optical viewfinder on your DSLR is seeing the world with crystal clarity. Thanks to the diopter adjustment for the camera's eyepiece, most of us can enjoy this experience even though our eyesight varies in strength.
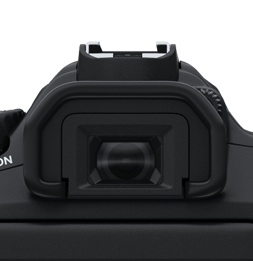
The diopter wheel is usually located near the optical viewfinder eyepiece. You can see it in this image just above the optic and to the right.
I check this setting regularly by having the camera focus on a scene at infinity, then rotating the diopter dial until the image looks as sharp and clear as possible. I talked about this during a recent episode of This Week in Photo, which prompted this follow up information from a listener, Kevin Miller, who is an ophthalmologist.
I thought you might enjoy Kevin's observations, so I've included them here.
"You mentioned that setting the diopter adjustment on our cameras by looking at infinity and making the adjustment. Just my input as an ophthalmologist. I think that seems right as well.
One other nuance that should help give the best endpoint on the diopter adjustment is to not only view at infinity, but start with the diopter setting all the way toward the "+" side. Then slowly move toward the "-" side of the adjustment until the focus just becomes clear.
As you click past that first clear setting, you may still see clear options for another few clicks especially for those who are younger with some accommodative muscle strength left (not needing bifocals yet). Yet, the cleanest endpoint should be the first click that shows a clear image coming from the most "+" side of the dial. (Hope that is not too confusing.)
One other point that I know you understand. The built-in diopter adjustment has limitations. Those with higher powers of near sightedness of far sightedness can order dioptric adjustment lenses that fit into the eyepiece of the camera that extend the adjustment options beyond that of the standard dioptric adjustment in the camera. Here is a link to some eyepieces from Canon.
I don't know if there are any commercially available options for adding a dioptric adjustment lens for those with significant astigmatism in their correction. Those with significant astigmatism may not find a clear option among the various options mentioned above. In these cases, the photographer would need to wear his/her own glasses or contacts, and then the above diopter adjustment technique can be used to further fine tune the view through the viewfinder."
Thanks Kevin for adding clarity to using the diopter setting on our cameras. As you may have guessed, this is for your consideration only, and it does not constitute medical advice. I think it's interesting.
The Digital Story on Facebook -- discussion, outstanding images from the TDS community, and inside information. Join our celebration of great photography!